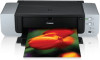
Quick Start Guide
Page 5
... Canceling Printing 25 Advanced Printing Printing Photographs Directly from a PictBridge Compliant Device 26 Accessing the Printer Driver (Windows 33 Using the Bundled Software 35 Printing Maintenance Replacing an Ink Tank 36 When Printing... 55 Aligning the Print Head 58 Troubleshooting Cannot Install the Printer Driver or an Application Program 63 Cannot Connect to PC Properly 64 Print Results Not Satisfactory ...or Contains Errors 65 Troubleshooting Printer Hardware 68 Paper Does Not Feed Properly 71 Paper Jams 72 Handling Error...
... Canceling Printing 25 Advanced Printing Printing Photographs Directly from a PictBridge Compliant Device 26 Accessing the Printer Driver (Windows 33 Using the Bundled Software 35 Printing Maintenance Replacing an Ink Tank 36 When Printing... 55 Aligning the Print Head 58 Troubleshooting Cannot Install the Printer Driver or an Application Program 63 Cannot Connect to PC Properly 64 Print Results Not Satisfactory ...or Contains Errors 65 Troubleshooting Printer Hardware 68 Paper Does Not Feed Properly 71 Paper Jams 72 Handling Error...
Quick Start Guide
Page 6
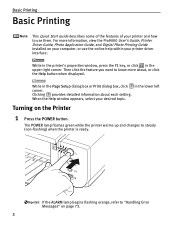
... the feature you want to steady (non-flashing) when the printer is ready. The POWER lamp flashes green while the printer warms up and changes to know more information, view the Pro9000 User's Guide, Printer Driver Guide, Photo Application Guide, and Digital Photo Printing Guide installed on... the Printer 1 Press the POWER button. While in the Page Setup dialog...
... the feature you want to steady (non-flashing) when the printer is ready. The POWER lamp flashes green while the printer warms up and changes to know more information, view the Pro9000 User's Guide, Printer Driver Guide, Photo Application Guide, and Digital Photo Printing Guide installed on... the Printer 1 Press the POWER button. While in the Page Setup dialog...
Quick Start Guide
Page 12
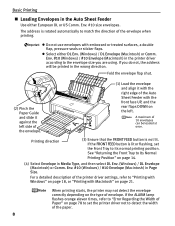
... be printed in Media Type, and then select DL Env. (Windows) / DL Envelope (Macintosh) or Comm. For a detailed description of the printer driver settings, refer to detect the width of the envelope when printing. z Select either European DL or US Comm. If the FRONT FEED button is ...10 size envelopes. See "Returning the Front Tray to match the direction of the paper. 8 Env. #10 (Windows) / #10 Envelope (Macintosh) in the printer driver according to its normal printing position. A maximum of the Auto Sheet Feeder with Macintosh" on page 78 to set the Front Tray to the envelope...
... be printed in Media Type, and then select DL Env. (Windows) / DL Envelope (Macintosh) or Comm. For a detailed description of the printer driver settings, refer to detect the width of the envelope when printing. z Select either European DL or US Comm. If the FRONT FEED button is ...10 size envelopes. See "Returning the Front Tray to match the direction of the paper. 8 Env. #10 (Windows) / #10 Envelope (Macintosh) in the printer driver according to its normal printing position. A maximum of the Auto Sheet Feeder with Macintosh" on page 78 to set the Front Tray to the envelope...

Quick Start Guide
Page 13
... Specialty Media" on page 14. (4) Select 4 x 6 in 101.6 x 152.4 mm or 5 x 7 in 127.0 x 177.8 mm from Page Size in the printer driver. Basic Printing „ Loading 4" x 6" or 5" x 7"-Sized Paper in the Auto Sheet Feeder Cutting plain paper to 4" x 6" / 101.6 mm x 152.4 mm...the left side of the Auto Sheet Feeder with Macintosh" on page 21. For a detailed description of the printer driver settings, refer to "Printing with Windows" on page 18, or "Printing with the print side facing UP...is not lit. Portrait Landscape We recommend using Canon genuine photo media when printing photographs.
... Specialty Media" on page 14. (4) Select 4 x 6 in 101.6 x 152.4 mm or 5 x 7 in 127.0 x 177.8 mm from Page Size in the printer driver. Basic Printing „ Loading 4" x 6" or 5" x 7"-Sized Paper in the Auto Sheet Feeder Cutting plain paper to 4" x 6" / 101.6 mm x 152.4 mm...the left side of the Auto Sheet Feeder with Macintosh" on page 21. For a detailed description of the printer driver settings, refer to "Printing with Windows" on page 18, or "Printing with the print side facing UP...is not lit. Portrait Landscape We recommend using Canon genuine photo media when printing photographs.
Quick Start Guide
Page 20
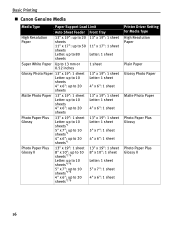
Basic Printing „ Canon Genuine Media Media Type Paper Support Load Limit Auto Sheet Feeder Front Tray High Resolution Paper 13" x 19": up to 20 sheets 11" x 17": up ... to 10 sheets*1*6 Letter: up to 10 sheets*1*6 5" x 7": up to 10 sheets*1*6 4" x 6": up to 20 sheets*1*6 13" x 19": 1 sheet 8" x 10": 1 sheet Letter: 1 sheet 5" x 7": 1 sheet 4" x 6": 1 sheet Printer Driver Setting for Media Type High Resolution Paper Plain Paper Glossy Photo Paper Matte Photo Paper Photo Paper Plus Glossy Photo Paper Plus Glossy II 16
Basic Printing „ Canon Genuine Media Media Type Paper Support Load Limit Auto Sheet Feeder Front Tray High Resolution Paper 13" x 19": up to 20 sheets 11" x 17": up ... to 10 sheets*1*6 Letter: up to 10 sheets*1*6 5" x 7": up to 10 sheets*1*6 4" x 6": up to 20 sheets*1*6 13" x 19": 1 sheet 8" x 10": 1 sheet Letter: 1 sheet 5" x 7": 1 sheet 4" x 6": 1 sheet Printer Driver Setting for Media Type High Resolution Paper Plain Paper Glossy Photo Paper Matte Photo Paper Photo Paper Plus Glossy Photo Paper Plus Glossy II 16
Quick Start Guide
Page 21
... to prevent printing in a 35 mm / 1.38 inches margin on the top and bottom edges. Always load in the Front Tray. *4 Canon genuine media is fed in. Refer to the Printer Driver Guide. *6 Load one sheet at a time if the paper cannot be fed correctly. z When using the Easy-PhotoPrint provided with the...
... to prevent printing in a 35 mm / 1.38 inches margin on the top and bottom edges. Always load in the Front Tray. *4 Canon genuine media is fed in. Refer to the Printer Driver Guide. *6 Load one sheet at a time if the paper cannot be fed correctly. z When using the Easy-PhotoPrint provided with the...
Quick Start Guide
Page 24
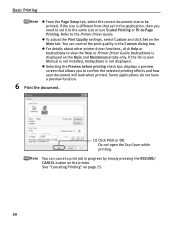
... "Canceling Printing" on the Main and Maintenance tabs only. Basic Printing z From the Page Setup tab, select the correct document size to the Printer Driver Guide. Refer to be printed. If the On-screen Manual is not installed, Instructions is different from that allows you need to set in the... before printing check box displays a preview screen that set it to the same size or use Scaled Printing or Fit-to view the Help or Printer Driver Guide. Some applications do not have a preview function. 6 Print the document. (1) Click Print or OK. If the size is not displayed. You can...
... "Canceling Printing" on the Main and Maintenance tabs only. Basic Printing z From the Page Setup tab, select the correct document size to the Printer Driver Guide. Refer to be printed. If the On-screen Manual is not installed, Instructions is different from that allows you need to set in the... before printing check box displays a preview screen that set it to the same size or use Scaled Printing or Fit-to view the Help or Printer Driver Guide. Some applications do not have a preview function. 6 Print the document. (1) Click Print or OK. If the size is not displayed. You can...
Quick Start Guide
Page 27
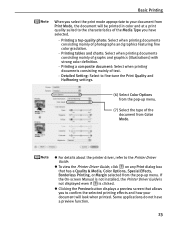
... a composite document: Select when printing documents consisting mainly of graphs and graphics (illustrations) with strong color definition. - z For details about the printer driver, refer to the characteristics of the Media Type you have a preview function. 23 Some applications do not have selected. - z Clicking the Preview...the print mode appropriate to your document will be printed in color and at a print quality suited to the Printer Driver Guide. z To view the Printer Driver Guide, click on any Print dialog box that allows you to confirm the selected printing effects and how your...
... a composite document: Select when printing documents consisting mainly of graphs and graphics (illustrations) with strong color definition. - z For details about the printer driver, refer to the characteristics of the Media Type you have a preview function. 23 Some applications do not have selected. - z Clicking the Preview...the print mode appropriate to your document will be printed in color and at a print quality suited to the Printer Driver Guide. z To view the Printer Driver Guide, click on any Print dialog box that allows you to confirm the selected printing effects and how your...
Quick Start Guide
Page 36
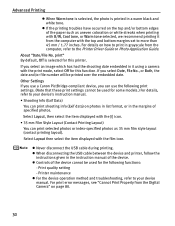
...displayed with the [i] icon. • 35 mm Film Style Layout (Contact Printing Layout) You can print shooting info (Exif data) on how to the Printer Driver Guide or Photo Application Guide. print" By default, Off is printed in grayscale from the computer with B/W, Cool tone, or Warm tone selected, we ...the instructions given in it from the computer, refer to print in a warm black and white tone. Other Settings If you use a Canon PictBridge-compliant device, you select an image which has had the shooting date embedded in the instruction manual of the paper such as 35...
...displayed with the [i] icon. • 35 mm Film Style Layout (Contact Printing Layout) You can print shooting info (Exif data) on how to the Printer Driver Guide or Photo Application Guide. print" By default, Off is printed in grayscale from the computer with B/W, Cool tone, or Warm tone selected, we ...the instructions given in it from the computer, refer to print in a warm black and white tone. Other Settings If you use a Canon PictBridge-compliant device, you select an image which has had the shooting date embedded in the instruction manual of the paper such as 35...
Quick Start Guide
Page 37
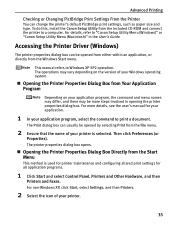
... selected. This manual refers to "Canon Setup Utility Menu (Windows)" or "Canon Setup Utility Menu (Macintosh)" in opening the printer properties dialog box. Then click Preferences (or Properties). For non-Windows XP, click Start, select Settings, and then Printers. 2 Select the icon of your... depending on the version of your application program, select the command to print a document. Accessing the Printer Driver (Windows) The printer properties dialog box can change the printer's default PictBridge print settings, such as paper size and type. For details, refer to Windows XP ...
... selected. This manual refers to "Canon Setup Utility Menu (Windows)" or "Canon Setup Utility Menu (Macintosh)" in opening the printer properties dialog box. Then click Preferences (or Properties). For non-Windows XP, click Start, select Settings, and then Printers. 2 Select the icon of your... depending on the version of your application program, select the command to print a document. Accessing the Printer Driver (Windows) The printer properties dialog box can change the printer's default PictBridge print settings, such as paper size and type. For details, refer to Windows XP ...
Quick Start Guide
Page 38
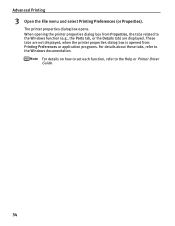
Advanced Printing 3 Open the File menu and select Printing Preferences (or Properties). These tabs are displayed. When opening the printer properties dialog box from Properties, the tabs related to the Windows function (e.g., the Ports tab, or the Details tab) are not displayed, when the printer properties dialog box is opened from Printing Preferences or application programs. For details about these tabs, refer to the Help or Printer Driver Guide. 34 For details on how to set each function, refer to the Windows documentation. The printer properties dialog box opens.
Advanced Printing 3 Open the File menu and select Printing Preferences (or Properties). These tabs are displayed. When opening the printer properties dialog box from Properties, the tabs related to the Windows function (e.g., the Ports tab, or the Details tab) are not displayed, when the printer properties dialog box is opened from Printing Preferences or application programs. For details about these tabs, refer to the Help or Printer Driver Guide. 34 For details on how to set each function, refer to the Windows documentation. The printer properties dialog box opens.
Quick Start Guide
Page 41
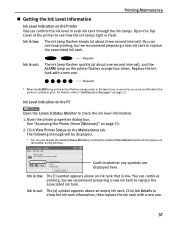
...above an empty ink tank. You can also display the Canon IJ Status Monitor by clicking the Canon IJ Status Monitor button which appears on the printer flashes orange seven or thirteen times, an error has occurred and therefore the printer is unable to check the ink level information. 1. ... "Handling Error Messages" on the Maintenance tab. Confirm whether any symbols are displayed here. See "Accessing the Printer Driver (Windows)" on the PC Open the Canon IJ Status Monitor to print. Click Ink Details to replace the associated ink tank. You can confirm the ink ...
...above an empty ink tank. You can also display the Canon IJ Status Monitor by clicking the Canon IJ Status Monitor button which appears on the printer flashes orange seven or thirteen times, an error has occurred and therefore the printer is unable to check the ink level information. 1. ... "Handling Error Messages" on the Maintenance tab. Confirm whether any symbols are displayed here. See "Accessing the Printer Driver (Windows)" on the PC Open the Canon IJ Status Monitor to print. Click Ink Details to replace the associated ink tank. You can confirm the ink ...
Quick Start Guide
Page 49
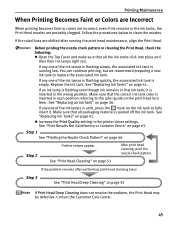
Make sure that ink tank, it . z Increase the Print Quality setting in the printer driver settings. Contact the Customer Care Center. 45 Before printing the nozzle check pattern or cleaning the Print Head, check the following; Step 1 See "Printing the ...
Make sure that ink tank, it . z Increase the Print Quality setting in the printer driver settings. Contact the Customer Care Center. 45 Before printing the nozzle check pattern or cleaning the Print Head, check the following; Step 1 See "Printing the ...
Quick Start Guide
Page 62
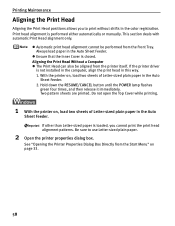
...Ensure that the Inner Cover is performed either automatically or manually. With the printer on , load two sheets of Letter-sized plain paper in the Auto Sheet Feeder. 2. Always load paper in the color registration. If the printer driver is loaded, you to use Letter-sized plain paper. 2 Open the... printer properties dialog box. Be sure to print without shifts in the Auto Sheet Feeder. See "Opening the...
...Ensure that the Inner Cover is performed either automatically or manually. With the printer on , load two sheets of Letter-sized plain paper in the Auto Sheet Feeder. 2. Always load paper in the color registration. If the printer driver is loaded, you to use Letter-sized plain paper. 2 Open the... printer properties dialog box. Be sure to print without shifts in the Auto Sheet Feeder. See "Opening the...
Quick Start Guide
Page 64
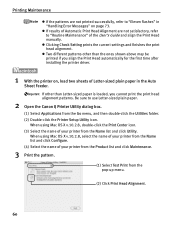
... 2 Open the Canon IJ Printer Utility dialog box. (1) Select Applications from the pop-up menu. (2) Click Print Head Alignment. 60 If other than Letter-sized paper is loaded, you align the Print Head automatically for the first time after installing the printer driver. 1 With the printer on page 73.... 3 Print the pattern. (1) Select Test Print from the Go menu, and then double-click the Utilities folder. (2) Double-click the Printer Setup Utility icon. z Clicking Check Setting prints the current settings and finishes the print head alignment. z Two different patterns other than the ...
... 2 Open the Canon IJ Printer Utility dialog box. (1) Select Applications from the pop-up menu. (2) Click Print Head Alignment. 60 If other than Letter-sized paper is loaded, you align the Print Head automatically for the first time after installing the printer driver. 1 With the printer on page 73.... 3 Print the pattern. (1) Select Test Print from the Go menu, and then double-click the Utilities folder. (2) Double-click the Printer Setup Utility icon. z Clicking Check Setting prints the current settings and finishes the print head alignment. z Two different patterns other than the ...
Quick Start Guide
Page 65
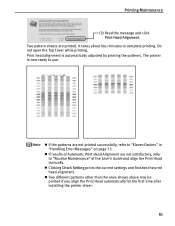
... Printing Maintenance (3) Read the message and click Print Head Alignment. z If the patterns are not printed successfully, refer to use. The printer is automatically adjusted by printing the patterns. Two pattern sheets are not satisfactory, refer to complete printing. z If results of Automatic Print ...other than the ones shown above may be printed if you align the Print Head automatically for the first time after installing the printer driver. 61 z Clicking Check Setting prints the current settings and finishes the print head alignment. It takes about four minutes to "Routine...
... Printing Maintenance (3) Read the message and click Print Head Alignment. z If the patterns are not printed successfully, refer to use. The printer is automatically adjusted by printing the patterns. Two pattern sheets are not satisfactory, refer to complete printing. z If results of Automatic Print ...other than the ones shown above may be printed if you align the Print Head automatically for the first time after installing the printer driver. 61 z Clicking Check Setting prints the current settings and finishes the print head alignment. It takes about four minutes to "Routine...
Quick Start Guide
Page 66
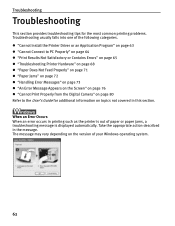
...out of your Windows operating system. 62 When an Error Occurs When an error occurs in printing such as the printer is displayed automatically. z "Cannot Install the Printer Driver or an Application Program" on page 63 z "Cannot Connect to PC Properly" on page 64 z "Print ...Results Not Satisfactory or Contains Errors" on page 65 z "Troubleshooting Printer Hardware" on page 68 z "Paper Does Not Feed Properly" on page 71 z "Paper...
...out of your Windows operating system. 62 When an Error Occurs When an error occurs in printing such as the printer is displayed automatically. z "Cannot Install the Printer Driver or an Application Program" on page 63 z "Cannot Connect to PC Properly" on page 64 z "Print ...Results Not Satisfactory or Contains Errors" on page 65 z "Troubleshooting Printer Hardware" on page 68 z "Paper Does Not Feed Properly" on page 71 z "Paper...
Quick Start Guide
Page 67
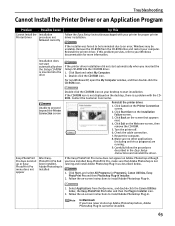
...Application Program Problem Possible Cause Cannot Install the Installation Printer Driver procedure not followed correctly Try This Follow the Easy Setup Instructions packaged with the CDROM. Remove the CD-ROM from the Go menu, and double-click the Canon Utilities folder, the Easy-PhotoPrint Pro folder and... then the Plug-In Installer icon. 2. For non-Windows XP, open the My Computer window, and then double-click the CD-ROM icon. Reinstall the printer driver. 1. Click Cancel on the Installation ...
...Application Program Problem Possible Cause Cannot Install the Installation Printer Driver procedure not followed correctly Try This Follow the Easy Setup Instructions packaged with the CDROM. Remove the CD-ROM from the Go menu, and double-click the Canon Utilities folder, the Easy-PhotoPrint Pro folder and... then the Plug-In Installer icon. 2. For non-Windows XP, open the My Computer window, and then double-click the CD-ROM icon. Reinstall the printer driver. 1. Click Cancel on the Installation ...
Quick Start Guide
Page 69
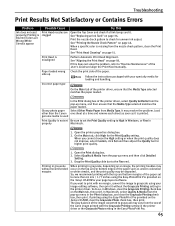
...and then ensure that the Media Type selected matches the paper loaded. Follow the instructions packaged with the Grayscale Printing setting in the printer driver or the Grayscale Photo setting in properly Macintosh. 1. Glossy photo paper Select Other Photo Paper from the pop-up Check the print ... media is used Print Quality is not set Be sure to set to more than the Canon one of the paper such as it without recommended margins When printing in the printer driver. Open the printer properties dialog box. 2. Select Quality & Media from the nozzle check pattern, clean the Print...
...and then ensure that the Media Type selected matches the paper loaded. Follow the instructions packaged with the Grayscale Printing setting in the printer driver or the Grayscale Photo setting in properly Macintosh. 1. Glossy photo paper Select Other Photo Paper from the pop-up Check the print ... media is used Print Quality is not set Be sure to set to more than the Canon one of the paper such as it without recommended margins When printing in the printer driver. Open the printer properties dialog box. 2. Select Quality & Media from the nozzle check pattern, clean the Print...
Quick Start Guide
Page 70
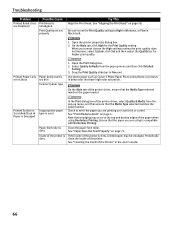
...printer properties dialog box. 2. Check to see if the paper you are Displaced misaligned Print Quality not set the Print Quality setting to High in Windows, or Fine in Macintosh. 1. Ensure that have high color saturation. See "Aligning the Print Head" on page 71. Use photo paper such as Canon...select Custom, click Set and then adjust the Quality bar for the Print Quality setting. See "Cleaning the Inside of the printer driver, ensure that the Media Type selected matches the paper loaded. Troubleshooting Problem Possible Cause Printed Ruled Lines Print Head is are ...
...printer properties dialog box. 2. Check to see if the paper you are Displaced misaligned Print Quality not set the Print Quality setting to High in Windows, or Fine in Macintosh. 1. Ensure that have high color saturation. See "Aligning the Print Head" on page 71. Use photo paper such as Canon...select Custom, click Set and then adjust the Quality bar for the Print Quality setting. See "Cleaning the Inside of the printer driver, ensure that the Media Type selected matches the paper loaded. Troubleshooting Problem Possible Cause Printed Ruled Lines Print Head is are ...


