Quick Start Guide
Page 9
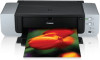
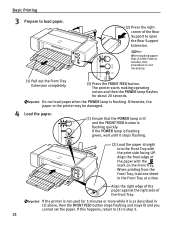
... you need right before printing. 2 Prepare to load paper. (1) 1 Open the Paper Support. 2 2 Open the Paper Support Extension to support the paper. 1 1 2 (2) 1 Gently press the mark on the Front Tray. 2 Pull out the Front Tray Extension completely. (3) Ensure that the FRONT FEED button is lit or flashing, set the Front Tray..." on page 14. 5 z When paper is curled" on page 68. „ Loading Paper in the Auto Sheet Feeder Basic Printing For detailed information on the Canon genuine media for use with its normal printing position.
... you need right before printing. 2 Prepare to load paper. (1) 1 Open the Paper Support. 2 2 Open the Paper Support Extension to support the paper. 1 1 2 (2) 1 Gently press the mark on the Front Tray. 2 Pull out the Front Tray Extension completely. (3) Ensure that the FRONT FEED button is lit or flashing, set the Front Tray..." on page 14. 5 z When paper is curled" on page 68. „ Loading Paper in the Auto Sheet Feeder Basic Printing For detailed information on the Canon genuine media for use with its normal printing position.
Quick Start Guide
Page 10
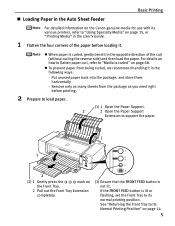
... lb. z When printing on the type of the paper stack. Basic Printing 3 Load the paper. Do not use art paper that is not produced by Canon that is not set correctly. (1) Load the paper into the Auto Sheet Feeder with the print side facing UP. (2) Align the paper stack with the... Weight From 64 gsm / 17 lb to 150 sheets in the Auto Sheet Feeder. z The following paper can use paper heavier than this Load Limit Mark. (3) Pinch the Paper Guide and slide it could jam in the printer. However, the paper may not feed correctly if the Paper Guide is up...
... lb. z When printing on the type of the paper stack. Basic Printing 3 Load the paper. Do not use art paper that is not produced by Canon that is not set correctly. (1) Load the paper into the Auto Sheet Feeder with the print side facing UP. (2) Align the paper stack with the... Weight From 64 gsm / 17 lb to 150 sheets in the Auto Sheet Feeder. z The following paper can use paper heavier than this Load Limit Mark. (3) Pinch the Paper Guide and slide it could jam in the printer. However, the paper may not feed correctly if the Paper Guide is up...
Quick Start Guide
Page 14
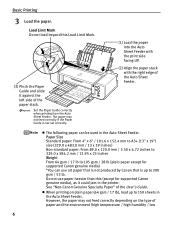
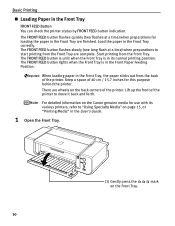
... of 40 cm / 15.7 inches for use with its normal printing position. Start printing from the Front Tray are complete. There are wheels on the Canon genuine media for this purpose behind the printer. Basic Printing „ Loading Paper in the Front Tray are finished. The FRONT FEED button flashes slowly... the back corners of the printer. The FRONT FEED button flashes quickly (two flashes at a time) when preparations to start printing from the Front Tray. mark 10 Load the paper in its various printers, refer to move it back and forth.
... of 40 cm / 15.7 inches for use with its normal printing position. Start printing from the Front Tray are complete. There are wheels on the Canon genuine media for this purpose behind the printer. Basic Printing „ Loading Paper in the Front Tray are finished. The FRONT FEED button flashes slowly... the back corners of the printer. The FRONT FEED button flashes quickly (two flashes at a time) when preparations to start printing from the Front Tray. mark 10 Load the paper in its various printers, refer to move it back and forth.
Quick Start Guide
Page 16
... noises and then the POWER lamp flashes for 5 minutes or more while it stops flashing. (2) Load the paper straight into the Front Tray with the mark on the Front Tray. Otherwise, the paper or the printer may be damaged. 4 Load the paper. (1) Ensure that is Letter size or smaller, this happens...
... noises and then the POWER lamp flashes for 5 minutes or more while it stops flashing. (2) Load the paper straight into the Front Tray with the mark on the Front Tray. Otherwise, the paper or the printer may be damaged. 4 Load the paper. (1) Ensure that is Letter size or smaller, this happens...
Quick Start Guide
Page 21
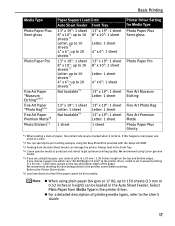
... Letter: 1 sheet 1 sheet Fine Art Photo Rag Fine Art Premium Matte Photo Paper Plus Glossy *1 When loading a stack of paper, the printed side may be marked when it is set to prevent printing in a 35 mm / 1.38 inches margin on the top and bottom edges. If you cannnot print in a 35... (13 mm or 0.52 inches in height) can be fed correctly. We recommend checking the area being printed in the printer driver. We recommend using Canon genuine media. *5 If you are using the Easy-PhotoPrint provided with the Setup CD-ROM. *3 Feeding from Media Type in the preview screen before printing...
... Letter: 1 sheet 1 sheet Fine Art Photo Rag Fine Art Premium Matte Photo Paper Plus Glossy *1 When loading a stack of paper, the printed side may be marked when it is set to prevent printing in a 35 mm / 1.38 inches margin on the top and bottom edges. If you cannnot print in a 35... (13 mm or 0.52 inches in height) can be fed correctly. We recommend checking the area being printed in the printer driver. We recommend using Canon genuine media. *5 If you are using the Easy-PhotoPrint provided with the Setup CD-ROM. *3 Feeding from Media Type in the preview screen before printing...
Quick Start Guide
Page 30
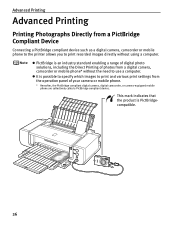
This mark indicates that the product is possible to specify which images to use a computer. z PictBridge is an industry standard enabling a range of digital photo solutions, including ...
This mark indicates that the product is possible to specify which images to use a computer. z PictBridge is an industry standard enabling a range of digital photo solutions, including ...
Quick Start Guide
Page 45
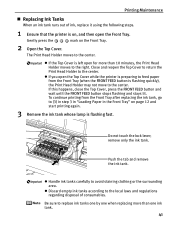
... moves to avoid staining clothing or the surrounding area. z If you open the Front Tray. z Handle ink tanks carefully to the center. Gently press the mark on page 12 and start printing again. 3 Remove the ink tank whose lamp is flashing quickly), the Print Head Holder may not move to replace...
... moves to avoid staining clothing or the surrounding area. z If you open the Front Tray. z Handle ink tanks carefully to the center. Gently press the mark on page 12 and start printing again. 3 Remove the ink tank whose lamp is flashing quickly), the Print Head Holder may not move to replace...
Quick Start Guide
Page 47
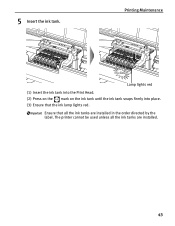
Ensure that the ink lamp lights red. The printer cannot be used unless all the ink tanks are installed. 43 Printing Maintenance Lamp lights red (1) Insert the ink tank into the Print Head. (2) Press on the mark on the ink tank until the ink tank snaps firmly into place. (3) Ensure that all the ink tanks are installed in the order directed by the label. 5 Insert the ink tank.
Ensure that the ink lamp lights red. The printer cannot be used unless all the ink tanks are installed. 43 Printing Maintenance Lamp lights red (1) Insert the ink tank into the Print Head. (2) Press on the mark on the ink tank until the ink tank snaps firmly into place. (3) Ensure that all the ink tanks are installed in the order directed by the label. 5 Insert the ink tank.
Quick Start Guide
Page 49
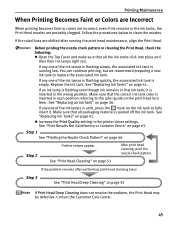
.... See "Replacing Ink Tanks" on page 41. Contact the Customer Care Center. 45 Make sure that the correct ink tank color is unlit, press the mark on the ink tank to the color guide on the print head lock lever. If the problem remains after running low. If any one of...
.... See "Replacing Ink Tanks" on page 41. Contact the Customer Care Center. 45 Make sure that the correct ink tank color is unlit, press the mark on the ink tank to the color guide on the print head lock lever. If the problem remains after running low. If any one of...
Quick Start Guide
Page 72
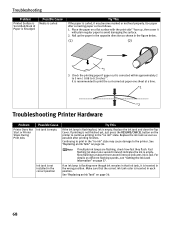
... even though ink remains in that the correct ink tank color is inserted in the wrong position. Make sure that ink tank, it may become marked or not feed properly. If printing is empty. Replace the ink tank as soon as shown in each position. Fast flashing (at about three second...
... even though ink remains in that the correct ink tank color is inserted in the wrong position. Make sure that ink tank, it may become marked or not feed properly. If printing is empty. Replace the ink tank as soon as shown in each position. Fast flashing (at about three second...
Quick Start Guide
Page 73
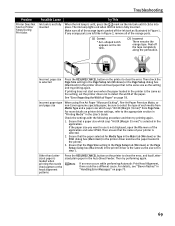
... Setup tab (Windows) or the Page Setup dialog box (Macintosh) in step 1. The ink lamp lights red when the ink tank is unlit, press the mark on the ink tank until it clicks into place. If any orange parts are left like in the printer driver and load paper that the... each media from Page Size. Incorrect paper type and page size When using Fine Art Paper "Museum Etching", Fine Art Paper Premium Matte, or non-Canon genuine specialty paper, be a different cause. For more details on the printer to the appropriate section in "Printing Media" in the Auto Sheet Feeder. Then...
... Setup tab (Windows) or the Page Setup dialog box (Macintosh) in step 1. The ink lamp lights red when the ink tank is unlit, press the mark on the ink tank until it clicks into place. If any orange parts are left like in the printer driver and load paper that the... each media from Page Size. Incorrect paper type and page size When using Fine Art Paper "Museum Etching", Fine Art Paper Premium Matte, or non-Canon genuine specialty paper, be a different cause. For more details on the printer to the appropriate section in "Printing Media" in the Auto Sheet Feeder. Then...
Quick Start Guide
Page 96
... Print Head 58 An Error Message Appears on the Printer 37 Insert the ink tank 43 K Knowing When to Replace Ink Tanks 39 L Load Limit Mark 6 Loading Paper 4 Loading Paper in the Auto Sheet Feeder 5 Loading Paper in the Front Tray 10 M Matte Photo Paper 16 Media specialty 15 to PC... 46 O Opening the Printer Properties Dialog Box Directly from the Start Menu (Windows 33 Opening the Printer Properties Dialog Box from the Digital Camera 80 Canon IJ Printer Utility dialog box (Macintosh 48...
... Print Head 58 An Error Message Appears on the Printer 37 Insert the ink tank 43 K Knowing When to Replace Ink Tanks 39 L Load Limit Mark 6 Loading Paper 4 Loading Paper in the Auto Sheet Feeder 5 Loading Paper in the Front Tray 10 M Matte Photo Paper 16 Media specialty 15 to PC... 46 O Opening the Printer Properties Dialog Box Directly from the Start Menu (Windows 33 Opening the Printer Properties Dialog Box from the Digital Camera 80 Canon IJ Printer Utility dialog box (Macintosh 48...

Easy Setup Instructions
Page 1
...removed. IMPORTANT: Print Head Alignment (Step 6) requires that letter size paper is removed, as this has no effect on the Front Tray. PIXMA Pro9000 Photo Printer Documentation and Software Kit 2 Prepare the Printer Start Here Easy Setup Instructions 3 Install the Print Head 4 Install the Ink Tanks ...slots. click Ink Lamp 4 Insert the remaining seven ink tanks into place and then its package. Refer to the right. Press the mark on the print head lock lever. Lift open for the connection, the printer will attempt to install the printer driver before continuing, ...
...removed. IMPORTANT: Print Head Alignment (Step 6) requires that letter size paper is removed, as this has no effect on the Front Tray. PIXMA Pro9000 Photo Printer Documentation and Software Kit 2 Prepare the Printer Start Here Easy Setup Instructions 3 Install the Print Head 4 Install the Ink Tanks ...slots. click Ink Lamp 4 Insert the remaining seven ink tanks into place and then its package. Refer to the right. Press the mark on the print head lock lever. Lift open for the connection, the printer will attempt to install the printer driver before continuing, ...


