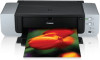
Quick Start Guide
Page 4
... statements, technical information and recommendations in the U.S. All information regarding the accuracy thereof. As an ENERGY STAR® partner, Canon U.S.A., Inc., has determined that it will be an easy-to-use guide to be, representation or warranties concerning the products ... production has stopped. and/or other countries. has reviewed this publication may be understood to your Canon PIXMA Pro9000 Photo Printer. z Photo Rag is made regarding non-Canon products was compiled from publicly available information. No part of Hahnemühle FineArt GmbH. No representation...
... statements, technical information and recommendations in the U.S. All information regarding the accuracy thereof. As an ENERGY STAR® partner, Canon U.S.A., Inc., has determined that it will be an easy-to-use guide to be, representation or warranties concerning the products ... production has stopped. and/or other countries. has reviewed this publication may be understood to your Canon PIXMA Pro9000 Photo Printer. z Photo Rag is made regarding non-Canon products was compiled from publicly available information. No part of Hahnemühle FineArt GmbH. No representation...
Quick Start Guide
Page 5
... Canceling Printing 25 Advanced Printing Printing Photographs Directly from a PictBridge Compliant Device 26 Accessing the Printer Driver (Windows 33 Using the Bundled Software 35 Printing Maintenance Replacing an Ink Tank 36 When... Cleaning 55 Aligning the Print Head 58 Troubleshooting Cannot Install the Printer Driver or an Application Program 63 Cannot Connect to PC Properly 64 Print Results Not ...Satisfactory or Contains Errors 65 Troubleshooting Printer Hardware 68 Paper Does Not Feed Properly 71 Paper Jams 72 Handling Error ...
... Canceling Printing 25 Advanced Printing Printing Photographs Directly from a PictBridge Compliant Device 26 Accessing the Printer Driver (Windows 33 Using the Bundled Software 35 Printing Maintenance Replacing an Ink Tank 36 When... Cleaning 55 Aligning the Print Head 58 Troubleshooting Cannot Install the Printer Driver or an Application Program 63 Cannot Connect to PC Properly 64 Print Results Not ...Satisfactory or Contains Errors 65 Troubleshooting Printer Hardware 68 Paper Does Not Feed Properly 71 Paper Jams 72 Handling Error ...
Quick Start Guide
Page 6
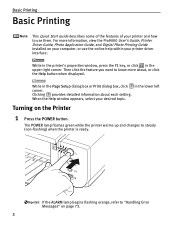
Then click the feature you want to know more information, view the Pro9000 User's Guide, Printer Driver Guide, Photo Application Guide, and Digital Photo Printing Guide installed on page 73. 2 While in the Page Setup dialog box or Print dialog box, ... the POWER button. Basic Printing Basic Printing This Quick Start Guide describes some of the features of your printer and how to use the online help within your printer driver interface: While in the printer's properties window, press the F1 key, or click in the lower left corner. When the Help window appears...
Then click the feature you want to know more information, view the Pro9000 User's Guide, Printer Driver Guide, Photo Application Guide, and Digital Photo Printing Guide installed on page 73. 2 While in the Page Setup dialog box or Print dialog box, ... the POWER button. Basic Printing Basic Printing This Quick Start Guide describes some of the features of your printer and how to use the online help within your printer driver interface: While in the printer's properties window, press the F1 key, or click in the lower left corner. When the Help window appears...
Quick Start Guide
Page 7
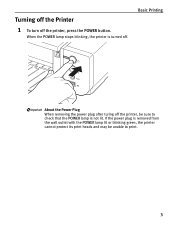
Basic Printing About the Power Plug When removing the power plug after turing off the printer, be unable to check that the POWER lamp is turned off the printer, press the POWER button. If the power plug is removed from the wall outlet with the POWER lamp lit or blinking green, the printer cannot protect its print heads and may be sure to print. 3 When the POWER lamp stops blinking, the printer is not lit. Turning off the Printer 1 To turn off .
Basic Printing About the Power Plug When removing the power plug after turing off the printer, be unable to check that the POWER lamp is turned off the printer, press the POWER button. If the power plug is removed from the wall outlet with the POWER lamp lit or blinking green, the printer cannot protect its print heads and may be sure to print. 3 When the POWER lamp stops blinking, the printer is not lit. Turning off the Printer 1 To turn off .
Quick Start Guide
Page 8
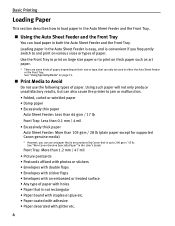
... glue etc. • Paper coated with adhesive • Paper decorated with holes • Paper that is convenient if you can also cause the printer to jam or malfunction. • Folded, curled or wrinkled paper • Damp paper • Excessively thin paper Auto Sheet Feeder: Less than ...with double flaps • Envelopes with sticker flaps • Envelopes with an embossed or treated surface • Any type of paper. See "Non-Canon Genuine Specialty Paper" in the User's Guide. See "Using Specialty Media" on various sizes or types of paper with glitter etc. 4 Basic Printing...
... glue etc. • Paper coated with adhesive • Paper decorated with holes • Paper that is convenient if you can also cause the printer to jam or malfunction. • Folded, curled or wrinkled paper • Damp paper • Excessively thin paper Auto Sheet Feeder: Less than ...with double flaps • Envelopes with sticker flaps • Envelopes with an embossed or treated surface • Any type of paper. See "Non-Canon Genuine Specialty Paper" in the User's Guide. See "Using Specialty Media" on various sizes or types of paper with glitter etc. 4 Basic Printing...
Quick Start Guide
Page 9
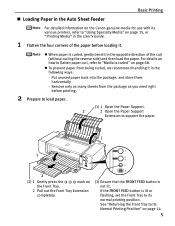
... Tray. 2 Pull out the Front Tray Extension completely. (3) Ensure that the FRONT FEED button is lit or flashing, set the Front Tray to its various printers, refer to "Using Specialty Media" on page 14. 5 Put unused paper back into the package, and store them horizontally. - z When paper is curled" on how... paper curl, refer to "Media is curled, gently bend it . „ Loading Paper in the Auto Sheet Feeder Basic Printing For detailed information on the Canon genuine media for use with its normal printing position.
... Tray. 2 Pull out the Front Tray Extension completely. (3) Ensure that the FRONT FEED button is lit or flashing, set the Front Tray to its various printers, refer to "Using Specialty Media" on page 14. 5 Put unused paper back into the package, and store them horizontally. - z When paper is curled" on how... paper curl, refer to "Media is curled, gently bend it . „ Loading Paper in the Auto Sheet Feeder Basic Printing For detailed information on the Canon genuine media for use with its normal printing position.
Quick Start Guide
Page 10
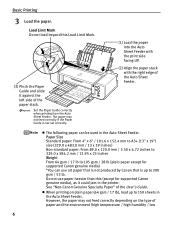
... the paper may not feed correctly if the Paper Guide is up to 105 gsm / 28 lb (plain paper except for supported Canon genuine media), as it against the left side of the Auto Sheet Feeder. Basic Printing 3 Load the paper. Do not use ...art paper that is not produced by Canon that is not set correctly. (1) Load the paper into the Auto Sheet Feeder with the print side facing UP. (2) Align ...x 4.72 inches to 329.0 x 584.2 mm / 12.95 x 23 inches Weight From 64 gsm / 17 lb to 150 sheets in the printer.
... the paper may not feed correctly if the Paper Guide is up to 105 gsm / 28 lb (plain paper except for supported Canon genuine media), as it against the left side of the Auto Sheet Feeder. Basic Printing 3 Load the paper. Do not use ...art paper that is not produced by Canon that is not set correctly. (1) Load the paper into the Auto Sheet Feeder with the print side facing UP. (2) Align ...x 4.72 inches to 329.0 x 584.2 mm / 12.95 x 23 inches Weight From 64 gsm / 17 lb to 150 sheets in the printer.
Quick Start Guide
Page 12
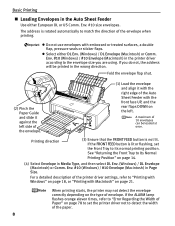
...button is rotated automatically to Its Normal Printing Position" on page 21. For a detailed description of envelope. When printing starts, the printer may not detect the envelope correctly depending on the left side of the envelope. (1) Load the envelope and align it with the right... Type, and then select DL Env. (Windows) / DL Envelope (Macintosh) or Comm. Env. #10 (Windows) / #10 Envelope (Macintosh) in the printer driver according to "Printing with Windows" on page 18, or "Printing with embossed or treated surfaces, a double flap, pressure seals or sticker flaps. Fold the...
...button is rotated automatically to Its Normal Printing Position" on page 21. For a detailed description of envelope. When printing starts, the printer may not detect the envelope correctly depending on the left side of the envelope. (1) Load the envelope and align it with the right... Type, and then select DL Env. (Windows) / DL Envelope (Macintosh) or Comm. Env. #10 (Windows) / #10 Envelope (Macintosh) in the printer driver according to "Printing with Windows" on page 18, or "Printing with embossed or treated surfaces, a double flap, pressure seals or sticker flaps. Fold the...

Quick Start Guide
Page 13
If the FRONT FEED button is not lit. For a detailed description of the printer driver settings, refer to its normal printing position. Portrait Landscape We recommend using Canon genuine photo media when printing photographs. See "Using Specialty Media" on page 14. (4) Select 4 x 6 in 101.6 x 152.4... mm or 5 x 7 in 127.0 x 177.8 mm from Page Size in the printer driver. See "Returning the Front Tray...
If the FRONT FEED button is not lit. For a detailed description of the printer driver settings, refer to its normal printing position. Portrait Landscape We recommend using Canon genuine photo media when printing photographs. See "Using Specialty Media" on page 14. (4) Select 4 x 6 in 101.6 x 152.4... mm or 5 x 7 in 127.0 x 177.8 mm from Page Size in the printer driver. See "Returning the Front Tray...
Quick Start Guide
Page 14
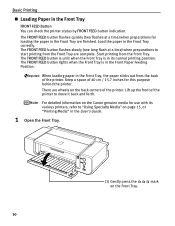
... FEED button lights when the Front Tray is in the User's Guide. 1 Open the Front Tray. (1) Gently press the on the back corners of the printer to start printing from the Front Tray. There are wheels on the Front Tray. Keep a space of 40 cm / 15.7 inches for loading the paper... in the Front Tray, the paper sticks out from the back of the printer. mark 10 Start printing from the Front Tray are finished. For detailed information on the Canon genuine media for use with its various printers, refer to "Using Specialty Media" on page 15, or "Printing Media" in its normal...
... FEED button lights when the Front Tray is in the User's Guide. 1 Open the Front Tray. (1) Gently press the on the back corners of the printer to start printing from the Front Tray. There are wheels on the Front Tray. Keep a space of 40 cm / 15.7 inches for loading the paper... in the Front Tray, the paper sticks out from the back of the printer. mark 10 Start printing from the Front Tray are finished. For detailed information on the Canon genuine media for use with its various printers, refer to "Using Specialty Media" on page 15, or "Printing Media" in its normal...
Quick Start Guide
Page 15
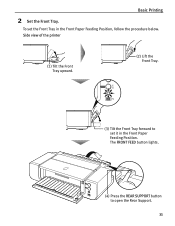
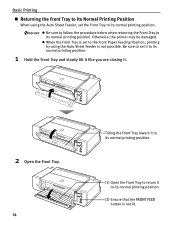
Side view of the printer (1) Tilt the Front Tray upward. (2) Lift the Front Tray. (3) Tilt the Front Tray forward to open the Rear Support. 11 To set it in the Front Paper Feeding Position, follow the procedure below. Basic Printing 2 Set the Front Tray. The FRONT FEED button lights. (4) Press the REAR SUPPORT button to set the Front Tray in the Front Paper Feeding Position.
Side view of the printer (1) Tilt the Front Tray upward. (2) Lift the Front Tray. (3) Tilt the Front Tray forward to open the Rear Support. 11 To set it in the Front Paper Feeding Position, follow the procedure below. Basic Printing 2 Set the Front Tray. The FRONT FEED button lights. (4) Press the REAR SUPPORT button to set the Front Tray in the Front Paper Feeding Position.
Quick Start Guide
Page 16
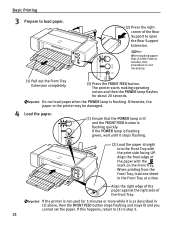
... 20 seconds. Align the right edge of the paper against the right side of the Rear Support to open the Rear Support Extension. If the printer is Letter size or smaller, this happens, return to (3) in step 3. 12 Do not load paper when the POWER lamp is flashing quickly. If the... the paper with the print side facing UP. When loading paper that the POWER lamp is lit and the FRONT FEED button is flashing. The printer starts making operating noises and then the POWER lamp flashes for 5 minutes or more while it stops flashing. (2) Load the paper straight into the Front...
... 20 seconds. Align the right edge of the paper against the right side of the Rear Support to open the Rear Support Extension. If the printer is Letter size or smaller, this happens, return to (3) in step 3. 12 Do not load paper when the POWER lamp is flashing quickly. If the... the paper with the print side facing UP. When loading paper that the POWER lamp is lit and the FRONT FEED button is flashing. The printer starts making operating noises and then the POWER lamp flashes for 5 minutes or more while it stops flashing. (2) Load the paper straight into the Front...
Quick Start Guide
Page 17
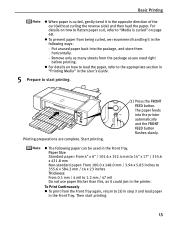
... FEED button. z The following ways: - For details on how to flatten paper curl, refer to "Media is curled, gently bend it could jam in the printer. z For details on page 68. Printing preparations are complete. Paper Size Standard paper: From 4" x 6" / 101.6 x 152.4 mm to 14" x 17" / 355.6 ... 0.1 mm / 4 mil to (3) in step 3 and load paper in the Front Tray. Then start printing. Put unused paper back into the printer automatically and the FRONT FEED button flashes slowly. The paper feeds into the package, and store them horizontally. - Remove only as many sheets from the...
... FEED button. z The following ways: - For details on how to flatten paper curl, refer to "Media is curled, gently bend it could jam in the printer. z For details on page 68. Printing preparations are complete. Paper Size Standard paper: From 4" x 6" / 101.6 x 152.4 mm to 14" x 17" / 355.6 ... 0.1 mm / 4 mil to (3) in step 3 and load paper in the Front Tray. Then start printing. Put unused paper back into the printer automatically and the FRONT FEED button flashes slowly. The paper feeds into the package, and store them horizontally. - Remove only as many sheets from the...
Quick Start Guide
Page 18
... sure to follow the procedure below when returning the Front Tray to its normal printing position. z When the Front Tray is not lit. Otherwise, the printer may be damaged. Be sure to set it to its normal printing position. 1 Hold the Front Tray and slowly tilt it like you are closing...
... sure to follow the procedure below when returning the Front Tray to its normal printing position. z When the Front Tray is not lit. Otherwise, the printer may be damaged. Be sure to set it to its normal printing position. 1 Hold the Front Tray and slowly tilt it like you are closing...
Quick Start Guide
Page 20
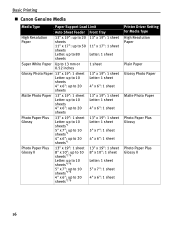
Basic Printing „ Canon Genuine Media Media Type Paper Support Load Limit Auto Sheet Feeder Front Tray High Resolution Paper 13" x 19": up to 20 sheets 11" x 17": up ... to 10 sheets*1*6 Letter: up to 10 sheets*1*6 5" x 7": up to 10 sheets*1*6 4" x 6": up to 20 sheets*1*6 13" x 19": 1 sheet 8" x 10": 1 sheet Letter: 1 sheet 5" x 7": 1 sheet 4" x 6": 1 sheet Printer Driver Setting for Media Type High Resolution Paper Plain Paper Glossy Photo Paper Matte Photo Paper Photo Paper Plus Glossy Photo Paper Plus Glossy II...
Basic Printing „ Canon Genuine Media Media Type Paper Support Load Limit Auto Sheet Feeder Front Tray High Resolution Paper 13" x 19": up to 20 sheets 11" x 17": up ... to 10 sheets*1*6 Letter: up to 10 sheets*1*6 5" x 7": up to 10 sheets*1*6 4" x 6": up to 20 sheets*1*6 13" x 19": 1 sheet 8" x 10": 1 sheet Letter: 1 sheet 5" x 7": 1 sheet 4" x 6": 1 sheet Printer Driver Setting for Media Type High Resolution Paper Plain Paper Glossy Photo Paper Matte Photo Paper Photo Paper Plus Glossy Photo Paper Plus Glossy II...
Quick Start Guide
Page 21
... gsm or 17 lb), up to 20 sheets*1 Not loadable*3 13" x 19": 1 sheet 8" x 10": 1 sheet Letter: 1 sheet 4" x 6": 1 sheet 13" x 19": 1 sheet Letter: 1 sheet Printer Driver Setting for Media Type Photo Paper Plus Semi-gloss Photo Paper Pro Fine Art Museum Etching 13" x 19": 1 sheet Letter: 1 sheet Not loadable*3 1 sheet... is produced and stored to 150 sheets (13 mm or 0.52 inches in the Auto Sheet Feeder. Always load in the Front Tray. *4 Canon genuine media is fed in. If you cannnot print in the printer driver. Refer to prevent printing in the preview screen before printing.
... gsm or 17 lb), up to 20 sheets*1 Not loadable*3 13" x 19": 1 sheet 8" x 10": 1 sheet Letter: 1 sheet 4" x 6": 1 sheet 13" x 19": 1 sheet Letter: 1 sheet Printer Driver Setting for Media Type Photo Paper Plus Semi-gloss Photo Paper Pro Fine Art Museum Etching 13" x 19": 1 sheet Letter: 1 sheet Not loadable*3 1 sheet... is produced and stored to 150 sheets (13 mm or 0.52 inches in the Auto Sheet Feeder. Always load in the Front Tray. *4 Canon genuine media is fed in. If you cannnot print in the printer driver. Refer to prevent printing in the preview screen before printing.
Quick Start Guide
Page 22
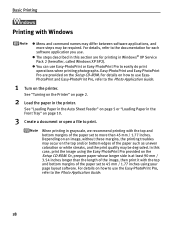
...in the Front Tray" on page 10. 3 Create a document or open a file to the Photo Application Guide. 18 In this section are provided on the printer. For details on how to use Easy-PhotoPrint or Easy-PhotoPrint Pro to the documentation for printing in this case, print the image using your...software application you use EasyPhotoPrint and Easy-PhotoPrint Pro, refer to the Photo Application Guide. 1 Turn on the Setup CD-ROM. See "Turning on the Printer" on page 2. 2 Load the paper in grayscale, we recommend printing with the top and bottom margins of the paper set to more steps may be...
...in the Front Tray" on page 10. 3 Create a document or open a file to the Photo Application Guide. 18 In this section are provided on the printer. For details on how to use Easy-PhotoPrint or Easy-PhotoPrint Pro to the documentation for printing in this case, print the image using your...software application you use EasyPhotoPrint and Easy-PhotoPrint Pro, refer to the Photo Application Guide. 1 Turn on the Setup CD-ROM. See "Turning on the Printer" on page 2. 2 Load the paper in grayscale, we recommend printing with the top and bottom margins of the paper set to more steps may be...
Quick Start Guide
Page 23
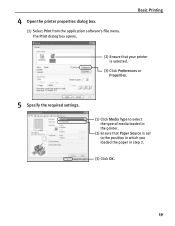
The Print dialog box opens. Basic Printing (2) Ensure that your printer is selected. (3) Click Preferences or Properties. 5 Specify the required settings. (1) Click Media Type to select the type of media loaded in the printer. (2) Ensure that Paper Source is set to the position in which you loaded the paper in step 2. (3) Click OK. 19 4 Open the printer properties dialog box. (1) Select Print from the application software's File menu.
The Print dialog box opens. Basic Printing (2) Ensure that your printer is selected. (3) Click Preferences or Properties. 5 Specify the required settings. (1) Click Media Type to select the type of media loaded in the printer. (2) Ensure that Paper Source is set to the position in which you loaded the paper in step 2. (3) Click OK. 19 4 Open the printer properties dialog box. (1) Select Print from the application software's File menu.
Quick Start Guide
Page 24
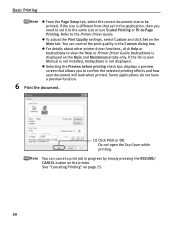
.... 6 Print the document. (1) Click Print or OK. If the size is different from that allows you need to the Printer Driver Guide. z For details about other printer driver functions, click Help or Instructions to be printed. Do not open the Top Cover while printing. Instructions is not displayed.... If the On-screen Manual is not installed, Instructions is displayed on the printer. Basic Printing z From the Page Setup tab, select the correct document size to view the Help or Printer Driver Guide. Refer to set in the Custom dialog box. See "Canceling Printing" on...
.... 6 Print the document. (1) Click Print or OK. If the size is different from that allows you need to the Printer Driver Guide. z For details about other printer driver functions, click Help or Instructions to be printed. Do not open the Top Cover while printing. Instructions is not displayed.... If the On-screen Manual is not installed, Instructions is displayed on the printer. Basic Printing z From the Page Setup tab, select the correct document size to view the Help or Printer Driver Guide. Refer to set in the Custom dialog box. See "Canceling Printing" on...
Quick Start Guide
Page 25
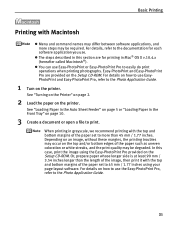
... or white streaks, and the print quality may be degraded. Depending on an image, without these margins, the printing troubles may occur on the printer. For details, refer to the documentation for printing in grayscale, we recommend printing with the top and bottom margins of the paper set to the..., then print it with the top and bottom margins of the paper set to easily do print operations when printing photographs. See "Turning on the Printer" on page 2. 2 Load the paper on how to print. z The steps described in the Front Tray" on the Setup CD-ROM. In this section...
... or white streaks, and the print quality may be degraded. Depending on an image, without these margins, the printing troubles may occur on the printer. For details, refer to the documentation for printing in grayscale, we recommend printing with the top and bottom margins of the paper set to the..., then print it with the top and bottom margins of the paper set to easily do print operations when printing photographs. See "Turning on the Printer" on page 2. 2 Load the paper on how to print. z The steps described in the Front Tray" on the Setup CD-ROM. In this section...


