Canon PIXMA MX892 Support Question
Canon PIXMA MX892 Support Question
Find answers below for this question about Canon PIXMA MX892.Need a Canon PIXMA MX892 manual? We have 11 online manuals for this item!
Question posted by chrisladas on January 21st, 2016
Rear Loading Tray Stuck
I accidentally selected the rear loading tray. now I cannot get the regular loading tray to work.it gives me an error message that says Rear tray.....there is no paper.....load paper and select OK.
Current Answers
Answer #1: Posted by TechSupport101 on January 21st, 2016 4:10 PM
TechSupport101

Member since:
May 24th, 2013 Points: 12,171,305

Member since:
May 24th, 2013 Points: 12,171,305
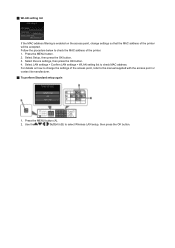
Hi. If you are attempting to change the setting on the printer itself, please perform the following to change the default Plain Paper feed source on the printer:
1. Press the Setup or Menu Button on the printer.
2. Use the scroll wheel to select Device Settings and press OK.
3. Select Plain Paper Feed settings and press OK.
4. Select your desired feed sources and press OK.
If the issue persist, then go here http://www.usa.canon.com/cusa/consumer/standard_display/contact_us_consumer
Related Canon PIXMA MX892 Manual Pages
Guide for Printer Setup for Network - Page 1
...Network Connection
Wireless Connection Preparation for Connection Printer Setup Setup Procedure Selection
Push Button Method Standard setup WPS Other setup (Advanced setup)
Disable WEP WPA/WPA2
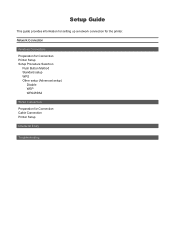
Wired Connection Preparation for the printer. Setup Guide
This guide provides information for setting up a network connection for Connection Cable Connection Printer Setup
Character Entry
Troubleshooting
Guide for Printer Setup for Network - Page 2
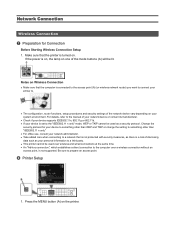
...is connected to the access point (A) (or wireless network router) you want to connect your printer to prepare an access point.
Press the MENU button (A) on Wireless Connection
• Make sure...power is turned on your personal information to a third party. • This printer cannot be lit. Notes on the printer. Be sure to .
• The configuration, router functions, ...
Guide for Printer Setup for Network - Page 3
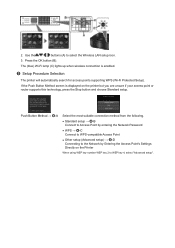
... Network by Entering the Access Point's Settings Directly on the printer but you are unsure if your access point or router supports this technology, press the Stop button and choose Standard setup. If the Push Button Method screen is enabled. 2.
Use the
buttons (A) to WEP key 4, select "Advanced setup". Press the OK button (B).
Guide for Printer Setup for Network - Page 4
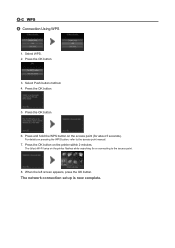
.... Press and hold the WPS button on pressing the WPS button, refer to the access point.
3. Press the OK button on the printer flashes while searching for about 5 seconds). For details on the access point (for or connecting to the access point manual.
2.
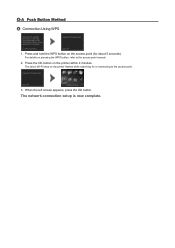
d-A Push Button Method d Connection ...
Guide for Printer Setup for Network - Page 5
... be displayed on the printer. 5.
Character entry is case-sensitive.
9. Press the left Function button.
10.When the left Function button.
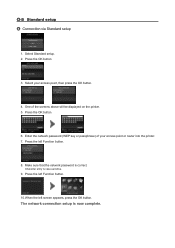
8. d-B Standard setup d Connection via Standard setup
1. Press the OK button.
6. Press the left screen appears, press the OK button. One of your access point, then press the OK button.
4.
Select Standard setup. 2. Press the...
Guide for Printer Setup for Network - Page 6
... connection setup is now complete. When the left screen appears, press the OK button. Press the OK button.
5. The (blue) Wi-Fi lamp on the access point (for or connecting to the access point manual.
7.
Press the OK button.
3. Press the OK button.
6. Select WPS. 2.
d-C WPS d Connection Using WPS
1.
For details on the printer within 2 minutes.
Guide for Printer Setup for Network - Page 10
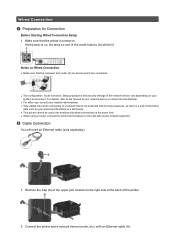
...; Take added care when connecting to a network that is a risk of disclosing
data such as there is not protected with an Ethernet cable (A). Connect the printer and a network device (router, etc.) with security measures, as your system environment.
b Cable Connection
You will be used over wireless and wired connections at the...
Guide for Printer Setup for Network - Page 11
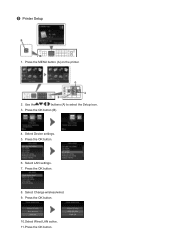
Use the
buttons (A) to select the Setup icon.
3. Press the OK button.
10.Select Wired LAN active. 11. Press the OK button.
6. Select Change wireless/wired. 9. Select Device settings. 5. Press the MENU button (A) on the printer.
2. Select LAN settings. 7. Press the OK button.
8. Press the OK button. Press the OK button (B).
4. c Printer Setup
1.
Guide for Printer Setup for Network - Page 13
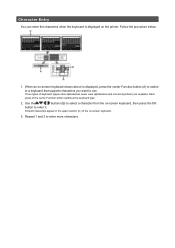
... on -screen keyboard, then press the OK
button to enter it. Repeat 1 and 2 to enter more characters. Use the
buttons (B) to select a character from the on -screen keyboard.
3. Each press of keyboard (upper case alphabetical, lower case alphabetical and numeric/symbolic) are available. When an on the printer. Follow the procedure below.
1. Character...
Guide for Printer Setup for Network - Page 14
... name exist. Do you have only one AccessPoint only, then press the OK button.
For details on this printer. If the problem is not supported on how to check the MAC address of the target access point on the printer directly. Select Directly enter the access point name in IEEE802.11n (2.4 GHz), IEEE802.11g...
Guide for Printer Setup for Network - Page 16
... filtering is enabled on the access point, change settings so that the MAC address of the printer will be used as the communication standard. Press the MENU button. 2. Select Device settings, then press the OK button. 4.
In addition, when using an access point that automatically creates WEP keys, check the WEP key...
Guide for Printer Setup for Network - Page 17
Select Device settings, then press the OK button. 4. Press the MENU button. 2. For details on the access point, change the... address of the printer will be accepted. Select LAN settings > Confirm LAN settings > WLAN setting list to select Wireless LAN setup, then press the OK button. Use the
buttons (B) to check MAC address. Select Setup, then press the OK button. 3. Follow...
MX890 series Specifications - Page 1
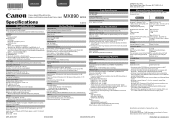
... destinations) Group dial (max. 99 destinations) Regular dialing (with Numeric buttons) Automatic redialing Manual ...Approx. 491 (W) X 448 (D) X 218 (H) mm * With the Paper Support and Paper Output Tray retracted.
without notice. CD-ROM Drive Required
Required
Display SVGA 800 X... Windows: Uninstall software bundled with the Canon inkjet printer before upgrading from Mac OS X 10.6 to ...
MX890 series Especificaciones [Spanish Version] - Page 1

...; Windows: Uninstall software bundled with the Canon inkjet printer before upgrading from Mac OS X 10.6 to ...100 destinations) Group dial (max. 99 destinations) Regular dialing (with Numeric buttons) Automatic redialing Manual redialing .... 491 (W) X 448 (D) X 218 (H) mm * With the Paper Support and Paper Output Tray retracted.
without notice. Transfer speed (Standard value):
IEEE802.11n: max...
Setup Guide - Page 6
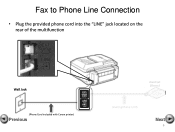
Fax to Phone Line Connection
• Plug the provided phone cord into the "LINE" jack located on the rear of the multifunction
Wall Jack
(Phone Cord included with Canon printer)
Previous
Hand Set (Phone)
(Existing Phone Cord)
Next
6
Setup Guide - Page 8

jack located on the rear of the multifunction
Wall Jack
(Phone Cord included with Canon printer)
Previous
Hand Set (Phone)
(Existing Phone Cord)
Next
8 Fax to Phone Line Connection
• Plug the second phone cord into the "EXT."
Setup Guide - Page 7
Wall Jack
Answering Machine
Hand Set (Phone)
(Phone Cord included with Canon printer)
Previous
(Existing Phone Cord)
(Existing Phone Cord)
Next
7
Fax to Phone Line Connection
• Plug the provided phone cord into the "LINE" jack located on the rear of the multifunction.
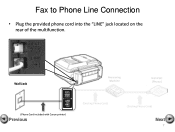
Setup Guide - Page 9
Fax to Phone Line Connection
• Plug the second phone cord into the "EXT." jack located on the rear of the multifunction
Wall Jack
Answering Machine
Hand Set (Phone)
(Phone Cord included with Canon printer)
Previous
(Existing Phone Cord)
(Existing Phone Cord)
Next
9
Setup Guide - Page 15

Fax to Phone Line Connection
• Plug the provided phone cord into the "LINE" jack located on the rear of the multifunction
Wall Jack
(Phone Cord included with Canon printer)
Previous
Hand Set (Phone)
(Existing Phone Cord)
Next
15
Setup Guide - Page 17
Fax to Phone Line Connection
• Plug the second phone cord into the "EXT." jack located on the rear of the multifunction
Wall Jack
(Phone Cord included with Canon printer)
Previous
Hand Set (Phone)
(Existing Phone Cord)
Next
17
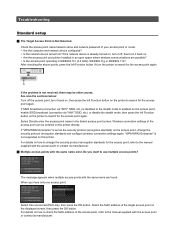
Similar Questions

Printer Quit. Gives Error Message
Refused to make photos. Then, it jammed. Took off back as instructed, but no jam there. Now won't pr...
Refused to make photos. Then, it jammed. Took off back as instructed, but no jam there. Now won't pr...
(Posted by multiedd 8 years ago)

Print #10 Env From Bottom Tray Gives Error Message 1007 No Matter How I Align En
does same thing for photopaper only prints on plain white paper.
does same thing for photopaper only prints on plain white paper.
(Posted by rkgt350 9 years ago)

What Is Wrong With Canon Pixma Mx892 When Error Message Says 5100
(Posted by 77edljohn 9 years ago)

Canon Pixma Mx892 How To Set Up Error Message Says No Paper
(Posted by michgt 10 years ago)
