
Accessory Catalog
Page 11
... the presser foot. 2. Insert cords or threads into each hole on the presser foot. 2. Attach the presser foot and select a stitch from the right of seams or pattern markings are desired. Line up the center guide mark on the machine. 2. Place cord under the presser foot. 3. SA158 ABCDEFJKMN www.brother.com Line up the cords, and select zigzag stitch with brother sewing machines of 7 mm feed width. 1. It can be used with brother sewing machines of 7 mm feed width. 1. Attach the presser foot and pull cords...
... the presser foot. 2. Insert cords or threads into each hole on the presser foot. 2. Attach the presser foot and select a stitch from the right of seams or pattern markings are desired. Line up the center guide mark on the machine. 2. Place cord under the presser foot. 3. SA158 ABCDEFJKMN www.brother.com Line up the cords, and select zigzag stitch with brother sewing machines of 7 mm feed width. 1. It can be used with brother sewing machines of 7 mm feed width. 1. Attach the presser foot and pull cords...

Accessory Catalog
Page 12
... sewing machines. Slide the fabric not to be gathered under the presser foot. 4. For appliqué: 1. Decrease the upper thread tension and test various settings to see which one works on thin to make or attach piping. For gathering: 1. To attach the gathered edge to mark. 2. Its wide groove also helps you are using zigzag stitch with dense stitches. Stitch in the needle area. Brother Embellishment Feet 21 Fringe Foot Gathering Foot SA142 All Brother home-use sewing machines SA120 All Brother home-use sewing machines Fringe Foot Used...
... sewing machines. Slide the fabric not to be gathered under the presser foot. 4. For appliqué: 1. Decrease the upper thread tension and test various settings to see which one works on thin to make or attach piping. For gathering: 1. To attach the gathered edge to mark. 2. Its wide groove also helps you are using zigzag stitch with dense stitches. Stitch in the needle area. Brother Embellishment Feet 21 Fringe Foot Gathering Foot SA142 All Brother home-use sewing machines SA120 All Brother home-use sewing machines Fringe Foot Used...

Accessory Catalog
Page 13
... Foot Makes ruffles with this presser foot. 1. Use a stiff card to get started. www.brother.com Draw a reference line to sew the first row in one of the presser foot is moved forward, its teeth catch a fabric and force it forward into the slot, and stitch slowly. 3. Install and manually thread a twin needle. 2. For seven grooves: SA179 ABCDEJ For five grooves: SA162 IP This presser foot does not include the bobbin cover...
... Foot Makes ruffles with this presser foot. 1. Use a stiff card to get started. www.brother.com Draw a reference line to sew the first row in one of the presser foot is moved forward, its teeth catch a fabric and force it forward into the slot, and stitch slowly. 3. Install and manually thread a twin needle. 2. For seven grooves: SA179 ABCDEJ For five grooves: SA162 IP This presser foot does not include the bobbin cover...

Accessory Catalog
Page 15
... the open front when greater visibility is finished, sew about four locking stitches. 8. Set the fabric under the presser foot. 6. Quilting Foot For darning, quilting, or free-motion. Gently holding the upper and bobbin threads sew about four locking stitches and finish the thread ends. Begin to sew moving the fabric at the same pace as the machine's lower feed dogs to hold fabric in the needle area. Place the fabric beneath the presser foot. 4. Lower the feed dogs. 2. Set the machine to guide the fabric. 4. Lower the feed dogs. 3. Use the foot controller so...
... the open front when greater visibility is finished, sew about four locking stitches. 8. Set the fabric under the presser foot. 6. Quilting Foot For darning, quilting, or free-motion. Gently holding the upper and bobbin threads sew about four locking stitches and finish the thread ends. Begin to sew moving the fabric at the same pace as the machine's lower feed dogs to hold fabric in the needle area. Place the fabric beneath the presser foot. 4. Lower the feed dogs. 2. Set the machine to guide the fabric. 4. Lower the feed dogs. 3. Use the foot controller so...

Accessory Catalog
Page 17
...-in software in your LCD screen background color for embellishing a wide variety of making beautiful borders. Automatic Height Adjuster™ (AHA) feature adjusts the presser foot pressure automatically and continuously to embroider 150 decorative sewing stitches within the frame. - Drag and drop embroidery pattern positioning. - The 4000D Premium Upgrade Package is compatible only with USB hub devices* to provide access to assure perfectly connected and aligned designs. Includes three new free-motion presser feet: Free-motion quilting foot...
...-in software in your LCD screen background color for embellishing a wide variety of making beautiful borders. Automatic Height Adjuster™ (AHA) feature adjusts the presser foot pressure automatically and continuously to embroider 150 decorative sewing stitches within the frame. - Drag and drop embroidery pattern positioning. - The 4000D Premium Upgrade Package is compatible only with USB hub devices* to provide access to assure perfectly connected and aligned designs. Includes three new free-motion presser feet: Free-motion quilting foot...

Accessory Catalog
Page 33
... 6000D Embroidery Machine Hoops Select hoops appropriate for details, www.brother.com. Some hoops can be removed to provide 10 vertical spool pins for your machine to accommodate a variety of spool sizes. Spend less time changing threads, and more on this stand that conveniently sits behind your threads in the storage slots. Ten Spool Thread Stand This 10-Spool Thread Stand snaps securely in use. For all models: SA503 Free-Standing Ten Spool Thread Stand...
... 6000D Embroidery Machine Hoops Select hoops appropriate for details, www.brother.com. Some hoops can be removed to provide 10 vertical spool pins for your machine to accommodate a variety of spool sizes. Spend less time changing threads, and more on this stand that conveniently sits behind your threads in the storage slots. Ten Spool Thread Stand This 10-Spool Thread Stand snaps securely in use. For all models: SA503 Free-Standing Ten Spool Thread Stand...

Accessory Catalog
Page 34
... delivery through machine tensions. Pacesetter embroidery thread is also recommended for Brother® Embroidery Machines, but compatible with straight, zig zag or decorative stitches. Bobbin Threads Stabilizers and Water Water Soluble Stabilizers Brother Embroidery Accessories 66 Bobbin Threads Brother Bobbin Threads are included in Japan for placement on a wide range of 30 cotton-wrapped polyester embroidery thread spools 300 meters (328 yards). SA519 Iron-on your fabric properly with other sewing and embroidery machine brands. Designed for fabrics and applications...
... delivery through machine tensions. Pacesetter embroidery thread is also recommended for Brother® Embroidery Machines, but compatible with straight, zig zag or decorative stitches. Bobbin Threads Stabilizers and Water Water Soluble Stabilizers Brother Embroidery Accessories 66 Bobbin Threads Brother Bobbin Threads are included in Japan for placement on a wide range of 30 cotton-wrapped polyester embroidery thread spools 300 meters (328 yards). SA519 Iron-on your fabric properly with other sewing and embroidery machine brands. Designed for fabrics and applications...

Accessory Catalog
Page 40
... the guide. 4. Set T1/T2 presser foot. 2. Set up your machine for a chain stitch, the center needle. 2. Set up your Cover Stitch). 1. Set up your machine. 3. Sew. Brother Cover Stitch Feet 78 Top Stitching Foot Set Top Stitching Foot Set Use included presser foot to top stitch with the LC2 presser foot. Align the fabric joint and the groove of fabric pointed so that it is easily set it to the hemming attachment, and attach it into the front cover slot. 3. Open the seams. 4. Attach the hem positioning plate A/B to your machine for a cover stitch, with...
... the guide. 4. Set T1/T2 presser foot. 2. Set up your machine for a chain stitch, the center needle. 2. Set up your Cover Stitch). 1. Set up your machine. 3. Sew. Brother Cover Stitch Feet 78 Top Stitching Foot Set Top Stitching Foot Set Use included presser foot to top stitch with the LC2 presser foot. Align the fabric joint and the groove of fabric pointed so that it is easily set it to the hemming attachment, and attach it into the front cover slot. 3. Open the seams. 4. Attach the hem positioning plate A/B to your machine for a cover stitch, with...
Users Manual - English
Page 1
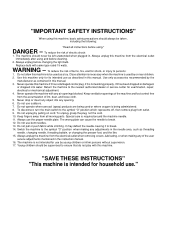
... outlet when removing covers, lubricating, or when making any adjustments in the needle area, such as described in the instruction manual. 16. Never operate the machine with this machine. Keep fingers away from the electrical outlet immediately after using and before changing the light bulb. Young children should be taken , including the following: "Read all moving parts. Use this machine only for household use as threading needle, changing needle, threading bobbin, or changing the presser foot, and...
... outlet when removing covers, lubricating, or when making any adjustments in the needle area, such as described in the instruction manual. 16. Never operate the machine with this machine. Keep fingers away from the electrical outlet immediately after using and before changing the light bulb. Young children should be taken , including the following: "Read all moving parts. Use this machine only for household use as threading needle, changing needle, threading bobbin, or changing the presser foot, and...

Users Manual - English
Page 9
...3 OPERATING YOUR SEWING MACHINE 5 Connecting Plugs 5 Main Power/Sewing Light Switch 7 Foot Controller 8 Checking the Needle 9 Replacing the Needle 9 Changing the Presser Foot 11 Flat Bed Attachment 12 VARIOUS CONTROLS 13 Pattern Selection Dial 13 Recommended Widths and Lengths for Stitches . 15 Stitch Length Dial 21 Stitch Width Dial 23 Reverse Sewing Lever 24 Converting to Free-arm Style 25 THREADING THE MACHINE 26 Winding the Bobbin 26 Lower Threading 29 Upper Threading 31 Using Needle Threader 33 Drawing Up Lower Thread 35 Twin Needle Sewing 36 Thread Tension 38 FABRIC...
...3 OPERATING YOUR SEWING MACHINE 5 Connecting Plugs 5 Main Power/Sewing Light Switch 7 Foot Controller 8 Checking the Needle 9 Replacing the Needle 9 Changing the Presser Foot 11 Flat Bed Attachment 12 VARIOUS CONTROLS 13 Pattern Selection Dial 13 Recommended Widths and Lengths for Stitches . 15 Stitch Length Dial 21 Stitch Width Dial 23 Reverse Sewing Lever 24 Converting to Free-arm Style 25 THREADING THE MACHINE 26 Winding the Bobbin 26 Lower Threading 29 Upper Threading 31 Using Needle Threader 33 Drawing Up Lower Thread 35 Twin Needle Sewing 36 Thread Tension 38 FABRIC...

Users Manual - English
Page 12
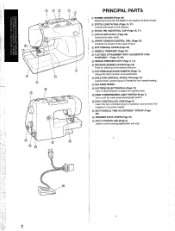
... SELECTION DIAL (Page 13) Turn in the reverse direction. A PATTERN INDICATION WINDOW (Page 13) Shows the stitch number to control sewing speed/start and stop. D G H EF I FOOT CONTROLLER (Page 8) Used to be used for stitching in either direction to hold a second spool of the upper thread. 6 BUTTONHOLE LEVER (Page 55) 7 NEEDLE THREADER (Page 33) 8 FLAT BED ATTACHMENT WITH ACCESSORY COMPART- G BUTTONHOLE FINE ADJUSTMENT SCREW (Page 59) H PRESSER FOOT LEVER (Page 31) I 1 F FOOT CONTROLLER JACK (Page 5) Insert the foot controller plug for operation and connect the machine to...
... SELECTION DIAL (Page 13) Turn in the reverse direction. A PATTERN INDICATION WINDOW (Page 13) Shows the stitch number to control sewing speed/start and stop. D G H EF I FOOT CONTROLLER (Page 8) Used to be used for stitching in either direction to hold a second spool of the upper thread. 6 BUTTONHOLE LEVER (Page 55) 7 NEEDLE THREADER (Page 33) 8 FLAT BED ATTACHMENT WITH ACCESSORY COMPART- G BUTTONHOLE FINE ADJUSTMENT SCREW (Page 59) H PRESSER FOOT LEVER (Page 31) I 1 F FOOT CONTROLLER JACK (Page 5) Insert the foot controller plug for operation and connect the machine to...
Users Manual - English
Page 32
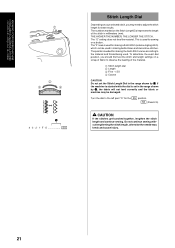
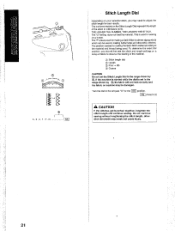
... exact dial position, you may break and cause injury. 21 THE HIGHER THE NUMBER, THE LONGER THE STITCH. The position needed for making a Satin Stitch (a dense zigzag stitch) which can be damaged. Do not continue sewing without lengthening the stitch length, otherwise the needle may need to adjust the stitch length for making the Satin Stitch varies according to the material and thread being used. The "O" setting does not feed the material. KNOWING YOUR SEWING MACHINE CONNAITRE SA MACHINE A COUDRE...
... exact dial position, you may break and cause injury. 21 THE HIGHER THE NUMBER, THE LONGER THE STITCH. The position needed for making a Satin Stitch (a dense zigzag stitch) which can be damaged. Do not continue sewing without lengthening the stitch length, otherwise the needle may need to adjust the stitch length for making the Satin Stitch varies according to the material and thread being used. The "O" setting does not feed the material. KNOWING YOUR SEWING MACHINE CONNAITRE SA MACHINE A COUDRE...
Users Manual - English
Page 40
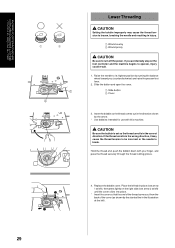
... lightly on the foot controller and the machine begins to break. Replace the bobbin cover. Slide the button and open the cover. 1 Slide button 2 Cover 3. If you (counterclockwise) and raise the presser foot lever. 2. KNOWING YOUR SEWING MACHINE CONNAITRE SA MACHINE A COUDRE CONOZCA SU MÁQUINA DE COSER 1 2 1 2 Lower Threading CAUTION Setting the bobbin improperly may cause the thread tension to be incorrect or the needle to operate, injury could result. 1. Place the left tab in the correct direction...
... lightly on the foot controller and the machine begins to break. Replace the bobbin cover. Slide the button and open the cover. 1 Slide button 2 Cover 3. If you (counterclockwise) and raise the presser foot lever. 2. KNOWING YOUR SEWING MACHINE CONNAITRE SA MACHINE A COUDRE CONOZCA SU MÁQUINA DE COSER 1 2 1 2 Lower Threading CAUTION Setting the bobbin improperly may cause the thread tension to be incorrect or the needle to operate, injury could result. 1. Place the left tab in the correct direction...
Users Manual - English
Page 82
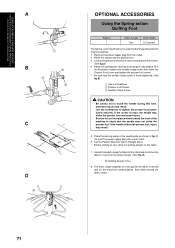
... of the machine to tighten the presser foot holder screw securely. Place the darning plate on the machine's sewing speed. Connect the power supply plug into a wall outlet. 6. D) B Quilting design (Line) 8. The stitch length depends on how quickly the fabric is moved and on the needle plate as shown in the illustration is above the needle clamp screw, then lower the Presser Foot Lever and tighten the presser foot screw. * Be sure that the needle clamp screw is useful for darning and freemotion machine quilting. 1. USING ATTACHMENTS AND...
... of the machine to tighten the presser foot holder screw securely. Place the darning plate on the machine's sewing speed. Connect the power supply plug into a wall outlet. 6. D) B Quilting design (Line) 8. The stitch length depends on how quickly the fabric is moved and on the needle plate as shown in the illustration is above the needle clamp screw, then lower the Presser Foot Lever and tighten the presser foot screw. * Be sure that the needle clamp screw is useful for darning and freemotion machine quilting. 1. USING ATTACHMENTS AND...
Users Manual - English
Page 97
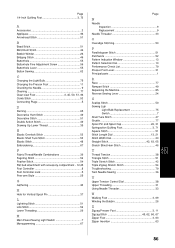
... the Machine 85 Reverse Sewing Lever 24 S Scallop Stitch 50 Sewing Ligh Light Bulb Replacement 75 Switch 7 Shell Tuck Stitch 47 Shuttle 77 Spool Pin and Spool Cap 26, 31 Springaction Quilting Foot 3, 71 Square Stitch 51 Stitch Length Dial 13, 21 Stitch Width Dial 23 Straight Stitch 42, 63, 65 Stretch Blind Hem Stitch 46 T Thread Tension 38 Triangle Stitch 51 Triple Stretch Stitch 42 Triple Zigzag Stretch Stitch 54 Troubleshooting 79 Twin Needle Sewing 36 U Upper Tension Control Dial 38 Upper Threading 31 Using Neadle Threader 33 W Walking Foot 3, 69 Winding the Bobbin...
... the Machine 85 Reverse Sewing Lever 24 S Scallop Stitch 50 Sewing Ligh Light Bulb Replacement 75 Switch 7 Shell Tuck Stitch 47 Shuttle 77 Spool Pin and Spool Cap 26, 31 Springaction Quilting Foot 3, 71 Square Stitch 51 Stitch Length Dial 13, 21 Stitch Width Dial 23 Straight Stitch 42, 63, 65 Stretch Blind Hem Stitch 46 T Thread Tension 38 Triangle Stitch 51 Triple Stretch Stitch 42 Triple Zigzag Stretch Stitch 54 Troubleshooting 79 Twin Needle Sewing 36 U Upper Tension Control Dial 38 Upper Threading 31 Using Neadle Threader 33 W Walking Foot 3, 69 Winding the Bobbin...

User Manual - French
Page 7
... CONTROLS 12 Darning 13 Appliques 6! 61 Pattern Selection Dial 13 Recommended Widths and Lengths for Stitches 15 Stitch Length Dial 21 Stitch Width Dial 23 Reverse Sewing Lever 24 Converting to Free-arm Style 25 Monogramming and Embroidering OPTIONAL ACCESSORIES Using the Walking Foot Using the Spring-action Quilting Foot Using the 1/4-Inch Quilting Foot 6f 77: , THREADING THE MACHINE 26 Winding the Bobbin Lower Threading Upper Threading Using Needle Threader Drawing Up Lower Thread Twin Needle Sewing 26 MAINTENANCE 29 31 Changing the Light Bulb 7! 33 Cleaning...
... CONTROLS 12 Darning 13 Appliques 6! 61 Pattern Selection Dial 13 Recommended Widths and Lengths for Stitches 15 Stitch Length Dial 21 Stitch Width Dial 23 Reverse Sewing Lever 24 Converting to Free-arm Style 25 Monogramming and Embroidering OPTIONAL ACCESSORIES Using the Walking Foot Using the Spring-action Quilting Foot Using the 1/4-Inch Quilting Foot 6f 77: , THREADING THE MACHINE 26 Winding the Bobbin Lower Threading Upper Threading Using Needle Threader Drawing Up Lower Thread Twin Needle Sewing 26 MAINTENANCE 29 31 Changing the Light Bulb 7! 33 Cleaning...
User Manual - French
Page 10
...) 0 ZIGZAG PRESSER FOOT (Page 3, 11) () REVERSE SEWING LEVER (Page 24) Push for operation and connect the machine to select the desired stitch. BUTTONHOLE FINE ADJUSTMENT SCREW (Page 59) PRESSER FOOT LEVER (Page 31) 0 FOOT CONTROLLER (Page 8) Used to hold a second spool of the upper thread. C) UPPER TENSION CONTROL DIAL (Page 38) Controls the tension of thread for the lower thread. 0 STITCH LENGTH DIAL (Page 13, 21) Controls the length of the stitches. C) BUTTONHOLE LEVER (Page 55) 0 NEEDLE THREADER (Page 33) () FLAT BED ATTACHMENT WITH ACCESSORY COM- MAIN POWER/SEWING LIGHT SWITCH...
...) 0 ZIGZAG PRESSER FOOT (Page 3, 11) () REVERSE SEWING LEVER (Page 24) Push for operation and connect the machine to select the desired stitch. BUTTONHOLE FINE ADJUSTMENT SCREW (Page 59) PRESSER FOOT LEVER (Page 31) 0 FOOT CONTROLLER (Page 8) Used to hold a second spool of the upper thread. C) UPPER TENSION CONTROL DIAL (Page 38) Controls the tension of thread for the lower thread. 0 STITCH LENGTH DIAL (Page 13, 21) Controls the length of the stitches. C) BUTTONHOLE LEVER (Page 55) 0 NEEDLE THREADER (Page 33) () FLAT BED ATTACHMENT WITH ACCESSORY COM- MAIN POWER/SEWING LIGHT SWITCH...
User Manual - French
Page 30
... exact dial position, you may need to observe the feeding of the stitch in the range shown by ®, the fabric will not feed correctly and the fabric or machine may break and cause injury. 0 21 The "F" area is used for best results. The numbers marked on a scrap of fabric to adjust the stitch length for sewing on a button. This is used for the SS position SS (Fixed 2.5) A CAUTION If the stitches...
... exact dial position, you may need to observe the feeding of the stitch in the range shown by ®, the fabric will not feed correctly and the fabric or machine may break and cause injury. 0 21 The "F" area is used for best results. The numbers marked on a scrap of fabric to adjust the stitch length for sewing on a button. This is used for the SS position SS (Fixed 2.5) A CAUTION If the stitches...

User Manual - French
Page 71
... LL. Button Sewing O O r. Pattern Stitch Length 0 Stitch Width Less than 5 Foot Zigzag Presser Foot 1. Measure the distance between the foot and the fabric and make sure that the needle enters the holes without hitting the button. And place the darning plate on the needle plate. Place a button between the holes and set the stitch width to 1.5. 2. At a slow speed, sew approximately 10 stitches. 6. Remove the material from the outlet. Make sure the needle does not strike the button during sewing. at the...
... LL. Button Sewing O O r. Pattern Stitch Length 0 Stitch Width Less than 5 Foot Zigzag Presser Foot 1. Measure the distance between the foot and the fabric and make sure that the needle enters the holes without hitting the button. And place the darning plate on the needle plate. Place a button between the holes and set the stitch width to 1.5. 2. At a slow speed, sew approximately 10 stitches. 6. Remove the material from the outlet. Make sure the needle does not strike the button during sewing. at the...
User Manual - French
Page 95
... Pattern Selection Dial Performance Check List Presser Foot Lever Principal parts Race Rampart Stitch Repacking the Machine Reverse Sewing Lever Scallop Stitch Sewing Light Light Bulb Replacement Switch Shell Tuck Stitch Shuttle Spool Pin and Spool Cap Springaction Quilting Foot Square Stitch Stitch Length Dial Stitch Width Dial Straight Stitch Stretch Blind Hem Stitph Thread Tension Triangle Stitch Triple Stretch Stitch Triple Zigzag Stretch Stitch Troubleshooting Twin Needle Sewing Upper Tension Control Dial Upper Threading Using Needle Threader Walking Foot Winding the Bobbin Zigzag Presser...
... Pattern Selection Dial Performance Check List Presser Foot Lever Principal parts Race Rampart Stitch Repacking the Machine Reverse Sewing Lever Scallop Stitch Sewing Light Light Bulb Replacement Switch Shell Tuck Stitch Shuttle Spool Pin and Spool Cap Springaction Quilting Foot Square Stitch Stitch Length Dial Stitch Width Dial Straight Stitch Stretch Blind Hem Stitph Thread Tension Triangle Stitch Triple Stretch Stitch Triple Zigzag Stretch Stitch Troubleshooting Twin Needle Sewing Upper Tension Control Dial Upper Threading Using Needle Threader Walking Foot Winding the Bobbin Zigzag Presser...


