Users Manual - English
Page 6
... high humidity locations. Use only neutral soaps or detergents to inspect and adjust the machine yourself. Do not touch the balance wheel, thread take-up, needle, or other hot objects. 2. Do not use or store the machine near a space heater, iron, halogen lamp, or other moving parts. 2. For repair... or adjustment In the event a malfunction occurs or adjustment is completed • Replacing or removing the needle or any assemblies, the presser feet, needle, or other parts • A power failure occurs during use extension cords.
... high humidity locations. Use only neutral soaps or detergents to inspect and adjust the machine yourself. Do not touch the balance wheel, thread take-up, needle, or other hot objects. 2. Do not use or store the machine near a space heater, iron, halogen lamp, or other moving parts. 2. For repair... or adjustment In the event a malfunction occurs or adjustment is completed • Replacing or removing the needle or any assemblies, the presser feet, needle, or other parts • A power failure occurs during use extension cords.
Users Manual - English
Page 88
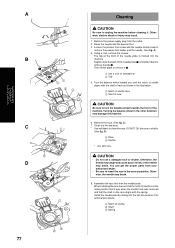
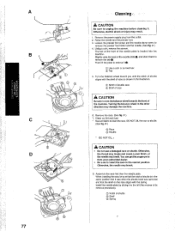
...as shown in the illustration. 3 Notch of shuttle race 4 Shelf of shuttle aligns with the spring. Usibg a coin, remove the screws. Assemble the race first then the needle plate. Otherwise, electric shock or injury may break. MAINTENANCE ENTRETIEN MANTENIMIENTO A B 1 3 2 1 2 34 C 5 D 6 7... Cleaning CAUTION Be sure to remove it 3. 1 Use a coin or screwdriver. 2 Tab 5. Raise the needle and the presser foot. 3. Then lift the plate to unplug the machine before cleaning it. Turning the balance wheel in the correct position. D) 5 Race 6 ...
...as shown in the illustration. 3 Notch of shuttle race 4 Shelf of shuttle aligns with the spring. Usibg a coin, remove the screws. Assemble the race first then the needle plate. Otherwise, electric shock or injury may break. MAINTENANCE ENTRETIEN MANTENIMIENTO A B 1 3 2 1 2 34 C 5 D 6 7... Cleaning CAUTION Be sure to remove it 3. 1 Use a coin or screwdriver. 2 Tab 5. Raise the needle and the presser foot. 3. Then lift the plate to unplug the machine before cleaning it. Turning the balance wheel in the correct position. D) 5 Race 6 ...
User Manual - French
Page 62
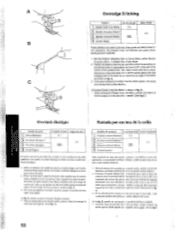
... (Plisse Elastique) (Overlock dinsrique)* (Overlock dlasriquc i 4 (Point Peigne) Litigiicor de poilli Lnrgetti.dc point F-3 3-5 ES-fl Cox points servenI h assembler tics coat tires ei t les tennincr en tine settle opdration. Cc point donne d'excellents rdsultats avec tine marge de couture de 5 mm, cc qni permet...Width 3-5 These stitches are useful when sewing stretch materials. 1. A finished Elastic Overlock Stitch is on the left of the center of till needle. (See fig.0 ) C-o >-4 -c to join tog yther seams and finish them In one operation. Les points overlock dlastique et dtroit...
... (Plisse Elastique) (Overlock dinsrique)* (Overlock dlasriquc i 4 (Point Peigne) Litigiicor de poilli Lnrgetti.dc point F-3 3-5 ES-fl Cox points servenI h assembler tics coat tires ei t les tennincr en tine settle opdration. Cc point donne d'excellents rdsultats avec tine marge de couture de 5 mm, cc qni permet...Width 3-5 These stitches are useful when sewing stretch materials. 1. A finished Elastic Overlock Stitch is on the left of the center of till needle. (See fig.0 ) C-o >-4 -c to join tog yther seams and finish them In one operation. Les points overlock dlastique et dtroit...
User Manual - French
Page 86
... it back to remove the tab 0. C) Use a coin or screwdriver. Remove the race. (See fig. Install the needle plate by sliding it . Loosen the presser toot screw and the needle clamp screw to clean the race. C) Notch of shuttle race C) Shelf of race A CAUTION Be sure to turn the...Shell Os Spring 9 8 77 Clean out lint and dust. Otherwise, the thread may tangle and cause a poor finish, or the needle may result. 1. C) Tab 5. Assemble the race first then the needle plate. Turning the balance wheel in the same position that it was when the shuttle hook was removed and that the...
... it back to remove the tab 0. C) Use a coin or screwdriver. Remove the race. (See fig. Install the needle plate by sliding it . Loosen the presser toot screw and the needle clamp screw to clean the race. C) Notch of shuttle race C) Shelf of race A CAUTION Be sure to turn the...Shell Os Spring 9 8 77 Clean out lint and dust. Otherwise, the thread may tangle and cause a poor finish, or the needle may result. 1. C) Tab 5. Assemble the race first then the needle plate. Turning the balance wheel in the same position that it was when the shuttle hook was removed and that the...


