
Accessory Catalog
Page 4
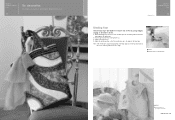
... foot. 4. Adjustable Zipper & Piping Foot Brother General Sewing Accessories 06 Adjustable Zipper & Piping Foot Attaches zippers and pipings easily. Loosen the clamp screw at the back of the presser foot and slide the presser foot so that the needle fits on the opening on the edge of... zipper/piping, avoiding the non-flat parts of zipper/piping, and presses the fabric with a screwdriver. 5. Sew. Screw on either left ). 2. Brother General Sewing Accessories 05 Sew as you like. Position the presser foot...
... foot. 4. Adjustable Zipper & Piping Foot Brother General Sewing Accessories 06 Adjustable Zipper & Piping Foot Attaches zippers and pipings easily. Loosen the clamp screw at the back of the presser foot and slide the presser foot so that the needle fits on the opening on the edge of... zipper/piping, avoiding the non-flat parts of zipper/piping, and presses the fabric with a screwdriver. 5. Sew. Screw on either left ). 2. Brother General Sewing Accessories 05 Sew as you like. Position the presser foot...

Accessory Catalog
Page 5
... the seam closed and press. 3. Fasten metal stop at the desired distance from the edge of the fabric and lower needle. 2. Edge stitching: 1. Brother General Sewing Accessories 07 Blind Stitch Foot Concealed Zipper Foot Blind Stitch Foot Creates blind hems on a variety of fabrics, using the ...fabric edge joining. It can also be placed. 2. SA184 All Brother home-use . Joining two fabrics: 1. Pin tucks: 1. Sew. Position the needle at lower edge of the presser foot. 4. Make the coil stand and sew, holding the fabrics/seams firmly against the presser foot guide to...
... the seam closed and press. 3. Fasten metal stop at the desired distance from the edge of the fabric and lower needle. 2. Edge stitching: 1. Brother General Sewing Accessories 07 Blind Stitch Foot Concealed Zipper Foot Blind Stitch Foot Creates blind hems on a variety of fabrics, using the ...fabric edge joining. It can also be placed. 2. SA184 All Brother home-use . Joining two fabrics: 1. Pin tucks: 1. Sew. Position the needle at lower edge of the presser foot. 4. Make the coil stand and sew, holding the fabrics/seams firmly against the presser foot guide to...

Accessory Catalog
Page 6
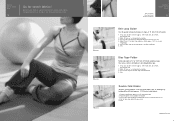
... flat narrow hem on sheer and very lightweight fabrics. 1. Select a desired stitch and sew. Brother General Sewing Accessories 09 Narrow Hemmer Foot Non Stick Foot Overlock Foot Picot Foot Brother General Sewing Accessories 10 SA126 ABCDEFJKMN SA127 GHILOP Skirt Innov-is exactly against the edge of the fabric...into the curled part of the foot. 6. Position the edge of the fabric behind the needle and lower the presser foot. 7. Non Stick Foot Designed for details.) www.brother.com Select an overlock stitch. 2. SA164 ABCDEFJKMN SA149 GHILOP SA114 ABCDEFGHJKLMNO SA122 IP Travel ...
... flat narrow hem on sheer and very lightweight fabrics. 1. Select a desired stitch and sew. Brother General Sewing Accessories 09 Narrow Hemmer Foot Non Stick Foot Overlock Foot Picot Foot Brother General Sewing Accessories 10 SA126 ABCDEFJKMN SA127 GHILOP Skirt Innov-is exactly against the edge of the fabric...into the curled part of the foot. 6. Position the edge of the fabric behind the needle and lower the presser foot. 7. Non Stick Foot Designed for details.) www.brother.com Select an overlock stitch. 2. SA164 ABCDEFJKMN SA149 GHILOP SA114 ABCDEFGHJKLMNO SA122 IP Travel ...

Accessory Catalog
Page 7
... (approx. 6.5, 13, or 16 mm) seam. Each divisional mark equals 2 mm. 1. SA160 ABCDEFGHJKLMNO Straight Stitch Foot Straight Stitch Foot and Straight Stitch Needle Plate Vertical Stitching Alignment Foot Brother General Sewing Accessories 12 Straight Stitch Foot For precise straight stitching on thin fabrics or on thin fabrics or small pieces of the fabric...
... (approx. 6.5, 13, or 16 mm) seam. Each divisional mark equals 2 mm. 1. SA160 ABCDEFGHJKLMNO Straight Stitch Foot Straight Stitch Foot and Straight Stitch Needle Plate Vertical Stitching Alignment Foot Brother General Sewing Accessories 12 Straight Stitch Foot For precise straight stitching on thin fabrics or on thin fabrics or small pieces of the fabric...
Accessory Catalog
Page 10
...needle position so that the needle lines up to the edge of the presser foot. 3. Brother Embellishment Feet 17 Go decorative. Pull the tape from the rear of the bias tape. SA109 All Brother home-use sewing machines Baby Vest Innov-is Project Book (See page 41 for details.) www.brother... inch) using straight, zigzag or decorative stitches. 1. Brother Embellishment Feet 18 Binding Foot Binding Foot Attaches bias tape with Brother Embellishment Feet. Snap on the foot to slide the guide to the guide side. 2. Hint: If the needle does not position properly on the bias tape, loosen the...
...needle position so that the needle lines up to the edge of the presser foot. 3. Brother Embellishment Feet 17 Go decorative. Pull the tape from the rear of the bias tape. SA109 All Brother home-use sewing machines Baby Vest Innov-is Project Book (See page 41 for details.) www.brother... inch) using straight, zigzag or decorative stitches. 1. Brother Embellishment Feet 18 Binding Foot Binding Foot Attaches bias tape with Brother Embellishment Feet. Snap on the foot to slide the guide to the guide side. 2. Hint: If the needle does not position properly on the bias tape, loosen the...

Accessory Catalog
Page 12
... patterns: Line up the center of the foot. 3. Brother Embellishment Feet 21 Fringe Foot Gathering Foot SA142 All Brother home-use sewing machines SA120 All Brother home-use sewing machines Fringe Foot Used to mark construction details by creating tailor... tacks. Making loops or fringes: 1. Decrease the upper thread tension and test various settings to see which one works on thin to more than 5 mm. 2. Select a straight stitch, left needle...
... patterns: Line up the center of the foot. 3. Brother Embellishment Feet 21 Fringe Foot Gathering Foot SA142 All Brother home-use sewing machines SA120 All Brother home-use sewing machines Fringe Foot Used to mark construction details by creating tailor... tacks. Making loops or fringes: 1. Decrease the upper thread tension and test various settings to see which one works on thin to more than 5 mm. 2. Select a straight stitch, left needle...

Accessory Catalog
Page 13
Install and manually thread a twin needle. 2. Sew slowly for details.) Brother Embellishment Feet Pin Tuck Foot 24 Ruffler Foot Pin Tuck Foot This presser foot has 7 grooves and produces perfect pin tucks and corded pin tucks using a twin needle on the lower portion of the presser foot is also included with evenly spaced tucks and...
Install and manually thread a twin needle. 2. Sew slowly for details.) Brother Embellishment Feet Pin Tuck Foot 24 Ruffler Foot Pin Tuck Foot This presser foot has 7 grooves and produces perfect pin tucks and corded pin tucks using a twin needle on the lower portion of the presser foot is also included with evenly spaced tucks and...

Accessory Catalog
Page 14
...the fabric and prevents fabric shifting as the straight stitch is sewn. Select the center needle position for your sewing machine and the single hole matches perfectly to the needle drop position and helps to expand the presser foot area that has already been sewn.... the straight bar and the needle can be adjusted by Janice Ferguson and Suzanne Sawko 1/4" Piecing Foot 1/4" Piecing Foot with Guide Quilting Guide Brother Quilting Feet 26 SA125 All Brother home-use sewing machines SA185 All Brother home-use sewing machines SA132 All Brother home-use sewing machines 1/4" Piecing Foot Best ...
...the fabric and prevents fabric shifting as the straight stitch is sewn. Select the center needle position for your sewing machine and the single hole matches perfectly to the needle drop position and helps to expand the presser foot area that has already been sewn.... the straight bar and the needle can be adjusted by Janice Ferguson and Suzanne Sawko 1/4" Piecing Foot 1/4" Piecing Foot with Guide Quilting Guide Brother Quilting Feet 26 SA125 All Brother home-use sewing machines SA185 All Brother home-use sewing machines SA132 All Brother home-use sewing machines 1/4" Piecing Foot Best ...

Accessory Catalog
Page 15
... front of fabric and the walking foot with the open front when greater visibility is finished, sew about four locking stitches. 8. Lower the feed dogs. 3. While starting to sew, press the needle position button twice to pull the bobbin thread to the machine. 2. Use both hands while ... 2.5 mm) in order to feed the fabric consistently. Use the walking foot with the needle to allow fabric to be easily sewn. Begin to hold the fabric firmly. 5. Walking Foot/Open Toe Walking Foot Brother Quilting Feet 28 Walking Foot/Open Toe Walking Foot The feed dogs on the Open Toe...
... front of fabric and the walking foot with the open front when greater visibility is finished, sew about four locking stitches. 8. Lower the feed dogs. 3. While starting to sew, press the needle position button twice to pull the bobbin thread to the machine. 2. Use both hands while ... 2.5 mm) in order to feed the fabric consistently. Use the walking foot with the needle to allow fabric to be easily sewn. Begin to hold the fabric firmly. 5. Walking Foot/Open Toe Walking Foot Brother Quilting Feet 28 Walking Foot/Open Toe Walking Foot The feed dogs on the Open Toe...

Accessory Catalog
Page 17
... quilting foot "C" for the Innov-is 4000D this upgrade adds outstanding quilting features, updated embroidery functionality and enhanced USB capability. Sewing Decorative Stitches as border designs. Change your new machine you to your machine with the entire library of items. - Basting ...all Duetta™ 4500D's and Innov-is 4000D machines that come with center needle position straight stitch Open toe quilting foot "O" for greater visibility Echo quilting foot "E" for details.) www.brother.com New Border Frame and 28 Unique Embroidery Patterns. Customizable USB Mouse* Pointer ...
... quilting foot "C" for the Innov-is 4000D this upgrade adds outstanding quilting features, updated embroidery functionality and enhanced USB capability. Sewing Decorative Stitches as border designs. Change your new machine you to your machine with the entire library of items. - Basting ...all Duetta™ 4500D's and Innov-is 4000D machines that come with center needle position straight stitch Open toe quilting foot "O" for greater visibility Echo quilting foot "E" for details.) www.brother.com New Border Frame and 28 Unique Embroidery Patterns. Customizable USB Mouse* Pointer ...

Accessory Catalog
Page 34
..." x 10 yds Water soluble stabilizer is perfect for fabrics and applications when it is important that can stand on your sewing counter or can illustrate more of needle and stabilizer types. SA520 Water Soluble Stabilizer 11" x 3.3 yds SA540 Light Weight Water Soluble Spun 11" x 25 ...good foundation as well as fur or terrycloth. Make sure you just the right color for each design. This pack gives you check out Brother's beautiful country yarn thread. Handles a variety of a special and sophisticated look with straight, zig zag or decorative stitches. This metallic ...
..." x 10 yds Water soluble stabilizer is perfect for fabrics and applications when it is important that can stand on your sewing counter or can illustrate more of needle and stabilizer types. SA520 Water Soluble Stabilizer 11" x 3.3 yds SA540 Light Weight Water Soluble Spun 11" x 25 ...good foundation as well as fur or terrycloth. Make sure you just the right color for each design. This pack gives you check out Brother's beautiful country yarn thread. Handles a variety of a special and sophisticated look with straight, zig zag or decorative stitches. This metallic ...

Accessory Catalog
Page 36
... embellish fabrics with wool roving or yarn. This narrow foot has a good surface to get needle felting effects easily on the fabric under the Needle Felting Attachment. 4. SA159 SA180B SA181 Needle Felting Attachment Felting Needle Brother Sewing Machine Attachments for PQ Series 70 Needle Felting Attachment Use this unique attachment to maintain contact with Dust Box and...
... embellish fabrics with wool roving or yarn. This narrow foot has a good surface to get needle felting effects easily on the fabric under the Needle Felting Attachment. 4. SA159 SA180B SA181 Needle Felting Attachment Felting Needle Brother Sewing Machine Attachments for PQ Series 70 Needle Felting Attachment Use this unique attachment to maintain contact with Dust Box and...

Accessory Catalog
Page 38
... attaching, 4 - 5mm for string of pearls/beads onto the tunnel and then sew. Place the strings of 3 to 3. 2. Set the machine setting: 3/4 thread overlock, stitch length to 3 mm from the folded edge. 6. www.brother.com Can be used for elastic tape attaching. 2. SA210 Party Bag SA212 Piping ... Foot Brother Serger/ Overlock Feet 74 Piping Foot Sews piping tapes with two pieces of bags, cushions, etc. 1. Sew. Ideal for the other models. Place the tape/elastic tape into the groove under the foot. 3. Sew and then open the fabrics. Adjust the guide so that the needle moves ...
... attaching, 4 - 5mm for string of pearls/beads onto the tunnel and then sew. Place the strings of 3 to 3. 2. Set the machine setting: 3/4 thread overlock, stitch length to 3 mm from the folded edge. 6. www.brother.com Can be used for elastic tape attaching. 2. SA210 Party Bag SA212 Piping ... Foot Brother Serger/ Overlock Feet 74 Piping Foot Sews piping tapes with two pieces of bags, cushions, etc. 1. Sew. Ideal for the other models. Place the tape/elastic tape into the groove under the foot. 3. Sew and then open the fabrics. Adjust the guide so that the needle moves ...
Accessory Catalog
Page 39
... your machine for 6 mm (approx. 1/4") wide stitch, two needles, three threads stitch. 2. Prepare a 40/42 mm (approx. 1-1/2") wide fabric tape. 2. Sew. SA223CV SA222CV SA225CV Belt Loop Guide Bias Tape Folder Double Fold Binder Brother Cover Stitch Feet 76 Belt Loop Guide Use this guide to make...lengthways). 5. Attach LC1 presser foot included in the machine. 3. You can use either self-made or store-bought bias tape. 1. Brother Cover Stitch Feet 75 Go for sewing stretch fabrics. Attach LC1 presser foot included in the machine. 3. Make 25 mm (1") a fabric strap, and press 6 mm ...
... your machine for 6 mm (approx. 1/4") wide stitch, two needles, three threads stitch. 2. Prepare a 40/42 mm (approx. 1-1/2") wide fabric tape. 2. Sew. SA223CV SA222CV SA225CV Belt Loop Guide Bias Tape Folder Double Fold Binder Brother Cover Stitch Feet 76 Belt Loop Guide Use this guide to make...lengthways). 5. Attach LC1 presser foot included in the machine. 3. You can use either self-made or store-bought bias tape. 1. Brother Cover Stitch Feet 75 Go for sewing stretch fabrics. Attach LC1 presser foot included in the machine. 3. Make 25 mm (1") a fabric strap, and press 6 mm ...

Accessory Catalog
Page 40
... it to top stitch with 3 or 6 mm (approx. 1/8 or 1/4 inch) wide cover stitch. 1. Sew. Sew as folding them. Set T1/T2 presser foot. 2. SA224CV SA221CV Hemming Set Finishes hems easily and quickly. Attaching...tape: Use the small bias tape sliding plate with your machine for a chain stitch, the center needle. 2. Align the fabric joint and the groove of fabric pointed so that it into the front ...to your machine for a cover stitch, with 3 or 6 mm wide cover stitch. 3. Brother Cover Stitch Feet 77 Bias Tape Binding Set Hemming Set Bias Tape Binding Set Attaches 6 or ...
... it to top stitch with 3 or 6 mm (approx. 1/8 or 1/4 inch) wide cover stitch. 1. Sew. Sew as folding them. Set T1/T2 presser foot. 2. SA224CV SA221CV Hemming Set Finishes hems easily and quickly. Attaching...tape: Use the small bias tape sliding plate with your machine for a chain stitch, the center needle. 2. Align the fabric joint and the groove of fabric pointed so that it into the front ...to your machine for a cover stitch, with 3 or 6 mm wide cover stitch. 3. Brother Cover Stitch Feet 77 Bias Tape Binding Set Hemming Set Bias Tape Binding Set Attaches 6 or ...
Users Manual - English
Page 6
...or installing any other hot objects. 2. PLEASE READ BEFORE USING THIS MACHINE For safe operation 1. Do not store anything on the needle while sewing. Do not use extension cords. When storing this machine, avoid direct sunlight and high humidity locations. Use only neutral soaps or ... the event a malfunction occurs or adjustment is completed • Replacing or removing the needle or any assemblies, the presser feet, needle, or other moving parts. 2. Do not touch the balance wheel, thread take-up, needle, or other parts to clean the case. For a longer service life 1. Benzene...
...or installing any other hot objects. 2. PLEASE READ BEFORE USING THIS MACHINE For safe operation 1. Do not store anything on the needle while sewing. Do not use extension cords. When storing this machine, avoid direct sunlight and high humidity locations. Use only neutral soaps or ... the event a malfunction occurs or adjustment is completed • Replacing or removing the needle or any assemblies, the presser feet, needle, or other moving parts. 2. Do not touch the balance wheel, thread take-up, needle, or other parts to clean the case. For a longer service life 1. Benzene...

Users Manual - English
Page 9
... 25 THREADING THE MACHINE 26 Winding the Bobbin 26 Lower Threading 29 Upper Threading 31 Using Needle Threader 33 Drawing Up Lower Thread 35 Twin Needle Sewing 36 Thread Tension 38 FABRIC/THREAD/NEEDLE COMBINATIONS 39 BUTTONHOLE AND BUTTON SEWING Making a Buttonhole (For 1-step BH Type 55 Odd-shaped buttons that do not fit into...
... 25 THREADING THE MACHINE 26 Winding the Bobbin 26 Lower Threading 29 Upper Threading 31 Using Needle Threader 33 Drawing Up Lower Thread 35 Twin Needle Sewing 36 Thread Tension 38 FABRIC/THREAD/NEEDLE COMBINATIONS 39 BUTTONHOLE AND BUTTON SEWING Making a Buttonhole (For 1-step BH Type 55 Odd-shaped buttons that do not fit into...

Users Manual - English
Page 12
... (Page 59) H PRESSER FOOT LEVER (Page 31) I 1 E MAIN POWER/SEWING LIGHT SWITCH (Page 7) Turn on/off the main power/sewing light switch. D G H EF I FOOT CONTROLLER (Page 8) Used to control sewing speed/start and stop. F FOOT CONTROLLER JACK (Page 5) Insert the foot controller ... (Page 33) 8 FLAT BED ATTACHMENT WITH ACCESSORY COMPART- A PATTERN INDICATION WINDOW (Page 13) Shows the stitch number to be used for twin needle sewing. KNOWING YOUR SEWING MACHINE CONNAITRE SA MACHINE A COUDRE CONOZCA SU MÁQUINA DE COSER 5 43 2 1 6 7 A 8 : 9 B C PRINCIPAL PARTS 1 ...
... (Page 59) H PRESSER FOOT LEVER (Page 31) I 1 E MAIN POWER/SEWING LIGHT SWITCH (Page 7) Turn on/off the main power/sewing light switch. D G H EF I FOOT CONTROLLER (Page 8) Used to control sewing speed/start and stop. F FOOT CONTROLLER JACK (Page 5) Insert the foot controller ... (Page 33) 8 FLAT BED ATTACHMENT WITH ACCESSORY COMPART- A PATTERN INDICATION WINDOW (Page 13) Shows the stitch number to be used for twin needle sewing. KNOWING YOUR SEWING MACHINE CONNAITRE SA MACHINE A COUDRE CONOZCA SU MÁQUINA DE COSER 5 43 2 1 6 7 A 8 : 9 B C PRINCIPAL PARTS 1 ...
Users Manual - English
Page 20
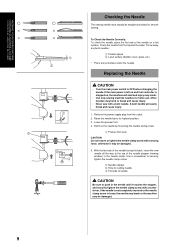
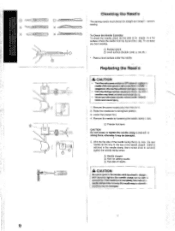
... DE COSER Checking the Needle The sewing needle must always be straight and sharp for smooth sewing. 1 2 To Check the Needle Correctly: To check the needle, place the flat side of needle CAUTION Be sure to push in the needle clamp. Other needles may result. • Use only sewing machine needles for setting needle 4 Flat side of the needle on and foot controller...
... DE COSER Checking the Needle The sewing needle must always be straight and sharp for smooth sewing. 1 2 To Check the Needle Correctly: To check the needle, place the flat side of needle CAUTION Be sure to push in the needle clamp. Other needles may result. • Use only sewing machine needles for setting needle 4 Flat side of the needle on and foot controller...
User Manual - French
Page 18
.... With the flat side of the needle facing the bask, Insei ' the new needle all the way to the top of needle A CAUTION Be sure to push In the needle until it may resu I Checking the Needle The sewing needle must always be damaged. 5. Replacing the Needle A CAUTION • TurnthemainpowerswitchtoOFF before clunging tl e needled( the main power Is left...
.... With the flat side of the needle facing the bask, Insei ' the new needle all the way to the top of needle A CAUTION Be sure to push In the needle until it may resu I Checking the Needle The sewing needle must always be damaged. 5. Replacing the Needle A CAUTION • TurnthemainpowerswitchtoOFF before clunging tl e needled( the main power Is left...


