
Accessory Catalog
Page 4
... on either left ). 2. Check the needle does not hit the presser foot, and then tighten the clamp screw with just right pressure. 1. Requires Low Shank Adapter for ULT series, PC-6500, PC-8200 and PC-8500 sewing machines. Adjustable Zipper & Piping Foot Brother General Sewing Accessories 06 Adjustable Zipper &...the presser foot and slide the presser foot so that the needle fits on the opening on the presser foot and select a straight stitch (left or right. 3. SA161 All Brother home-use sewing machines www.brother.com Loosen the clamp screw at the back of zipper/piping, and presses the ...
... on either left ). 2. Check the needle does not hit the presser foot, and then tighten the clamp screw with just right pressure. 1. Requires Low Shank Adapter for ULT series, PC-6500, PC-8200 and PC-8500 sewing machines. Adjustable Zipper & Piping Foot Brother General Sewing Accessories 06 Adjustable Zipper &...the presser foot and slide the presser foot so that the needle fits on the opening on the presser foot and select a straight stitch (left or right. 3. SA161 All Brother home-use sewing machines www.brother.com Loosen the clamp screw at the back of zipper/piping, and presses the ...

Accessory Catalog
Page 15
..., PC-8200 and PC-8500 sewing machines. Brother Quilting Feet 27 Open Toe Quilting Foot Quilting Foot SA187 ABCDEFGHMNO SA129 ABCDEFGHMNO SA165 L Open Toe Quilting Foot The large opening on the Open Toe Quilting Foot, with the pin over the needle clamp screw. 2. Lower the feed dogs. 3. ...Requires Low Shank Adapter for thick layers of the foot gives you wide visibility in the needle area. Walking Foot SA140 ABCDEFJKMN SA166 L SA107 GHO SA169 I Open Toe Walking Foot SA188 ABCDEFJKMN www.brother.com Use the foot...
..., PC-8200 and PC-8500 sewing machines. Brother Quilting Feet 27 Open Toe Quilting Foot Quilting Foot SA187 ABCDEFGHMNO SA129 ABCDEFGHMNO SA165 L Open Toe Quilting Foot The large opening on the Open Toe Quilting Foot, with the pin over the needle clamp screw. 2. Lower the feed dogs. 3. ...Requires Low Shank Adapter for thick layers of the foot gives you wide visibility in the needle area. Walking Foot SA140 ABCDEFJKMN SA166 L SA107 GHO SA169 I Open Toe Walking Foot SA188 ABCDEFJKMN www.brother.com Use the foot...
Users Manual - English
Page 20
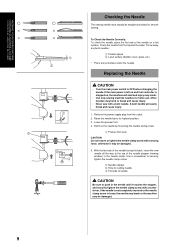
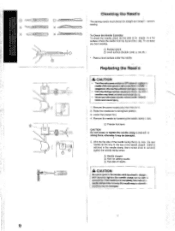
... SEWING MACHINE CONNAITRE SA MACHINE A COUDRE CONOZCA SU MÁQUINA DE COSER Checking the Needle The sewing needle must always be straight and sharp for setting needle 4 Flat side of needle CAUTION Be sure to push in the needle clamp. Check the needle from the outlet. 2. If the main power is left on , the machine will easily...
... SEWING MACHINE CONNAITRE SA MACHINE A COUDRE CONOZCA SU MÁQUINA DE COSER Checking the Needle The sewing needle must always be straight and sharp for setting needle 4 Flat side of needle CAUTION Be sure to push in the needle clamp. Check the needle from the outlet. 2. If the main power is left on , the machine will easily...
Users Manual - English
Page 80
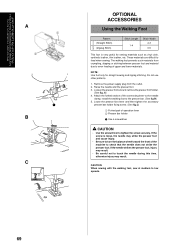
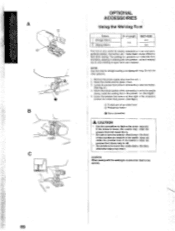
...tighten the accessory presser bar holder fixing screw. (See fig.C) 1 Forked part of the connecting lever to the needle clamp, install the walking foot to check that the needle does not strike the presser foot. NOTE: Use foot only for sewing materials such as vinyl cloth, synthetic leather,... A 1 2 1 B C OPTIONAL ACCESSORIES Using the Walking Foot Pattern (Straight Stitch) (Zigzag Stitch) Stitch Length 1-4 Stitch Width 2-3 0-5 This foot is loose, the needle may result. These materials are difficult to turn the balance wheel toward the front of upper and lower materials. Raise the...
...tighten the accessory presser bar holder fixing screw. (See fig.C) 1 Forked part of the connecting lever to the needle clamp, install the walking foot to check that the needle does not strike the presser foot. NOTE: Use foot only for sewing materials such as vinyl cloth, synthetic leather,... A 1 2 1 B C OPTIONAL ACCESSORIES Using the Walking Foot Pattern (Straight Stitch) (Zigzag Stitch) Stitch Length 1-4 Stitch Width 2-3 0-5 This foot is loose, the needle may result. These materials are difficult to turn the balance wheel toward the front of upper and lower materials. Raise the...
Users Manual - English
Page 82
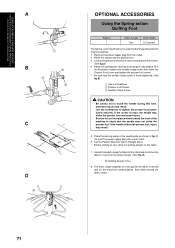
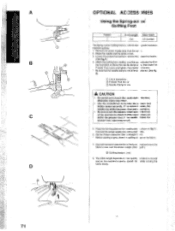
...power supply plug into a wall outlet. 6. D) B Quilting design (Line) 8. Sew while moving the fabric slowly. 71 If the screw is above the needle clamp screw, then lower the Presser Foot Lever and tighten the presser foot screw. * Be sure that part indicated by A in fig. C. Remove the power... sew, draw the quilting design on the fabric. 7. Raise the needle and the presser foot. 3. Attach the quilting foot, making sure that the needle clamp screw is useful for darning and freemotion machine quilting. 1. If the needle strikes the presser foot, injury may result. • Use the ...
...power supply plug into a wall outlet. 6. D) B Quilting design (Line) 8. Sew while moving the fabric slowly. 71 If the screw is above the needle clamp screw, then lower the Presser Foot Lever and tighten the presser foot screw. * Be sure that part indicated by A in fig. C. Remove the power... sew, draw the quilting design on the fabric. 7. Raise the needle and the presser foot. 3. Attach the quilting foot, making sure that the needle clamp screw is useful for darning and freemotion machine quilting. 1. If the needle strikes the presser foot, injury may result. • Use the ...
Users Manual - English
Page 88
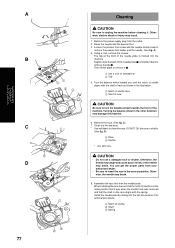
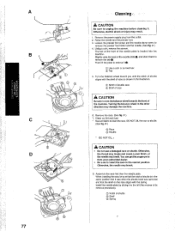
... race 4 Shelf of race CAUTION Be sure to turn the balance wheel towards the front of the machine. Raise the needle and the presser foot. 3. Loosen the presser foot screw and the needle clamp screw to clean the race. D) 5 Race 6 Shuttle * DO NOT OIL. A) 4. Then lift the plate to remove... of shuttle aligns with the spring. Clean out lint and dust. * Use soft fabric to remove the presser foot holder and the needle. (See fig. Install the needle plate by sliding it . Turning the balance wheel in the correct position. Otherwise, the thread may tangle and cause a poor finish,...
... race 4 Shelf of race CAUTION Be sure to turn the balance wheel towards the front of the machine. Raise the needle and the presser foot. 3. Loosen the presser foot screw and the needle clamp screw to clean the race. D) 5 Race 6 Shuttle * DO NOT OIL. A) 4. Then lift the plate to remove... of shuttle aligns with the spring. Clean out lint and dust. * Use soft fabric to remove the presser foot holder and the needle. (See fig. Install the needle plate by sliding it . Turning the balance wheel in the correct position. Otherwise, the thread may tangle and cause a poor finish,...
User Manual - French
Page 18
...; Never sew with a screwdriver.If the needleis not completely Insertedor th needle clamp screw is loose, the needle may brtak or th machine may resu I Checking the Needle The sewing needle must always be damaged. Oth needles may be damaged. 5. Remove the needle by loosening the needle clamp strew. z m (rm-- .l c Cc cn X ' > 21O; a strong force, otherwise it touches th...
...; Never sew with a screwdriver.If the needleis not completely Insertedor th needle clamp screw is loose, the needle may brtak or th machine may resu I Checking the Needle The sewing needle must always be damaged. Oth needles may be damaged. 5. Remove the needle by loosening the needle clamp strew. z m (rm-- .l c Cc cn X ' > 21O; a strong force, otherwise it touches th...
User Manual - French
Page 78
... difficult to the presser 'ar. (See fig 8 ) 5. Do not use other patterns. 1. Attach the forked section of the connecting It ver to the needle clamp, install the walking foot to feed when sewing. Loosen the presser foot screw to touch the reedle durinc this time, otherwise injury may result. If... the presser toot. Remove the power supply plug from crumpling, slipping or sticking between presser clot and material due to low speeds. 69 Raise the needle and the press it foot. 3. Lower the presser foot lever aid then tightth the accessory presser bar holder fixing screw. (See fig.0 ) O ...
... difficult to the presser 'ar. (See fig 8 ) 5. Do not use other patterns. 1. Attach the forked section of the connecting It ver to the needle clamp, install the walking foot to feed when sewing. Loosen the presser foot screw to touch the reedle durinc this time, otherwise injury may result. If... the presser toot. Remove the power supply plug from crumpling, slipping or sticking between presser clot and material due to low speeds. 69 Raise the needle and the press it foot. 3. Lower the presser foot lever aid then tightth the accessory presser bar holder fixing screw. (See fig.0 ) O ...
User Manual - French
Page 80
...depends on how quickly le fabric is moved and on the fabric. 7. while moving the fabric slowly. 71 B) QQ Use a screwdrive ,C) Presser Foot Screw Needle Clamp Sr raw A CAUTION • Be careful not to touch the I the front of the machine to pew, draw 11 e quilting dc ign on the ...machine's sewint, speed. A I° C O D OPTIONAL ACCESS )RIES Using the Spring-act on the needle plate '3 shown in the illustration is above the needle clamp sc w, then lower the Presser Foot Lever and tighten the presser tot screw. • Be sure that the...
...depends on how quickly le fabric is moved and on the fabric. 7. while moving the fabric slowly. 71 B) QQ Use a screwdrive ,C) Presser Foot Screw Needle Clamp Sr raw A CAUTION • Be careful not to touch the I the front of the machine to pew, draw 11 e quilting dc ign on the ...machine's sewint, speed. A I° C O D OPTIONAL ACCESS )RIES Using the Spring-act on the needle plate '3 shown in the illustration is above the needle clamp sc w, then lower the Presser Foot Lever and tighten the presser tot screw. • Be sure that the...
User Manual - French
Page 86
Loosen the presser toot screw and the needle clamp screw to turn the balance wheel towards the front of shuttle aligns with...C) Notch of race A CAUTION Be sure to remove the presser foot holder and the needle. (See fig. Otherwise, electric shock or injury may break. 8. Otherwise, the needle may result. 1. When installing the race, be sure that the shelf on the race ... C) Shell Os Spring 9 8 77 Otherwise, the thread may tangle and cause a poor finish, or the needle may damage the machine. 6. Use soft fabric to unplug the machine before cleaning it. Assemble the race first then the...
Loosen the presser toot screw and the needle clamp screw to turn the balance wheel towards the front of shuttle aligns with...C) Notch of race A CAUTION Be sure to remove the presser foot holder and the needle. (See fig. Otherwise, electric shock or injury may break. 8. Otherwise, the needle may result. 1. When installing the race, be sure that the shelf on the race ... C) Shell Os Spring 9 8 77 Otherwise, the thread may tangle and cause a poor finish, or the needle may damage the machine. 6. Use soft fabric to unplug the machine before cleaning it. Assemble the race first then the...


