
Users Manual - English
Page 6
... 3. For a longer service life 1. For repair or adjustment In the event a malfunction occurs or adjustment is completed • Replacing or removing the needle or any assemblies, the presser feet, needle, or other moving parts. 2. Remember to turn off the power switch and unplug the cord when: • Operation is required, first follow the...Benzene, thinner, and scouring powders can damage the case and machine, and should never be used. 3. Do not touch the balance wheel, thread take-up, needle, or other parts to inspect and adjust the machine yourself. Do not store anything on the...
... 3. For a longer service life 1. For repair or adjustment In the event a malfunction occurs or adjustment is completed • Replacing or removing the needle or any assemblies, the presser feet, needle, or other moving parts. 2. Remember to turn off the power switch and unplug the cord when: • Operation is required, first follow the...Benzene, thinner, and scouring powders can damage the case and machine, and should never be used. 3. Do not touch the balance wheel, thread take-up, needle, or other parts to inspect and adjust the machine yourself. Do not store anything on the...
Users Manual - English
Page 88
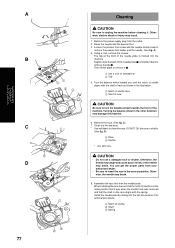
...5 D 6 7 Cleaning CAUTION Be sure to remove the presser foot holder and the needle. (See fig. Then lift the plate to clean the race. Clean out lint and dust. * Use soft fabric to remove it . Assemble the race first then the needle plate. Turn the balance wheel toward you until the notch of the... machine. You can get the proper parts from the outlet. 2. Install the needle plate by sliding it was when the shuttle hook was removed...
...5 D 6 7 Cleaning CAUTION Be sure to remove the presser foot holder and the needle. (See fig. Then lift the plate to clean the race. Clean out lint and dust. * Use soft fabric to remove it . Assemble the race first then the needle plate. Turn the balance wheel toward you until the notch of the... machine. You can get the proper parts from the outlet. 2. Install the needle plate by sliding it was when the shuttle hook was removed...
User Manual - French
Page 62
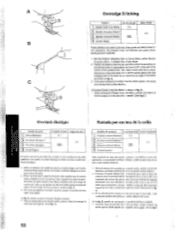
...point .., $. (Plisse Elastique) (Overlock dinsrique)* (Overlock dlasriquc i 4 (Point Peigne) Litigiicor de poilli Lnrgetti.dc point F-3 3-5 ES-fl Cox points servenI h assembler tics coat tires ei t les tennincr en tine settle opdration. A. 3. La Fig. The Elastic Overt )ck Stitches are used to faille du point, cooper l ... A . B When sewing the Elastic Overlock Stitch, position the fabric so that the seamline (or arrowhead point) is on the left of till needle. (See fig.0 ) C-o >-4 -c to the left of the center of the fabric as this allows the right (zigzag) side of the ...
...point .., $. (Plisse Elastique) (Overlock dinsrique)* (Overlock dlasriquc i 4 (Point Peigne) Litigiicor de poilli Lnrgetti.dc point F-3 3-5 ES-fl Cox points servenI h assembler tics coat tires ei t les tennincr en tine settle opdration. A. 3. La Fig. The Elastic Overt )ck Stitches are used to faille du point, cooper l ... A . B When sewing the Elastic Overlock Stitch, position the fabric so that the seamline (or arrowhead point) is on the left of till needle. (See fig.0 ) C-o >-4 -c to the left of the center of the fabric as this allows the right (zigzag) side of the ...
User Manual - French
Page 86
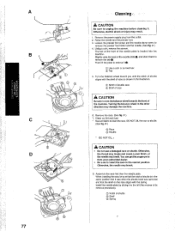
...shuttle hook was removed and that the notch of shuttle is hooked into the machine. Assemble the race first then the needle plate. Install the needle plate by sliding it to the left (the reverse of the needle plate and slide it . Otherwise, electric shock or injury may break. C) Use ...the spring. A ) 4. a Slightly raise the back of its removal procedure). Otherwise, the thread may tangle and cause a poor finish, or the needle may result. 1. Remove the power supply plug from your authorized dealer. • Be sure to turn the balance wheel towards the front of shuttle C)...
...shuttle hook was removed and that the notch of shuttle is hooked into the machine. Assemble the race first then the needle plate. Install the needle plate by sliding it to the left (the reverse of the needle plate and slide it . Otherwise, electric shock or injury may break. C) Use ...the spring. A ) 4. a Slightly raise the back of its removal procedure). Otherwise, the thread may tangle and cause a poor finish, or the needle may result. 1. Remove the power supply plug from your authorized dealer. • Be sure to turn the balance wheel towards the front of shuttle C)...


