

Accessory Catalog
Page 13
... evenly spaced by trying different combinations of stitching and use that to slide the fabric from left into gathers or tucks. www.brother.com A specially designed bobbin cover is Project Book (See pages 16 and 17 for most consistent results. The ruffling blade on lightweight fabric. Move fabric about ...For five grooves: SA162 IP This presser foot does not include the bobbin cover. Adjust the amount of tuck or gather by placing the completed row in the center position. 3. Sew slowly for details.) Brother Embellishment Feet Pin Tuck Foot 24 Ruffler Foot Pin Tuck Foot This ...
... evenly spaced by trying different combinations of stitching and use that to slide the fabric from left into gathers or tucks. www.brother.com A specially designed bobbin cover is Project Book (See pages 16 and 17 for most consistent results. The ruffling blade on lightweight fabric. Move fabric about ...For five grooves: SA162 IP This presser foot does not include the bobbin cover. Adjust the amount of tuck or gather by placing the completed row in the center position. 3. Sew slowly for details.) Brother Embellishment Feet Pin Tuck Foot 24 Ruffler Foot Pin Tuck Foot This ...
Users Manual - English
Page 1
...of burns, fire, electric shock, or injury to the nearest authorized dealer or service center for use as threading needle, changing needle, threading bobbin, or changing the presser foot, and the like. 15. Return the machine to persons: 1. Never drop or insert any object into water... without supervision. 17. Switch the machine to the symbol "O" position which represents off, then remove plug from the electrical outlet when removing covers, lubricating, or when making any air openings blocked. "SAVE THESE INSTRUCTIONS" "This machine is not working properly, if it has been dropped...
...of burns, fire, electric shock, or injury to the nearest authorized dealer or service center for use as threading needle, changing needle, threading bobbin, or changing the presser foot, and the like. 15. Return the machine to persons: 1. Never drop or insert any object into water... without supervision. 17. Switch the machine to the symbol "O" position which represents off, then remove plug from the electrical outlet when removing covers, lubricating, or when making any air openings blocked. "SAVE THESE INSTRUCTIONS" "This machine is not working properly, if it has been dropped...
Users Manual - English
Page 20
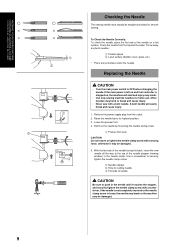
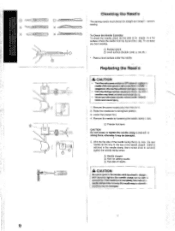
... needle on , the machine will easily break and cause injury. 1 1. Check the needle from the outlet. 2. Throw away any bent needles. 1 Parallel space 2 Level surface (bobbin cover, glass, etc.) * Place a level surface under the needle. A bent needle will start and injury may bend or break and cause injury. • Never sew with...
... needle on , the machine will easily break and cause injury. 1 1. Check the needle from the outlet. 2. Throw away any bent needles. 1 Parallel space 2 Level surface (bobbin cover, glass, etc.) * Place a level surface under the needle. A bent needle will start and injury may bend or break and cause injury. • Never sew with...
Users Manual - English
Page 40
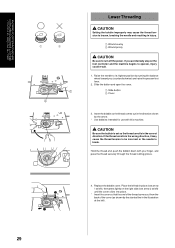
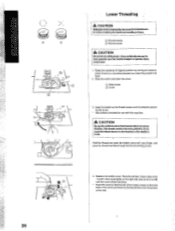
... may cause the thread tension to loosen, breaking the needle and resulting in the correct direction. Hold the thread end, push the bobbin down with this machine. Replace the bobbin cover. Slide the button and open the cover. 1 Slide button 2 Cover 3. If you accidentally step on the right side (see arrow 2 at left) until the...
... may cause the thread tension to loosen, breaking the needle and resulting in the correct direction. Hold the thread end, push the bobbin down with this machine. Replace the bobbin cover. Slide the button and open the cover. 1 Slide button 2 Cover 3. If you accidentally step on the right side (see arrow 2 at left) until the...
User Manual - French
Page 18
... until it may resu I Checking the Needle The sewing needle must always be damaged. 5. Th ow away any bent needles. 0) Parallel space CO Level surface (bobbin cover, g ass, etc ) " Place a level surface under the needle. stepped on and foot a introtter ; z m (rm-- .l c Cc cn X ' > 21O...
... until it may resu I Checking the Needle The sewing needle must always be damaged. 5. Th ow away any bent needles. 0) Parallel space CO Level surface (bobbin cover, g ass, etc ) " Place a level surface under the needle. stepped on and foot a introtter ; z m (rm-- .l c Cc cn X ' > 21O...
User Manual - French
Page 38
... in the direction shown by the slanted line in the illustration • at the left). 29 Hold the thread end, push the bobbin down with this machine. Replace the bobbin cover. r 4. Place the left tab in injury. Ityouaccidentallysteponthe foot controller and the machine begins to loosen, breaking the needle and resulting in place...
... in the direction shown by the slanted line in the illustration • at the left). 29 Hold the thread end, push the bobbin down with this machine. Replace the bobbin cover. r 4. Place the left tab in injury. Ityouaccidentallysteponthe foot controller and the machine begins to loosen, breaking the needle and resulting in place...


