
Accessory Catalog
Page 16
...with Windows 98 or later. Comes with a USB card writer and blank memory card and is compatible with PE-DESIGN 5.0, 6.0 & 7.0. SAVR8.0 Upgrade kit is designed for the individual that needs more than PED-BASIC®'s downloading capability but doesn't need all of the top end features of embroidery... you obtain or purchase .pes embroidery designs from the Internet with Windows 2000 or later. Master basic digitizing and embroidery design work with Brother's easy to embroidery software? PE-DESIGN® Lite is compatible with Windows 2000 or later. PED-BASIC® lets you to use...
...with Windows 98 or later. Comes with a USB card writer and blank memory card and is compatible with PE-DESIGN 5.0, 6.0 & 7.0. SAVR8.0 Upgrade kit is designed for the individual that needs more than PED-BASIC®'s downloading capability but doesn't need all of the top end features of embroidery... you obtain or purchase .pes embroidery designs from the Internet with Windows 2000 or later. Master basic digitizing and embroidery design work with Brother's easy to embroidery software? PE-DESIGN® Lite is compatible with Windows 2000 or later. PED-BASIC® lets you to use...

Installation Guide English - English
Page 4
...of your preferred language. Then, use the CERTIFICATION key within the disc and selecting either file listed to activate the upgrade application for KIT I on the "manual" folder and selecting your preferred language. Note • For details on proper use the Certification...) Contents of CD-ROM • Certification Key Issuing Wizard • Upgrade KIT I Operation Manual (PDF) * Adobe Reader is required for viewing and printing the Operation Manual. • Upgrade application for KIT I Note • Upgrade application data is contained in the "NV6000D(US)", "NV6000D(Canada)" or...
...of your preferred language. Then, use the CERTIFICATION key within the disc and selecting either file listed to activate the upgrade application for KIT I on the "manual" folder and selecting your preferred language. Note • For details on proper use the Certification...) Contents of CD-ROM • Certification Key Issuing Wizard • Upgrade KIT I Operation Manual (PDF) * Adobe Reader is required for viewing and printing the Operation Manual. • Upgrade application for KIT I Note • Upgrade application data is contained in the "NV6000D(US)", "NV6000D(Canada)" or...

Installation Guide English - English
Page 5
... the label attached to view files. 3 Note • If the procedure described below is not fully completed, your sewing machine to KIT I . • Access to the Internet is recorded accurately as ® and ™ are registered trademarks of Microsoft Corporation in ... countries. * "Windows", "Windows Vista", and "Windows 7", are not exhibited clearly within the Certification Key Issuing Wizard in order to upgrade the sewing machine) * "IBM" is a registered trademark of the Settings screen. ENGLISH Computer Requirements Before starting the Certification Key Issuing Wizard...
... the label attached to view files. 3 Note • If the procedure described below is not fully completed, your sewing machine to KIT I . • Access to the Internet is recorded accurately as ® and ™ are registered trademarks of Microsoft Corporation in ... countries. * "Windows", "Windows Vista", and "Windows 7", are not exhibited clearly within the Certification Key Issuing Wizard in order to upgrade the sewing machine) * "IBM" is a registered trademark of the Settings screen. ENGLISH Computer Requirements Before starting the Certification Key Issuing Wizard...

Installation Guide English - English
Page 6
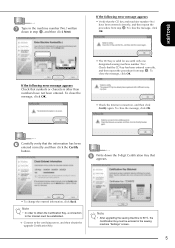
If the following procedure can be used in place of the number "0"? → KIT I " been entered in place of the number "1"? • Has the uppercase letter "O" been entered in the CD Key. 4 Memo • To help eliminate any confusion ... the desired language, and then click OK. c Open the designated drive for possible entry error(s). Type the path to the CD-ROM envelope of the upgrade kit, and then click Next. e Carefully read the information that appears, and then click Next. Memo • The following error message appears Check below list for...
If the following procedure can be used in place of the number "0"? → KIT I " been entered in place of the number "1"? • Has the uppercase letter "O" been entered in the CD Key. 4 Memo • To help eliminate any confusion ... the desired language, and then click OK. c Open the designated drive for possible entry error(s). Type the path to the CD-ROM envelope of the upgrade kit, and then click Next. e Carefully read the information that appears, and then click Next. Memo • The following error message appears Check below list for...
Installation Guide English - English
Page 7
...procedure from step c. Note • In order to obtain the Certification Key, a connection to the certifying server, and then obtain the upgrade Certification Key. To close the message, click OK. • Check the Internet connection, and then click Certify again. If the following error... message appears Check that appears. • To change the entered information, click Back. Note • After upgrading the sewing machine to KIT I, the Certification Key must be established. → Connect to the Internet must be entered in step a, and then click Next....
...procedure from step c. Note • In order to obtain the Certification Key, a connection to the certifying server, and then obtain the upgrade Certification Key. To close the message, click OK. • Check the Internet connection, and then click Certify again. If the following error... message appears Check that appears. • To change the entered information, click Back. Note • After upgrading the sewing machine to KIT I, the Certification Key must be established. → Connect to the Internet must be entered in step a, and then click Next....

Installation Guide English - English
Page 8
...) from the CD-ROM to the USB media. m Press . Use USB media or a computer to install the upgrade application for KIT I to the instructions that follow. n Insert the USB media into the primary (top) USB port connector on the sewing machine. If ...(US)", "NV6000D(Canada)" or "NV1" folder. Note • Upgrade application data is to be used , refer to perform the installation k While pressing the "Automatic Threading" button, turn the sewing machine on the media. j Click Finish. l Copy Upgrade application for KIT I on the machine. 6 When using USB media to page 7....
...) from the CD-ROM to the USB media. m Press . Use USB media or a computer to install the upgrade application for KIT I to the instructions that follow. n Insert the USB media into the primary (top) USB port connector on the sewing machine. If ...(US)", "NV6000D(Canada)" or "NV1" folder. Note • Upgrade application data is to be used , refer to perform the installation k While pressing the "Automatic Threading" button, turn the sewing machine on the media. j Click Finish. l Copy Upgrade application for KIT I on the machine. 6 When using USB media to page 7....

Installation Guide English - English
Page 10
... has been completed. (If an error occurs, a message will appear in red.) 8 Note • Upgrade application data is contained in the Settings screen. o Press . q Turn the sewing machine off, then on the sewing machine LCD screen. s Press in the... "NV6000D(US)", "NV6000D(Canada)" or "NV1" folder. Note • When the message "Upgrade complete." p Unplug the USB cable. message appears on again. appears, installation of the Settings screen. Do not disconnect the USB cable". Select the appropriate folder...
... has been completed. (If an error occurs, a message will appear in red.) 8 Note • Upgrade application data is contained in the Settings screen. o Press . q Turn the sewing machine off, then on the sewing machine LCD screen. s Press in the... "NV6000D(US)", "NV6000D(Canada)" or "NV1" folder. Note • When the message "Upgrade complete." p Unplug the USB cable. message appears on again. appears, installation of the Settings screen. Do not disconnect the USB cable". Select the appropriate folder...

Installation Guide English - English
Page 12
You may also view the Operation Manual or New Features of Version 2 by clicking on the "manual_index.pdf" icon contained within the disc and selecting either file listed to the side of the upgraded functions, see the Operation Manual viewable from the disc by clicking on the "manual" folder and selecting your preferred language. 10 w Confirm that there is a check mark beside "KIT I" in the Settings screen. • The "KIT I" has been successfully certified. Note • For details of your preferred language.
You may also view the Operation Manual or New Features of Version 2 by clicking on the "manual_index.pdf" icon contained within the disc and selecting either file listed to the side of the upgraded functions, see the Operation Manual viewable from the disc by clicking on the "manual" folder and selecting your preferred language. 10 w Confirm that there is a check mark beside "KIT I" in the Settings screen. • The "KIT I" has been successfully certified. Note • For details of your preferred language.

Operation Manual Kit 1 - English
Page 1
Upgrade KITI Operation Manual Before using this upgrade kit, be sure to read this Operation Manual for information on its correct use.
Upgrade KITI Operation Manual Before using this upgrade kit, be sure to read this Operation Manual for information on its correct use.
Operation Manual Kit 1 - English
Page 2
... SIZE WHILE MAINTAINING THE DESIRED THREAD DENSITY (STITCH RECALCULATOR)...23 NEW PATTERNS...25 Thumbnail List ...25 Embroidery Patterns Color Change Table 26 Before using this upgrade kit, be sure to read this Operation Manual for information on its correct use. 1
... SIZE WHILE MAINTAINING THE DESIRED THREAD DENSITY (STITCH RECALCULATOR)...23 NEW PATTERNS...25 Thumbnail List ...25 Embroidery Patterns Color Change Table 26 Before using this upgrade kit, be sure to read this Operation Manual for information on its correct use. 1
Operation Manual Kit 1 - English
Page 3
NEW FEATURES The following features will be activated with the upgrade for Kit I. • The bobbin case (gray) and bobbin cover (for bobbin work have been added so bobbin work embroidery patterns or sew using decorative thread or ... instructions are included, allowing you to embroider the added bobbin work can immediately be aligned while displaying the fabric being used as outlined in this upgrade Operation Manual. Embroidery can easily be positioned. (page 20) • Embroidery patterns can be enlarged or reduced while maintaining their thread density. (page 23) •...
NEW FEATURES The following features will be activated with the upgrade for Kit I. • The bobbin case (gray) and bobbin cover (for bobbin work have been added so bobbin work embroidery patterns or sew using decorative thread or ... instructions are included, allowing you to embroider the added bobbin work can immediately be aligned while displaying the fabric being used as outlined in this upgrade Operation Manual. Embroidery can easily be positioned. (page 20) • Embroidery patterns can be enlarged or reduced while maintaining their thread density. (page 23) •...
Operation Manual Kit 2 - English
Page 4
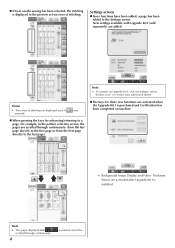
...displayed even if was pressed. „„The keys for these new functions are activated when the Upgrade Kit I is purchased and Certification has been completed on Upgrade Kit I is pressed cannot be Note • The pages displayed after scrolled through continuously (from the...last page). →→ Background Image Display and Fabric Thickness Sensor are activated after Upgrade Kit I , visit our website "www. New settings available with Upgrade Kit I (sold separately) are added. brother.com" or contact your authorized dealer. „„If twin needle sewing has been ...
...displayed even if was pressed. „„The keys for these new functions are activated when the Upgrade Kit I is purchased and Certification has been completed on Upgrade Kit I is pressed cannot be Note • The pages displayed after scrolled through continuously (from the...last page). →→ Background Image Display and Fabric Thickness Sensor are activated after Upgrade Kit I , visit our website "www. New settings available with Upgrade Kit I (sold separately) are added. brother.com" or contact your authorized dealer. „„If twin needle sewing has been ...

KIT 2 USER - English
Page 2
... Media 10 Displaying The Grid ...11 Other New Features ...12 New Patterns for Version 2 15 NEW PATTERNS FOR KIT II ...16 Thumbnail List ...16 Color Change Table for the Embroidery Patterns on the CD-ROM 17 Before using this upgrade kit, be sure to read this Operation Manual for information for proper use. 1
... Media 10 Displaying The Grid ...11 Other New Features ...12 New Patterns for Version 2 15 NEW PATTERNS FOR KIT II ...16 Thumbnail List ...16 Color Change Table for the Embroidery Patterns on the CD-ROM 17 Before using this upgrade kit, be sure to read this Operation Manual for information for proper use. 1

KIT 2 USER - English
Page 15
Note • For details on Upgrade Kits, visit our website " www.brother.com " or contact your authorized Brother dealer. ■ The keys for these new functions are activated when the Upgrade Kit I is installed and certified. 14 Settings screen ■ Since functions have been added, a page has been added to the Settings screen. New settings available with Upgrade Kit (sold separately) are activated after Upgrade Kit I is purchased and Certification has been completed on machine. → Background Image Display and the Fabric Thickness Sensor are added.
Note • For details on Upgrade Kits, visit our website " www.brother.com " or contact your authorized Brother dealer. ■ The keys for these new functions are activated when the Upgrade Kit I is installed and certified. 14 Settings screen ■ Since functions have been added, a page has been added to the Settings screen. New settings available with Upgrade Kit (sold separately) are activated after Upgrade Kit I is purchased and Certification has been completed on machine. → Background Image Display and the Fabric Thickness Sensor are added.

MY CUSTOM DESIGN - English
Page 3
... desired colors as easily as drawing images and text on the screen, and then embroider it can write your sewing machine or with the purchasable upgrade kit, makes this software Lines of the sewing machine or the tablet and painting the drawing with fill stitches. Until now, you have a favorite picture, it...
... desired colors as easily as drawing images and text on the screen, and then embroider it can write your sewing machine or with the purchasable upgrade kit, makes this software Lines of the sewing machine or the tablet and painting the drawing with fill stitches. Until now, you have a favorite picture, it...

INSTALLATION KIT 2 - Multi
Page 4
... For details on the "manual" folder and selecting your sewing machine. Accessories The following .) Note • Upgrade application data is contained in the Settings screen of the internal machine identification number (No.). [Step 2] Insert the CD-ROM into the computer's CD-ROM drive, and ...then start the Certification Key Issuing Wizard. [Step 3] Follow the wizard instructions for obtaining the Certification Key. [Step 4] Install the upgrade application for KIT II on ...
... For details on the "manual" folder and selecting your sewing machine. Accessories The following .) Note • Upgrade application data is contained in the Settings screen of the internal machine identification number (No.). [Step 2] Insert the CD-ROM into the computer's CD-ROM drive, and ...then start the Certification Key Issuing Wizard. [Step 3] Follow the wizard instructions for obtaining the Certification Key. [Step 4] Install the upgrade application for KIT II on ...

INSTALLATION KIT 2 - Multi
Page 7
...and "I " been entered in place of the number "1"? • Has the uppercase letter "O" been entered in place of the upgrade kit, and then click Next. h Type in the internal machine identification number (No.) written down in step a, and then click Next. ENGLISH g Type in the 15-digit CD key ...found on the label attached to the certifying server, and then obtain the upgrade Certification Key. 5 If the following error...
...and "I " been entered in place of the number "1"? • Has the uppercase letter "O" been entered in place of the upgrade kit, and then click Next. h Type in the internal machine identification number (No.) written down in step a, and then click Next. ENGLISH g Type in the 15-digit CD key ...found on the label attached to the certifying server, and then obtain the upgrade Certification Key. 5 If the following error...

INSTALLATION KIT 3 - Multi
Page 4
... 4 inches) This frame is required for viewing and printing the Operation Manual. • Upgrade application for using the pattern connecting function. Contents of CD-ROM • Certification Key Issuing Wizard • Upgrade KIT III Operation Manual (PDF) * Adobe Reader is useful for embroidering repeated patterns since the ...USA)", "NV6000D_NV6700D(CAN)" or "NV1_NV1e" folder. Also, the embroidery positioning stickers and white stickers (solid) are necessary for KIT III • 10 embroidery patterns Note • Upgrade application data is missing or damaged, contact your purchase.
... 4 inches) This frame is required for viewing and printing the Operation Manual. • Upgrade application for using the pattern connecting function. Contents of CD-ROM • Certification Key Issuing Wizard • Upgrade KIT III Operation Manual (PDF) * Adobe Reader is useful for embroidering repeated patterns since the ...USA)", "NV6000D_NV6700D(CAN)" or "NV1_NV1e" folder. Also, the embroidery positioning stickers and white stickers (solid) are necessary for KIT III • 10 embroidery patterns Note • Upgrade application data is missing or damaged, contact your purchase.

INSTALLATION KIT 3 - Multi
Page 7
...Has the uppercase letter "I " are used in the CD Key. Note • If the displayed version has already been installed in place of the upgrade kit, and then click Next. Memo • To help eliminate any confusion between the number "0" and the uppercase letter "O" or "1" and the uppercase...uppercase letter "O" been entered in the machine, click Next to the CD-ROM envelope of the number "0"? If the latest upgrade file is the latest upgrade file the following error message appears Check below list for the latest program on your computer. ENGLISH f The Wizard checks for...
...Has the uppercase letter "I " are used in the CD Key. Note • If the displayed version has already been installed in place of the upgrade kit, and then click Next. Memo • To help eliminate any confusion between the number "0" and the uppercase letter "O" or "1" and the uppercase...uppercase letter "O" been entered in the machine, click Next to the CD-ROM envelope of the number "0"? If the latest upgrade file is the latest upgrade file the following error message appears Check below list for the latest program on your computer. ENGLISH f The Wizard checks for...

KIT 3 USER MANUAL - English
Page 44
Note • For details on machine. Settings screen ■ Since functions have been added, a page has been added to the Settings screen. New settings available with Upgrade Kit (sold separately) are added. ■ The keys for these new functions are activated when the Upgrade Kit I is purchased and Certification has been completed on Upgrade Kits, visit our website " www.brother.com " or contact your authorized Brother dealer. → Background Image Display and Fabric Thickness Sensor are activated after Upgrade Kit I is installed and certified. 43
Note • For details on machine. Settings screen ■ Since functions have been added, a page has been added to the Settings screen. New settings available with Upgrade Kit (sold separately) are added. ■ The keys for these new functions are activated when the Upgrade Kit I is purchased and Certification has been completed on Upgrade Kits, visit our website " www.brother.com " or contact your authorized Brother dealer. → Background Image Display and Fabric Thickness Sensor are activated after Upgrade Kit I is installed and certified. 43


