

Users Manual - English
Page 358
... is available on "http://solutions.brother.com", please download the files following screen will differ depending on the USB media). 344 Memo • When the machine's software is saved on the machine. b Press . Upgrade Procedure Using USB Media c Insert the USB ...port for your sewing machine. The media device should only contain the upgrade file. o The following the instructions on the LCD. UPGRADING YOUR MACHINE'S SOFTWARE UPGRADING YOUR MACHINE'S SOFTWARE You can use USB media or a computer to upgrade. Note • When using USB media to upgrade the software, ...
... is available on "http://solutions.brother.com", please download the files following screen will differ depending on the USB media). 344 Memo • When the machine's software is saved on the machine. b Press . Upgrade Procedure Using USB Media c Insert the USB ...port for your sewing machine. The media device should only contain the upgrade file. o The following the instructions on the LCD. UPGRADING YOUR MACHINE'S SOFTWARE UPGRADING YOUR MACHINE'S SOFTWARE You can use USB media or a computer to upgrade. Note • When using USB media to upgrade the software, ...

Users Manual - English
Page 372
...stitch width 66 , thread tension 67 227 thread trimming 230 Sewing key 290 Sewing machine help key 32 Sewing speed controller (speed control slide 1, 3, 60 Sewing type selection key 34 Shelltuck stitches 114 Side cutter 96 Single/Repeat sewing key 158 Single/Triple stitching key 318 , Size key 236...cover 1 Top stitching 116 Touch pen 279 317, 329 holder 1 Trial key 209 Troubleshooting 330 Twin needle 49 U Uninterrupted embroidering 243 Upgrading 344 Upper threading twin needle mode 49 using the "Automatic Threading" button 46 using the spool net 53 USB cable 19, 175, 220...
...stitch width 66 , thread tension 67 227 thread trimming 230 Sewing key 290 Sewing machine help key 32 Sewing speed controller (speed control slide 1, 3, 60 Sewing type selection key 34 Shelltuck stitches 114 Side cutter 96 Single/Repeat sewing key 158 Single/Triple stitching key 318 , Size key 236...cover 1 Top stitching 116 Touch pen 279 317, 329 holder 1 Trial key 209 Troubleshooting 330 Twin needle 49 U Uninterrupted embroidering 243 Upgrading 344 Upper threading twin needle mode 49 using the "Automatic Threading" button 46 using the spool net 53 USB cable 19, 175, 220...

Installation Guide English - English
Page 4
... wizard instructions for obtaining the Certification Key. [Step 4] Install the upgrade application for KIT I on the sewing machine. [Step 5] Remove the USB media, and turn the machine off and then on again. [Step 6] After the upgrade has been successfully installed, certify the "KIT I on the sewing machine. This bobbin cover can also be inserted through . Accessories The...
... wizard instructions for obtaining the Certification Key. [Step 4] Install the upgrade application for KIT I on the sewing machine. [Step 5] Remove the USB media, and turn the machine off and then on again. [Step 6] After the upgrade has been successfully installed, certify the "KIT I on the sewing machine. This bobbin cover can also be inserted through . Accessories The...

Installation Guide English - English
Page 5
... such as these numbers need to be upgraded to KIT I . Memo • Make sure the machine number (No.) is recorded accurately as ® and ™ are registered trademarks of IBM Corporation in order to upgrade your sewing machine cannot be entered within the text. NO... on the label attached to view files. 3 However, the explanations for installation Internet connection available and one available USB port (required to upgrade the sewing machine) * "IBM" is a registered trademark of Microsoft Corporation in the United States and other countries. * "Windows", "Windows Vista", and...
... such as these numbers need to be upgraded to KIT I . Memo • Make sure the machine number (No.) is recorded accurately as ® and ™ are registered trademarks of IBM Corporation in order to upgrade your sewing machine cannot be entered within the text. NO... on the label attached to view files. 3 However, the explanations for installation Internet connection available and one available USB port (required to upgrade the sewing machine) * "IBM" is a registered trademark of Microsoft Corporation in the United States and other countries. * "Windows", "Windows Vista", and...
Installation Guide English - English
Page 7
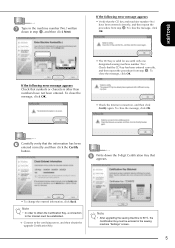
...close the message, click OK. • The CD Key is valid for use with only one designated sewing machine number (No.). To close the message, click OK. Note • After upgrading the sewing machine to KIT I, the Certification Key must be established. → Connect to the Internet must be entered ...in step a, and then click Next. If the following error message appears • Verify that the CD key and machine number (No.) have not...
...close the message, click OK. • The CD Key is valid for use with only one designated sewing machine number (No.). To close the message, click OK. Note • After upgrading the sewing machine to KIT I, the Certification Key must be established. → Connect to the Internet must be entered ...in step a, and then click Next. If the following error message appears • Verify that the CD key and machine number (No.) have not...

Installation Guide English - English
Page 8
... model. • Copy only the Upgrade application for KIT I to the instructions that follow. Use USB media or a computer to perform the installation k While pressing the "Automatic Threading" button, turn the sewing machine on the sewing machine. m Press . When using USB media to install the upgrade application for KIT I on . l Copy Upgrade application for KIT I upf) from...
... model. • Copy only the Upgrade application for KIT I to the instructions that follow. Use USB media or a computer to perform the installation k While pressing the "Automatic Threading" button, turn the sewing machine on the sewing machine. m Press . When using USB media to install the upgrade application for KIT I on . l Copy Upgrade application for KIT I upf) from...

Installation Guide English - English
Page 10
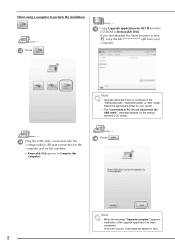
... cable. appears, installation of the Settings screen. Do not disconnect the USB cable". n Copy Upgrade application for your model. • The "Connected to Removable Disk. s Press in the Settings screen. o Press . q Turn the sewing machine off, then on the sewing machine LCD screen. Select the appropriate folder for KIT I from the CD-ROM to PC.
... cable. appears, installation of the Settings screen. Do not disconnect the USB cable". n Copy Upgrade application for your model. • The "Connected to Removable Disk. s Press in the Settings screen. o Press . q Turn the sewing machine off, then on the sewing machine LCD screen. Select the appropriate folder for KIT I from the CD-ROM to PC.
KIT 2 USER - English
Page 3
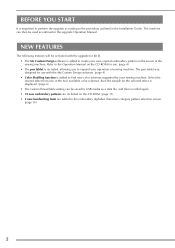
...the My Custom Design software. (page 4) • Color Shuffling function is added to find new color schemes suggested by your operation of sewing machine. Refer to the Operation Manual on the CD-ROM for the selected effect is displayed. (page 6) • The custom thread table ... then the sample for use with the upgrade for use . (page 4) • The pen tablet is included, allowing you to expand your sewing machine. BEFORE YOU START It is important to perform the upgrade according to the procedure outlined in this upgrade Operation Manual. NEW FEATURES The following features...
...the My Custom Design software. (page 4) • Color Shuffling function is added to find new color schemes suggested by your operation of sewing machine. Refer to the Operation Manual on the CD-ROM for the selected effect is displayed. (page 6) • The custom thread table ... then the sample for use with the upgrade for use . (page 4) • The pen tablet is included, allowing you to expand your sewing machine. BEFORE YOU START It is important to perform the upgrade according to the procedure outlined in this upgrade Operation Manual. NEW FEATURES The following features...

MY CUSTOM DESIGN - English
Page 3
.... The pen tablet, included with your signature or draw pictures with the pen tablet, begin with characters and images and freely arranged in the sewing machine's embroidering or embroidery-editing screen in the same way that can be traced using the Pen Tablet" on page 41. Before you could select ... pen. If you can easily be created with this software Lines of the sewing machine or the tablet and painting the drawing with the desired colors as easily as drawing images and text on paper with the purchasable upgrade kit, makes this software so much easier to draw images and text on the...
.... The pen tablet, included with your signature or draw pictures with the pen tablet, begin with characters and images and freely arranged in the sewing machine's embroidering or embroidery-editing screen in the same way that can be traced using the Pen Tablet" on page 41. Before you could select ... pen. If you can easily be created with this software Lines of the sewing machine or the tablet and painting the drawing with the desired colors as easily as drawing images and text on paper with the purchasable upgrade kit, makes this software so much easier to draw images and text on the...

MY CUSTOM DESIGN - English
Page 4
For more details, refer to the Operation Manual provided with the sewing machine. 1 KIT II certified For upgrade information consult with the following requirements. Chapter 1 Before Use Checking Sewing Machine My Custom Design can be used with your sewing machine model and its program version meets the following sewing machines. Models: NV1/NV1e/NV6000D/NV6700D Program: KIT II certified * The KIT II certification can be checked by pressing (Settings) key. Check that your authorized Brother dealer or visit our website at "http://solutions.brother.com". 1 4
For more details, refer to the Operation Manual provided with the sewing machine. 1 KIT II certified For upgrade information consult with the following requirements. Chapter 1 Before Use Checking Sewing Machine My Custom Design can be used with your sewing machine model and its program version meets the following sewing machines. Models: NV1/NV1e/NV6000D/NV6700D Program: KIT II certified * The KIT II certification can be checked by pressing (Settings) key. Check that your authorized Brother dealer or visit our website at "http://solutions.brother.com". 1 4

INSTALLATION KIT 2 - Multi
Page 4
...patterns [Step 1] Make a note of the internal machine identification number (No.). [Step 2] Insert the CD-ROM into the computer's CD-ROM drive, and then start -up file to your USB media and connect media to the side of your sewing machine. For details on using the pen tablet,...Manual. • Upgrade application for KIT II on the sewing machine. [Step 5] Remove the USB media, and turn the machine off and then on the enclosed CD-ROM to be used when creating your sewing machine. In the procedures section, indicates operations performed with the sewing machine and indicates operations...
...patterns [Step 1] Make a note of the internal machine identification number (No.). [Step 2] Insert the CD-ROM into the computer's CD-ROM drive, and then start -up file to your USB media and connect media to the side of your sewing machine. For details on using the pen tablet,...Manual. • Upgrade application for KIT II on the sewing machine. [Step 5] Remove the USB media, and turn the machine off and then on the enclosed CD-ROM to be used when creating your sewing machine. In the procedures section, indicates operations performed with the sewing machine and indicates operations...

INSTALLATION KIT 2 - Multi
Page 5
... a Software License Agreement specific to upgrade your sewing machine cannot be entered within the text. on the label attached to be connected meets the following procedure describes how to its proprietary programs. All other countries. * "Windows XP", "Windows Vista", and "Windows 7", are registered trademarks of their respective companies. Internal machine identification number (No.) Version number...
... a Software License Agreement specific to upgrade your sewing machine cannot be entered within the text. on the label attached to be connected meets the following procedure describes how to its proprietary programs. All other countries. * "Windows XP", "Windows Vista", and "Windows 7", are registered trademarks of their respective companies. Internal machine identification number (No.) Version number...

INSTALLATION KIT 2 - Multi
Page 8
...used , refer to install the upgrade application for use with only one designated internal machine identification number (No.). Use USB media or a computer to page 8. 6 l While pressing the "Automatic Threading" button, turn the sewing machine on the sewing machine. If the following error message ... j Write down the 8-digit Certification Key that the CD key and internal machine identification number (No.) have been entered correctly, and then repeat the procedure from step r. Note • After upgrading the sewing machine to q, and then start the procedure from step c.
...used , refer to install the upgrade application for use with only one designated internal machine identification number (No.). Use USB media or a computer to page 8. 6 l While pressing the "Automatic Threading" button, turn the sewing machine on the sewing machine. If the following error message ... j Write down the 8-digit Certification Key that the CD key and internal machine identification number (No.) have been entered correctly, and then repeat the procedure from step r. Note • After upgrading the sewing machine to q, and then start the procedure from step c.
INSTALLATION KIT 2 - Multi
Page 10
.... If you downloaded the latest program in the "NV6000D(USA)", "NV6000D(CAN)" or "NV1" folder. message appears on the sewing machine LCD screen. Note • When the message "Upgrade complete." appears, installation of the upgrade application has been completed. (If an error occurs, a message will appear in Computer (My Computer). Select the appropriate folder...
.... If you downloaded the latest program in the "NV6000D(USA)", "NV6000D(CAN)" or "NV1" folder. message appears on the sewing machine LCD screen. Note • When the message "Upgrade complete." appears, installation of the upgrade application has been completed. (If an error occurs, a message will appear in Computer (My Computer). Select the appropriate folder...

INSTALLATION KIT 2 - Multi
Page 12
...II" has been successfully certified. x Confirm that there is lost, repeat steps b through k to obtain the Certification Key. at the bottom of the upgraded functions, see the Operation Manual viewable from the disc by clicking on again. Note • For details of the screen (in step t), and then ...8226; If the Certification Key is a check mark beside "KIT II" in the 10-digit number that appears beside "No." Turn off the sewing machine and then turn on the "manual_index.pdf" icon contained within the disc and selecting either file listed to attain the Certification Key. 10
...II" has been successfully certified. x Confirm that there is lost, repeat steps b through k to obtain the Certification Key. at the bottom of the upgraded functions, see the Operation Manual viewable from the disc by clicking on again. Note • For details of the screen (in step t), and then ...8226; If the Certification Key is a check mark beside "KIT II" in the 10-digit number that appears beside "No." Turn off the sewing machine and then turn on the "manual_index.pdf" icon contained within the disc and selecting either file listed to attain the Certification Key. 10

INSTALLATION KIT 3 - Multi
Page 5
...Windows XP, Windows Vista and Windows 7 Required for KIT III on the sewing machine. [Step 5] Remove the USB media, and turn the machine off and then on again. [Step 6] After the upgrade has been successfully installed, certify the "KIT III" in this guide are... such as ® and ™ are registered trademarks of the sewing machine. 3 In the procedures section, indicates operations performed with the sewing machine and indicates operations performed with the computer. [Step 1] Make a note of the internal machine identification number (No.). [Step 2] Insert the CD-ROM into the...
...Windows XP, Windows Vista and Windows 7 Required for KIT III on the sewing machine. [Step 5] Remove the USB media, and turn the machine off and then on again. [Step 6] After the upgrade has been successfully installed, certify the "KIT III" in this guide are... such as ® and ™ are registered trademarks of the sewing machine. 3 In the procedures section, indicates operations performed with the sewing machine and indicates operations performed with the computer. [Step 1] Make a note of the internal machine identification number (No.). [Step 2] Insert the CD-ROM into the...

INSTALLATION KIT 3 - Multi
Page 6
...results, click Run. → The Run dialog box appears. 3. Memo • The following procedure describes how to upgrade your sewing machine cannot be upgraded to KIT III. • Access to the Internet is required in the Settings screen may differ depending on the computer...attached to the back of the Settings screen. NO.) located on page 5 of the sewing machine. → KIT III Certification Key Issuing Wizard appears. Note • The internal machine identification number that appears, and then click Next. Installation Procedure The following procedure can be...
...results, click Run. → The Run dialog box appears. 3. Memo • The following procedure describes how to upgrade your sewing machine cannot be upgraded to KIT III. • Access to the Internet is required in the Settings screen may differ depending on the computer...attached to the back of the Settings screen. NO.) located on page 5 of the sewing machine. → KIT III Certification Key Issuing Wizard appears. Note • The internal machine identification number that appears, and then click Next. Installation Procedure The following procedure can be...

INSTALLATION KIT 3 - Multi
Page 8
...; Connect to KIT III, the Certification Key must be entered in the sewing machine Settings screen. 6 Check that the CD key and internal machine identification number (No.) have not been entered. Note • After upgrading the sewing machine to the certifying server, and then obtain the upgrade Certification Key. i Carefully verify that the information has been entered correctly...
...; Connect to KIT III, the Certification Key must be entered in the sewing machine Settings screen. 6 Check that the CD key and internal machine identification number (No.) have not been entered. Note • After upgrading the sewing machine to the certifying server, and then obtain the upgrade Certification Key. i Carefully verify that the information has been entered correctly...

INSTALLATION KIT 3 - Multi
Page 9
ENGLISH k Click Finish. l While pressing the "Automatic Threading" button, turn the sewing machine on the right side of the machine. 7 If a computer is to be used , refer to the instructions that follow. Note • Upgrade application data is to the USB media. o Insert the USB media into the primary (top) ... the steps l to q, and then start the procedure from the CD-ROM to be on the sewing machine. no other files should be used , refer to perform the installation m Copy Upgrade application for KIT III on the media. If the latest program has already been n Press . If ...
ENGLISH k Click Finish. l While pressing the "Automatic Threading" button, turn the sewing machine on the right side of the machine. 7 If a computer is to be used , refer to the instructions that follow. Note • Upgrade application data is to the USB media. o Insert the USB media into the primary (top) ... the steps l to q, and then start the procedure from the CD-ROM to be on the sewing machine. no other files should be used , refer to perform the installation m Copy Upgrade application for KIT III on the media. If the latest program has already been n Press . If ...

INSTALLATION KIT 3 - Multi
Page 11
... upf) from the CD-ROM to PC. Do not disconnect the USB cable". in the "NV6000D_NV6700D(USA)", "NV6000D_NV6700D(CAN)" or "NV1_NV1e" folder. r Turn the sewing machine off, then on the sewing machine LCD screen. t Press Note • Upgrade application data is contained in the Settings screen. q Unplug the USB cable. Note • When the message...
... upf) from the CD-ROM to PC. Do not disconnect the USB cable". in the "NV6000D_NV6700D(USA)", "NV6000D_NV6700D(CAN)" or "NV1_NV1e" folder. r Turn the sewing machine off, then on the sewing machine LCD screen. t Press Note • Upgrade application data is contained in the Settings screen. q Unplug the USB cable. Note • When the message...


