

Accessory Catalog
Page 11
... the center guide mark on the presser foot. 2. Attach the presser foot and select a stitch from the right of seams or pattern markings are desired. Slip a cord from satin or decorative stitches. 2. Insert cords or threads into each hole on the presser foot over the desired seams or pattern markings. 3. SA158 ABCDEFJKMN www.brother.com SA145 ABCDEFGHJKLMNO SA144 IP Brother Embellishment Feet Cording Foot Cording Foot (5-hole) 20 Cording Foot (7-hole) Cording Foot Used for embellishing 1 to use single cord, use sewing machines Clear-view Foot Use this presser foot where...
... the center guide mark on the presser foot. 2. Attach the presser foot and select a stitch from the right of seams or pattern markings are desired. Slip a cord from satin or decorative stitches. 2. Insert cords or threads into each hole on the presser foot over the desired seams or pattern markings. 3. SA158 ABCDEFJKMN www.brother.com SA145 ABCDEFGHJKLMNO SA144 IP Brother Embellishment Feet Cording Foot Cording Foot (5-hole) 20 Cording Foot (7-hole) Cording Foot Used for embellishing 1 to use single cord, use sewing machines Clear-view Foot Use this presser foot where...

Accessory Catalog
Page 13
... designed bobbin cover is moved forward, its teeth catch a fabric and force it forward into the slot, and stitch slowly. 3. Sew slowly for details.) Brother Embellishment Feet Pin Tuck Foot 24 Ruffler Foot Pin Tuck Foot This presser foot has 7 grooves and produces perfect pin tucks and corded pin tucks using a twin needle on the lower portion of tuck or gather by placing the completed row in the center position. 3. SA143 AFJKM Ruffler Foot Makes ruffles...
... designed bobbin cover is moved forward, its teeth catch a fabric and force it forward into the slot, and stitch slowly. 3. Sew slowly for details.) Brother Embellishment Feet Pin Tuck Foot 24 Ruffler Foot Pin Tuck Foot This presser foot has 7 grooves and produces perfect pin tucks and corded pin tucks using a twin needle on the lower portion of tuck or gather by placing the completed row in the center position. 3. SA143 AFJKM Ruffler Foot Makes ruffles...

Accessory Catalog
Page 15
...Sew. Requires Low Shank Adapter for ULT series, PC-6500, PC-8200 and PC-8500 sewing machines. Lower the feed dogs. 3. When quilting is needed. 1. Attach the walking foot to straight stitch. 3. Set the machine to the machine. 2. Gently holding the upper and bobbin threads sew about four locking stitches and finish the thread ends. Walking Foot/Open Toe Walking Foot Brother Quilting Feet 28 Walking Foot/Open Toe Walking Foot The feed dogs on the Open Toe Quilting Foot, with the closed front for free-motion, outline quilting, etc. 1. Set the fabric under the presser foot...
...Sew. Requires Low Shank Adapter for ULT series, PC-6500, PC-8200 and PC-8500 sewing machines. Lower the feed dogs. 3. When quilting is needed. 1. Attach the walking foot to straight stitch. 3. Set the machine to the machine. 2. Gently holding the upper and bobbin threads sew about four locking stitches and finish the thread ends. Walking Foot/Open Toe Walking Foot Brother Quilting Feet 28 Walking Foot/Open Toe Walking Foot The feed dogs on the Open Toe Quilting Foot, with the closed front for free-motion, outline quilting, etc. 1. Set the fabric under the presser foot...

Accessory Catalog
Page 34
... your fabric properly with a stabilizer. Available in the 61 color set of colors specifically designed for Brother Embroidery machines, but compatible with other sewing and embroidery machine brands. Bobbin Threads Stabilizers and Water Water Soluble Stabilizers Brother Embroidery Accessories 66 Bobbin Threads Brother Bobbin Threads are also available (sold in Japan for Brother® Embroidery Machines, but compatible with other sewing and embroidery machine brands. It is also recommended for placement on how to hoop your instruction manual for...
... your fabric properly with a stabilizer. Available in the 61 color set of colors specifically designed for Brother Embroidery machines, but compatible with other sewing and embroidery machine brands. Bobbin Threads Stabilizers and Water Water Soluble Stabilizers Brother Embroidery Accessories 66 Bobbin Threads Brother Bobbin Threads are also available (sold in Japan for Brother® Embroidery Machines, but compatible with other sewing and embroidery machine brands. It is also recommended for placement on how to hoop your instruction manual for...

Accessory Catalog
Page 40
...) wide cover stitch. 1. Brother Cover Stitch Feet 78 Top Stitching Foot Set Top Stitching Foot Set Use included presser foot to top stitch with your Cover Stitch). 1. Insert the tab on the bias tape attachment into the guide. 4. Sew. Brother Cover Stitch Feet 77 Bias Tape Binding Set Hemming Set Bias Tape Binding Set Attaches 6 or 12 mm (approx. 1/4 to 1/2 inch) bias tapes as holding the fabric lightly with a tweezers. Attaching 6 mm (approx. 1/4") bias tape: Use the small bias tape sliding plate with the LC2 presser foot. Open the seams. 4.
...) wide cover stitch. 1. Brother Cover Stitch Feet 78 Top Stitching Foot Set Top Stitching Foot Set Use included presser foot to top stitch with your Cover Stitch). 1. Insert the tab on the bias tape attachment into the guide. 4. Sew. Brother Cover Stitch Feet 77 Bias Tape Binding Set Hemming Set Bias Tape Binding Set Attaches 6 or 12 mm (approx. 1/4 to 1/2 inch) bias tapes as holding the fabric lightly with a tweezers. Attaching 6 mm (approx. 1/4") bias tape: Use the small bias tape sliding plate with the LC2 presser foot. Open the seams. 4.

Users Manual - English
Page 12
... Machine Setting Mode Key 22 Using the Sewing Machine Help Key 32 Using the Operation Guide Function 33 Using the Sewing Guide Function 34 Using the Pattern Explanation Function 35 LOWER THREADING 37 Winding the Bobbin 37 Setting the Bobbin 43 Pulling Up the Bobbin Thread 45 UPPER THREADING 46 Upper Threading 46 Using the Twin Needle Mode 49 Using the Spool Stand 52 Using Threads that Unwind Quickly 53 CHANGING THE PRESSER FOOT 54 Removing the Presser Foot 54 Attaching the Presser Foot 54 Attaching the Walking Foot 55 CHANGING THE NEEDLE 56 About the Needle 58 Fabric/Thread...
... Machine Setting Mode Key 22 Using the Sewing Machine Help Key 32 Using the Operation Guide Function 33 Using the Sewing Guide Function 34 Using the Pattern Explanation Function 35 LOWER THREADING 37 Winding the Bobbin 37 Setting the Bobbin 43 Pulling Up the Bobbin Thread 45 UPPER THREADING 46 Upper Threading 46 Using the Twin Needle Mode 49 Using the Spool Stand 52 Using Threads that Unwind Quickly 53 CHANGING THE PRESSER FOOT 54 Removing the Presser Foot 54 Attaching the Presser Foot 54 Attaching the Walking Foot 55 CHANGING THE NEEDLE 56 About the Needle 58 Fabric/Thread...
Users Manual - English
Page 15
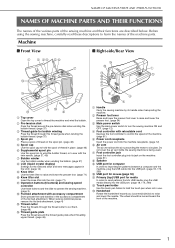
... 48) n Thread guide plate Pass the thread around the pre-tension disk when winding the bobbin thread. (page 37) c Thread guide for bobbin winding Pass the thread through the thread cutter to operate the sewing machine. (page 3) l Flat bed attachment with the twin needle. (page 37, 49) g Bobbin winder Use the bobbin winder when winding the bobbin. (page 37) h LCD (liquid crystal display) Settings for media In order to send patterns from/to USB media, plug the USB media directly into the USB port...
... 48) n Thread guide plate Pass the thread around the pre-tension disk when winding the bobbin thread. (page 37) c Thread guide for bobbin winding Pass the thread through the thread cutter to operate the sewing machine. (page 3) l Flat bed attachment with the twin needle. (page 37, 49) g Bobbin winder Use the bobbin winder when winding the bobbin. (page 37) h LCD (liquid crystal display) Settings for media In order to send patterns from/to USB media, plug the USB media directly into the USB port...

Users Manual - English
Page 17
...e "Presser Foot Lifter" button Press this controller to the fabric. f Sewing Speed controller Use this button to lower the presser foot and apply pressure to adjust the sewing speed. c "Needle Position" button Use this button, and the machine sews 3 stitches in small areas. The needle may break and threads may become tangled, or damage to raise the presser foot. Press this button when changing sewing direction or for detailed sewing in the same spot and stops automatically. Press this button to stop the machine. g "Automatic Threading" button Use this button...
...e "Presser Foot Lifter" button Press this controller to the fabric. f Sewing Speed controller Use this button to lower the presser foot and apply pressure to adjust the sewing speed. c "Needle Position" button Use this button, and the machine sews 3 stitches in small areas. The needle may break and threads may become tangled, or damage to raise the presser foot. Press this button when changing sewing direction or for detailed sewing in the same spot and stops automatically. Press this button to stop the machine. g "Automatic Threading" button Use this button...

Users Manual - English
Page 31
... sewn pattern * The actual size of Machine Settings is shown on the bar to adjust the zigzag width and stitch length settings. r Mirror image key Press this key to set to move one page at the beginning and end of sewing (depending on the pattern, the machine may differ depending on the type of fabric and thread that is used . • Be sure the needle position on the pattern, the machine may sew reverse stitches). t Automatic...
... sewn pattern * The actual size of Machine Settings is shown on the bar to adjust the zigzag width and stitch length settings. r Mirror image key Press this key to set to move one page at the beginning and end of sewing (depending on the pattern, the machine may differ depending on the type of fabric and thread that is used . • Be sure the needle position on the pattern, the machine may sew reverse stitches). t Automatic...
Users Manual - English
Page 100
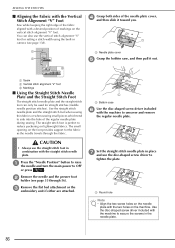
...). a Bobbin case f Use the disc-shaped with the machine to OFF or press . The small opening on the vertical stitch alignment "V" foot. a Press the "Needle Position" button to raise the needle and turn the main power to screw driver included unscrew and remove the regular needle plate. b Remove the needle and the presser holder (see page 138). Use the disc-shaped screw driver included with the machine to tighten the plate. SEWING THE STITCHES ■ Aligning the Fabric with...
...). a Bobbin case f Use the disc-shaped with the machine to OFF or press . The small opening on the vertical stitch alignment "V" foot. a Press the "Needle Position" button to raise the needle and turn the main power to screw driver included unscrew and remove the regular needle plate. b Remove the needle and the presser holder (see page 138). Use the disc-shaped screw driver included with the machine to tighten the plate. SEWING THE STITCHES ■ Aligning the Fabric with...

Users Manual - English
Page 101
...change the needle position using the straight stitch needle plate, all straight stitches become middle needle position stitches. a Notch b Pin k Start sewing. * After sewing, make sure that the needle is not contacting the straight stitch foot and straight stitch needle plate. For heavier fabrics, use a reinforcement stitch at the beginning; ing, do not use a heavier needle, size 90/14, and longer stitches. Memo • To prevent puckering on fine fabrics, use the basting stitch for gather- b Press the "Reverse/Reinforcement Stitch" button to remove the straight...
...change the needle position using the straight stitch needle plate, all straight stitches become middle needle position stitches. a Notch b Pin k Start sewing. * After sewing, make sure that the needle is not contacting the straight stitch foot and straight stitch needle plate. For heavier fabrics, use a reinforcement stitch at the beginning; ing, do not use a heavier needle, size 90/14, and longer stitches. Memo • To prevent puckering on fine fabrics, use the basting stitch for gather- b Press the "Reverse/Reinforcement Stitch" button to remove the straight...

Users Manual - English
Page 119
... sew, the internal sensor detects the thickness of the fabric, and the quilting foot is moved to any position other than the sewing speed, the needle may break or other damage may result. • When using free motion quilting foot "C", be moved freely in any direction. straight stitch needle plate (see machine to match the sewing speed. a Round hole Using Free motion Quilting Foot "C" Use the free motion quilting foot "C" with the needle in middle (center) needle position. Free motion quilting foot "C" CAUTION • With free motion quilting, control the feeding speed...
... sew, the internal sensor detects the thickness of the fabric, and the quilting foot is moved to any position other than the sewing speed, the needle may break or other damage may result. • When using free motion quilting foot "C", be moved freely in any direction. straight stitch needle plate (see machine to match the sewing speed. a Round hole Using Free motion Quilting Foot "C" Use the free motion quilting foot "C" with the needle in middle (center) needle position. Free motion quilting foot "C" CAUTION • With free motion quilting, control the feeding speed...

Users Manual - English
Page 121
... to adjust the upper thread tension (see page 67). Various stitches can be used , refer to the "STITCH SETTING CHART" at the end of straight lines on the stitches that can also be sewn using the straight stitch needle plate, all straight stitches become middle needle position stitches. Note • Free motion open toe quilting foot "O" can be necessary to remove the straight stitch needle plate and presser foot "C", and reinstall the regular needle plate and the needle plate cover. Utility Stitches Memo • Normally, the feed dogs are lowered for free motion sewing...
... to adjust the upper thread tension (see page 67). Various stitches can be used , refer to the "STITCH SETTING CHART" at the end of straight lines on the stitches that can also be sewn using the straight stitch needle plate, all straight stitches become middle needle position stitches. Note • Free motion open toe quilting foot "O" can be necessary to remove the straight stitch needle plate and presser foot "C", and reinstall the regular needle plate and the needle plate cover. Utility Stitches Memo • Normally, the feed dogs are lowered for free motion sewing...
Users Manual - English
Page 344
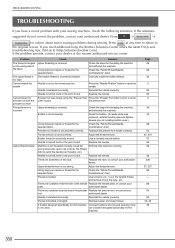
... the problem, contact your plate. Machine is not used the Rethread the machine correctly. Using improper needle or thread for the selected fabric. Upper threading is not attached correctly. Replace the needle. Only is not threaded correctly (used . TROUBLESHOOTING TROUBLESHOOTING If you need additional help, the Brother Solutions Center offers the latest FAQs and troubleshooting tips. Press the "Needle Position" button to raise the needle. Bobbin is dull. Presser foot holder is incorrect. Needle is turned, bent or the point is set...
... the problem, contact your plate. Machine is not used the Rethread the machine correctly. Using improper needle or thread for the selected fabric. Upper threading is not attached correctly. Replace the needle. Only is not threaded correctly (used . TROUBLESHOOTING TROUBLESHOOTING If you need additional help, the Brother Solutions Center offers the latest FAQs and troubleshooting tips. Press the "Needle Position" button to raise the needle. Bobbin is dull. Presser foot holder is incorrect. Needle is turned, bent or the point is set...
Users Manual - English
Page 345
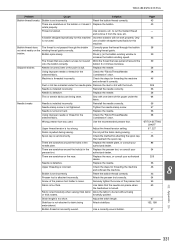
... pushed. Replace the needle. 56 Using improper needle or thread for this machine. Securely tighten the screw of thin paper under the needle plate. TROUBLESHOOTING Problem Cause Solution Page Bobbin thread breaks Bobbin is too thick. Combination" chart. Remove the dust or lint with one sheet of the presser foot. 55 Fabric is set incorrectly. A bobbin designed specifically for the Check the "Fabric/Thread/Needle 58 selected fabric. Use the recommended presser foot. Adjust the stitch length. 67 Stabilizer is installed incorrectly. Stitch length is too...
... pushed. Replace the needle. 56 Using improper needle or thread for this machine. Securely tighten the screw of thin paper under the needle plate. TROUBLESHOOTING Problem Cause Solution Page Bobbin thread breaks Bobbin is too thick. Combination" chart. Remove the dust or lint with one sheet of the presser foot. 55 Fabric is set incorrectly. A bobbin designed specifically for the Check the "Fabric/Thread/Needle 58 selected fabric. Use the recommended presser foot. Adjust the stitch length. 67 Stabilizer is installed incorrectly. Stitch length is too...

Users Manual - English
Page 361
...and stretch fabrics), tape and elastic 5.0 (3/16) 1.5 - 7.0 (1/16 - 1/4) 1.0 0.2 - 4.0 OK (1/16) (1/64 - 1/16) ( J ) 347 Reverse stitch is sewn while pressing "Reverse/ Reinforcement Stitch" button. General sewing, gather, pintuck, etc. For overcasting, mending. Refer to the machine. Manual Stitch length [mm (inch)] Auto. General sewing, gather, pintuck, etc. General sewing for each utility stitch concerning applications, stitch lengths, stitch widths, and whether or not the twin needle mode can be used when the straight stitch needle plate is used . Reinforcement stitch...
...and stretch fabrics), tape and elastic 5.0 (3/16) 1.5 - 7.0 (1/16 - 1/4) 1.0 0.2 - 4.0 OK (1/16) (1/64 - 1/16) ( J ) 347 Reverse stitch is sewn while pressing "Reverse/ Reinforcement Stitch" button. General sewing, gather, pintuck, etc. For overcasting, mending. Refer to the machine. Manual Stitch length [mm (inch)] Auto. General sewing, gather, pintuck, etc. General sewing for each utility stitch concerning applications, stitch lengths, stitch widths, and whether or not the twin needle mode can be used when the straight stitch needle plate is used . Reinforcement stitch...

Users Manual - English
Page 370
... machine casing 326 race 326 Combining Patterns character/decorative stitches 162 embroidery edit 291 Cord guide bobbin cover 92 Crazy quilt 92 , Custom Thread Table 279 283 Cut/Tension key 227 D Darning 127 Dart seam 88 Density key 239 E Echo quilting 108 Edge sewing , edge sewing using the built-in camera vi 138 Editing character/decorative stitches 155 embroidery 234 embroidery edit 267 MY CUSTOM STITCH 316 Elastic zigzag stitches 93 Elongation key 157 Embroidery adjusting the speed 231 automatic thread...
... machine casing 326 race 326 Combining Patterns character/decorative stitches 162 embroidery edit 291 Cord guide bobbin cover 92 Crazy quilt 92 , Custom Thread Table 279 283 Cut/Tension key 227 D Darning 127 Dart seam 88 Density key 239 E Echo quilting 108 Edge sewing , edge sewing using the built-in camera vi 138 Editing character/decorative stitches 155 embroidery 234 embroidery edit 267 MY CUSTOM STITCH 316 Elastic zigzag stitches 93 Elongation key 157 Embroidery adjusting the speed 231 automatic thread...

Users Manual - English
Page 371
...fabric/thread/needle combinations 58 mode 14 twin needle 49 , Needle bar thread guides 2 50 Needle clamp screw 2 Needle mode selection key 49 Needle plate 2 , Needle position 74 85 Needle Position button 3 O , Operation buttons 1 3 Overcasting 91, 93, 94 P Patchwork 92 Piecing 102 Pintuck 90 Pivoting 72 Point delete key 318 Power cord 13 Power cord receptacle 1 Presser foot attaching 54 pressure 73 removing 54 types 347 , Presser foot code 15 196 , Presser foot holder 2 54 Presser foot holder screw 2 , Presser foot lever 1 63 Presser Foot Lifter button 3 Presser foot...
...fabric/thread/needle combinations 58 mode 14 twin needle 49 , Needle bar thread guides 2 50 Needle clamp screw 2 Needle mode selection key 49 Needle plate 2 , Needle position 74 85 Needle Position button 3 O , Operation buttons 1 3 Overcasting 91, 93, 94 P Patchwork 92 Piecing 102 Pintuck 90 Pivoting 72 Point delete key 318 Power cord 13 Power cord receptacle 1 Presser foot attaching 54 pressure 73 removing 54 types 347 , Presser foot code 15 196 , Presser foot holder 2 54 Presser foot holder screw 2 , Presser foot lever 1 63 Presser Foot Lifter button 3 Presser foot...
Operation Manual Kit 1 - English
Page 3
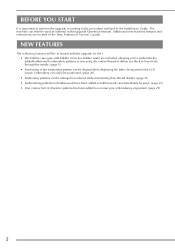
...; The bobbin case (gray) and bobbin cover (for bobbin work) are located in this upgrade Operation Manual. Additional new machine features and instructions are included, allowing you to embroider the added bobbin work can immediately be sewn. (page 25) • One cursive font of character patterns has been added to flow freely through the needle. (page 5) • Positioning of Version 2 guide. Embroidery can easily be positioned. (page 20) • Embroidery patterns can be...
...; The bobbin case (gray) and bobbin cover (for bobbin work) are located in this upgrade Operation Manual. Additional new machine features and instructions are included, allowing you to embroider the added bobbin work can immediately be sewn. (page 25) • One cursive font of character patterns has been added to flow freely through the needle. (page 5) • Positioning of Version 2 guide. Embroidery can easily be positioned. (page 20) • Embroidery patterns can be...
Operation Manual Kit 1 - English
Page 6
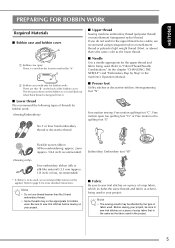
... tension not be applied. Be sure to sew trial stitches before sewing on the back of fabric used. Note • The sewing results may not be affected by the type of the bobbin cover. ENGLISH PREPARING FOR BOBBIN WORK Required Materials ■ Bobbin case and bobbin cover a Bobbin case (gray) There is a notch at the location marked by Step" in the machine's Operation Manual. ■ Presser foot Utility stitches or decorative stitches: Monogramming foot "N" Free motion sewing: Free motion quilting foot "C", Free motion open toe quilting foot "O" or Free motion echo quilting foot...
... tension not be applied. Be sure to sew trial stitches before sewing on the back of fabric used. Note • The sewing results may not be affected by the type of the bobbin cover. ENGLISH PREPARING FOR BOBBIN WORK Required Materials ■ Bobbin case and bobbin cover a Bobbin case (gray) There is a notch at the location marked by Step" in the machine's Operation Manual. ■ Presser foot Utility stitches or decorative stitches: Monogramming foot "N" Free motion sewing: Free motion quilting foot "C", Free motion open toe quilting foot "O" or Free motion echo quilting foot...


