

Accessory Catalog
Page 36
Brother Sewing Machine Attachments for PQ Series 69 Heavyweight Foot Ver y Narrow Foot Bobbin for PQ Series Heavyweight Foot An improved larger foot print assures better contact of wool roving or yarn on the fabric under the Needle Felting Attachment. 4. Put a...the fabric while sewing. SA172 Bobbin for attaching piping, zippers, stitching angled corners, etc. Draw a rough sketch on your PQ series! Comes with a chalk pen. 3. SA159 SA180B SA181 Needle Felting Attachment Felting Needle Brother Sewing Machine Attachments for PQ Series 70 Needle Felting Attachment Use ...
Brother Sewing Machine Attachments for PQ Series 69 Heavyweight Foot Ver y Narrow Foot Bobbin for PQ Series Heavyweight Foot An improved larger foot print assures better contact of wool roving or yarn on the fabric under the Needle Felting Attachment. 4. Put a...the fabric while sewing. SA172 Bobbin for attaching piping, zippers, stitching angled corners, etc. Draw a rough sketch on your PQ series! Comes with a chalk pen. 3. SA159 SA180B SA181 Needle Felting Attachment Felting Needle Brother Sewing Machine Attachments for PQ Series 70 Needle Felting Attachment Use ...

Users Manual - English
Page 9
...pattern and background may not match. Completed embroidery patterns can be combined with printed backgrounds that the print settings are built into this machine. See "PRINT AND STITCH (COMBINING EMBROIDERY PATTERNS AND PRINTED DESIGNS)" on page 295. Uninterrupted Embroidering (Using a Single Color) You ... Using the Built-In Camera to Align the Embroidering Position Print and Stitch (Combining the Embroidery and Printing) The embroidering position can easily be aligned by ironing a background onto fabric or printing it onto printable fabric, and then embroider a design to ...
...pattern and background may not match. Completed embroidery patterns can be combined with printed backgrounds that the print settings are built into this machine. See "PRINT AND STITCH (COMBINING EMBROIDERY PATTERNS AND PRINTED DESIGNS)" on page 295. Uninterrupted Embroidering (Using a Single Color) You ... Using the Built-In Camera to Align the Embroidering Position Print and Stitch (Combining the Embroidery and Printing) The embroidering position can easily be aligned by ironing a background onto fabric or printing it onto printable fabric, and then embroider a design to ...
Users Manual - English
Page 13
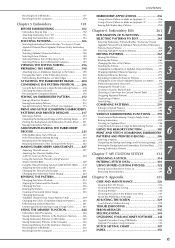
...by Step 182 Attaching Embroidery Foot "W 183 Attaching the Embroidery Unit 184 SELECTING PATTERNS 186 Selecting Embroidery Patterns/Brother "Exclusives"/Greek Alphabet Patterns/Floral Alphabet Patterns/Utility Embroidery Patterns 189 Selecting Alphabet Character Patterns 190 Selecting Frame ... Patterns 213 Sewing Embroidery Patterns Which Use Appliqu 215 PRINT AND STITCH (COMBINING EMBROIDERY PATTERNS AND PRINTED DESIGNS 217 Selecting a Pattern 218 Outputting the Background Image and Positioning Image........219 Printing the Background and Embroidery Position Sheet ..... 221 Sewing ...
...by Step 182 Attaching Embroidery Foot "W 183 Attaching the Embroidery Unit 184 SELECTING PATTERNS 186 Selecting Embroidery Patterns/Brother "Exclusives"/Greek Alphabet Patterns/Floral Alphabet Patterns/Utility Embroidery Patterns 189 Selecting Alphabet Character Patterns 190 Selecting Frame ... Patterns 213 Sewing Embroidery Patterns Which Use Appliqu 215 PRINT AND STITCH (COMBINING EMBROIDERY PATTERNS AND PRINTED DESIGNS 217 Selecting a Pattern 218 Outputting the Background Image and Positioning Image........219 Printing the Background and Embroidery Position Sheet ..... 221 Sewing ...

Users Manual - English
Page 195
...Unit 185 SELECTING PATTERNS 186 ■ Copyright Information 186 ■ Pattern Selection Screens 187 Selecting Embroidery Patterns/Brother "Exclusives"/Greek Alphabet Patterns/Floral Alphabet Patterns/Utility Embroidery Patterns 189 Selecting Alphabet Character Patterns 190 Selecting Frame ...9632; Embroidery Needle Plate Cover 213 Sewing Embroidery Patterns 213 Sewing Embroidery Patterns Which Use Appliqu 215 PRINT AND STITCH (COMBINING EMBROIDERY PATTERNS AND PRINTED DESIGNS 217 Selecting a Pattern 218 ■ Checking Only the Embroidery Pattern 218 Outputting the Background...
...Unit 185 SELECTING PATTERNS 186 ■ Copyright Information 186 ■ Pattern Selection Screens 187 Selecting Embroidery Patterns/Brother "Exclusives"/Greek Alphabet Patterns/Floral Alphabet Patterns/Utility Embroidery Patterns 189 Selecting Alphabet Character Patterns 190 Selecting Frame ...9632; Embroidery Needle Plate Cover 213 Sewing Embroidery Patterns 213 Sewing Embroidery Patterns Which Use Appliqu 215 PRINT AND STITCH (COMBINING EMBROIDERY PATTERNS AND PRINTED DESIGNS 217 Selecting a Pattern 218 ■ Checking Only the Embroidery Pattern 218 Outputting the Background...

Users Manual - English
Page 231
... page 221. Beautiful three-dimensional embroidered designs can be combined with the background image. PRINT AND STITCH (COMBINING EMBROIDERY PATTERNS AND PRINTED DESIGNS) PRINT AND STITCH (COMBINING EMBROIDERY PATTERNS AND PRINTED DESIGNS) Completed embroidery patterns combined with the background image ironed on or printed, check the embroidering position, and then start embroidering. Using iron-on paper Using...
... page 221. Beautiful three-dimensional embroidered designs can be combined with the background image. PRINT AND STITCH (COMBINING EMBROIDERY PATTERNS AND PRINTED DESIGNS) PRINT AND STITCH (COMBINING EMBROIDERY PATTERNS AND PRINTED DESIGNS) Completed embroidery patterns combined with the background image ironed on or printed, check the embroidering position, and then start embroidering. Using iron-on paper Using...

Users Manual - English
Page 232
... Reference Guide for the detail of the pattern combined with the background appears. 218 * To return to the image of patterns which enable this function. PRINT AND STITCH (COMBINING EMBROIDERY PATTERNS AND PRINTED DESIGNS) Selecting a Pattern Patterns combining embroidery and printed designs can be selected from the pages that contain .
... Reference Guide for the detail of the pattern combined with the background appears. 218 * To return to the image of patterns which enable this function. PRINT AND STITCH (COMBINING EMBROIDERY PATTERNS AND PRINTED DESIGNS) Selecting a Pattern Patterns combining embroidery and printed designs can be selected from the pages that contain .

Users Manual - English
Page 233
...PRINT AND STITCH (COMBINING EMBROIDERY PATTERNS AND PRINTED DESIGNS) Outputting the Background Image and Positioning Image Use USB media or the computer to output the following three images from the machine. * File name may not be able to correctly detect the positioning marks. (For details on printing, refer to poor printing...the USB port on printable fabric) 5 • [xxx]p.pdf (Example: E_1p.pdf) An image that the print settings are correctly specified. • When printing the PDF file of the embroidery pattern and background may not match. In addition, the built-in a different ...
...PRINT AND STITCH (COMBINING EMBROIDERY PATTERNS AND PRINTED DESIGNS) Outputting the Background Image and Positioning Image Use USB media or the computer to output the following three images from the machine. * File name may not be able to correctly detect the positioning marks. (For details on printing, refer to poor printing...the USB port on printable fabric) 5 • [xxx]p.pdf (Example: E_1p.pdf) An image that the print settings are correctly specified. • When printing the PDF file of the embroidery pattern and background may not match. In addition, the built-in a different ...

Users Manual - English
Page 234
...; Do not remove the USB media from the USB media to select the primary (top) USB port where the USB media is finished. PRINT AND STITCH (COMBINING EMBROIDERY PATTERNS AND PRINTED DESIGNS) c Press to the computer. d Remove the USB media where the image data is saved from the machine, and then copy the...
...; Do not remove the USB media from the USB media to select the primary (top) USB port where the USB media is finished. PRINT AND STITCH (COMBINING EMBROIDERY PATTERNS AND PRINTED DESIGNS) c Press to the computer. d Remove the USB media where the image data is saved from the machine, and then copy the...
Users Manual - English
Page 235
... mark. 221 In addition, the built-in their original dimensions. The background file that is printed differs depending on transfer sheet is not done, the builtin camera may not match. c Press PRINT AND STITCH (COMBINING EMBROIDERY PATTERNS AND PRINTED DESIGNS) . d Copy the image data saved in a different size, the sizes of the embroidery pattern...
... mark. 221 In addition, the built-in their original dimensions. The background file that is printed differs depending on transfer sheet is not done, the builtin camera may not match. c Press PRINT AND STITCH (COMBINING EMBROIDERY PATTERNS AND PRINTED DESIGNS) . d Copy the image data saved in a different size, the sizes of the embroidery pattern...

Users Manual - English
Page 236
...the center positioning image so it can help you find the correct alignment position. is used, transfer c Place the paper printed with the positioning image on top of the fabric so that the pattern is aligned, and then affix the paper to ...After checking that the embroidery position sheet is selected, press . In Camera to steps b through f of the pattern before transferring the image. PRINT AND STITCH (COMBINING EMBROIDERY PATTERNS AND PRINTED DESIGNS) d If an iron-on page 206. Sewing Embroidery Patterns a Hoop in step c. 222 CAUTION • Before pressing the "Start/Stop...
...the center positioning image so it can help you find the correct alignment position. is used, transfer c Place the paper printed with the positioning image on top of the fabric so that the pattern is aligned, and then affix the paper to ...After checking that the embroidery position sheet is selected, press . In Camera to steps b through f of the pattern before transferring the image. PRINT AND STITCH (COMBINING EMBROIDERY PATTERNS AND PRINTED DESIGNS) d If an iron-on page 206. Sewing Embroidery Patterns a Hoop in step c. 222 CAUTION • Before pressing the "Start/Stop...

Users Manual - English
Page 275
6 Chapter Embroidery Edit EXPLANATION OF FUNCTIONS 262 SELECTING PATTERNS TO EDIT 263 Selecting Embroidery Patterns/Brother "Exclusives"/Greek Alphabet Patterns/Floral Alphabet Patterns/Utility Embroidery Patterns/Frame Patterns 264 Selecting Alphabet Character Patterns 264... for the Outline 300 Using the Built-In Camera to Align the Embroidering Position 302 USING THE MEMORY FUNCTION 305 PRINT AND STITCH (COMBINING EMBROIDERY PATTERNS AND PRINTED DESIGNS 306 Selecting a Pattern 307 ■ Checking Only the Embroidery Pattern 307 Outputting the Background Image and Positioning Image...
6 Chapter Embroidery Edit EXPLANATION OF FUNCTIONS 262 SELECTING PATTERNS TO EDIT 263 Selecting Embroidery Patterns/Brother "Exclusives"/Greek Alphabet Patterns/Floral Alphabet Patterns/Utility Embroidery Patterns/Frame Patterns 264 Selecting Alphabet Character Patterns 264... for the Outline 300 Using the Built-In Camera to Align the Embroidering Position 302 USING THE MEMORY FUNCTION 305 PRINT AND STITCH (COMBINING EMBROIDERY PATTERNS AND PRINTED DESIGNS 306 Selecting a Pattern 307 ■ Checking Only the Embroidery Pattern 307 Outputting the Background Image and Positioning Image...

Users Manual - English
Page 276
This machine can perform the 9 functions listed below. ■ Print and Stitch (Combining Embroidery Patterns and Printed Designs) You can create beautiful three-dimensional embroidered designs by ironing a background onto fabric or printing it onto printable fabric, then sewing complementary embroidery on top of the background. ■ Create Appliqué Piece You can create an...
This machine can perform the 9 functions listed below. ■ Print and Stitch (Combining Embroidery Patterns and Printed Designs) You can create beautiful three-dimensional embroidered designs by ironing a background onto fabric or printing it onto printable fabric, then sewing complementary embroidery on top of the background. ■ Create Appliqué Piece You can create an...

Users Manual - English
Page 320
.... Step3 When using printable fabric With a printer, print the background onto printable fabric, and print the embroidery position sheet on plain paper. Step4 Hoop in their original dimensions. PRINT AND STITCH (COMBINING EMBROIDERY PATTERNS AND PRINTED DESIGNS) PRINT AND STITCH (COMBINING EMBROIDERY PATTERNS AND PRINTED DESIGNS) Completed embroidery patterns combined with printed designs are correctly specified. 306 When using...
.... Step3 When using printable fabric With a printer, print the background onto printable fabric, and print the embroidery position sheet on plain paper. Step4 Hoop in their original dimensions. PRINT AND STITCH (COMBINING EMBROIDERY PATTERNS AND PRINTED DESIGNS) PRINT AND STITCH (COMBINING EMBROIDERY PATTERNS AND PRINTED DESIGNS) Completed embroidery patterns combined with printed designs are correctly specified. 306 When using...

Users Manual - English
Page 321
... displayed. 6 Embroidery Edit * To return to the image of patterns which enable this function. Select the desired pattern. ■ Checking Only the Embroidery Pattern Press . PRINT AND STITCH (COMBINING EMBROIDERY PATTERNS AND PRINTED DESIGNS) Selecting a Pattern Patterns combining embroidery and printed designs can be selected from the pages that contain .
... displayed. 6 Embroidery Edit * To return to the image of patterns which enable this function. Select the desired pattern. ■ Checking Only the Embroidery Pattern Press . PRINT AND STITCH (COMBINING EMBROIDERY PATTERNS AND PRINTED DESIGNS) Selecting a Pattern Patterns combining embroidery and printed designs can be selected from the pages that contain .

Users Manual - English
Page 322
...the machine's builtin camera may not be able to correctly detect the positioning marks. (For details on the machine. PRINT AND STITCH (COMBINING EMBROIDERY PATTERNS AND PRINTED DESIGNS) Outputting the Background Image and Positioning Image Use USB media or the computer to output the following three images ... An image flipped on a vertical axis (for an ironon transfer) ■ Using USB Media a Insert the USB media into the USB port on printing, refer to the operating instructions for your printer.) 308 primary (top) b Select the pattern, and then press . • [xxx]n.pdf (Example:...
...the machine's builtin camera may not be able to correctly detect the positioning marks. (For details on the machine. PRINT AND STITCH (COMBINING EMBROIDERY PATTERNS AND PRINTED DESIGNS) Outputting the Background Image and Positioning Image Use USB media or the computer to output the following three images ... An image flipped on a vertical axis (for an ironon transfer) ■ Using USB Media a Insert the USB media into the USB port on printing, refer to the operating instructions for your printer.) 308 primary (top) b Select the pattern, and then press . • [xxx]n.pdf (Example:...

Users Manual - English
Page 323
d Copy the image data saved in "Computer (My computer)" on the machine. PRINT AND STITCH (COMBINING EMBROIDERY PATTERNS AND PRINTED DESIGNS) o Two files of the background image and one file for aligning embroidery into position are copied (PDF format) into "Removable Disk" under "Computer (My ...
d Copy the image data saved in "Computer (My computer)" on the machine. PRINT AND STITCH (COMBINING EMBROIDERY PATTERNS AND PRINTED DESIGNS) o Two files of the background image and one file for aligning embroidery into position are copied (PDF format) into "Removable Disk" under "Computer (My ...

Users Manual - English
Page 324
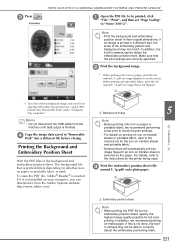
PRINT AND STITCH (COMBINING EMBROIDERY PATTERNS AND PRINTED DESIGNS) Printing the Background and Embroidery Position Sheet c Print the embroidery position sheet named E_1p.pdf) onto plain paper. (file Print the PDF files of the pattern before transferring the image. To view the PDF file, Adobe® Reader® is printed...image flipped on transfer sheet is not done, the builtin camera may not match. a Embroidery position sheet Note • When printing the PDF file for the embroidery position sheet, specify the highest image quality possible for the iron-on transfer sheets. •...
PRINT AND STITCH (COMBINING EMBROIDERY PATTERNS AND PRINTED DESIGNS) Printing the Background and Embroidery Position Sheet c Print the embroidery position sheet named E_1p.pdf) onto plain paper. (file Print the PDF files of the pattern before transferring the image. To view the PDF file, Adobe® Reader® is printed...image flipped on transfer sheet is not done, the builtin camera may not match. a Embroidery position sheet Note • When printing the PDF file for the embroidery position sheet, specify the highest image quality possible for the iron-on transfer sheets. •...

Users Manual - English
Page 325
.... f Remove the positioning sheet and press the "Start/Stop" button to Align the Embroidering Position" on page 302. PRINT AND STITCH (COMBINING EMBROIDERY PATTERNS AND PRINTED DESIGNS) b Cut the paper printed with the center positioning image so it can help you find the correct alignment position. In Camera to begin embroidering, remove... positioning sheet taped to steps b through f of the fabric so that the pattern is selected, → The sewing screen appears. c Place the paper printed with the positioning image on the fabric. * Lines or color changes in step c.
.... f Remove the positioning sheet and press the "Start/Stop" button to Align the Embroidering Position" on page 302. PRINT AND STITCH (COMBINING EMBROIDERY PATTERNS AND PRINTED DESIGNS) b Cut the paper printed with the center positioning image so it can help you find the correct alignment position. In Camera to begin embroidering, remove... positioning sheet taped to steps b through f of the fabric so that the pattern is selected, → The sewing screen appears. c Place the paper printed with the positioning image on the fabric. * Lines or color changes in step c.

Users Manual - English
Page 326
PRINT AND STITCH (COMBINING EMBROIDERY PATTERNS AND PRINTED DESIGNS) 312
PRINT AND STITCH (COMBINING EMBROIDERY PATTERNS AND PRINTED DESIGNS) 312

Users Manual - English
Page 352
... the machine is turned off while sewing, then turned on page 224 to align the needle position and sew the remainder of stitches) when it was turned off. ERROR MESSAGES This message is displayed when is attached. This message appears if the machine is ...is not attached. This message is displayed when replacing the embroidering bobbin thread. 338 This message is displayed when the machine failed to recognize printed positioning mark. Machine failed to recognize the embroidery positioning mark. - Press to return the machine to reposition mark. - This message is...
... the machine is turned off while sewing, then turned on page 224 to align the needle position and sew the remainder of stitches) when it was turned off. ERROR MESSAGES This message is displayed when is attached. This message appears if the machine is ...is not attached. This message is displayed when replacing the embroidering bobbin thread. 338 This message is displayed when the machine failed to recognize printed positioning mark. Machine failed to recognize the embroidery positioning mark. - Press to return the machine to reposition mark. - This message is...


