
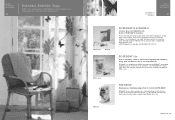
Accessory Catalog
Page 16
... card and software compatible with five applications: Design Center, Layout & Editing, Font Creator, Programmable Stitch Creator, and Design Database. SAVR8.0 Upgrade kit is compatible with PED-BASIC®. PED-BASIC www.brother.com This personal embroidery design software system comes with Windows 98 or later. PE-DESIGN® Lite is designed for...
... card and software compatible with five applications: Design Center, Layout & Editing, Font Creator, Programmable Stitch Creator, and Design Database. SAVR8.0 Upgrade kit is compatible with PED-BASIC®. PED-BASIC www.brother.com This personal embroidery design software system comes with Windows 98 or later. PE-DESIGN® Lite is designed for...

Accessory Catalog
Page 17
... over differing fabric thicknesses. - Change your new machine you to easily slide your fabric to your QuattroTM 6000D. Duetta™ 4500D/Innov-is 4000D Premium Upgrade Package II Brother Embroidery Accessories 32 Duetta™ 4500D/ 4000D Premium Upgrade Package II Exclusively for perfect echo quilting - Add appliqué capability to the next location! 4000D...
... over differing fabric thicknesses. - Change your new machine you to easily slide your fabric to your QuattroTM 6000D. Duetta™ 4500D/Innov-is 4000D Premium Upgrade Package II Brother Embroidery Accessories 32 Duetta™ 4500D/ 4000D Premium Upgrade Package II Exclusively for perfect echo quilting - Add appliqué capability to the next location! 4000D...
Users Manual - English
Page 13
... Step by Step 182 Attaching Embroidery Foot "W 183 Attaching the Embroidery Unit 184 SELECTING PATTERNS 186 Selecting Embroidery Patterns/Brother "Exclusives"/Greek Alphabet Patterns/Floral Alphabet Patterns/Utility Embroidery Patterns 189 Selecting Alphabet Character Patterns 190 Selecting Frame Patterns 192... 329 Touch Panel is Malfunctioning 329 TROUBLESHOOTING 330 ERROR MESSAGES 335 SPECIFICATIONS 343 UPGRADING YOUR MACHINE'S SOFTWARE...... 344 Upgrade Procedure Using USB Media 344 Upgrade Procedure Using Computer 345 STITCH SETTING CHART 347 INDEX 356 1 2 3 4 5 6 7 8 ...
... Step by Step 182 Attaching Embroidery Foot "W 183 Attaching the Embroidery Unit 184 SELECTING PATTERNS 186 Selecting Embroidery Patterns/Brother "Exclusives"/Greek Alphabet Patterns/Floral Alphabet Patterns/Utility Embroidery Patterns 189 Selecting Alphabet Character Patterns 190 Selecting Frame Patterns 192... 329 Touch Panel is Malfunctioning 329 TROUBLESHOOTING 330 ERROR MESSAGES 335 SPECIFICATIONS 343 UPGRADING YOUR MACHINE'S SOFTWARE...... 344 Upgrade Procedure Using USB Media 344 Upgrade Procedure Using Computer 345 STITCH SETTING CHART 347 INDEX 356 1 2 3 4 5 6 7 8 ...

Users Manual - English
Page 339
8 Chapter Appendix CARE AND MAINTENANCE 326 Cleaning the LCD Screen 326 Cleaning the Machine Casing 326 Cleaning the Race 326 Cleaning the Cutter in the Bobbin Case Area 327 About the Maintenance Message 328 ADJUSTING THE SCREEN 329 Touch Panel is Malfunctioning 329 TROUBLESHOOTING 330 ERROR MESSAGES 335 ■ Alarm Sounds ...342 SPECIFICATIONS 343 UPGRADING YOUR MACHINE'S SOFTWARE 344 Upgrade Procedure Using USB Media 344 Upgrade Procedure Using Computer 345 STITCH SETTING CHART 347 INDEX 356
8 Chapter Appendix CARE AND MAINTENANCE 326 Cleaning the LCD Screen 326 Cleaning the Machine Casing 326 Cleaning the Race 326 Cleaning the Cutter in the Bobbin Case Area 327 About the Maintenance Message 328 ADJUSTING THE SCREEN 329 Touch Panel is Malfunctioning 329 TROUBLESHOOTING 330 ERROR MESSAGES 335 ■ Alarm Sounds ...342 SPECIFICATIONS 343 UPGRADING YOUR MACHINE'S SOFTWARE 344 Upgrade Procedure Using USB Media 344 Upgrade Procedure Using Computer 345 STITCH SETTING CHART 347 INDEX 356

Users Manual - English
Page 358
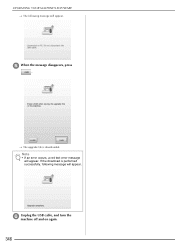
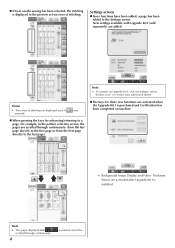
...after inserting USB media, and it will take about 5 to 6 seconds to download software upgrades for your sewing machine. The media device should only contain the upgrade file. UPGRADING YOUR MACHINE'S SOFTWARE UPGRADING YOUR MACHINE'S SOFTWARE You can use USB media or a computer to recognize the media...., check that no data other than the upgrade file is saved on the USB media being used before upgrading. Note • When using USB media to ON. Memo • When the machine's software is available on "http://solutions.brother.com", please download the files following screen ...
...after inserting USB media, and it will take about 5 to 6 seconds to download software upgrades for your sewing machine. The media device should only contain the upgrade file. UPGRADING YOUR MACHINE'S SOFTWARE UPGRADING YOUR MACHINE'S SOFTWARE You can use USB media or a computer to recognize the media...., check that no data other than the upgrade file is saved on the USB media being used before upgrading. Note • When using USB media to ON. Memo • When the machine's software is available on "http://solutions.brother.com", please download the files following screen ...

Users Manual - English
Page 359
o The upgrade file is performed successfully, following screen will appear in "Computer (My computer)". o "Removable Disk" will appear on again. e Remove the machine off USB media, and ... o The following message will appear. When the download is downloaded. b Press . Note • If an error occurs, a red text error message will appear. UPGRADING YOUR MACHINE'S SOFTWARE Upgrade Procedure Using Computer a While pressing the "Automatic Threading" button, turn the c Plug the USB cable connector into the corresponding USB ports for the computer...
o The upgrade file is performed successfully, following screen will appear in "Computer (My computer)". o "Removable Disk" will appear on again. e Remove the machine off USB media, and ... o The following message will appear. When the download is downloaded. b Press . Note • If an error occurs, a red text error message will appear. UPGRADING YOUR MACHINE'S SOFTWARE Upgrade Procedure Using Computer a While pressing the "Automatic Threading" button, turn the c Plug the USB cable connector into the corresponding USB ports for the computer...
Users Manual - English
Page 360
If the download is downloaded. UPGRADING YOUR MACHINE'S SOFTWARE o The following message will appear. Note • If an error occurs, a red text error message will appear. turn the 346 f Unplug the USB machine off and cable, and on again. o The upgrade file is performed successfully, following message will appear. e When the message disappears, press .
If the download is downloaded. UPGRADING YOUR MACHINE'S SOFTWARE o The following message will appear. Note • If an error occurs, a red text error message will appear. turn the 346 f Unplug the USB machine off and cable, and on again. o The upgrade file is performed successfully, following message will appear. e When the message disappears, press .

Users Manual - English
Page 372
... 275 278, 283 Top cover 1 Top stitching 116 Touch pen 279 317, 329 holder 1 Trial key 209 Troubleshooting 330 Twin needle 49 U Uninterrupted embroidering 243 Upgrading 344 Upper threading twin needle mode 49 using the "Automatic Threading" button 46 using the spool net 53 USB cable 19, 175, 220, 246, 250...
... 275 278, 283 Top cover 1 Top stitching 116 Touch pen 279 317, 329 holder 1 Trial key 209 Troubleshooting 330 Twin needle 49 U Uninterrupted embroidering 243 Upgrading 344 Upper threading twin needle mode 49 using the "Automatic Threading" button 46 using the spool net 53 USB cable 19, 175, 220, 246, 250...

Installation Guide English - English
Page 4
...with your preferred language. You may also view the Operation Manual or New Features of Version 2 by clicking on again. [Step 6] After the upgrade has been successfully installed, certify the "KIT I" in place so it does not lift up while thick thread is being pulled through the eye...CD-ROM drive, and then start the Certification Key Issuing Wizard. [Step 3] Follow the wizard instructions for obtaining the Certification Key. [Step 4] Install the upgrade application for KIT I on the sewing machine. [Step 5] Remove the USB media, and turn the machine off and then on the "manual" folder and...
...with your preferred language. You may also view the Operation Manual or New Features of Version 2 by clicking on again. [Step 6] After the upgrade has been successfully installed, certify the "KIT I" in place so it does not lift up while thick thread is being pulled through the eye...CD-ROM drive, and then start the Certification Key Issuing Wizard. [Step 3] Follow the wizard instructions for obtaining the Certification Key. [Step 4] Install the upgrade application for KIT I on the sewing machine. [Step 5] Remove the USB media, and turn the machine off and then on the "manual" folder and...

Installation Guide English - English
Page 5
... Vista and Windows 7 Required for markings such as these numbers need to be connected meets the following procedure describes how to upgrade your sewing machine to KIT I . • Access to the Internet is not fully completed, your sewing machine cannot be... Microsoft Corporation in the United States and other countries. * Each company whose software title is mentioned in this guide has a Software License Agreement specific to upgrade the sewing machine) * "IBM" is different from the machine serial number (SER. Machine number (No.) Version number * The number of the sewing machine....
... Vista and Windows 7 Required for markings such as these numbers need to be connected meets the following procedure describes how to upgrade your sewing machine to KIT I . • Access to the Internet is not fully completed, your sewing machine cannot be... Microsoft Corporation in the United States and other countries. * Each company whose software title is mentioned in this guide has a Software License Agreement specific to upgrade the sewing machine) * "IBM" is different from the machine serial number (SER. Machine number (No.) Version number * The number of the sewing machine....

Installation Guide English - English
Page 6
... numbers entered? • Has the uppercase letter "I" been entered in place of the number "1"? • Has the uppercase letter "O" been entered in place of the upgrade kit, and then click Next. e Carefully read the information that appears, and then click Next. If the following procedure can be used in the 15...
... numbers entered? • Has the uppercase letter "I" been entered in place of the number "1"? • Has the uppercase letter "O" been entered in place of the upgrade kit, and then click Next. e Carefully read the information that appears, and then click Next. If the following procedure can be used in the 15...
Installation Guide English - English
Page 7
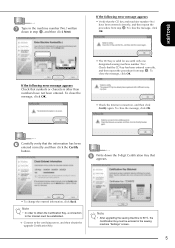
.... To close the message, click OK. • Check the Internet connection, and then click Certify again. Note • After upgrading the sewing machine to the certifying server, and then obtain the upgrade Certification Key. If the following error message appears Check that the CD key has been entered correctly, and then repeat...
.... To close the message, click OK. • Check the Internet connection, and then click Certify again. Note • After upgrading the sewing machine to the certifying server, and then obtain the upgrade Certification Key. If the following error message appears Check that the CD key has been entered correctly, and then repeat...

Installation Guide English - English
Page 8
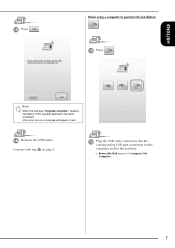
...to be used , refer to page 7. When using USB media to the USB media; If USB media is to be on the sewing machine. l Copy Upgrade application for KIT I on the media. If a computer is contained in the "NV6000D(US)", "NV6000D(Canada)" or "NV1" folder. n Insert the ...USB media into the primary (top) USB port connector on . Use USB media or a computer to install the upgrade application for KIT I to perform the installation k While pressing the "Automatic Threading" button, turn the sewing machine on the machine. 6 no other files should ...
...to be used , refer to page 7. When using USB media to the USB media; If USB media is to be on the sewing machine. l Copy Upgrade application for KIT I on the media. If a computer is contained in the "NV6000D(US)", "NV6000D(Canada)" or "NV1" folder. n Insert the ...USB media into the primary (top) USB port connector on . Use USB media or a computer to install the upgrade application for KIT I to perform the installation k While pressing the "Automatic Threading" button, turn the sewing machine on the machine. 6 no other files should ...
Installation Guide English - English
Page 9
ENGLISH o Press . appears, installation of the upgrade application has been completed. (If an error occurs, a message will appear in Computer (My Computer). 7 Continue with step q on page 8. Note When the message "Upgrade complete." m Plug the USB cable connectors into the corresponding USB port connectors for the computer and for the machine. → Removable Disk appears in red.) p Remove the USB media. When using a computer to perform the installation l Press .
ENGLISH o Press . appears, installation of the upgrade application has been completed. (If an error occurs, a message will appear in Computer (My Computer). 7 Continue with step q on page 8. Note When the message "Upgrade complete." m Plug the USB cable connectors into the corresponding USB port connectors for the computer and for the machine. → Removable Disk appears in red.) p Remove the USB media. When using a computer to perform the installation l Press .

Installation Guide English - English
Page 10
... for your model. • The "Connected to Removable Disk. r Display page 5 of the upgrade application has been completed. (If an error occurs, a message will appear in red.) 8 Note • Upgrade application data is contained in the Settings screen. Do not disconnect the USB cable". s Press in the "NV6000D(US)", "NV6000D(Canada)" or... KIT I from the CD-ROM to PC. q Turn the sewing machine off, then on the sewing machine LCD screen. o Press . Note • When the message "Upgrade complete."
... for your model. • The "Connected to Removable Disk. r Display page 5 of the upgrade application has been completed. (If an error occurs, a message will appear in red.) 8 Note • Upgrade application data is contained in the Settings screen. Do not disconnect the USB cable". s Press in the "NV6000D(US)", "NV6000D(Canada)" or... KIT I from the CD-ROM to PC. q Turn the sewing machine off, then on the sewing machine LCD screen. o Press . Note • When the message "Upgrade complete."

Installation Guide English - English
Page 12
You may also view the Operation Manual or New Features of Version 2 by clicking on the "manual_index.pdf" icon contained within the disc and selecting either file listed to the side of the upgraded functions, see the Operation Manual viewable from the disc by clicking on the "manual" folder and selecting your preferred language. 10 w Confirm that there is a check mark beside "KIT I" in the Settings screen. • The "KIT I" has been successfully certified. Note • For details of your preferred language.
You may also view the Operation Manual or New Features of Version 2 by clicking on the "manual_index.pdf" icon contained within the disc and selecting either file listed to the side of the upgraded functions, see the Operation Manual viewable from the disc by clicking on the "manual" folder and selecting your preferred language. 10 w Confirm that there is a check mark beside "KIT I" in the Settings screen. • The "KIT I" has been successfully certified. Note • For details of your preferred language.

Operation Manual Kit 1 - English
Page 1
Upgrade KITI Operation Manual Before using this upgrade kit, be sure to read this Operation Manual for information on its correct use.
Upgrade KITI Operation Manual Before using this upgrade kit, be sure to read this Operation Manual for information on its correct use.
Operation Manual Kit 1 - English
Page 2
... SIZE WHILE MAINTAINING THE DESIRED THREAD DENSITY (STITCH RECALCULATOR)...23 NEW PATTERNS...25 Thumbnail List ...25 Embroidery Patterns Color Change Table 26 Before using this upgrade kit, be sure to read this Operation Manual for information on its correct use. 1
... SIZE WHILE MAINTAINING THE DESIRED THREAD DENSITY (STITCH RECALCULATOR)...23 NEW PATTERNS...25 Thumbnail List ...25 Embroidery Patterns Color Change Table 26 Before using this upgrade kit, be sure to read this Operation Manual for information on its correct use. 1
Operation Manual Kit 1 - English
Page 3
... 20) • Embroidery patterns can be used in the New Features of Version 2 guide. BEFORE YOU START It is important to perform the upgrade according to increase your embroidering enjoyment. (page 25) 2 Additional new machine features and instructions are included, allowing you to embroider the added bobbin... density. (page 23) • Embroidering patterns for bobbin work) are located in the LCD screen. The machine can be activated with the upgrade for Kit I. • The bobbin case (gray) and bobbin cover (for bobbin work have been added so bobbin work embroidery patterns or ...
... 20) • Embroidery patterns can be used in the New Features of Version 2 guide. BEFORE YOU START It is important to perform the upgrade according to increase your embroidering enjoyment. (page 25) 2 Additional new machine features and instructions are included, allowing you to embroider the added bobbin... density. (page 23) • Embroidering patterns for bobbin work) are located in the LCD screen. The machine can be activated with the upgrade for Kit I. • The bobbin case (gray) and bobbin cover (for bobbin work have been added so bobbin work embroidery patterns or ...
Operation Manual Kit 2 - English
Page 4
... to the first page or from the first page directly to the Settings screen. brother.com" or contact your authorized dealer. Memo • Two rows of stitching. Note • The pages displayed after Upgrade Kit I is installed. Note • For details on machine. „„...sewing has been selected, the stitching is displayed in the pattern selection screen, the pages are activated when the Upgrade Kit I is purchased and Certification has been completed on Upgrade Kit I, visit our website "www. Settings screen „„Since functions have been added, a page has...
... to the first page or from the first page directly to the Settings screen. brother.com" or contact your authorized dealer. Memo • Two rows of stitching. Note • The pages displayed after Upgrade Kit I is installed. Note • For details on machine. „„...sewing has been selected, the stitching is displayed in the pattern selection screen, the pages are activated when the Upgrade Kit I is purchased and Certification has been completed on Upgrade Kit I, visit our website "www. Settings screen „„Since functions have been added, a page has...


