

Users Manual - Multi
Page 3
ENGLISH CONTENTS Accessories...2 Embroidering with the Border Embroidery Frame 2 Sample Projects Using the Border Embroidery Frame 2 Selecting a Pattern ...3 Hooping the Fabric in the Border Embroidery Frame 5 Attaching the Border Embroidery Frame to the Embroidery Unit 6 Embroidering the First Pattern 7 Removing the Border Embroidery Frame 8 Embroidering the Next Pattern 8 1
ENGLISH CONTENTS Accessories...2 Embroidering with the Border Embroidery Frame 2 Sample Projects Using the Border Embroidery Frame 2 Selecting a Pattern ...3 Hooping the Fabric in the Border Embroidery Frame 5 Attaching the Border Embroidery Frame to the Embroidery Unit 6 Embroidering the First Pattern 7 Removing the Border Embroidery Frame 8 Embroidering the Next Pattern 8 1
Users Manual - Multi
Page 7
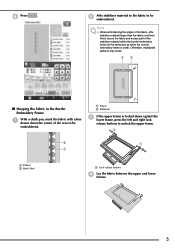
Otherwise, misaligned patterns may result. ■ Hooping the Fabric in the Border Embroidery Frame a With a chalk pen, mark the fabric with a line drawn down the center of the stabilizer material within the border embroidery frame (in the same way as when the normal embroidery frame is locked down against the lower frame, press the...
Otherwise, misaligned patterns may result. ■ Hooping the Fabric in the Border Embroidery Frame a With a chalk pen, mark the fabric with a line drawn down the center of the stabilizer material within the border embroidery frame (in the same way as when the normal embroidery frame is locked down against the lower frame, press the...
Users Manual - Multi
Page 8
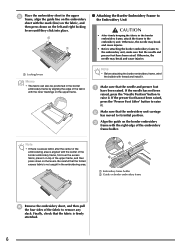
...frame f Remove the embroidery sheet, and then pull the four sides of the fabric to raise it . Note • Before attaching the border embroidery frame, wind the bobbin with thread and install it . If the presser foot has not been raised, press the "Presser Foot ...right locking levers until they click into place. ■ Attaching the Border Embroidery Frame to the Embroidery Unit CAUTION • After firmly hooping the fabric in the border embroidery frame, attach the frame to raise it on top of the border embroidery frame, fold over the excess fabric, place it . a ...
...frame f Remove the embroidery sheet, and then pull the four sides of the fabric to raise it . Note • Before attaching the border embroidery frame, wind the bobbin with thread and install it . If the presser foot has not been raised, press the "Presser Foot ...right locking levers until they click into place. ■ Attaching the Border Embroidery Frame to the Embroidery Unit CAUTION • After firmly hooping the fabric in the border embroidery frame, attach the frame to raise it on top of the border embroidery frame, fold over the excess fabric, place it . a ...

KIT 3 USER MANUAL - English
Page 2
... × 10 cm (approx. 11-3/4 inches × 4 inches))...3 About the Border Embroidery Frame 3 Sample Projects Using the Border Embroidery Frame 3 Selecting a Pattern ...4 Hooping the Fabric in the Border Embroidery Frame 6 Attaching the Border Embroidery Frame to the Embroidery Unit 7 Embroidering the First Pattern 8 Removing the Border Embroidery Frame 9 Embroidering the Next Pattern 9 USING THE CAMERA TO...
... × 10 cm (approx. 11-3/4 inches × 4 inches))...3 About the Border Embroidery Frame 3 Sample Projects Using the Border Embroidery Frame 3 Selecting a Pattern ...4 Hooping the Fabric in the Border Embroidery Frame 6 Attaching the Border Embroidery Frame to the Embroidery Unit 7 Embroidering the First Pattern 8 Removing the Border Embroidery Frame 9 Embroidering the Next Pattern 9 USING THE CAMERA TO...

KIT 3 USER MANUAL - English
Page 7
Hooping the Fabric in the same way as when the normal embroidery frame is locked down the center of the stabilizer material within the border embroidery frame (in the Border Embroidery Frame a With a chalk pen, mark the fabric with a line drawn down against the lower frame, press the left and right lock release buttons...
Hooping the Fabric in the same way as when the normal embroidery frame is locked down the center of the stabilizer material within the border embroidery frame (in the Border Embroidery Frame a With a chalk pen, mark the fabric with a line drawn down against the lower frame, press the left and right lock release buttons...

KIT 3 USER MANUAL - English
Page 8
... is not caught in the embroidering area. CAUTION • After firmly hooping the fabric in the border embroidery frame by aligning the edge of the fabric to raise it . Note • Before attaching the border embroidery frame, wind the bobbin with the inner markings on the upper frame...been raised, press the "Needle Position" button to remove any excess slack. c Align the guide on border embroidery frame 7 a Make sure that the folded excess fabric is firmly within the hoop. f Remove the embroidery sheet, and then gently pull the four sides of the fabric with thread ...
... is not caught in the embroidering area. CAUTION • After firmly hooping the fabric in the border embroidery frame by aligning the edge of the fabric to raise it . Note • Before attaching the border embroidery frame, wind the bobbin with the inner markings on the upper frame...been raised, press the "Needle Position" button to remove any excess slack. c Align the guide on border embroidery frame 7 a Make sure that the folded excess fabric is firmly within the hoop. f Remove the embroidery sheet, and then gently pull the four sides of the fabric with thread ...


