
Accessory Catalog - English
Page 22
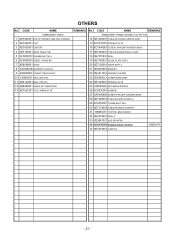
CODE NAME REMARKS EMBROIDERY FRAME HOLDER C (for PR-1000) 14 XE7400001 TUBULAR ROUND ARM RA ASSY 15 XC7076051 SPRING,PLATE 16 XC7644051 SCREW, PAM (S/P WASHER) M3X5 17 XE7149001 TUBLAR ROUND ARM LC ASSY 18 XE7375001 SEAL 19 XE7140001 GUIDE PLATE ASSY 20 XE7152001 HOOP STAY C 21 XE2270001 MAGNET 22 XE2271001 MAGNET HOLDER 23 060300613 SCREW BIND M3X6 24 XE7143001 SPRING PLATE 25 048030346 RETAINING RING E3 26...
CODE NAME REMARKS EMBROIDERY FRAME HOLDER C (for PR-1000) 14 XE7400001 TUBULAR ROUND ARM RA ASSY 15 XC7076051 SPRING,PLATE 16 XC7644051 SCREW, PAM (S/P WASHER) M3X5 17 XE7149001 TUBLAR ROUND ARM LC ASSY 18 XE7375001 SEAL 19 XE7140001 GUIDE PLATE ASSY 20 XE7152001 HOOP STAY C 21 XE2270001 MAGNET 22 XE2271001 MAGNET HOLDER 23 060300613 SCREW BIND M3X6 24 XE7143001 SPRING PLATE 25 048030346 RETAINING RING E3 26...

Users Manual - English
Page 1
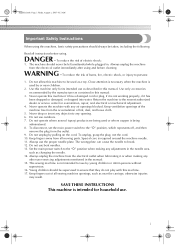
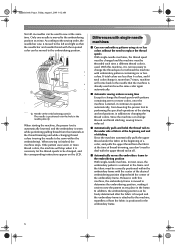
... the "{" position when making any object into water. Never operate this manual. Set the main power switch to persons: 1. Return the machine to break. 12. Never drop or insert any other user servicing adjustments mentioned in this manual. 3. To reduce the risk of electric shock: 1. Sapphire.book Page i Friday, August 1, 2003 9:12 AM Important Safety Instructions When using . Do not use . Keep ventilation openings of lint, dust, and loose cloth...
... the "{" position when making any object into water. Never operate this manual. Set the main power switch to persons: 1. Return the machine to break. 12. Never drop or insert any other user servicing adjustments mentioned in this manual. 3. To reduce the risk of electric shock: 1. Sapphire.book Page i Friday, August 1, 2003 9:12 AM Important Safety Instructions When using . Do not use . Keep ventilation openings of lint, dust, and loose cloth...

Users Manual - English
Page 10
... to change the thread spools with the upper thread tail at all six needles can be used to the machine, regardless of how the fabric is positioned in the embroidery frame. When sewing is positioned over the hole in the frame. With this machine, the embroidery frame is moved to determine the embroidering position, making it continues to operate automatically, from the materials at the same time. Since the machine can change threads and finish stitching, sewing time...
... to change the thread spools with the upper thread tail at all six needles can be used to the machine, regardless of how the fabric is positioned in the embroidery frame. When sewing is positioned over the hole in the frame. With this machine, the embroidery frame is moved to determine the embroidering position, making it continues to operate automatically, from the materials at the same time. Since the machine can change threads and finish stitching, sewing time...

Users Manual - English
Page 15
...Setup location ...7 Setting up the machine...8 Adjusting the operation panel position ...9 Preparing the thread guide assembly ...10 Positioning the spool stand...11 Attaching the embroidery frame holder ...11 EMBROIDERING TUTORIAL 13 Operating Precautions...14 Power supply precautions ...14 Needle precautions ...15 Checking the needle ...15 Bobbin precautions ...15 Upper thread recommendations ...16 Fabric recommendations...16 Display recommendations...16 Basic Procedures ...17 Installing the Bobbin ...18 Removing the bobbin case ...18 Installing the bobbin ...19 Installing the bobbin case...
...Setup location ...7 Setting up the machine...8 Adjusting the operation panel position ...9 Preparing the thread guide assembly ...10 Positioning the spool stand...11 Attaching the embroidery frame holder ...11 EMBROIDERING TUTORIAL 13 Operating Precautions...14 Power supply precautions ...14 Needle precautions ...15 Checking the needle ...15 Bobbin precautions ...15 Upper thread recommendations ...16 Fabric recommendations...16 Display recommendations...16 Basic Procedures ...17 Installing the Bobbin ...18 Removing the bobbin case ...18 Installing the bobbin ...19 Installing the bobbin case...

Users Manual - English
Page 16
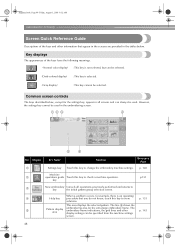
... Upper threading...35 Threading the needle ...39 Sewing the Embroidery...41 Starting embroidering ...41 Stopping embroidering ...43 Checking the Thread Tension 44 Removing the Embroidery Frame and Fabric 45 Removing the embroidery frame ...45 Removing the fabric ...45 Turning Off the Machine ...46 Screen Quick Reference Guide 48 Key displays ...48 Common screen controls ...48 Understanding the pattern type selection screen 49 Understanding the pattern list screen ...50 Understanding the pattern editing screen ...51 Understanding the embroidering settings screen...
... Upper threading...35 Threading the needle ...39 Sewing the Embroidery...41 Starting embroidering ...41 Stopping embroidering ...43 Checking the Thread Tension 44 Removing the Embroidery Frame and Fabric 45 Removing the embroidery frame ...45 Removing the fabric ...45 Turning Off the Machine ...46 Screen Quick Reference Guide 48 Key displays ...48 Common screen controls ...48 Understanding the pattern type selection screen 49 Understanding the pattern list screen ...50 Understanding the pattern editing screen ...51 Understanding the embroidering settings screen...
Users Manual - English
Page 66
... change the embroidery machine settings. Sapphire.book Page 48 Friday, August 1, 2003 9:12 AM EMBROIDERING TUTORIAL Screen Quick Reference Guide Descriptions of the keys have the following meanings. (Normal color display) : This key is not selected, but can always be selected. (Dark-colored display) : This key is an operating 4 Help key procedure that appear in the screens are provided in the tables...
... change the embroidery machine settings. Sapphire.book Page 48 Friday, August 1, 2003 9:12 AM EMBROIDERING TUTORIAL Screen Quick Reference Guide Descriptions of the keys have the following meanings. (Normal color display) : This key is not selected, but can always be selected. (Dark-colored display) : This key is an operating 4 Help key procedure that appear in the screens are provided in the tables...

Users Manual - English
Page 76
... carriage Make sure that the position of upper thread is caught under the bobbin's tension spring. ■ The frame came out from the PC to set the own embroidery colors instead of thread. - The machine remembers the pattern and the position even after turning off the power. And the machine can be deleted. (Refer to page 60) 1 Pretension plates 2 Tension disk pulley ■ Thread tension changed suddenly - Use the "Temporary needle bar setting" function...
... carriage Make sure that the position of upper thread is caught under the bobbin's tension spring. ■ The frame came out from the PC to set the own embroidery colors instead of thread. - The machine remembers the pattern and the position even after turning off the power. And the machine can be deleted. (Refer to page 60) 1 Pretension plates 2 Tension disk pulley ■ Thread tension changed suddenly - Use the "Temporary needle bar setting" function...
Users Manual - English
Page 161
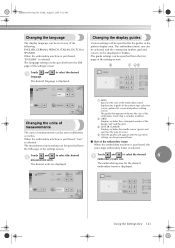
... AM Changing the language The display language can be specified from the first page of the settings screen. ENGLISH, GERMAN, FRENCH, ITALIAN, DUTCH or SPANISH When the embroidery machine is purchased, "ENGLISH" is displayed. The guide settings can be set to select the desired The desired language is selected. The embroidering area for the guides in the pattern type selection screen, pattern list screen and pattern editing...
... AM Changing the language The display language can be specified from the first page of the settings screen. ENGLISH, GERMAN, FRENCH, ITALIAN, DUTCH or SPANISH When the embroidery machine is purchased, "ENGLISH" is displayed. The guide settings can be set to select the desired The desired language is selected. The embroidering area for the guides in the pattern type selection screen, pattern list screen and pattern editing...
Users Manual - English
Page 208
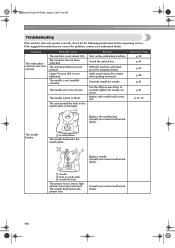
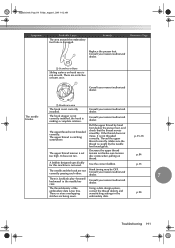
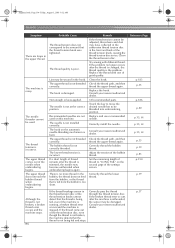
... requesting service. Replace the needle with a new one. Upper Tension dial is bent or blunt. Correctly install the needle. The needle is over tightened. The needle breaks. 1 Scratches/Burrs The needle hits/touchs the needle plate. 12 3 1 Needle 2 Hole in the needle plate is loose. Symptom The embroidery machine does not operate. Consult your nearest authorized dealer. The machine has not been unlocked. Use the Allen screw driver to securely tighten the needle set screw is damaged. 1 Remedy Turn on thread...
... requesting service. Replace the needle with a new one. Upper Tension dial is bent or blunt. Correctly install the needle. The needle is over tightened. The needle breaks. 1 Scratches/Burrs The needle hits/touchs the needle plate. 12 3 1 Needle 2 Hole in the needle plate is loose. Symptom The embroidery machine does not operate. Consult your nearest authorized dealer. The machine has not been unlocked. Use the Allen screw driver to securely tighten the needle set screw is damaged. 1 Remedy Turn on thread...
Users Manual - English
Page 209
... The upper thread tension is not used. p.84 A bobbin designed specifically for this machine is set too high. Consult your nearest authorized dealer. The thread density of the embroidery data is damaged. Sapphire.book Page 191 Friday, August 1, 2003 9:12 AM Symptom Probable Cause The area around the embroidery foot hole is too fine. Thread the upper thread correctly. The upper thread is catching somewhere. Pull the upper thread by the needle bar thread guide. It...
... The upper thread tension is not used. p.84 A bobbin designed specifically for this machine is set too high. Consult your nearest authorized dealer. The thread density of the embroidery data is damaged. Sapphire.book Page 191 Friday, August 1, 2003 9:12 AM Symptom Probable Cause The area around the embroidery foot hole is too fine. Thread the upper thread correctly. The upper thread is catching somewhere. Pull the upper thread by the needle bar thread guide. It...
Users Manual - English
Page 210
The needle set screw. The upper thread breaks. 12 Consult your nearest authorized dealer. 1 Scratches/Burrs The needle is touching the needle plate. Use the Allen screw driver to tighten the needle set screw is set too high and not correctly positioned. Reference Page p.61 p.61 p.15, 61 Replace the needle plate or consult your nearest authorized dealer. 3 1 Needle 2 Needle plate hole 3 Needle touching hole The presser foot is loose. The area around the hole in the needle plate is damaged. Replace the presser foot. 1 Consult...
The needle set screw. The upper thread breaks. 12 Consult your nearest authorized dealer. 1 Scratches/Burrs The needle is touching the needle plate. Use the Allen screw driver to tighten the needle set screw is set too high and not correctly positioned. Reference Page p.61 p.61 p.15, 61 Replace the needle plate or consult your nearest authorized dealer. 3 1 Needle 2 Needle plate hole 3 Needle touching hole The presser foot is loose. The area around the hole in the needle plate is damaged. Replace the presser foot. 1 Consult...

Users Manual - English
Page 212
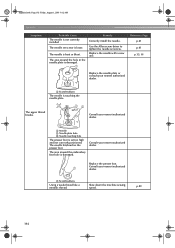
.... Remove the thread jammed and clean the hook. Use tweezers to correctly frame the fabric in the embroidery frame (for the size of the embroidery. The bobbin case is too weak due to the needle. The needle is broken. The needle and the hook are being sewn. Delete all stitches with an extremely small pitch. Probable Cause The automatic needle-threading mechanism is bent or blunt. Replace the bobbin case. Thread the upper thread correctly...
.... Remove the thread jammed and clean the hook. Use tweezers to correctly frame the fabric in the embroidery frame (for the size of the embroidery. The bobbin case is too weak due to the needle. The needle is broken. The needle and the hook are being sewn. Delete all stitches with an extremely small pitch. Probable Cause The automatic needle-threading mechanism is bent or blunt. Replace the bobbin case. Thread the upper thread correctly...

Users Manual - English
Page 214
.... Not enough oil was tightened. The hook on the automatic needle-threading mechanism is poor. Clean the thread tension disc. Try sewing with one of thread remains after the machine is not threaded correctly. Consult your nearest authorized dealer. Correctly install the needle. Adjust the tension of the needle when embroidering begins. If the broken thread error occurs after the thread is too short. The needle threader cannot be threaded into embroidering position. The upper thread is rethreaded...
.... Not enough oil was tightened. The hook on the automatic needle-threading mechanism is poor. Clean the thread tension disc. Try sewing with one of thread remains after the machine is not threaded correctly. Consult your nearest authorized dealer. Correctly install the needle. Adjust the tension of the needle when embroidering begins. If the broken thread error occurs after the thread is too short. The needle threader cannot be threaded into embroidering position. The upper thread is rethreaded...

Users Manual - English
Page 226
... needle bar 70 M Machine operations guide key 48, 151 Main power switch 3, 20, 46 Maintenance 151, 183 Manual needle bar settings 94 Maximum sewing speed key 54, 55 Merge key 52 Mounting jig 172 Moving needle 40 Multi color key 52, 125 N Names of machine parts 2 Needle 15 changing 61 Needle bar case 2 Needle bar key 35, 55 Needle plate 184 New embroidery key 48 Next page key 50 Number of thread color changes 50, 51, 53 O Oiling 186 Operation panel 2, 3, 9 Optional accessories 5 P Pattern...
... needle bar 70 M Machine operations guide key 48, 151 Main power switch 3, 20, 46 Maintenance 151, 183 Manual needle bar settings 94 Maximum sewing speed key 54, 55 Merge key 52 Mounting jig 172 Moving needle 40 Multi color key 52, 125 N Names of machine parts 2 Needle 15 changing 61 Needle bar case 2 Needle bar key 35, 55 Needle plate 184 New embroidery key 48 Next page key 50 Number of thread color changes 50, 51, 53 O Oiling 186 Operation panel 2, 3, 9 Optional accessories 5 P Pattern...
Users Manual - English
Page 227
... 98, 149, 163 Temporary needle bar setting key 56, 92 Tension dial 44, 84 Terry cloth 167 Thread 15, 16, 35, 164 Thread color 130, 146, 163 Thread color display 145 Thread color set up display 55 Thread guide 2, 36 Thread guide assembly support 2 Thread guide pin 2 Thread spools 75 Thread tension 83, 160 7 Thread tension disc 37 Thread tension knobs 2, 84 Thread trimming button 3, 43 Threading needle 39 upper thread 33, 35 Touch panel 3 Trial sewing key 32, 54 Troubleshooting 151, 189 T-shirt 167...
... 98, 149, 163 Temporary needle bar setting key 56, 92 Tension dial 44, 84 Terry cloth 167 Thread 15, 16, 35, 164 Thread color 130, 146, 163 Thread color display 145 Thread color set up display 55 Thread guide 2, 36 Thread guide assembly support 2 Thread guide pin 2 Thread spools 75 Thread tension 83, 160 7 Thread tension disc 37 Thread tension knobs 2, 84 Thread trimming button 3, 43 Threading needle 39 upper thread 33, 35 Touch panel 3 Trial sewing key 32, 54 Troubleshooting 151, 189 T-shirt 167...
Users Manual - English
Page 1
... instructions before cleaning. Set the main power switch to ensure that they do not play with any other user servicing adjustments mentioned in this manual. 3. Always unplug the machine from the outlet. 9. Return the machine to persons: 1. Do not use bent needles. 13. Use only accessories recommended by or near the carriage, otherwise injuries may result. Never operate this machine. 17. Always unplug the machine from all sewing machine openings...
... instructions before cleaning. Set the main power switch to ensure that they do not play with any other user servicing adjustments mentioned in this manual. 3. Always unplug the machine from the outlet. 9. Return the machine to persons: 1. Do not use bent needles. 13. Use only accessories recommended by or near the carriage, otherwise injuries may result. Never operate this machine. 17. Always unplug the machine from all sewing machine openings...
Users Manual - English
Page 10
... to change the thread spool or rethread the machine with single-needle machines ■ Can sew embroidery patterns using six or less colors without the need to deal with the center of how the fabric is positioned over the hole in addition to changing the thread colors. However, with this machine, it continues to operate automatically, from lowering the presser foot to performing the specified operations at the starting the machine, the presser foot is automatically lowered, and the embroidery...
... to change the thread spool or rethread the machine with single-needle machines ■ Can sew embroidery patterns using six or less colors without the need to deal with the center of how the fabric is positioned over the hole in addition to changing the thread colors. However, with this machine, it continues to operate automatically, from lowering the presser foot to performing the specified operations at the starting the machine, the presser foot is automatically lowered, and the embroidery...

Users Manual - English
Page 212
... bobbin. Try using a new spool. The fabric is tangled. The thread is misaligned. Clean the hook and the needle plate. The embroidery pattern is tangled. The thread quality is not taut, the pattern may become misaligned or the stitching may shrink. The embroidery data contains many stitches with a new one. Replace the needle. Consult your nearest authorized dealer. Sapphire.book Page 194 Friday, August 1, 2003 9:12 AM Appendix Symptom The upper thread breaks. Replace the bobbin case. Replace...
... bobbin. Try using a new spool. The fabric is tangled. The thread is misaligned. Clean the hook and the needle plate. The embroidery pattern is tangled. The thread quality is not taut, the pattern may become misaligned or the stitching may shrink. The embroidery data contains many stitches with a new one. Replace the needle. Consult your nearest authorized dealer. Sapphire.book Page 194 Friday, August 1, 2003 9:12 AM Appendix Symptom The upper thread breaks. Replace the bobbin case. Replace...
Users Manual - English
Page 214
... desired needle bar to "LONG TAIL" on the automatic needle-threading mechanism is noisy. The lower thread tension is not installed correctly. Try sewing with one of the settings screen. Replace the thread with different thread. Clean the hook. Replace and use recommended needle. Check the thread path, and then thread the upper thread again. If the problem no more thread in the thread tension disc of the bobbin thread. If the thread breakage sensor in the bobbin, the thread does not feed...
... desired needle bar to "LONG TAIL" on the automatic needle-threading mechanism is noisy. The lower thread tension is not installed correctly. Try sewing with one of the settings screen. Replace the thread with different thread. Clean the hook. Replace and use recommended needle. Check the thread path, and then thread the upper thread again. If the problem no more thread in the thread tension disc of the bobbin thread. If the thread breakage sensor in the bobbin, the thread does not feed...
Users Manual - English
Page 226
... needle bar 70 M Machine operations guide key 48, 151 Main power switch 3, 20, 46 Maintenance 151, 183 Manual needle bar settings 94 Maximum sewing speed key 54, 55 Merge key 52 Mounting jig 172 Moving needle 40 Multi color key 52, 125 N Names of machine parts 2 Needle 15 changing 61 Needle bar case 2 Needle bar key 35, 55 Needle plate 184 New embroidery key 48 Next page key 50 Number of thread color changes 50, 51, 53 O Oiling 186 Operation panel 2, 3, 9 Optional accessories 5 P Pattern...
... needle bar 70 M Machine operations guide key 48, 151 Main power switch 3, 20, 46 Maintenance 151, 183 Manual needle bar settings 94 Maximum sewing speed key 54, 55 Merge key 52 Mounting jig 172 Moving needle 40 Multi color key 52, 125 N Names of machine parts 2 Needle 15 changing 61 Needle bar case 2 Needle bar key 35, 55 Needle plate 184 New embroidery key 48 Next page key 50 Number of thread color changes 50, 51, 53 O Oiling 186 Operation panel 2, 3, 9 Optional accessories 5 P Pattern...


