

Users Manual - English
Page 6
vi Sapphire.book Page vi Friday, August 1, 2003 9:12 AM Warning Labels The following warning labels are on the machine. Be sure to observe the precautions described in the labels. 1 2 Label locations Please put one drop of oil to the hook before you use, everyday.
vi Sapphire.book Page vi Friday, August 1, 2003 9:12 AM Warning Labels The following warning labels are on the machine. Be sure to observe the precautions described in the labels. 1 2 Label locations Please put one drop of oil to the hook before you use, everyday.
Users Manual - English
Page 18
...Using a frame pattern to create appliqués (1 157 Using a frame pattern to create appliqués (2 158 Helpful Tips for the Operation of PR-600 160 Checking the thread tension of built-in patterns 160 Sewing a pattern aligned with a mark on the fabric 161 Color thread table ...163 Colors ... Connecting the AC adapter ...179 Winding the bobbin ...180 Maintenance...183 Cleaning the LCD...183 Cleaning the machine surface ...183 Cleaning the hook ...183 Cleaning around the needle plate...184 Cleaning the bobbin case ...185 Oiling the machine ...186 Cleaning the magnetic head of the floppy...
...Using a frame pattern to create appliqués (1 157 Using a frame pattern to create appliqués (2 158 Helpful Tips for the Operation of PR-600 160 Checking the thread tension of built-in patterns 160 Sewing a pattern aligned with a mark on the fabric 161 Color thread table ...163 Colors ... Connecting the AC adapter ...179 Winding the bobbin ...180 Maintenance...183 Cleaning the LCD...183 Cleaning the machine surface ...183 Cleaning the hook ...183 Cleaning around the needle plate...184 Cleaning the bobbin case ...185 Oiling the machine ...186 Cleaning the magnetic head of the floppy...

Users Manual - English
Page 20
... the tension of the thread. 2 Thread Guide Pin 3 Needle bar case The case moves to the left and right. 5 Hook cover/Hook Open the hook cover, and then insert the bobbin case into the hook. 6 Thread guide 7 Thread guide assembly support 8 Spool stand Put 6 thread spools to embroider. 9 Operation panel 0 Feet Use the feet...
... the tension of the thread. 2 Thread Guide Pin 3 Needle bar case The case moves to the left and right. 5 Hook cover/Hook Open the hook cover, and then insert the bobbin case into the hook. 6 Thread guide 7 Thread guide assembly support 8 Spool stand Put 6 thread spools to embroider. 9 Operation panel 0 Feet Use the feet...
Users Manual - English
Page 36
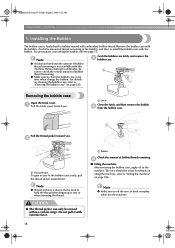
...is not available with embroidery bobbin thread. Grab the bobbin case latch, and remove the 3 bobbin case. 1 Removing the bobbin case Open the hook cover. 1 Pull the hook cover toward you. 1 Latch Close the latch, and then remove the bobbin 4 from the bobbin case. 1 Pull the thread picker toward front.... For details on page 185. Note ● Thread picker is a device that shows the amount of hook everyday when use the machine. Remove the bobbin case with the bobbin, check the amount of thread remaining in the bobbin, and then re-install...
...is not available with embroidery bobbin thread. Grab the bobbin case latch, and remove the 3 bobbin case. 1 Removing the bobbin case Open the hook cover. 1 Pull the hook cover toward you. 1 Latch Close the latch, and then remove the bobbin 4 from the bobbin case. 1 Pull the thread picker toward front.... For details on page 185. Note ● Thread picker is a device that shows the amount of hook everyday when use the machine. Remove the bobbin case with the bobbin, check the amount of thread remaining in the bobbin, and then re-install...

Users Manual - English
Page 37
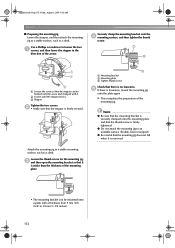
...1 Tab 2 Notch • Fully insert the bobbin case until it snaps 1 into the hook. 1 Insert the bobbin case while aligning the tab on the bobbin case with the notch in the hook, as shown in the illustration. If the bobbin is not equipped with a bobbin-winder. ...AM Installing the bobbin Insert the bobbin into the bobbin case. 1 Installing the bobbin case Insert the bobbin case into place. 2 3 4 5 6 Close the hook cover. 2 7 8 9 10 11 Memo 12 ● This embroidery machine is installed with the thread winding off the bobbin clockwise as shown in the illustration....
...1 Tab 2 Notch • Fully insert the bobbin case until it snaps 1 into the hook. 1 Insert the bobbin case while aligning the tab on the bobbin case with the notch in the hook, as shown in the illustration. If the bobbin is not equipped with a bobbin-winder. ...AM Installing the bobbin Insert the bobbin into the bobbin case. 1 Installing the bobbin case Insert the bobbin case into place. 2 3 4 5 6 Close the hook cover. 2 7 8 9 10 11 Memo 12 ● This embroidery machine is installed with the thread winding off the bobbin clockwise as shown in the illustration....
Users Manual - English
Page 57
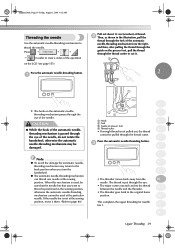
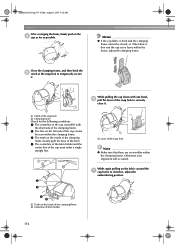
... the automatic needle-threading mechanism from the 10 needle. The thread is not at the particular needle. CAUTION ● While the hook of the automatic needlethreading mechanism is passed through the eye of the needle, do not rotate the handwheel, otherwise the automatic needle-...threading mechanism may be damaged. 3 2 1 1 Hook 3 2 Fork 3 Guide on presser foot 4 Thread cutter 4 • If enough thread is positioned as shown in order to the original home position...
... the automatic needle-threading mechanism from the 10 needle. The thread is not at the particular needle. CAUTION ● While the hook of the automatic needlethreading mechanism is passed through the eye of the needle, do not rotate the handwheel, otherwise the automatic needle-...threading mechanism may be damaged. 3 2 1 1 Hook 3 2 Fork 3 Guide on presser foot 4 Thread cutter 4 • If enough thread is positioned as shown in order to the original home position...

Users Manual - English
Page 96
Pull the trim end of the upper thread. • If the hook cover can be opened , temporarily remove the embroidery frame. (Refer to page 45.) After replacing the bobbin, reattach the embroidery frame. (Refer to page 30.) &#... frame is removed before embroidering of the pattern is finished, be cleanly removed, trim the thread with a bag-shaped piece of fabric, or if the hook cover cannot be opened , replace the bobbin without removing the embroidery frame from the machine. • If the machine bed is hidden, for example, with...
Pull the trim end of the upper thread. • If the hook cover can be opened , temporarily remove the embroidery frame. (Refer to page 45.) After replacing the bobbin, reattach the embroidery frame. (Refer to page 30.) &#... frame is removed before embroidering of the pattern is finished, be cleanly removed, trim the thread with a bag-shaped piece of fabric, or if the hook cover cannot be opened , replace the bobbin without removing the embroidery frame from the machine. • If the machine bed is hidden, for example, with...
Users Manual - English
Page 173
...173 Installing the embroidery frame holder / 176 Maintenance ...183 Cleaning the LCD / 183 Cleaning the machine surface / 183 Cleaning the hook / 183 Cleaning around the needle plate / 184 Cleaning the bobbin case / 185 Oiling the machine / 186 Cleaning the magnetic head... / 165 Hooping Techniques / 166 Fabric/stabilizer compatibility chart / 167 OPTIONAL ACCESSORIES Attaching an optional embroidery frame for the Operation of PR-600 160 Checking the thread tension of the floppy disk drive / 188 Troubleshooting ...189 On-screen troubleshooting / 189 Troubleshooting / 190 Error...
...173 Installing the embroidery frame holder / 176 Maintenance ...183 Cleaning the LCD / 183 Cleaning the machine surface / 183 Cleaning the hook / 183 Cleaning around the needle plate / 184 Cleaning the bobbin case / 185 Oiling the machine / 186 Cleaning the magnetic head... / 165 Hooping Techniques / 166 Fabric/stabilizer compatibility chart / 167 OPTIONAL ACCESSORIES Attaching an optional embroidery frame for the Operation of PR-600 160 Checking the thread tension of the floppy disk drive / 188 Troubleshooting ...189 On-screen troubleshooting / 189 Troubleshooting / 190 Error...

Users Manual - English
Page 184
... side. Inner/outer frame positioning: There should be generated between design parts. The wrong size or type of embroidery frame may cause puckers around the hook assembly. Pull no more than is removed.
... side. Inner/outer frame positioning: There should be generated between design parts. The wrong size or type of embroidery frame may cause puckers around the hook assembly. Pull no more than is removed.
Users Manual - English
Page 190
... removed. Securely clamp the mounting bracket onto the 4 mounting surface, and then tighten the thumb screw. 1 2 1 Loosen the screw so that the stopper can be hooked onto the screw and clamped with a thickness from 9 mm (3/8 inch) to 38 mm (1-1/2 inches). 172 Use a Phillips screwdriver to a stable mounting surface, such as a desk...
... removed. Securely clamp the mounting bracket onto the 4 mounting surface, and then tighten the thumb screw. 1 2 1 Loosen the screw so that the stopper can be hooked onto the screw and clamped with a thickness from 9 mm (3/8 inch) to 38 mm (1-1/2 inches). 172 Use a Phillips screwdriver to a stable mounting surface, such as a desk...
Users Manual - English
Page 192
... frame. 2 The line on the fabric around the 7 cap frame to temporarily secure it , adjust the embroidering position. 174 Close the clamping frame, and then hook the 5 catch of the cap cannot be closed, or if the fabric is thin and the cap is parallel with one hand, 6 pull the lever...
... frame. 2 The line on the fabric around the 7 cap frame to temporarily secure it , adjust the embroidering position. 174 Close the clamping frame, and then hook the 5 catch of the cap cannot be closed, or if the fabric is thin and the cap is parallel with one hand, 6 pull the lever...
Users Manual - English
Page 201
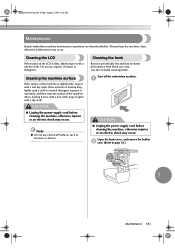
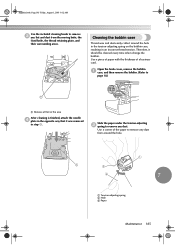
...cord before cleaning the machine, otherwise injuries or an electric shock may occur. Note ● Do not use organic cleansers or detergents. Open the hook cover, and remove the bobbin 2 case. (Refer to page 18.) 7 Maintenance 183 If the machine is slightly dirty, wipe it with ...a soft dry cloth. Use the included cleaning brush. Cleaning the hook Remove periodically lint and dust for better performance from Hook race area. Sapphire.book Page 183 Friday, August 1, 2003 9:12 AM Maintenance Simple embroidery machine maintenance operations are...
...cord before cleaning the machine, otherwise injuries or an electric shock may occur. Note ● Do not use organic cleansers or detergents. Open the hook cover, and remove the bobbin 2 case. (Refer to page 18.) 7 Maintenance 183 If the machine is slightly dirty, wipe it with ...a soft dry cloth. Use the included cleaning brush. Cleaning the hook Remove periodically lint and dust for better performance from Hook race area. Sapphire.book Page 183 Friday, August 1, 2003 9:12 AM Maintenance Simple embroidery machine maintenance operations are...
Users Manual - English
Page 202
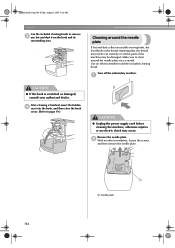
...retaining plate, the thread may not be damaged. Turn off the embroidery machine. 1 CAUTION ● If the hook is finished, insert the bobbin 4 case into the hook, and then close the hook cover. (Refer to page 19.) CAUTION ● Unplug the power supply cord before cleaning the machine, otherwise ...around the needle plate If lint and dust collect around the needle plate once a month. Make sure to remove 3 any lint and dust from the hook and its surrounding area. Remove the needle plate. 2 With an offset screwdriver, loosen the screws, and then remove the needle plate. 1 1 Needle...
...retaining plate, the thread may not be damaged. Turn off the embroidery machine. 1 CAUTION ● If the hook is finished, insert the bobbin 4 case into the hook, and then close the hook cover. (Refer to page 19.) CAUTION ● Unplug the power supply cord before cleaning the machine, otherwise ...around the needle plate If lint and dust collect around the needle plate once a month. Make sure to remove 3 any lint and dust from the hook and its surrounding area. Remove the needle plate. 2 With an offset screwdriver, loosen the screws, and then remove the needle plate. 1 1 Needle...
Users Manual - English
Page 203
... the hole in the tension-adjusting spring on the bobbin case, resulting in step 2. Therefore, it was removed in an incorrect thread tension. Open the hook cover, remove the bobbin 1 case, and then remove the bobbin. (Refer to page 18.) 1 1 Remove all lint in this area After cleaning is finished, attach...
... the hole in the tension-adjusting spring on the bobbin case, resulting in step 2. Therefore, it was removed in an incorrect thread tension. Open the hook cover, remove the bobbin 1 case, and then remove the bobbin. (Refer to page 18.) 1 1 Remove all lint in this area After cleaning is finished, attach...
Users Manual - English
Page 204
Afterward, apply 1 drop of oil into the hook, and then close the hook cover. (Refer to clean the bobbin case. Use the enclosed cleaning brush to page 19.) 186 In addition, do not use the machine everyday. ■ ... 19.) CAUTION ● Unplug the power supply cord before use anything other than thick paper or paper of hook before cleaning the machine, otherwise injuries or an electric shock may occur. Open the hook cover, and remove the bobbin 2 case. (Refer to remove 3 any lint and dust from inside the bobbin case...
Afterward, apply 1 drop of oil into the hook, and then close the hook cover. (Refer to clean the bobbin case. Use the enclosed cleaning brush to page 19.) 186 In addition, do not use the machine everyday. ■ ... 19.) CAUTION ● Unplug the power supply cord before use anything other than thick paper or paper of hook before cleaning the machine, otherwise injuries or an electric shock may occur. Open the hook cover, and remove the bobbin 2 case. (Refer to remove 3 any lint and dust from inside the bobbin case...

Users Manual - English
Page 205
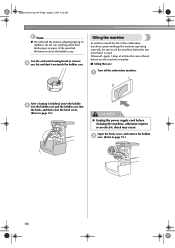
... rotate the handwheel counterclockwise. Sapphire.book Page 187 Friday, August 1, 2003 9:12 AM Rotate the handwheel (about 50 degrees) to 3 move the race of the hook to a position where it can easily be oiled. 1 1 Handwheel • Be sure to page 18.) 7 Maintenance 187 If too much oil. Fabric or .... ● Do not apply too much oil is applied, wipe off any other type of the hook becomes loud, apply oil onto the race hook. 1 1 Apply oil here. After oiling, insert the bobbin case into the hook race every day. ● Apply only sewing machine oil. Use of any excess with a rag....
... rotate the handwheel counterclockwise. Sapphire.book Page 187 Friday, August 1, 2003 9:12 AM Rotate the handwheel (about 50 degrees) to 3 move the race of the hook to a position where it can easily be oiled. 1 1 Handwheel • Be sure to page 18.) 7 Maintenance 187 If too much oil. Fabric or .... ● Do not apply too much oil is applied, wipe off any other type of the hook becomes loud, apply oil onto the race hook. 1 1 Apply oil here. After oiling, insert the bobbin case into the hook race every day. ● Apply only sewing machine oil. Use of any excess with a rag....
Users Manual - English
Page 209
... tension disc rotate when pulling on it is not correctly installed. Use the correct bobbin. Hook timing may be OFF. Consult your nearest authorized dealer. 1 Scratches or Burrs Sliding surface on hook race is backlash play (forward/ backward) in the embroidery data. Using a data design ... sure the thread is making a complete rotation. There are scratches or burrs on thread. Consult your nearest authorized dealer. 1 Hook race area The hook is not threaded correctly. Remedy Reference Page Replace the presser foot. 1 Consult your nearest authorized dealer. The...
... tension disc rotate when pulling on it is not correctly installed. Use the correct bobbin. Hook timing may be OFF. Consult your nearest authorized dealer. 1 Scratches or Burrs Sliding surface on hook race is backlash play (forward/ backward) in the embroidery data. Using a data design ... sure the thread is making a complete rotation. There are scratches or burrs on thread. Consult your nearest authorized dealer. 1 Hook race area The hook is not threaded correctly. Remedy Reference Page Replace the presser foot. 1 Consult your nearest authorized dealer. The...
Users Manual - English
Page 211
...the machine and re-thread the machine. p.15 A bobbin designed specifically for this machine is not wound correctly. The upper thread breaks. 1 Hook race area The thread is correctly wound or rewind the bobbin. There are knots or tangles in the thread. p.36-37 There are burns ...on hook is tangled in the hook area. If the thread is not smooth. p.83 7 incorrect. Replace the bobbin case with one . Consult your nearest authorized dealer...
...the machine and re-thread the machine. p.15 A bobbin designed specifically for this machine is not wound correctly. The upper thread breaks. 1 Hook race area The thread is correctly wound or rewind the bobbin. There are knots or tangles in the thread. p.36-37 There are burns ...on hook is tangled in the hook area. If the thread is not smooth. p.83 7 incorrect. Replace the bobbin case with one . Consult your nearest authorized dealer...

Users Manual - English
Page 212
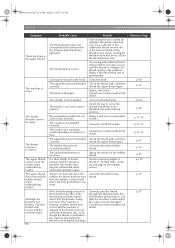
... in irregular loop formation. Correctly thread the bobbin thread. Replace the bobbin. Thread the upper thread correctly. Improper twisting results in the hook. Try using a new spool. If the fabric is bent or blunt. Stitches are being sewn. Adhesive is not correctly threaded. The...the embroidery data is not installed correctly. The needle is too fine. Remedy Consult your nearest authorized dealer. The needle and the hook are not correctly passing each other. Delete all stitches with an extremely small pitch. Consult your nearest authorized dealer. Use tweezers ...
... in irregular loop formation. Correctly thread the bobbin thread. Replace the bobbin. Thread the upper thread correctly. Improper twisting results in the hook. Try using a new spool. If the fabric is bent or blunt. Stitches are being sewn. Adhesive is not correctly threaded. The...the embroidery data is not installed correctly. The needle is too fine. Remedy Consult your nearest authorized dealer. The needle and the hook are not correctly passing each other. Delete all stitches with an extremely small pitch. Consult your nearest authorized dealer. Use tweezers ...
Users Manual - English
Page 214
... not reach the bobbin thread when embroidering begins. Although the thread is rethreaded, the sensor may have collected in the hook. The hook is noisy. Replace the hook. Consult your nearest authorized dealer. Set the remaining length of the thread tension knob, causing the thread tension disc to... thread is not broken, the machine detects that the thread tension knob was applied. Replace the thread with different thread. Clean the hook. Touch the key to move the desired needle bar to the amount that the thread is the problem. Replace and use recommended needle...
... not reach the bobbin thread when embroidering begins. Although the thread is rethreaded, the sensor may have collected in the hook. The hook is noisy. Replace the hook. Consult your nearest authorized dealer. Set the remaining length of the thread tension knob, causing the thread tension disc to... thread is not broken, the machine detects that the thread tension knob was applied. Replace the thread with different thread. Clean the hook. Touch the key to move the desired needle bar to the amount that the thread is the problem. Replace and use recommended needle...


