
Brother International CE-5000PRW Support Question
Brother International CE-5000PRW Support Question
Find answers below for this question about Brother International CE-5000PRW.Need a Brother International CE-5000PRW manual? We have 1 online manual for this item!
Question posted by Bgfuller1981 on August 22nd, 2015
How Do I Adjust The Hook Timming On The Brother Ce5000prw
The person who posted this question about this Brother International product did not include a detailed explanation. Please use the "Request More Information" button to the right if more details would help you to answer this question.
Current Answers
Answer #1: Posted by TechSupport101 on August 22nd, 2015 6:52 PM
TechSupport101

Member since:
May 24th, 2013 Points: 12,171,305

Member since:
May 24th, 2013 Points: 12,171,305
Please see the User Manual here https://www.helpowl.com/manuals/Brother%20International/CE5000PRW/154608 for the best walk through on adjusting the hook timming on the Brother Sewing machine model.
Related Brother International CE-5000PRW Manual Pages
Users Manual - English - Page 1

KNOWING YOUR SEWING MACHINE SEWING BASICS UTILITY STITCHES APPENDIX
Computerized Sewing Machine
Operation Manual
Users Manual - English - Page 2
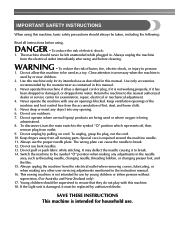
.... Always use by pulling on cord. This sewing machine is damaged, it to ensure that they do not play with any adjustments in . SAVE THESE INSTRUCTIONS This machine is required around the machine needle. 11. IMPORTANT SAFETY INSTRUCTIONS
When using this machine only for examination, repair, electrical or mechanical adjustment.
4. Do not unplug by young children or...
Users Manual - English - Page 4
...notice.
2
When storing this manual and specifications of the most advanced computerized household sewing machines. Use only neutral soaps or detergents to turn off the power switch and unplug ... adjust the machine yourself. Do not drop or hit the machine. 4. Do not touch the hand wheel, thread take- Do not use extension cords. Be sure to keep your local authorized Brother dealer...
Users Manual - English - Page 5
...5
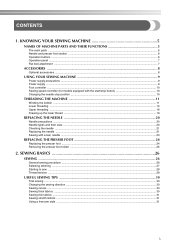
The main parts ...5 Needle and presser foot section ...6 Operation buttons ...6 Operation panel ...7 Flat bed attachment ...7
ACCESSORIES ...8
Optional accessories ...8
USING YOUR SEWING MACHINE 9
Power supply precautions ...9 Power supply ...9 Foot controller ...10 Sewing speed controller (for models equipped with the start/stop button 10 Changing the needle stop position ...10
THREADING THE...
Users Manual - English - Page 7
... foot controller plug.
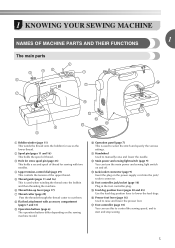
k Handwheel Used to start and stop sewing.
5 q Foot controller (page 10) You can turn the main power and sewing light switch on the power supply cord into the jack/ socket... winding the thread onto the bobbin and then threading the machine.
1 KNOWING YOUR SEWING MACHINE
1
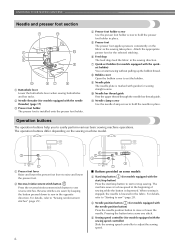
NAMES OF MACHINE PARTS AND THEIR FUNCTIONS
The main parts
a Bobbin winder (page 11) This...
Users Manual - English - Page 8
... (for models equipped with the quickset bobbin) You can start /stop button to adjust the sewing speed.
6
Operation buttons
The operation buttons help you to raise and lower the presser foot.
The machine sews at a slow speed at the beginning of sewing while the button is marked with guides for models equipped with the start...
Users Manual - English - Page 9

...attachment. press the "+" side to increase the stitch length.)
d Stitch width adjustment key Press this key to adjust the stitch length. (Press the "-" side to reduce the stitch length; ...Stitch length adjustment key Press this key to adjust the stitch width. (Press the "-" side to reduce the stitch width; Operation panel
The operation panel, located on the front of the sewing machine, allows ...
Users Manual - English - Page 10
KNOWING YOUR SEWING MACHINE
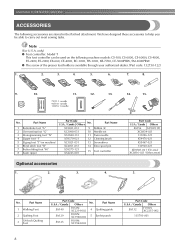
ACCESSORIES
The following machine models: CS-100, CS-6000, CS-6000i, CS-4000, ES-2400, ES-2000, EX-660, CE-4000, BC-1000, HS-1000, XR-7700, CE-5000PRW, SM-6500PRW
&#...SA132
F016N: XC2215-002
135793-001
8 We have designed these accessories to help you be used on machine) 6 Blind stitch foot "R" 7 Button fitting foot "M" 8 Seam ripper
Part Code U.S.A. / Canada...
Users Manual - English - Page 11
... electric shock. ● Do not allow the power cord to correctly operate the machine.
(For U.S.A.
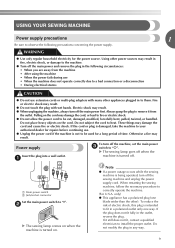
USING YOUR SEWING MACHINE
Power supply precautions
1
Be sure to observe the following circumstances: • When...a wall outlet. Note
● If a power outage occurs while the sewing machine is being operated, turn off the machine, set the main power c switch to fit in the outlet, reverse ...
Users Manual - English - Page 12
....
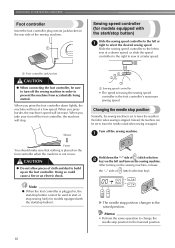
10 a
Faster
You should make sure that nothing is the foot controller's maximum sewing speed. Slower
a Sewing speed controller
• The speed set using the sewing speed controller is placed on the sewing machine, release
the "-" side of the sewing machine. KNOWING YOUR SEWING MACHINE
Foot controller
Insert the foot controller plug into its jack/socket on the rear...
Users Manual - English - Page 13
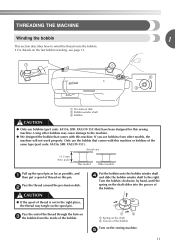
... bobbin.
1
2
a Spring on the shaft b Groove of thread on the sewing machine. Using other models, the machine will not work properly.
If you use bobbins from the inside of the thread ...with this pin. Only use bobbins (part code: SA156, SFB: XA5539-151) that comes with this sewing machine. Pass the thread around the pre-tension disk.
e
11
Pass the end of the bobbin. b...
Users Manual - English - Page 14
...start /stop button).
g
CAUTION
● Make sure you follow the instructions carefully. KNOWING YOUR SEWING MACHINE
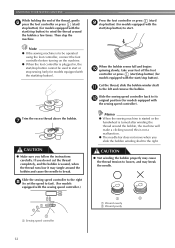
While holding the end of the thread, gently f press the foot controller or press (start/
... used to its l original position (for models equipped with the sewing speed controller.)
Memo
● When the sewing machine is started or the handwheel is wound, when the thread runs ...
Users Manual - English - Page 15
...; When the foot controller is wound without cutting the thread using the foot controller, connect the foot controller before turning on the sewing machine.
Slide the sewing speed controller back to the right. If the bobbin is plugged in the bobbin or the needle may break the needle. c
While holding the thread ...
Users Manual - English - Page 16
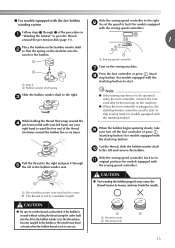
...
• Only use bobbins that the thread is correctly
inserted through the tension-adjusting spring of the same type (part code: SA156, SFB: XA5539-151). CAUTION...sewing machine.
Lower threading
Install the bobbin wound with this machine.
CAUTION
● Make sure you slide the bobbin winding shaft to be injured. KNOWING YOUR SEWING MACHINE
Memo
● When the sewing machine...
Users Manual - English - Page 19
... as shown in a "Upper threading" to thread the machine to break.
If you may tangle on page 20 for models equipped with home sewing machine needles size 75/11100/16.
Follow steps 1 through the...needles, such as the twin needle and wing needle.
b
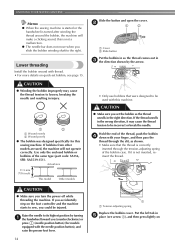
While lowering the needle threader lever, c hook the thread onto the guide. Note
● If the thread take -up lever is off when...
Users Manual - English - Page 20

... (2 inch)
Note
● If you incorrectly feed the thread you and the hook passes through the eye of the sewing
machine. X The end of the needle threader rotates toward the back of the needle.
KNOWING YOUR SEWING MACHINE
Fully lower the needle threader lever. e
a Hook b Thread
While lightly holding the thread, release the f needle threader lever.
Users Manual - English - Page 29

... changes the digit on the right and pressing on the left .
■ [Example] Selecting stitch . a Stitch width adjustment key b Narrow c Wide
Note
● When the stitch length or stitch width is turned on the sewing machine. The
b
number of in the needle bending or breaking.
27 c
Note
● The presser foot to be...
Users Manual - English - Page 40
... foot "M"
38 Attach buttonhole foot "A". UTILITY STITCHES
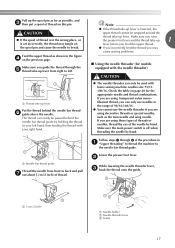
■ Sewing buttonholes on stretch fabrics When sewing buttonholes on the base, to (to the right as seen from the front of the machine).
c
Adjust the stitch width to remove any excess of the fabric, and
then tie it .
Hook the gimp thread onto the part of a buttonhole...
Users Manual - English - Page 41
... stitch width so that the needle
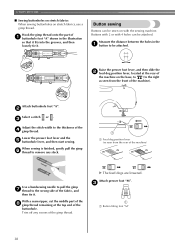
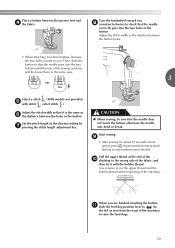
correctly goes into the two holes of the sewing machine, and then sew them in the button. Set the stitch length to the shortest setting by g pressing the stitch length adjustment key.
Start sewing.
Use scissors to cut the upper thread and the bobbin thread at low speed, press...
Users Manual - English - Page 53

... fabrics.
If the needle hits the presser foot, the needle may bend or break.
● After adjusting the stitch width, slowly turn the handwheel toward you (counterclockwise) and check that the right side d ...one side. wing needle, otherwise the sewing machine
may be sewn over so that the needle does not touch the presser foot. Heirloom stitching
When sewing with the
center of 6.0 mm ...
Similar Questions

How To Thread A Bobbin On My Brother Sewing Machine Ce5000prw
(Posted by jerryMell 9 years ago)
Does A Brother Ce5000prw Need To Be Oiled
(Posted by Auswo 9 years ago)

Best Stitch To Use When Quilting On A Brother Ce5000prw
(Posted by bmarmathe 9 years ago)

Replace And Adjust Belt Of Brother Vx950 Sewing Machine
(Posted by Lettycvrealestate 10 years ago)

How To Adjust Hook Timing On A Brother Ce8080prw Sewing Machine
(Posted by bensbPea 10 years ago)