
Brother International CE8080PRW Support Question
Brother International CE8080PRW Support Question
Find answers below for this question about Brother International CE8080PRW.Need a Brother International CE8080PRW manual? We have 6 online manuals for this item!
Question posted by bensbPea on September 16th, 2013
How To Adjust Hook Timing On A Brother Ce8080prw Sewing Machine
The person who posted this question about this Brother International product did not include a detailed explanation. Please use the "Request More Information" button to the right if more details would help you to answer this question.
Current Answers
Related Brother International CE8080PRW Manual Pages
Users Manual - English - Page 1
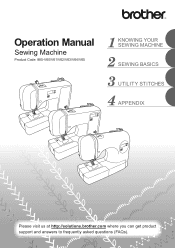
Operation Manual
Sewing Machine
Product Code: 885-V60/V61/V62/V63/V64/V65
KNOWING YOUR SEWING MACHINE
SEWING BASICS
UTILITY STITCHES
APPENDIX
Please visit us at http://solutions.brother.com where you can get product support and answers to frequently asked questions (FAQs).
Users Manual - English - Page 6
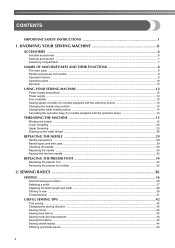
... ...35
2. SEWING BASICS 36
SEWING ...36
General sewing procedure ...36 Selecting a stitch ...37 Adjusting the stitch length and width ...38 Starting to sew ...39 Thread tension ...41
USEFUL SEWING TIPS ...42
Trial sewing ...42 Changing the sewing direction ...42 Sewing curves ...42 Sewing thick fabrics ...42 Sewing hook-and-loop fastener ...43 Sewing thin fabrics ...44 Sewing stretch fabrics...
Users Manual - English - Page 11
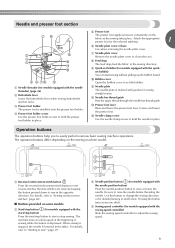
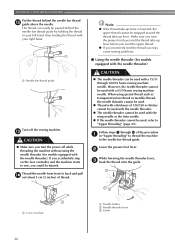
...the needle position button) Press the needle position button to adjust the sewing speed.
9 Attach the appropriate presser foot for sewing straight seams.
l Needle bar thread guide Pass the upper ... foot
The presser foot applies pressure consistently on the sewing machine model.
The machine sews at a slow speed at the beginning of sewing while the button is installed onto the presser foot ...
Users Manual - English - Page 12

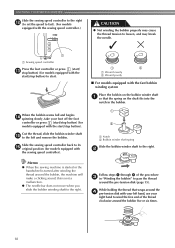
... the "+" side to increase the stitch length.) d Stitch width adjustment key Press this key to adjust the stitch length. (Press the "-" side to reduce the stitch length; Spool pin
As shown, press down on the sewing machine model.
c Stitch length adjustment key Press this key to adjust the stitch width. (Press the "-" side to raise the...
Users Manual - English - Page 14

KNOWING YOUR SEWING MACHINE
USING YOUR SEWING MACHINE
Power supply precautions
Be sure to "{".
To reduce the risk of time. Do not place heavy objects on . Otherwise a fire may result. ● When unplugging the machine, always turn off the machine, set the main power c switch to observe the following circumstances:
• When you are firmly inserted into the...
Users Manual - English - Page 16

...beep)
When the sewing machine is purchased, it is set to beep each time a key is now set so that it is turned on the sewing
machine. Turn off the sewing machine. X The initial...sewing machine is turned off.
● Perform the same operation to change the setting so that the machine does not beep. After turning on the sewing machine, release
the "-" side of
(stitch width
b adjustment...
Users Manual - English - Page 19

...Then stop button) to wind the thread around the bobbin a few times. Note
● If the sewing machine is to be operated using the foot controller, connect the foot controller...out 7 to 10 cm (2-3/4 to the right. Note
● Make sure that the thread passes under the g hook of the bobbin-winding thread guide, and
then wind the thread counterclockwise
CAUTION
between the discs, pulling it in ,...
Users Manual - English - Page 20
... the bobbin five or six times.
18 b
Follow steps a through g of the thread clockwise around the d pre-tension disk with the sewing speed controller.)
CAUTION
● Not winding the bobbin properly may cause the thread tension to loosen, and may break the needle.
Memo
● When the sewing machine is started or the handwheel...
Users Manual - English - Page 23

...thread through
equipped with the needle position button), and
the tension-adjusting spring of the bobbin
raise the presser foot lever. case, it may cause incorrect thread tension
1
(page 41).
Be sure to thread the machine as shown, lightly pull the thread to guide it through the... by marks on
the right side (see arrow b) until the cover clicks into place. Turn off the sewing machine.
Users Manual - English - Page 24

... through the tension-adjusting spring of the bobbin case, it with e your right hand as shown, guide the thread
through the slit (a and b). • At this time, check that the...SEWING MACHINE
While lightly holding down the bobbin with the cutter (c). Replace the bobbin cover. Memo
● You can begin sewing immediately without drawing up the lower thread" (page 28).
1
a Tension-adjusting ...
Users Manual - English - Page 28
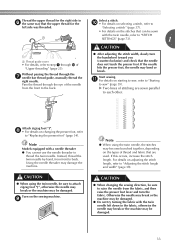
... steps a through 100/16 home sewing machine needle. The thread can be used with the wing needle or the twin needle.
● If the needle threader cannot be injured.
Thread the needle from front to sew, you turn the power off the sewing machine. b
While lowering the needle threader lever, c hook the thread onto the guide.
Users Manual - English - Page 35
... the twin needle. "Selecting a stitch" (page 37).
• For details on adjusting the stitch length, refer to sew" (page 39). Start sewing.
Thread the upper thread for the
Select a stitch.
If the needle hits the presser foot, the needle may damage the machine.
Attach zigzag foot "J". Note
Models equipped with the twin needle left...
Users Manual - English - Page 39
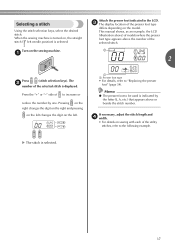
... necessary, adjust the stitch length and d width.
• For details on the left needle position) is selected.
Press the "+" or "-" side of the selected stitch is indicated by one. a Presser foot type
• For details, refer to be used is displayed. X The stitch is turned on the model. When the sewing machine is...
Users Manual - English - Page 74
...to
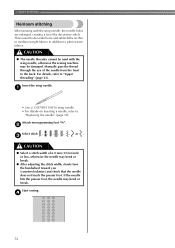
"Replacing the needle" (page 30). Insert the wing needle. b
Select stitch or . Start sewing.
c
CAUTION
● Select a stitch width of the needle from the front to plain weave fabrics. a...or break. UTILITY STITCHES
Heirloom stitching
When sewing with the wing needle, otherwise the sewing machine may bend or break.
● After adjusting the stitch width, slowly turn the handwheel ...
Users Manual - English - Page 82
...
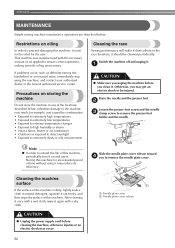
MAINTENANCE
Simple sewing machine maintenance operations are described below , otherwise damage to the machine may occur.
80
a Needle plate cover b Needle plate cover release
a
CAUTION
● Make sure you unplug the machine before cleaning the machine, otherwise injuries or an electric shock may result, for an extended period of the machine.
Cleaning the machine surface
If...
Users Manual - English - Page 85

....
If the bobbin is adjusted.
You can solve most problems by yourself. Frequent troubleshooting topics
Detailed causes and remedies for common troubleshooting topics are described below .) • The upper thread has tightened up, and comes out when pulled. • The upper thread has tightened up . Turn off the sewing machine. a Lower side of...
Users Manual - English - Page 89
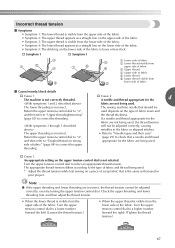
...tension.)
• When the upper thread is visible from the lower side of the fabric. The sewing machine needle that should be
used depends on wrong side of fabric" (page 84) to correct the ...134; Cause 1 The machine is not correctly threaded.
Note
● If the upper threading and lower threading are not being used . * Adjust the thread tension while test sewing on a piece of scrap...
Users Manual - English - Page 99
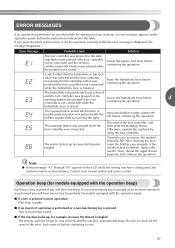
... operation.
4
buttonhole lever is tangled The sewing machine beeps for the cause of the error, ...time a key is bent or broken, replace the needle. The motor locked up , an error message appears on the operation panel. If you will hear two or four beeps (only for example, because the thread is raised.
ERROR MESSAGES
If an operation is performed incorrectly before the sewing machine...
Users Manual - English - Page 100
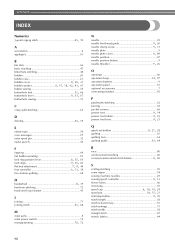
...8, 44 foot controller 6 13, 39
free-motion quilting 64
H
, handwheel 8 39
heirloom stitching 72 hook-and-loop fastener 43
J
joining 71
, joining stitch 61 68
M
main parts 8 main power switch 12...40
, reverse/reinforcement stitch button 9 40
S
scallop stitching 70 seam ripper 54 sewing machine needles 29
, sewing speed controller 9 13
sleeve holes 66 smocking 70
spool cap 6 10, 15, ...
Users Manual - English - Page 14
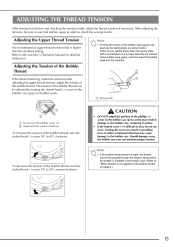
... top surface of the bobbin thread. The tension of the bobbin thread can be achieved after adjusting the upper thread tension, adjust the tension of the bobbin case (gray), and then insert the bobbin case into the machine. ADJUSTING THE THREAD TENSION
After sewing trial stitches and checking the sewing results, adjust the thread tensions if necessary.
Similar Questions

Why Wont My New Brother Ce8080prw Sewing Machine Sew
(Posted by grweblet 9 years ago)

How To Thread A Brother Ce8080prw Sewing Machine
(Posted by ds302moreck 10 years ago)

How To Service My Brother Ce8080prw Sewing Machine
(Posted by amageva 10 years ago)
Replace And Adjust Belt Of Brother Vx950 Sewing Machine
(Posted by Lettycvrealestate 10 years ago)

Where Can I Buy Brother Ce8080prw Sewing Machine Spare Parts?
I need to buy Broher sewing machine spare part. Part number:XE7316001 01221201119300073CT. Brand:...
I need to buy Broher sewing machine spare part. Part number:XE7316001 01221201119300073CT. Brand:...
(Posted by brothernyxami 11 years ago)