
Brother International CE8080PRW Support Question
Brother International CE8080PRW Support Question
Find answers below for this question about Brother International CE8080PRW.Need a Brother International CE8080PRW manual? We have 6 online manuals for this item!
Question posted by amageva on February 22nd, 2014
How To Service My Brother Ce8080prw Sewing Machine
The person who posted this question about this Brother International product did not include a detailed explanation. Please use the "Request More Information" button to the right if more details would help you to answer this question.
Current Answers
Related Brother International CE8080PRW Manual Pages
Users Manual - English - Page 1
Operation Manual
Sewing Machine
Product Code: 885-V60/V61/V62/V63/V64/V65
KNOWING YOUR SEWING MACHINE
SEWING BASICS
UTILITY STITCHES
APPENDIX
Please visit us at http://solutions.brother.com where you can get product support and answers to frequently asked questions (FAQs).
Users Manual - English - Page 6
... and width ...38 Starting to sew ...39 Thread tension ...41
USEFUL SEWING TIPS ...42
Trial sewing ...42 Changing the sewing direction ...42 Sewing curves ...42 Sewing thick fabrics ...42 Sewing hook-and-loop fastener ...43 Sewing thin fabrics ...44 Sewing stretch fabrics ...44 Stitching cylindrical pieces ...44
4 KNOWING YOUR SEWING MACHINE 6
ACCESSORIES ...6
Included accessories ...6 Optional...
Users Manual - English - Page 8
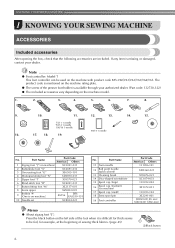
... XC1074-051 130012-024
XE1372-001
130013-124 XE2241-001 XD0501-021 (EU area) XC8816-021 (Other areas)
Memo
● About zigzag foot "J"; KNOWING YOUR SEWING MACHINE
1 KNOWING YOUR SEWING MACHINE
ACCESSORIES
Included accessories
After opening the box, check that the following accessories are included.
Users Manual - English - Page 10
... select the stitch and specify the various settings.
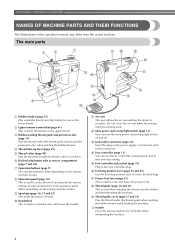
o Foot controller jack/socket (page 13) Plug in this to control the sewing speed, and to start and stop sewing.
KNOWING YOUR SEWING MACHINE
NAMES OF MACHINE PARTS AND THEIR FUNCTIONS
The illustrations in the foot controller plug.
b Upper tension-control dial (page 41) This controls the...
Users Manual - English - Page 11
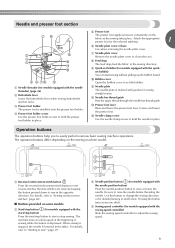
Needle and presser foot section
e Presser foot
The presser foot applies pressure consistently on the sewing machine model. Attach the appropriate presser foot for detailed sewing in place. i Quick-set bobbin (for models equipped with guides for sewing straight seams.
l Needle bar thread guide Pass the upper thread through the needle bar thread guide. c Presser...
Users Manual - English - Page 12

...display location (2) of the presser foot type differs
depending on the sewing machine model. For details, refer to increase the stitch width.)
10 ...the stitch length; The operation panel differs depending on the model. KNOWING YOUR SEWING MACHINE
Operation panel
The operation panel, located on the front of the sewing machine, allows you wish to use. CAUTION
● Do not grab the ...
Users Manual - English - Page 13
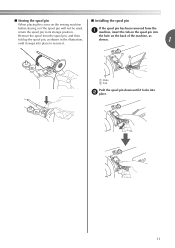
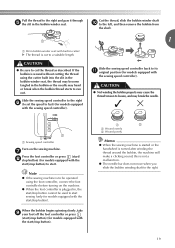
...; Storing the spool pin
■ Installing the spool pin
When placing the cover on the back of the machine, as
fold up the spool pin, as shown in the illustration,
shown.
1
until it locks into place...pin has been removed from the a machine, insert the tab on the spool pin into
Remove the spool from the spool pin, and then
the hole on the sewing machine
before storing or if the spool pin...
Users Manual - English - Page 14

... intended to fit in to them.
Power supply
Insert the plug into a wall outlet.
Do not place heavy objects on .
KNOWING YOUR SEWING MACHINE
USING YOUR SEWING MACHINE
Power supply precautions
Be sure to observe the following circumstances:
• When you are firmly inserted into the electrical outlet and the power supply jack ...
Users Manual - English - Page 15
... its jack/socket on the rear side of (stitch selection key).
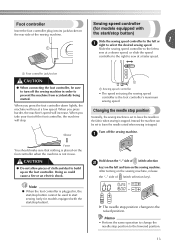
When you take your foot off the sewing machine. Slower
a Sewing speed controller
• The speed set to build up on the foot controller. Sewing speed controller
(for models equipped with
the start/stop position changes to leave the needle in the fabric...
Users Manual - English - Page 16

... selection key).
Memo
● The specified initial needle position is maintained even after the machine is turned on the sewing
machine. KNOWING YOUR SEWING MACHINE
Changing the initial needle position
Normally, the straight stitch (left needle position) is automatically selected when the sewing machine is turned off.
● Perform the same operation to change the setting so...
Users Manual - English - Page 17

... to wind the thread onto the bobbin. • For details on the spool pin lever a with this sewing machine. Remove the spool cap. If you use bobbins from other bobbins may cause damage to the machine.
● We designed the bobbin that comes with your finger.
a Spool pin b Spool cap
CAUTION
● Be...
Users Manual - English - Page 18

... toward the left hand. Memo
● When sewing with your right hand so that there is no slack in the spool or the machine may be damaged. d With the slightly rounded side...machine may be damaged.
● Three spool cap sizes are available, allowing you to choose a spool cap that the spool is horizontal and the thread unwinds to the front at the bottom. KNOWING YOUR SEWING MACHINE...
Users Manual - English - Page 19

...holding the end of the
thread straight up.
If you follow the instructions carefully.
a Spring on the sewing machine. b Hook c Pretension disk d Pull it in , the start/stop button cannot be operated using ...the needle to break.
17
Then stop button). Note
● If the sewing machine is to be used to start sewing (only for models equipped with the start /stop button) to wind the...
Users Manual - English - Page 20
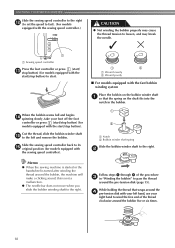
... button). While holding the thread that the spring on the shaft fits into the
notch in "Winding the bobbin" to the right. KNOWING YOUR SEWING MACHINE
Slide the sewing speed controller to the right l (to set the speed to fast). (For models
equipped with your left and remove the bobbin. Cut the thread...
Users Manual - English - Page 21
... in bobbin winder seat (with built-in cutter)
X The thread is plugged in, the start/stop button).
1
2
a Wound evenly b Wound poorly
Memo
● When the sewing machine is started or the handwheel is not a malfunction.
● The needle bar does not move when you slide the bobbin winding shaft to a suitable length...
Users Manual - English - Page 82
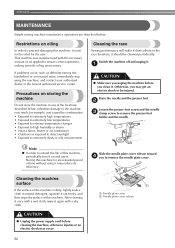
...sewing machine maintenance operations are described below , otherwise damage to prevent damaging this machine, periodically turn it on oiling
In order to the machine may reduce its efficiency. Precautions on storing the machine
Do not store the machine in any of time without using the machine, and contact your authorized dealer or the nearest authorized service...
This machine was ...
Users Manual - English - Page 85

... the lower thread is visible from the bobbin case. If you need additional help, the Brother Solutions Center offers the latest FAQs and troubleshooting tips. Turn off the sewing machine. Then, with your dealer or the nearest authorized service center. a Lower side of fabric b Lower thread visible from the upper side of the appropriate...
Users Manual - English - Page 90
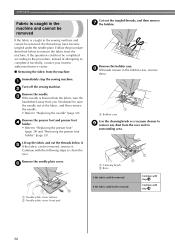
... to the procedure, instead of attempting to complete it forcefully, contact your nearest authorized service center.
■ Removing the fabric from you (clockwise) to raise the needle out...Fabric is caught in the machine and cannot be removed
If the fabric is lowered into the fabric, turn the
handwheel away from the machine
Immediately stop the sewing machine.
Follow the procedure described...
Users Manual - English - Page 95
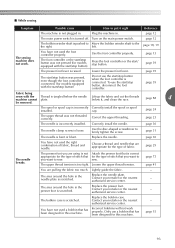
... designed for the type of fabric, thread and needle. Contact your retailer or the nearest authorized service center.
- You have not used the foot controller properly.
The presser foot you want to sew.
page 18, 19
The sewing machine does not work properly.
The upper thread tension is turned off. Loosen the upper thread...
Users Manual - English - Page 99
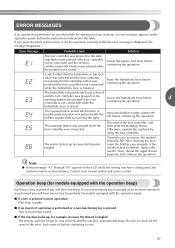
... Move the bobbin winder shaft to remove the tangled thread (p.84).
Contact your nearest authorized service center. The start / stop button was pressed (or the start /stop button.
Operation ... left before continuing the operation. If the needle is tangled The sewing machine beeps for four seconds and the machine automatically stops.
If a non-functioning key is pressed or an ...
Similar Questions

How To Service Brother Vx1435 Sewing Machine
(Posted by kumarwquint 9 years ago)

Why Wont My New Brother Ce8080prw Sewing Machine Sew
(Posted by grweblet 9 years ago)

How To Thread A Brother Ce8080prw Sewing Machine
(Posted by ds302moreck 9 years ago)

How To Adjust Hook Timing On A Brother Ce8080prw Sewing Machine
(Posted by bensbPea 10 years ago)
Where Can I Buy Brother Ce8080prw Sewing Machine Spare Parts?
I need to buy Broher sewing machine spare part. Part number:XE7316001 01221201119300073CT. Brand:...
I need to buy Broher sewing machine spare part. Part number:XE7316001 01221201119300073CT. Brand:...
(Posted by brothernyxami 11 years ago)