
Brother International CE8080PRW Support Question
Brother International CE8080PRW Support Question
Find answers below for this question about Brother International CE8080PRW.Need a Brother International CE8080PRW manual? We have 6 online manuals for this item!
Question posted by brothernyxami on September 12th, 2012
Where Can I Buy Brother Ce8080prw Sewing Machine Spare Parts?
I need to buy Broher sewing machine spare part. Part number:XE7316001 01221201119300073CT.
Brand: Brother
Model: CE8080PRW
thank you
Current Answers
Related Brother International CE8080PRW Manual Pages
Users Manual - English - Page 1
Operation Manual
Sewing Machine
Product Code: 885-V60/V61/V62/V63/V64/V65
KNOWING YOUR SEWING MACHINE
SEWING BASICS
UTILITY STITCHES
APPENDIX
Please visit us at http://solutions.brother.com where you can get product support and answers to frequently asked questions (FAQs).
Users Manual - English - Page 6
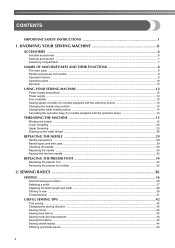
... ...6 Optional accessories ...7 Accessory compartment ...7
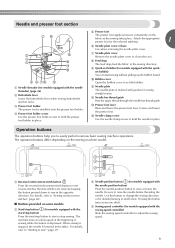
NAMES OF MACHINE PARTS AND THEIR FUNCTIONS 8
The main parts ...8 Needle and presser foot section ...9 Operation buttons ...9 Operation panel ...10 Spool pin ...10
USING YOUR SEWING MACHINE 12
Power supply precautions ...12 Power supply ...12 Foot controller ...13 Sewing speed controller (for models equipped with the start/stop button 13...
Users Manual - English - Page 8
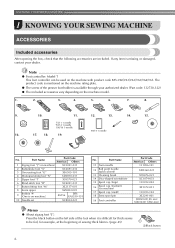
... dealer. (Part code: 132730-122)
● The included accessories vary depending on machine)
17 Spool cap (small)
18 Extra spool pin
19 Foot controller
Part Code Americas Others...controller: Model T This foot controller can be fed, for thick seams to be used on the machine with product code 885-V60/V61/V62/V63/V64/V65. KNOWING YOUR SEWING MACHINE
1 KNOWING YOUR SEWING MACHINE
ACCESSORIES...
Users Manual - English - Page 10
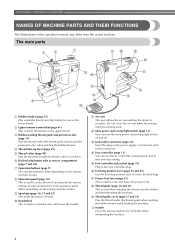
...sewing machine model.
b Upper tension-control dial (page 41) This controls the tension of the operation panel differs depending on and off.
h Operation panel (page 10) This is used to manually raise and lower the needle. l Main power and sewing light switch (page 12) You can use as the lower thread.
The main parts... the machine. KNOWING YOUR SEWING MACHINE
NAMES OF MACHINE PARTS AND ...
Users Manual - English - Page 11
... to "Starting to easily perform various basic sewing machine operations. k Needle plate The needle plate is installed onto the presser foot holder.
Reverse stitches are sewn by keeping the button pressed down to change the sewing direction or for models equipped with the quick-
For details, refer to "Sewing reinforcement stitches" (page 40).
■ Buttons...
Users Manual - English - Page 12

... example, the LCD (illustration above) of models where the presser foot type appears above the number of the presser foot type differs
depending on the model. CAUTION
● Do not grab the bar...with the rounded side toward the spool pin.
Spool pin
As shown, press down on the sewing machine model.
press the "+" side to increase the stitch length.) d Stitch width adjustment key Press this...
Users Manual - English - Page 13
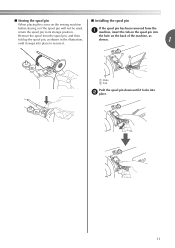
... the spool pin
■ Installing the spool pin
When placing the cover on the back of the machine, as
fold up the spool pin, as shown in the illustration,
shown.
1
until it snaps into... spool pin has been removed from the a machine, insert the tab on the spool pin into
Remove the spool from the spool pin, and then
the hole on the sewing machine
before storing or if the spool pin will...
Users Manual - English - Page 15
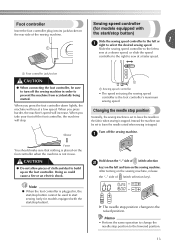
... run at a faster speed.
Turn off the sewing machine in , the start/stop button cannot be used to start sewing (only for models equipped with the start /stop button). a
Faster
You should make sure that nothing is the foot controller's maximum sewing speed. Hold down lightly, the machine will increase. After turning on the foot controller...
Users Manual - English - Page 16

... of
(stitch width adjustment
key).
a
Cancelling the operation beep (for models equipped with the operation beep)
When the sewing machine is purchased, it is pressed.
X The initial needle position changes to beep each time a key is set to the center needle position.
X The machine is now set so that it is turned on. Memo...
Users Manual - English - Page 17

... sewing machine.
a Spool pin b Spool cap
CAUTION
● Be sure to raise the spool pin, otherwise, the spool pin may bend or break. Actual size
11.5 mm (7/16 inch)
This model
Other models
... swings up.
The thread may cause damage to the machine.
● We designed the bobbin that comes with this machine or bobbins of the same type (part code: SA156, SFB: XA5539-151). b
CAUTION
&#...
Users Manual - English - Page 19

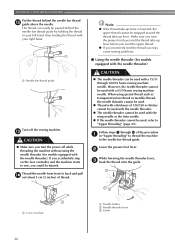
... cm (3/8 inch) of thread from the hole on the bobbin.
Then stop button). Note
● If the sewing machine is to be operated using the foot controller, connect the foot controller before turning on the bobbin.
1
a 1...pulled taut or held at an angle, injuries
1
may not be used to start sewing (only for models equipped with the start /stop button) to wind the thread around
the bobbin. ...
Users Manual - English - Page 22

... its highest position by turning a the handwheel toward you turn the power off the sewing machine. Turn off while threading the machine.
b
Slide the button and open the cover. Use only the enclosed bobbin or bobbins of the same type (part code: SA156, SFB: XA5539-151). If you accidentally step on quick-set the...
Users Manual - English - Page 28
... onto the guide.
Follow steps a through 100/16 home sewing machine needle. Lower the presser foot lever. When using the needle threader (for models equipped with a 65/9 home sewing machine needle.
Thread the needle from front to sew, you accidentally step on the foot controller and the machine starts to back and pull n out about 5 cm (2 inches...
Users Manual - English - Page 33
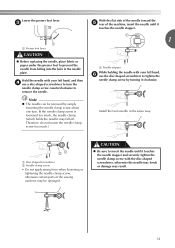
...• Do not apply strong force when loosening or tightening the needle clamp screw, otherwise certain parts of the machine, insert the needle until it
touches the needle stopper.
1
a Presser foot lever
CAUTION
●...can be damaged. c
With the flat side of the needle toward the e rear of the sewing machine may result.
31 Hold the needle with your left hand, and then d use the disc-...
Users Manual - English - Page 34
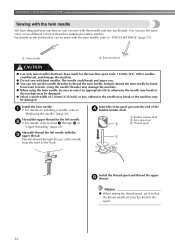
... your machine so you . ● You can sew with this machine (part code: 131096-121). b • For details, refer to steps a through the eye of 5.0 mm (3/16 inch) or less, otherwise the needle may break or the machine may
be sewn with the twin needle, refer to
"Replacing the needle" (page 30). KNOWING YOUR SEWING MACHINE
Sewing with...
Users Manual - English - Page 38
... the sewing machine. Before operating the sewing machine, read the following precautions.
When sewing is in injuries. ● Make sure that the needle does not strike basting pins, otherwise the needle may break.
● Never use bent needles. Select the stitch appropriate for the stitch.
In addition, keep your hands away from all moving parts such...
Users Manual - English - Page 47

... foot controller or (start/stop button) is accidentally pressed and the machine starts sewing.
Using zigzag foot
Sew with the edge of 5.0 mm (3/16 inch) or less.
...They are also useful for sewing stretch materials. Pattern Presser Foot 100 stitches model 90 stitches model 80 stitches model 70 stitches model 60 stitches model 50 stitches model 40 stitches model Twin Needle Walking Foot ...
Users Manual - English - Page 85

...9632; Fabric is pulled up. For this before requesting service.
Turn off the sewing machine.
a Lower side of the fabric. Then, with an incorrect thread tension.
...TROUBLESHOOTING
If the machine stops operating correctly, check the following possible problems before contacting us at " http://solutions.brother.com " . If you need additional help, the Brother Solutions Center offers...
Users Manual - English - Page 90
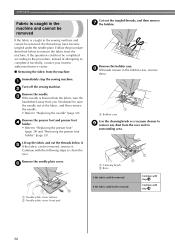
... cleaning brush or a vacuum cleaner to i remove any dust from the machine
Immediately stop the sewing machine.
Remove the bobbin case.
a Needle plate cover release b Needle plate cover (front part)
88 b
Remove the needle.
Remove the needle plate cover.
a
Turn off the sewing machine. Continue with step p. If the operation could not be removed
Continue with...
Users Manual - English - Page 100
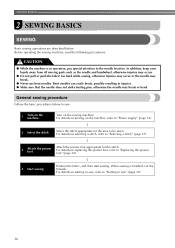
... 39
heirloom stitching 72 hook-and-loop fastener 43
J
joining 71
, joining stitch 61 68
M
main parts 8 main power switch 12
, monogramming 70 72
N
needle 29
, needle bar thread guide 9 26 ,... 40
, reverse/reinforcement stitch button 9 40
S
scallop stitching 70 seam ripper 54 sewing machine needles 29
, sewing speed controller 9 13
sleeve holes 66 smocking 70
spool cap 6 10, 15, 24...
Similar Questions

Why Wont My New Brother Ce8080prw Sewing Machine Sew
(Posted by grweblet 9 years ago)

How To Thread A Brother Ce8080prw Sewing Machine
(Posted by ds302moreck 10 years ago)

Request A Manual For A Brother Model Vx710 Sewing Machine
Request a manual for a Brother model VX710 Sewing machine
Request a manual for a Brother model VX710 Sewing machine
(Posted by williamg9629 10 years ago)
How To Service My Brother Ce8080prw Sewing Machine
(Posted by amageva 10 years ago)

How To Adjust Hook Timing On A Brother Ce8080prw Sewing Machine
(Posted by bensbPea 10 years ago)