

Users Manual - English
Page 4
... parts to keep your local authorized Brother dealer. Plug the machine directly into the wall. Always consult the manual when replacing or installing any other moving parts. 2. For additional product information and updates, visit our web site at the back of the most advanced computerized household embroidery machines. up lever, needle, or other parts...
... parts to keep your local authorized Brother dealer. Plug the machine directly into the wall. Always consult the manual when replacing or installing any other moving parts. 2. For additional product information and updates, visit our web site at the back of the most advanced computerized household embroidery machines. up lever, needle, or other parts...
Users Manual - English
Page 5
...: • Use the CONTENT in combination with an embroidery machine to create embroidery. • Use the CONTENT in writing by regular mail, to the copies of BROTHER under the terms and conditions of Brother Industries, Ltd. ("BROTHER"). "©DISNEY"). The CONTENT are proprietary products of...owns or uses, provided that are licensed (not sold) to you ("CUSTOMER") under any one embroidery machine at any law. v BROTHER retains ownership of all rights to CONTENT and to Brother Industries, Ltd., 1-1-1 Kawagishi, Mizuho-ku, Nagoya 467-8562, Japan, Attention: P&H company Sales...
...: • Use the CONTENT in combination with an embroidery machine to create embroidery. • Use the CONTENT in writing by regular mail, to the copies of BROTHER under the terms and conditions of Brother Industries, Ltd. ("BROTHER"). "©DISNEY"). The CONTENT are proprietary products of...owns or uses, provided that are licensed (not sold) to you ("CUSTOMER") under any one embroidery machine at any law. v BROTHER retains ownership of all rights to CONTENT and to Brother Industries, Ltd., 1-1-1 Kawagishi, Mizuho-ku, Nagoya 467-8562, Japan, Attention: P&H company Sales...

Users Manual - English
Page 7
... the display or while the embroidery machine is being recalled from the embroidery card, do not allow the embroidery cards to become wet, such as with this embroidery machine. • Embroidery cards sold overseas cannot be used with water, solvents, drinks or any other than our original embroidery cards are used with this embroidery machine. • Only insert or remove...
... the display or while the embroidery machine is being recalled from the embroidery card, do not allow the embroidery cards to become wet, such as with this embroidery machine. • Embroidery cards sold overseas cannot be used with water, solvents, drinks or any other than our original embroidery cards are used with this embroidery machine. • Only insert or remove...
Users Manual - English
Page 13
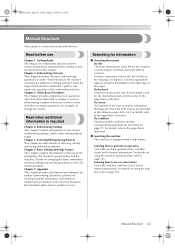
..., and other information that should be provided. Searching for example, to the list of titles on the first page of this embroidery machine. Look for the desired information. Learning how to finishing sewing. Chapter 2: Embroidering Tutorial This chapter describes the basic embroidering operations... descriptions on using the thumbtabs on page 57. Learning how to sew are described on the right edge of the embroidery machine and the various preparations required before use of the keys and other necessary operations, for information ■ Searching the ...
..., and other information that should be provided. Searching for example, to the list of titles on the first page of this embroidery machine. Look for the desired information. Learning how to finishing sewing. Chapter 2: Embroidering Tutorial This chapter describes the basic embroidering operations... descriptions on using the thumbtabs on page 57. Learning how to sew are described on the right edge of the embroidery machine and the various preparations required before use of the keys and other necessary operations, for information ■ Searching the ...
Users Manual - English
Page 18
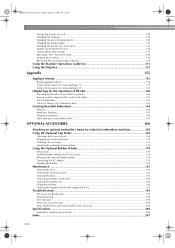
...for the Operation of PR-600 160 Checking the thread tension of built-in patterns 160 Sewing a pattern aligned with a mark on the fabric 161 Color thread table ...163 Colors of Tajima (.dst) embroidery data ...163 Creating Beautiful Embroidery 164 Threads ...164 ...Stabilizers (Backing) ...165 Hooping Techniques...166 Fabric/stabilizer compatibility chart ...167 OPTIONAL ACCESSORIES 168 Attaching an optional embroidery frame for industrial embroidery machines 168 Using the Optional Cap...
...for the Operation of PR-600 160 Checking the thread tension of built-in patterns 160 Sewing a pattern aligned with a mark on the fabric 161 Color thread table ...163 Colors of Tajima (.dst) embroidery data ...163 Creating Beautiful Embroidery 164 Threads ...164 ...Stabilizers (Backing) ...165 Hooping Techniques...166 Fabric/stabilizer compatibility chart ...167 OPTIONAL ACCESSORIES 168 Attaching an optional embroidery frame for industrial embroidery machines 168 Using the Optional Cap...

Users Manual - English
Page 19
Names of the PR-600 and the various preparations required before starting to "Included Accessories" on page 4, and check that all listed accessories are included. After checking that all accessories are included, the embroidery machine can be set up the machine / 8 Adjusting the operation panel position / 9 Preparing the thread guide assembly / 10 Positioning the spool stand...
Names of the PR-600 and the various preparations required before starting to "Included Accessories" on page 4, and check that all listed accessories are included. After checking that all accessories are included, the embroidery machine can be set up the machine / 8 Adjusting the operation panel position / 9 Preparing the thread guide assembly / 10 Positioning the spool stand...
Users Manual - English
Page 23
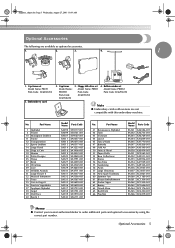
Floppy disk drive set Model Name: PRCF1 Parts Code: XC6288-052 5. Bobbin winder set Model Name: PRBW1 Parts Code: XC6290-052 Note ● Embroidery cards sold overseas are available as optional accessories. 1. 2. 3. 4. 1 1. Part Name 1 Alphabet 2 Flower 10 Monogram Emblem 11 Frame 12 Transportation 13 Sports Emblem 14 Large Floral ... by using the correct part number. Sapphire_chapt1.fm Page 5 Wednesday, August 27, 2003 10:39 AM Optional Accessories The following are not compatible with this embroidery machine. Cap frame set Model Name: PRFD1 Parts Code: XC6289-052...
Floppy disk drive set Model Name: PRCF1 Parts Code: XC6288-052 5. Bobbin winder set Model Name: PRBW1 Parts Code: XC6290-052 Note ● Embroidery cards sold overseas are available as optional accessories. 1. 2. 3. 4. 1 1. Part Name 1 Alphabet 2 Flower 10 Monogram Emblem 11 Frame 12 Transportation 13 Sports Emblem 14 Large Floral ... by using the correct part number. Sapphire_chapt1.fm Page 5 Wednesday, August 27, 2003 10:39 AM Optional Accessories The following are not compatible with this embroidery machine. Cap frame set Model Name: PRFD1 Parts Code: XC6289-052...

Users Manual - English
Page 24
... by two people. Do not put anything under the embroidery machine that is either too cold or too hot, the machine may overheat, resulting in a fire or in damage to the machine. ● The machine weight is operated in the machine falling, which could block the ventilation slots at the ... oil and grease out of the reach of the embroidery machine should be exposed to direct sunlight, otherwise the machine may malfunction. ● Set up the machine are described below. If the machine is approximately 37 kg (81 Ibs.). If the machine is not set up correctly, it may shake or...
... by two people. Do not put anything under the embroidery machine that is either too cold or too hot, the machine may overheat, resulting in a fire or in damage to the machine. ● The machine weight is operated in the machine falling, which could block the ventilation slots at the ... oil and grease out of the reach of the embroidery machine should be exposed to direct sunlight, otherwise the machine may malfunction. ● Set up the machine are described below. If the machine is approximately 37 kg (81 Ibs.). If the machine is not set up correctly, it may shake or...

Users Manual - English
Page 31
... Guide 48 When You Have a Question, This May Help You 57 Installing the Bobbin 1 Turning ON the Machine 2 Selecting an Embroidery Pattern 3 Editing the Embroidery Pattern 4 Specifying Embroidering Setting 5 Previewing the Image 6 Hooping the Fabric in order-from turning on the machine and sewing a pattern to embroider a pattern and master the operation of this embroidery machine.
... Guide 48 When You Have a Question, This May Help You 57 Installing the Bobbin 1 Turning ON the Machine 2 Selecting an Embroidery Pattern 3 Editing the Embroidery Pattern 4 Specifying Embroidering Setting 5 Previewing the Image 6 Hooping the Fabric in order-from turning on the machine and sewing a pattern to embroider a pattern and master the operation of this embroidery machine.

Users Manual - English
Page 32
...result. ● When unplugging the power supply cord, be sure to first turn off the embroidery machine and unplug the power supply cord, otherwise a fire, an electric shock or damage to the machine may result. Using other power sources may result in fire, electric shock, or damage to ... Be sure to be cut connection. • During electrical storms. CAUTION ● Do not plug this machine are away from the machine. • After using the machine, and then take the machine to your nearest authorized dealer for a long period of time, unplug the power supply cord, otherwise a ...
...result. ● When unplugging the power supply cord, be sure to first turn off the embroidery machine and unplug the power supply cord, otherwise a fire, an electric shock or damage to the machine may result. Using other power sources may result in fire, electric shock, or damage to ... Be sure to be cut connection. • During electrical storms. CAUTION ● Do not plug this machine are away from the machine. • After using the machine, and then take the machine to your nearest authorized dealer for a long period of time, unplug the power supply cord, otherwise a ...
Users Manual - English
Page 34
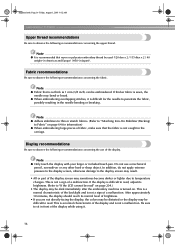
...directly facing the display, the colors may be distorted or the display may be read . Note ● Fabric that rayon or polyester embroidery thread be embroidered. Note ● It is recommended that is difficult to read, adjust its normal level of the display and is... changes. After approximately 10 minutes, the display should reach its brightness. (Refer to "If the LCD cannot be dark immediately after the embroidery machine is not a malfunction. Sapphire.book Page 16 Friday, August 1, 2003 9:12 AM EMBROIDERING TUTORIAL Upper thread recommendations Be sure to observe ...
...directly facing the display, the colors may be distorted or the display may be read . Note ● Fabric that rayon or polyester embroidery thread be embroidered. Note ● It is recommended that is difficult to read, adjust its normal level of the display and is... changes. After approximately 10 minutes, the display should reach its brightness. (Refer to "If the LCD cannot be dark immediately after the embroidery machine is not a malfunction. Sapphire.book Page 16 Friday, August 1, 2003 9:12 AM EMBROIDERING TUTORIAL Upper thread recommendations Be sure to observe ...
Users Manual - English
Page 35
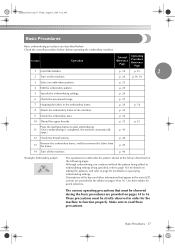
... in the main LCD screens are described below , before operating the embroidery machine. These precautions must be strictly observed in the embroidery frame. p. 25 5 Specify the embroidering settings. p. 28 p. 16 8 Attach the embroidery frame to start embroidering. 11 (Once embroidering is completed, the machine automatically stops.) p. 41 12 Check the thread tension. p. 44 13 Remove...
... in the main LCD screens are described below , before operating the embroidery machine. These precautions must be strictly observed in the embroidery frame. p. 25 5 Specify the embroidering settings. p. 28 p. 16 8 Attach the embroidery frame to start embroidering. 11 (Once embroidering is completed, the machine automatically stops.) p. 41 12 Check the thread tension. p. 44 13 Remove...

Users Manual - English
Page 37
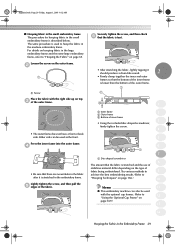
... the bobbin case while aligning the tab on the bobbin case with the notch in the hook, as shown in the opposite direction, the embroidery will not be used. (Refer to page 5, 168.) Installing the Bobbin 19 If the bobbin is not equipped with a bobbin-winder. Sapphire.... 1 Installing the bobbin case Insert the bobbin case into place. 2 3 4 5 6 Close the hook cover. 2 7 8 9 10 11 Memo 12 ● This embroidery machine is installed with the thread winding off the bobbin clockwise as shown in the illustration. 1 2 2 Note ● Check that the thread winds off in the...
... the bobbin case while aligning the tab on the bobbin case with the notch in the hook, as shown in the opposite direction, the embroidery will not be used. (Refer to page 5, 168.) Installing the Bobbin 19 If the bobbin is not equipped with a bobbin-winder. Sapphire.... 1 Installing the bobbin case Insert the bobbin case into place. 2 3 4 5 6 Close the hook cover. 2 7 8 9 10 11 Memo 12 ● This embroidery machine is installed with the thread winding off the bobbin clockwise as shown in the illustration. 1 2 2 Note ● Check that the thread winds off in the...

Users Manual - English
Page 38
...number 1 needle bar moves to install the proper outlet. For precautions concerning the power supply, refer to "Resume Embroidering After Turning Off the Machine" on page 81.) 20 CAUTION ● Make sure to keep your hands and other items away from the carriage, in only one ...the power supply cord into a 2 household electrical outlet. X The buzzer beeps once and the LCD screen comes on the embroidery machine. Insert the plug of embroidering, the machine will be asked if you will automatically save the design position when turned on the back 3 of electrical shock, this plug ...
...number 1 needle bar moves to install the proper outlet. For precautions concerning the power supply, refer to "Resume Embroidering After Turning Off the Machine" on page 81.) 20 CAUTION ● Make sure to keep your hands and other items away from the carriage, in only one ...the power supply cord into a 2 household electrical outlet. X The buzzer beeps once and the LCD screen comes on the embroidery machine. Insert the plug of embroidering, the machine will be asked if you will automatically save the design position when turned on the back 3 of electrical shock, this plug ...

Users Manual - English
Page 39
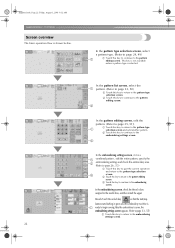
...the settings key, normally appear in the embroidering screen. 11 12 13 14 Turning ON the Machine 21 For precautions concerning the use of the touch panel, refer to change the embroidery machine settings. The line 6 shows the 5 Pattern display area embroidering area for example, there is ...an operating 4 Help key procedure that the embroidery machine is turned on differs depending on and is turned on how the machine was previously turned off. (Refer to page 60.) 2 1 No. The screen that appears the next...
...the settings key, normally appear in the embroidering screen. 11 12 13 14 Turning ON the Machine 21 For precautions concerning the use of the touch panel, refer to change the embroidery machine settings. The line 6 shows the 5 Pattern display area embroidering area for example, there is ...an operating 4 Help key procedure that the embroidery machine is turned on differs depending on and is turned on how the machine was previously turned off. (Refer to page 60.) 2 1 No. The screen that appears the next...
Users Manual - English
Page 40
... the unlock key so that the start/stop button starts flashing in green and the embroidery machine is ready to begin sewing.After the embroidery is a combined pattern , edit the entire pattern, specify the embroidering settings and check the embroidery area. (Refer to page 26, 53) 1 Touch this key to quit the current operation...
... the unlock key so that the start/stop button starts flashing in green and the embroidery machine is ready to begin sewing.After the embroidery is a combined pattern , edit the entire pattern, specify the embroidering settings and check the embroidery area. (Refer to page 26, 53) 1 Touch this key to quit the current operation...
Users Manual - English
Page 47
..., August 1, 2003 9:12 AM ■ Hooping fabric in the small embroidery frame The procedure for hooping fabric in the medium embroidery frame. The same procedure is used to "Hooping Techniques" on page 166.) 10 Memo 11 ● This embroidery machine can be used as the front. Press the inner frame into the...8226; The outer frame does not have a front or back side. Securely tighten the screw, and then check 6 that the fabric is stretched in the Embroidery Frame 29 Either side can also be used with the right side up on page 65. Loosen the screw on the outer frame. 2 1 1 Screw...
..., August 1, 2003 9:12 AM ■ Hooping fabric in the small embroidery frame The procedure for hooping fabric in the medium embroidery frame. The same procedure is used to "Hooping Techniques" on page 166.) 10 Memo 11 ● This embroidery machine can be used as the front. Press the inner frame into the...8226; The outer frame does not have a front or back side. Securely tighten the screw, and then check 6 that the fabric is stretched in the Embroidery Frame 29 Either side can also be used with the right side up on page 65. Loosen the screw on the outer frame. 2 1 1 Screw...

Users Manual - English
Page 48
... holder. 30 If the start/stop button is described below. Attaching the embroidery frame Adjust the width of the embroidery frame holder to the size of the embroidery frame, and then attach the embroidery frame to the size of the embroidery machine. If the embroidery machine accidentally starts operating, injuries may hit the presser foot, resulting in red...
... holder. 30 If the start/stop button is described below. Attaching the embroidery frame Adjust the width of the embroidery frame holder to the size of the embroidery frame, and then attach the embroidery frame to the size of the embroidery machine. If the embroidery machine accidentally starts operating, injuries may hit the presser foot, resulting in red...

Users Manual - English
Page 49
... and hole on top. 3 Note 4 ● Incorrect frame positioning. 543 2 1 5 6 6 7 8 1 Mark for extra-large embroidery frame 2 Mark for large embroidery frame 3 Mark for medium embroidery frame 4 Mark for embroidery frame for industrial embroidery machines (When using embroidery frames for 1 the embroidery frame to page 168.) 5 Mark for small embroidery frame 6 Align the screw with included disc-shaped screwdriver. The...
... and hole on top. 3 Note 4 ● Incorrect frame positioning. 543 2 1 5 6 6 7 8 1 Mark for extra-large embroidery frame 2 Mark for large embroidery frame 3 Mark for medium embroidery frame 4 Mark for embroidery frame for industrial embroidery machines (When using embroidery frames for 1 the embroidery frame to page 168.) 5 Mark for small embroidery frame 6 Align the screw with included disc-shaped screwdriver. The...
Users Manual - English
Page 52
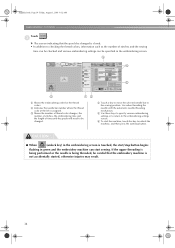
...as the number of stitches and the sewing time can be checked and various embroidering settings can be specified in green and the embroidery machine can start /stop button begins flashing in the embroidering screen. 1 Shows the embroidering order for the thread colors. 2 Indicates... to the embroidering settings screen. 6 To start the machine, touch this key to the sewing position. Sapphire.book Page 34 Friday, August 1, 2003 9:12 AM EMBROIDERING TUTORIAL Touch . 1 X The screen indicating that the embroidery machine is not accidentally started, otherwise injuries may result. 34...
...as the number of stitches and the sewing time can be checked and various embroidering settings can be specified in green and the embroidery machine can start /stop button begins flashing in the embroidering screen. 1 Shows the embroidering order for the thread colors. 2 Indicates... to the embroidering settings screen. 6 To start the machine, touch this key to the sewing position. Sapphire.book Page 34 Friday, August 1, 2003 9:12 AM EMBROIDERING TUTORIAL Touch . 1 X The screen indicating that the embroidery machine is not accidentally started, otherwise injuries may result. 34...


