
Accessory Catalog - English
Page 22
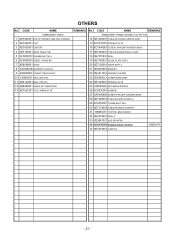
...NAME REMARKS EMBROIDERY FRAME HOLDER C (for PR-1000) 14 XE7400001 TUBULAR ROUND ARM RA ASSY 15 XC7076051 SPRING,PLATE 16 XC7644051 SCREW, PAM (S/P WASHER) M3X5 17 XE7149001 TUBLAR ROUND ARM LC ASSY 18 XE7375001 SEAL 19 XE7140001 GUIDE PLATE ASSY 20 XE7152001 HOOP STAY C...TAPTITE, BIND B M3X8 32 XE7416001 SEAL C 33 XE2641001 BAG 280X470H 34 XD0639050 BUBBLE SHEET 300X300 1000023079 35 XE7419001 CARTON - 21 - CODE NAME EMBROIDERY TABLE 1 XE7423001 POLYSTYRENE FOAM PAD CORNER 2 XE7424001 PAD 3 XE7425001 CARTON 4 XE7197001 WIDE TABLE TOP 5 XC5553051 THUMB BOLT M4 L 6 XC6459051...
...NAME REMARKS EMBROIDERY FRAME HOLDER C (for PR-1000) 14 XE7400001 TUBULAR ROUND ARM RA ASSY 15 XC7076051 SPRING,PLATE 16 XC7644051 SCREW, PAM (S/P WASHER) M3X5 17 XE7149001 TUBLAR ROUND ARM LC ASSY 18 XE7375001 SEAL 19 XE7140001 GUIDE PLATE ASSY 20 XE7152001 HOOP STAY C...TAPTITE, BIND B M3X8 32 XE7416001 SEAL C 33 XE2641001 BAG 280X470H 34 XD0639050 BUBBLE SHEET 300X300 1000023079 35 XE7419001 CARTON - 21 - CODE NAME EMBROIDERY TABLE 1 XE7423001 POLYSTYRENE FOAM PAD CORNER 2 XE7424001 PAD 3 XE7425001 CARTON 4 XE7197001 WIDE TABLE TOP 5 XC5553051 THUMB BOLT M4 L 6 XC6459051...

Users Manual - English
Page 10
...embroidering position at any place in the needle plate 2. Differences with single-needle machines ■ Can sew embroidery patterns using six or less colors without the need to changing the thread colors. Only one needle is...In addition, the embroidering position can change the thread spool or rethread the machine with this machine, the embroidery frame is used to performing the specified operations at the same time. x With this machine, it ... machine must be freely determined after the fabric is hooped and the embroidery frame is positioned over the hole in the frame.
...embroidering position at any place in the needle plate 2. Differences with single-needle machines ■ Can sew embroidery patterns using six or less colors without the need to changing the thread colors. Only one needle is...In addition, the embroidering position can change the thread spool or rethread the machine with this machine, the embroidery frame is used to performing the specified operations at the same time. x With this machine, it ... machine must be freely determined after the fabric is hooped and the embroidery frame is positioned over the hole in the frame.

Users Manual - English
Page 16
...the Image ...27 Checking a preview image ...27 Hooping the Fabric in the Embroidery Frame 28 Hooping the fabric in the embroidery frame...28 Attaching the Embroidery Frame to the Machine 30 Attaching the embroidery frame ...30 Checking the Embroidery Area 32 Continuing to the embroidering screen ...32 ... Attaching Iron-On Stabilizer (Backing) to Fabric 64 Hooping the Fabric...65 Hooping the fabric in the extra-large and large embroidery frames 65 Using the embroidery sheet...66 Large/small pieces of fabric ...67 Embroidery Frame Position and Movement 68 Changing the Embroidering Position ...
...the Image ...27 Checking a preview image ...27 Hooping the Fabric in the Embroidery Frame 28 Hooping the fabric in the embroidery frame...28 Attaching the Embroidery Frame to the Machine 30 Attaching the embroidery frame ...30 Checking the Embroidery Area 32 Continuing to the embroidering screen ...32 ... Attaching Iron-On Stabilizer (Backing) to Fabric 64 Hooping the Fabric...65 Hooping the fabric in the extra-large and large embroidery frames 65 Using the embroidery sheet...66 Large/small pieces of fabric ...67 Embroidery Frame Position and Movement 68 Changing the Embroidering Position ...
Users Manual - English
Page 18
... Helpful Tips for the Operation of PR-600 160 Checking the thread tension of built-in patterns 160 Sewing a pattern aligned with a mark on the fabric 161 Color thread table ...163 Colors of Tajima (.dst) embroidery data ...163 Creating Beautiful Embroidery 164 Threads ...164 Stabilizers (Backing) ...165 Hooping Techniques...166 Fabric/stabilizer compatibility chart ...167...
... Helpful Tips for the Operation of PR-600 160 Checking the thread tension of built-in patterns 160 Sewing a pattern aligned with a mark on the fabric 161 Color thread table ...163 Colors of Tajima (.dst) embroidery data ...163 Creating Beautiful Embroidery 164 Threads ...164 Stabilizers (Backing) ...165 Hooping Techniques...166 Fabric/stabilizer compatibility chart ...167...

Users Manual - English
Page 31
... Guide 48 When You Have a Question, This May Help You 57 Installing the Bobbin 1 Turning ON the Machine 2 Selecting an Embroidery Pattern 3 Editing the Embroidery Pattern 4 Specifying Embroidering Setting 5 Previewing the Image 6 Hooping the Fabric in order-from turning on the machine and sewing a pattern to finishing sewing. Sapphire.book Page 13 Friday...
... Guide 48 When You Have a Question, This May Help You 57 Installing the Bobbin 1 Turning ON the Machine 2 Selecting an Embroidery Pattern 3 Editing the Embroidery Pattern 4 Specifying Embroidering Setting 5 Previewing the Image 6 Hooping the Fabric in order-from turning on the machine and sewing a pattern to finishing sewing. Sapphire.book Page 13 Friday...
Users Manual - English
Page 35
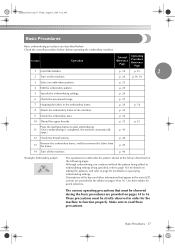
...automatically stops.) p. 41 12 Check the thread tension. Check the overall procedure below . p. 25 5 Specify the embroidering settings. p. 30 9 Check the embroidery area. p. 33 p.15 Press the start/stop button to read these tables for details on the machine. Procedure Operation 1 Install the bobbin. 2 Turn ...operating precautions that appear in the main LCD screens are provided in the tables on pages 48 to function properly. p. 27 7 Hooping the fabric in order for details on editing the patterns, and refer to embroider the pattern shown at the left are provided on...
...automatically stops.) p. 41 12 Check the thread tension. Check the overall procedure below . p. 25 5 Specify the embroidering settings. p. 30 9 Check the embroidery area. p. 33 p.15 Press the start/stop button to read these tables for details on the machine. Procedure Operation 1 Install the bobbin. 2 Turn ...operating precautions that appear in the main LCD screens are provided in the tables on pages 48 to function properly. p. 27 7 Hooping the fabric in order for details on editing the patterns, and refer to embroider the pattern shown at the left are provided on...
Users Manual - English
Page 46
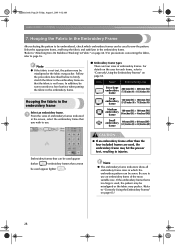
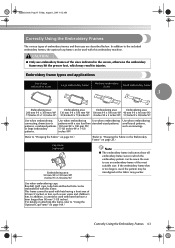
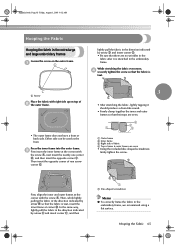
...12 AM EMBROIDERING TUTORIAL 7. In addition, be used appear lighter ( ). Hooping the fabric in the embroidery frame Select an embroidery frame. 1 From the sizes of embroidery frames indicated in the embroidery frame. Icon Name Embroidering area Extra-large embroidery frame 200 mm (H) × 300 mm (W) (7-7/8 inches (H) ×... For precautions concerning the fabric, refer to "Correctly Using the Embroidery Frames" on page 63.) 28 Select the appropriate frame, and hoop the fabric and stabilizer in which embroidery frames can be misaligned or the fabric may hit the presser foot...
...12 AM EMBROIDERING TUTORIAL 7. In addition, be used appear lighter ( ). Hooping the fabric in the embroidery frame Select an embroidery frame. 1 From the sizes of embroidery frames indicated in the embroidery frame. Icon Name Embroidering area Extra-large embroidery frame 200 mm (H) × 300 mm (W) (7-7/8 inches (H) ×... For precautions concerning the fabric, refer to "Correctly Using the Embroidery Frames" on page 63.) 28 Select the appropriate frame, and hoop the fabric and stabilizer in which embroidery frames can be misaligned or the fabric may hit the presser foot...
Users Manual - English
Page 47
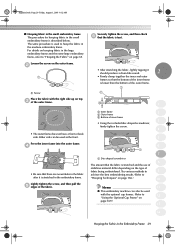
... so that the fabric is stretched in the embroidery frame. Loosen the screw on the outer frame. 2 1 1 Screw Place the fabric with the optional cap frames. (Refer to "Hooping the Fabric" on page 169.) 13 14 Hooping the Fabric in the Embroidery Frame 29 Either side can also be used ...as the front. For details on hooping fabric in the large embroidery frame and the extra-large embroidery frame, refer to 12 "Using the Optional...
... so that the fabric is stretched in the embroidery frame. Loosen the screw on the outer frame. 2 1 1 Screw Place the fabric with the optional cap frames. (Refer to "Hooping the Fabric" on page 169.) 13 14 Hooping the Fabric in the Embroidery Frame 29 Either side can also be used ...as the front. For details on hooping fabric in the large embroidery frame and the extra-large embroidery frame, refer to 12 "Using the Optional...

Users Manual - English
Page 48
... that there is described below. Insert the embroidery frame into the clips on embroidery frame holder. Attaching the embroidery frame Adjust the width of the embroidery frame holder to the machine. Attaching the Embroidery Frame to the Machine After hooping the fabric in the bobbin. Note ● Before attaching the embroidery frame, check that the start sewing...
... that there is described below. Insert the embroidery frame into the clips on embroidery frame holder. Attaching the embroidery frame Adjust the width of the embroidery frame holder to the machine. Attaching the Embroidery Frame to the Machine After hooping the fabric in the bobbin. Note ● Before attaching the embroidery frame, check that the start sewing...
Users Manual - English
Page 77
... chapter provides explanations on operations other than those described in the extra-large and large embroidery frames / 65 Using the embroidery sheet / 66 Large/small pieces of fabric / 67 Embroidery Frame Position and Movement 68 Changing the Embroidering Position 70 Adjusting the angle / 71 ... Changing the Needle 61 Replacing the needle / 61 Correctly Using the Embroidery Frames 63 Embroidery frame types and applications / 63 Attaching Iron-On Stabilizer (Backing) to Fabric 64 Hooping the Fabric 65 Hooping the fabric in chapter 2, such as sewing a pattern with Designs of...
... chapter provides explanations on operations other than those described in the extra-large and large embroidery frames / 65 Using the embroidery sheet / 66 Large/small pieces of fabric / 67 Embroidery Frame Position and Movement 68 Changing the Embroidering Position 70 Adjusting the angle / 71 ... Changing the Needle 61 Replacing the needle / 61 Correctly Using the Embroidery Frames 63 Embroidery frame types and applications / 63 Attaching Iron-On Stabilizer (Backing) to Fabric 64 Hooping the Fabric 65 Hooping the fabric in chapter 2, such as sewing a pattern with Designs of...
Users Manual - English
Page 81
Be sure to use embroidery frames of 50 mm (2 inches) or less, such as nametags. (Refer to "Hooping the Fabric" on page 65.) (Refer to "Hooping the Fabric in which may result in injuries. Use when embroidering Use when embroidering patterns with a size less than 80 mm (3-1/8... inches). (For details on attaching this frame, refer to the included embroidery frames, the optional cap...
Be sure to use embroidery frames of 50 mm (2 inches) or less, such as nametags. (Refer to "Hooping the Fabric" on page 65.) (Refer to "Hooping the Fabric in which may result in injuries. Use when embroidering Use when embroidering patterns with a size less than 80 mm (3-1/8... inches). (For details on attaching this frame, refer to the included embroidery frames, the optional cap...
Users Manual - English
Page 82
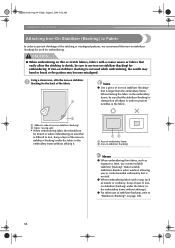
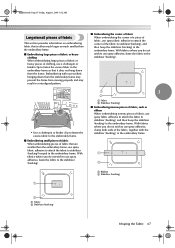
...soluble stabilizers dissolve when washed, allowing you to create beautiful embroidery that is difficult to iron, hoop a layer of the iron-on stabilizer (backing) under the fabric in the embroidery frame without affixing it . 12 1 Area of embroidery frame 2 Iron-on stabilizer (backing) Memo ● ... ● When embroidering on thin or stretch fabrics, fabrics with a nap, such as towels or corduroy, hoop a layer of ironon stabilizer (backing) under the fabric in the embroidery frame without affixing it . ● For other uses of stabilizer (backing), refer to "Stabilizers (Backing)"...
...soluble stabilizers dissolve when washed, allowing you to create beautiful embroidery that is difficult to iron, hoop a layer of the iron-on stabilizer (backing) under the fabric in the embroidery frame without affixing it . 12 1 Area of embroidery frame 2 Iron-on stabilizer (backing) Memo ● ... ● When embroidering on thin or stretch fabrics, fabrics with a nap, such as towels or corduroy, hoop a layer of ironon stabilizer (backing) under the fabric in the embroidery frame without affixing it . ● For other uses of stabilizer (backing), refer to "Stabilizers (Backing)"...
Users Manual - English
Page 83
... insert the nearby one corner B, and then insert the opposite corner C. Sapphire.book Page 65 Friday, August 1, 2003 9:12 AM Hooping the Fabric Hooping the fabric in the extra-large and large embroidery frames Loosen the screw on top of inner & outer frames are no wrinkles in the fabric after it should produce...
... insert the nearby one corner B, and then insert the opposite corner C. Sapphire.book Page 65 Friday, August 1, 2003 9:12 AM Hooping the Fabric Hooping the fabric in the extra-large and large embroidery frames Loosen the screw on top of inner & outer frames are no wrinkles in the fabric after it should produce...
Users Manual - English
Page 84
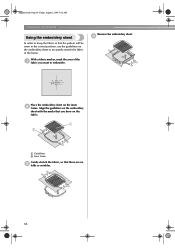
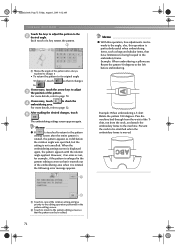
... with the marks that you want to embroider. Sapphire.book Page 66 Friday, August 1, 2003 9:12 AM OTHER BASIC PROCEDURES Using the embroidery sheet In order to hoop the fabric so that there are no 3 folds or wrinkles. 66 With a fabric marker, mark the area of the 1 fabric you drew on the...
... with the marks that you want to embroider. Sapphire.book Page 66 Friday, August 1, 2003 9:12 AM OTHER BASIC PROCEDURES Using the embroidery sheet In order to hoop the fabric so that there are no 3 folds or wrinkles. 66 With a fabric marker, mark the area of the 1 fabric you drew on the...
Users Manual - English
Page 85
...or binder clip to fasten the excess fabric to the embroidery frame so that is either much larger or much smaller than the embroidery frame, use spray fabric adhesive to attach the fabric to stabilizer (backing) hooped in the embroidery frame. With fabrics where you do not wish to ... ribbon When embroidering narrow pieces of fabric, use spray fabric adhesive to attach the fabric to stabilizer (backing), and then hoop the stabilizer (backing) in the embroidery frame. Sapphire.book Page 67 Friday, August 1, 2003 9:12 AM Large/small pieces of fabric This section provides information ...
...or binder clip to fasten the excess fabric to the embroidery frame so that is either much larger or much smaller than the embroidery frame, use spray fabric adhesive to attach the fabric to stabilizer (backing) hooped in the embroidery frame. With fabrics where you do not wish to ... ribbon When embroidering narrow pieces of fabric, use spray fabric adhesive to attach the fabric to stabilizer (backing), and then hoop the stabilizer (backing) in the embroidery frame. Sapphire.book Page 67 Friday, August 1, 2003 9:12 AM Large/small pieces of fabric This section provides information ...
Users Manual - English
Page 88
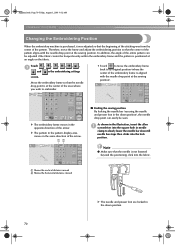
...book Page 70 Friday, August 1, 2003 9:12 AM OTHER BASIC PROCEDURES Changing the Embroidering Position When the embroidery machine is positioned at an angle on the fabric. X The embroidery frame moves in the embroidering settings screen. Note ● Make sure that the needle drop point is ... into the lock position. In addition, the angle of the entire pattern can easily be hooped evenly within the embroidery frame and the pattern is purchased, it was from the center of the embroidery frame is not lowered beyond the positioning click into the fabric. 1 Shows the vertical distance...
...book Page 70 Friday, August 1, 2003 9:12 AM OTHER BASIC PROCEDURES Changing the Embroidering Position When the embroidery machine is positioned at an angle on the fabric. X The embroidery frame moves in the embroidering settings screen. Note ● Make sure that the needle drop point is ... into the lock position. In addition, the angle of the entire pattern can easily be hooped evenly within the embroidery frame and the pattern is purchased, it was from the center of the embroidery frame is not lowered beyond the positioning click into the fabric. 1 Shows the vertical distance...
Users Manual - English
Page 90
...embroidering settings screen is rotated, the following error message appears. Memo ● With this operation is touched to return to being hooped in the embroidery frame. Example: When embroidering a T-shirt Rotate the pattern 180 degrees. If necessary, touch the arrow keys to the machine. ... to . Example: When embroidering a pillowcase Rotate the pattern 90 degrees to page 70. Prevent the neck to be stretched when the embroidery frame is moved. 1 Touch to cancel the rotation setting and give priority to the editing operation performed in the pattern editing screen so...
...embroidering settings screen is rotated, the following error message appears. Memo ● With this operation is touched to return to being hooped in the embroidery frame. Example: When embroidering a T-shirt Rotate the pattern 180 degrees. If necessary, touch the arrow keys to the machine. ... to . Example: When embroidering a pillowcase Rotate the pattern 90 degrees to page 70. Prevent the neck to be stretched when the embroidery frame is moved. 1 Touch to cancel the rotation setting and give priority to the editing operation performed in the pattern editing screen so...
Users Manual - English
Page 173
...;s (2) / 158 Helpful Tips for the Operation of PR-600 160 Checking the thread tension of built-in patterns / 160 Sewing a pattern aligned with a mark on the fabric / 161 Color thread table / 163 Colors of Tajima (.dst) embroidery data / 163 Creating Beautiful Embroidery 164 Threads / 164 Stabilizers (Backing) / 165 Hooping Techniques / 166 Fabric/stabilizer compatibility chart...
...;s (2) / 158 Helpful Tips for the Operation of PR-600 160 Checking the thread tension of built-in patterns / 160 Sewing a pattern aligned with a mark on the fabric / 161 Color thread table / 163 Colors of Tajima (.dst) embroidery data / 163 Creating Beautiful Embroidery 164 Threads / 164 Stabilizers (Backing) / 165 Hooping Techniques / 166 Fabric/stabilizer compatibility chart...

Users Manual - English
Page 183
...amount of a formal backing must not be required in your fabric to keep the nap or pile, for medium- Creating Beautiful Embroidery 165 embroidery frame causing poor alignment of stitches. In these four types, various easily be placed on the front after embroidering is used in... black for those difficult-to-hoop fabrics. Water-soluble stabilizer is excellent for example, on " the exposed surface in the sewing areas. This...
...amount of a formal backing must not be required in your fabric to keep the nap or pile, for medium- Creating Beautiful Embroidery 165 embroidery frame causing poor alignment of stitches. In these four types, various easily be placed on the front after embroidering is used in... black for those difficult-to-hoop fabrics. Water-soluble stabilizer is excellent for example, on " the exposed surface in the sewing areas. This...

Users Manual - English
Page 184
... hold caps for embroidering. Avoid overtightening the screw as this process may "strip" the screw. 166 Cap frames: These are specialized embroidery frames (hoops) designed to make the fabric flat and smooth. Hooping fabric: The framed fabric and backing should be a slight ridge (3 mm (1/8 inch)) of fabric and backing below the outer frame...
... hold caps for embroidering. Avoid overtightening the screw as this process may "strip" the screw. 166 Cap frames: These are specialized embroidery frames (hoops) designed to make the fabric flat and smooth. Hooping fabric: The framed fabric and backing should be a slight ridge (3 mm (1/8 inch)) of fabric and backing below the outer frame...


