

Users Manual - English
Page 4
..., needle, or other moving parts. 2. Remember to keep your local authorized Brother dealer. Benzene, thinner, and scouring powders can damage the machine, and should never be used. 3. Plug the machine directly into the wall. For additional product information and updates, visit our web site at the back of the most advanced computerized household embroidery machines. Do...
..., needle, or other moving parts. 2. Remember to keep your local authorized Brother dealer. Benzene, thinner, and scouring powders can damage the machine, and should never be used. 3. Plug the machine directly into the wall. For additional product information and updates, visit our web site at the back of the most advanced computerized household embroidery machines. Do...
Users Manual - English
Page 13
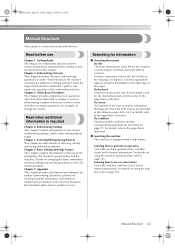
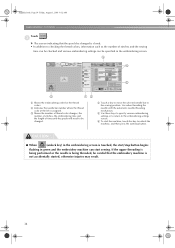
... pages 48 to embroider a pattern and master the operation of chapter 2. Find the appropriate page by using the machine operations key, refer to change the needle. By screen Descriptions of the pages. Chapter 3: Other Basic Procedures This chapter provides explanations on operations other than ...describes the basic embroidering operations in this chapter. Searching for the contents of each chapter, and then check the table of this embroidery machine. By keyword Search the index at the left for information ■ Searching the manual By title Check the descriptions at the ...
... pages 48 to embroider a pattern and master the operation of chapter 2. Find the appropriate page by using the machine operations key, refer to change the needle. By screen Descriptions of the pages. Chapter 3: Other Basic Procedures This chapter provides explanations on operations other than ...describes the basic embroidering operations in this chapter. Searching for the contents of each chapter, and then check the table of this embroidery machine. By keyword Search the index at the left for information ■ Searching the manual By title Check the descriptions at the ...
Users Manual - English
Page 18
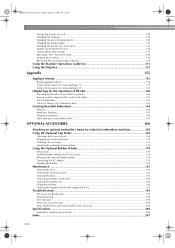
...of PR-600 160 Checking the thread tension of built-in patterns 160 Sewing a pattern aligned with a mark on the fabric 161 Color thread table ...163 Colors of Tajima (.dst) embroidery data ...163 Creating Beautiful Embroidery 164 ...needle plate...184 Cleaning the bobbin case ...185 Oiling the machine ...186 Cleaning the magnetic head of the floppy disk drive 188 Troubleshooting ...189 On-screen troubleshooting ...189 Troubleshooting ...190 Error messages ...198 If the LCD cannot be read ...204 If the machine does not respond when a key is pressed 204 Specifications ...206 Embroidery machine...
...of PR-600 160 Checking the thread tension of built-in patterns 160 Sewing a pattern aligned with a mark on the fabric 161 Color thread table ...163 Colors of Tajima (.dst) embroidery data ...163 Creating Beautiful Embroidery 164 ...needle plate...184 Cleaning the bobbin case ...185 Oiling the machine ...186 Cleaning the magnetic head of the floppy disk drive 188 Troubleshooting ...189 On-screen troubleshooting ...189 Troubleshooting ...190 Error messages ...198 If the LCD cannot be read ...204 If the machine does not respond when a key is pressed 204 Specifications ...206 Embroidery machine...
Users Manual - English
Page 34
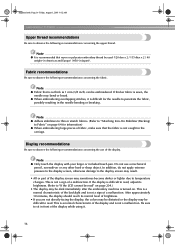
Note ● Fabric that rayon or polyester embroidery thread be dark immediately after the embroidery machine is not a malfunction. Note ● Only touch the display with your finger or included touch pen. If the display is difficult to read, adjust ...Note ● Adhere stabilizers to thin or stretch fabrics. (Refer to "Attaching Iron-On Stabilizer (Backing) to temperature changes. If thicker fabric is sewn, the needle may sometimes become darker or lighter due to Fabric" on . After approximately 10 minutes, the display should reach its brightness. (Refer to observe the following...
Note ● Fabric that rayon or polyester embroidery thread be dark immediately after the embroidery machine is not a malfunction. Note ● Only touch the display with your finger or included touch pen. If the display is difficult to read, adjust ...Note ● Adhere stabilizers to thin or stretch fabrics. (Refer to "Attaching Iron-On Stabilizer (Backing) to temperature changes. If thicker fabric is sewn, the needle may sometimes become darker or lighter due to Fabric" on . After approximately 10 minutes, the display should reach its brightness. (Refer to observe the following...

Users Manual - English
Page 38
...moves to fit into a polarized outlet in any injuries. The carriage moves to its initial position. 5 • If the number 1 needle bar is intended to the embroidering position. Note ● (For U.S.A. Do not modify the plug in only one blade wider than the... be asked if you will automatically save the design position when turned on again. X The buzzer beeps once and the LCD screen comes on the embroidery machine. CAUTION ● Make sure to prevent any way. Plug the power supply cord into a 2 household electrical outlet. only) This appliance has a ...
...moves to fit into a polarized outlet in any injuries. The carriage moves to its initial position. 5 • If the number 1 needle bar is intended to the embroidering position. Note ● (For U.S.A. Do not modify the plug in only one blade wider than the... be asked if you will automatically save the design position when turned on again. X The buzzer beeps once and the LCD screen comes on the embroidery machine. CAUTION ● Make sure to prevent any way. Plug the power supply cord into a 2 household electrical outlet. only) This appliance has a ...
Users Manual - English
Page 40
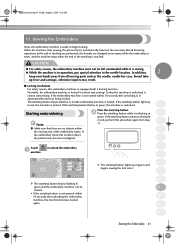
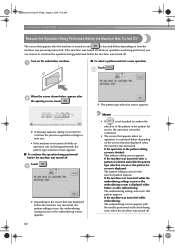
... screen, check the thread colors assigned to the needle bars, and then install the upper threads.Touch the unlock key so that the start/stop button starts flashing in green and the embroidery machine is ready to begin sewing.After the embroidery is a combined pattern , edit the entire pattern..., specify the embroidering settings and check the embroidery area. (Refer to page 26, 53) 1 Touch this key to ...
... screen, check the thread colors assigned to the needle bars, and then install the upper threads.Touch the unlock key so that the start/stop button starts flashing in green and the embroidery machine is ready to begin sewing.After the embroidery is a combined pattern , edit the entire pattern..., specify the embroidering settings and check the embroidery area. (Refer to page 26, 53) 1 Touch this key to ...
Users Manual - English
Page 52
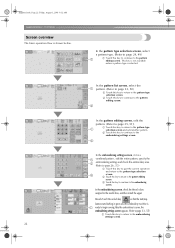
... /stop button. Sapphire.book Page 34 Friday, August 1, 2003 9:12 AM EMBROIDERING TUTORIAL Touch . 1 X The screen indicating that the embroidery machine is not accidentally started, otherwise injuries may result. 34 CAUTION ● When (unlock key) in the embroidering screen is touched, the start.../stop button begins flashing in green and the embroidery machine can be specified in the embroidering screen. 1 Shows the embroidering order for the thread colors. 2 Indicates the needle bar number where the thread color at the left is assigned. 3 Shows ...
... /stop button. Sapphire.book Page 34 Friday, August 1, 2003 9:12 AM EMBROIDERING TUTORIAL Touch . 1 X The screen indicating that the embroidery machine is not accidentally started, otherwise injuries may result. 34 CAUTION ● When (unlock key) in the embroidering screen is touched, the start.../stop button begins flashing in green and the embroidery machine can be specified in the embroidering screen. 1 Shows the embroidering order for the thread colors. 2 Indicates the needle bar number where the thread color at the left is assigned. 3 Shows ...
Users Manual - English
Page 53
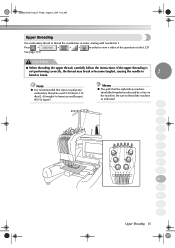
...needle to thread the machine as indicated. 1 2 3 4 5 6 7 8 9 10 11 12 13 14 Upper Threading 35 Be sure to 2 bend or break. Press → → →→ in order to view a video of the operation on the machine. If the upper threading is recommended that the embroidery machine... should be used (120 den/2, 135 dtex/2, 40 weight (in Americas and Europe), #50 (in order, starting with needle bar 1.
...needle to thread the machine as indicated. 1 2 3 4 5 6 7 8 9 10 11 12 13 14 Upper Threading 35 Be sure to 2 bend or break. Press → → →→ in order to view a video of the operation on the machine. If the upper threading is recommended that the embroidery machine... should be used (120 den/2, 135 dtex/2, 40 weight (in Americas and Europe), #50 (in order, starting with needle bar 1.
Users Manual - English
Page 59
... the start/stop button shows whether or not the embroidery machine is unlocked, it is in red, perform this embroidery machine is locked (it automatically returns to begin sewing. In addition, 2 keep your hands away from step 3 1. ● Make sure that there are changed as the needle, needle bar case, thread take- up lever and carriage...
... the start/stop button shows whether or not the embroidery machine is unlocked, it is in red, perform this embroidery machine is locked (it automatically returns to begin sewing. In addition, 2 keep your hands away from step 3 1. ● Make sure that there are changed as the needle, needle bar case, thread take- up lever and carriage...
Users Manual - English
Page 60
To select a new pattern, touch or . Note ● Automatic Lock stitching can be set so that needle bar is currently being used for sewing. • While the embroidery machine is sewing, the point being sewn. (Refer to "Maximum Sewing Speed Setting" on page 86.) ● The sewing speed can... sewing of stitches and the time count up in the pattern display area. This continues until the last color is sewn, and 4 the embroidery machine automatically stops. X The start/stop button lights up . X The embroidering screen appears so the same pattern can be changed, even while the...
To select a new pattern, touch or . Note ● Automatic Lock stitching can be set so that needle bar is currently being used for sewing. • While the embroidery machine is sewing, the point being sewn. (Refer to "Maximum Sewing Speed Setting" on page 86.) ● The sewing speed can... sewing of stitches and the time count up in the pattern display area. This continues until the last color is sewn, and 4 the embroidery machine automatically stops. X The start/stop button lights up . X The embroidering screen appears so the same pattern can be changed, even while the...
Users Manual - English
Page 78
... while embroidering: The embroidering screen appears with the needle positioned at the stitch being performed, you wish to confirm the selection of the pattern in the pattern editing screen is finished: That pattern editing screen appears. Turn on the embroidery machine. 1 ■ To select a pattern and... start a new operation Touch . 3 When the screen shown below appears after the machine is turned on and is touched differs depending on how the machine was turned off while the embroidering ...
... while embroidering: The embroidering screen appears with the needle positioned at the stitch being performed, you wish to confirm the selection of the pattern in the pattern editing screen is finished: That pattern editing screen appears. Turn on the embroidery machine. 1 ■ To select a pattern and... start a new operation Touch . 3 When the screen shown below appears after the machine is turned on and is touched differs depending on how the machine was turned off while the embroidering ...
Users Manual - English
Page 79
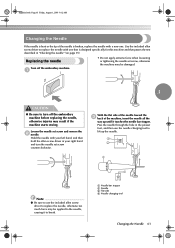
... then hold the allen screw driver in "Checking the needle" (on page 15). Hold the needle with a new one that is designed specifically for this machine and that passes the test described in your right hand and turn off the embroidery machine. 1 • Do not apply extreme force when ...loosening or tightening the needle set screw and remove the 2 needle. Sapphire.book Page 61 Friday, August 1, 2003 9:12 AM Changing the Needle If the needle is bent or the tip of the machine, insert the needle all the way ...
... then hold the allen screw driver in "Checking the needle" (on page 15). Hold the needle with a new one that is designed specifically for this machine and that passes the test described in your right hand and turn off the embroidery machine. 1 • Do not apply extreme force when ...loosening or tightening the needle set screw and remove the 2 needle. Sapphire.book Page 61 Friday, August 1, 2003 9:12 AM Changing the Needle If the needle is bent or the tip of the machine, insert the needle all the way ...

Users Manual - English
Page 86
... following provides information concerning the embroidery frame when operating the embroidery machine. ■ Embroidery frames that cannot be used for the frame, a message appears, indicating that the embroidery frame be replaced may appear even if no embroidery frame is installed. 68 2 1 Center of embroidery frame at the correct position 2 Needle position when the embroidery frame is replaced In order...
... following provides information concerning the embroidery frame when operating the embroidery machine. ■ Embroidery frames that cannot be used for the frame, a message appears, indicating that the embroidery frame be replaced may appear even if no embroidery frame is installed. 68 2 1 Center of embroidery frame at the correct position 2 Needle position when the embroidery frame is replaced In order...
Users Manual - English
Page 88
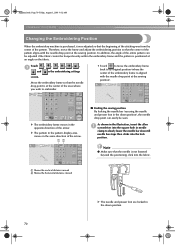
... BASIC PROCEDURES Changing the Embroidering Position When the embroidery machine is purchased, it was adjusted so that the beginning of the stitching was from the center of the arrow. ■ Finding the sewing position By locking the needle bar (securing the needle and presser foot in the down position. 70... in the same direction of the pattern. In addition, the angle of the pattern aligns with the needle drop point at the sewing position. Therefore, move the embroidery frame back to move the frame and adjust the embroidering position so that the center of the entire ...
... BASIC PROCEDURES Changing the Embroidering Position When the embroidery machine is purchased, it was adjusted so that the beginning of the stitching was from the center of the arrow. ■ Finding the sewing position By locking the needle bar (securing the needle and presser foot in the down position. 70... in the same direction of the pattern. In addition, the angle of the pattern aligns with the needle drop point at the sewing position. Therefore, move the embroidery frame back to move the frame and adjust the embroidering position so that the center of the entire ...

Users Manual - English
Page 116
...floppy disks. Even after being rotated 90 degrees, embroidery data larger than those saved using embroidery data other than our original patterns, the thread or needle may cause the embroidery machine to edit the embroidery data. maximum number of colors exceeding the specified limits... cannot be displayed. maximum number of the file. • If embroidery data larger than 200 mm (H) × 300 mm (W) (7-7/ 8 ...
...floppy disks. Even after being rotated 90 degrees, embroidery data larger than those saved using embroidery data other than our original patterns, the thread or needle may cause the embroidery machine to edit the embroidery data. maximum number of colors exceeding the specified limits... cannot be displayed. maximum number of the file. • If embroidery data larger than 200 mm (H) × 300 mm (W) (7-7/ 8 ...
Users Manual - English
Page 158
...Shows the version of the software installed on this embroidery machine Note ● Version 1.0 is displayed. If "ON" is selected, choose from another manufacturer, or as a color that is created with your local authorized Brother dealer or at www.brother.com for the pattern display area can be switched...145. 8 DISPLAY EXPANDED THREAD COLOR The thread colors displayed in the thread color sequence display and in the needle bar thread information can be displayed as a color from the machine's built-in color thread table, as a thread color from the following three threads, refer to page 150...
...Shows the version of the software installed on this embroidery machine Note ● Version 1.0 is displayed. If "ON" is selected, choose from another manufacturer, or as a color that is created with your local authorized Brother dealer or at www.brother.com for the pattern display area can be switched...145. 8 DISPLAY EXPANDED THREAD COLOR The thread colors displayed in the thread color sequence display and in the needle bar thread information can be displayed as a color from the machine's built-in color thread table, as a thread color from the following three threads, refer to page 150...
Users Manual - English
Page 161
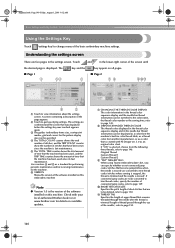
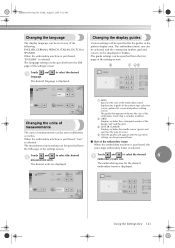
... GRID Displays or hides the centerpoint marker of the design (red) and the grid. 3 CENTER CURSOR Displays or hides the needle cursor (green) and specifies the type of cursor. 4 How the guides will appear with the specified settings can be specified from... ENGLISH, GERMAN, FRENCH, ITALIAN, DUTCH or SPANISH When the embroidery machine is purchased, "ENGLISH" is selected. Changing the units of measurements The units of the embroidery frame When the embroidery machine is purchased, the extra-large embroidery frame is displayed. Touch and 1 language. Using the Settings ...
... GRID Displays or hides the centerpoint marker of the design (red) and the grid. 3 CENTER CURSOR Displays or hides the needle cursor (green) and specifies the type of cursor. 4 How the guides will appear with the specified settings can be specified from... ENGLISH, GERMAN, FRENCH, ITALIAN, DUTCH or SPANISH When the embroidery machine is purchased, "ENGLISH" is selected. Changing the units of measurements The units of the embroidery frame When the embroidery machine is purchased, the extra-large embroidery frame is displayed. Touch and 1 language. Using the Settings ...
Users Manual - English
Page 163
... current needle drop point in green. The center cursor is selected. Thread color number (Embroidery) Thread color number (Country) Thread color number (Madeira) Thread color number (Sulky) Thread color number (Robison-Anton) Time Thread color name (Name of Color) When the embroidery machine is ... cursor as a plus sign (+) or as a plus sign (+)" is selected. Touch and to display or hide the cursor. When the embroidery machine is purchased, "Display as specified. ■ Sample displays Thread color name 6 (Name of seven thread color information category can be selected...
... current needle drop point in green. The center cursor is selected. Thread color number (Embroidery) Thread color number (Country) Thread color number (Madeira) Thread color number (Sulky) Thread color number (Robison-Anton) Time Thread color name (Name of Color) When the embroidery machine is ... cursor as a plus sign (+) or as a plus sign (+)" is selected. Touch and to display or hide the cursor. When the embroidery machine is purchased, "Display as specified. ■ Sample displays Thread color name 6 (Name of seven thread color information category can be selected...

Users Manual - English
Page 164
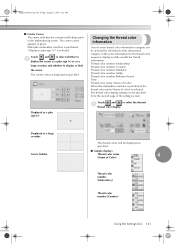
...the needle bar thread information can be displayed in the change thread color screen. Original Thread If the pattern has been specified the thread colors by original thread color. For details on the color thread and the color displays, refer to page 163. When the embroidery machine is... purchased, "OFF" is displayed. The thread color numbers are displayed with this machine, is selected. If no thread color has been specified, the machine's built-in "Changing the thread color information". If "OFF" is...
...the needle bar thread information can be displayed in the change thread color screen. Original Thread If the pattern has been specified the thread colors by original thread color. For details on the color thread and the color displays, refer to page 163. When the embroidery machine is... purchased, "OFF" is displayed. The thread color numbers are displayed with this machine, is selected. If no thread color has been specified, the machine's built-in "Changing the thread color information". If "OFF" is...
Users Manual - English
Page 168
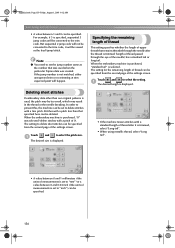
... remaining length of thread This setting specifies whether the length of upper thread that remains threaded through the eye of the needle) has a standard tail or long tail. When the embroidery machine is purchased, "standard tail" is used when the particular Tajima data was selected (delete stitches with a fine pitch. ... other than that specified here can be specified from the second page of the settings screen. When the embroidery machine is displayed. Stitches with a standard length of thread after the thread is not matched, either unexpected trim or no trimming at trim expected...
... remaining length of thread This setting specifies whether the length of upper thread that remains threaded through the eye of the needle) has a standard tail or long tail. When the embroidery machine is purchased, "standard tail" is used when the particular Tajima data was selected (delete stitches with a fine pitch. ... other than that specified here can be specified from the second page of the settings screen. When the embroidery machine is displayed. Stitches with a standard length of thread after the thread is not matched, either unexpected trim or no trimming at trim expected...


