
Users Manual - English
Page 2
... Only) Responsible Party: Brother International Corporation 100 Somerset Corporate Boulevard Bridgewater, NJ 08807-0911 USA declares that the product Product Name: Brother USB Writer Model Number: PE-Design complies with Part 15 of the following ...operation. Changes or modifications not expressly approved by the manufacturer or local sales distributor could void the user's authority to the following measures: - Consult the dealer or an experienced radio/TV technician for radio noise emission from a digital apparatus as set out in a residential installation. This equipment generates, uses...
... Only) Responsible Party: Brother International Corporation 100 Somerset Corporate Boulevard Bridgewater, NJ 08807-0911 USA declares that the product Product Name: Brother USB Writer Model Number: PE-Design complies with Part 15 of the following ...operation. Changes or modifications not expressly approved by the manufacturer or local sales distributor could void the user's authority to the following measures: - Consult the dealer or an experienced radio/TV technician for radio noise emission from a digital apparatus as set out in a residential installation. This equipment generates, uses...

Users Manual - English
Page 3
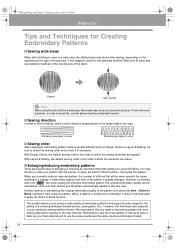
... dropping a needle, a piece of material from this unit and to ensure safe and correct operation, please read before using this product For designing beautiful embroidery patterns • This system allows you make a trial sewing sample with your sewing data before sewing on the final material. For a longer service life • When storing the unit, avoid direct sunlight and high humidity locations. This software can...
... dropping a needle, a piece of material from this unit and to ensure safe and correct operation, please read before using this product For designing beautiful embroidery patterns • This system allows you make a trial sewing sample with your sewing data before sewing on the final material. For a longer service life • When storing the unit, avoid direct sunlight and high humidity locations. This software can...
Users Manual - English
Page 5
... the Manual 3 Structure of the manual 3 List of terms used 3 Introduction 4 Applications of the software 4 Package contents 5 Optional supplies 6 Principal parts 6 Installation 7 Installation procedure 7 System requirements 8 [STEP 1] Installing the software 8 [STEP 2] Installing the driver for the card writer module 10 [STEP 3] Upgrading the USB card writer module 12 Online registration 13 Uninstallation 13 Technical support 13 Tips and Techniques for Creating Embroidery Patterns 14 Sew Types 15 Chapter 1 Basic Operation 17 Getting Started 18...
... the Manual 3 Structure of the manual 3 List of terms used 3 Introduction 4 Applications of the software 4 Package contents 5 Optional supplies 6 Principal parts 6 Installation 7 Installation procedure 7 System requirements 8 [STEP 1] Installing the software 8 [STEP 2] Installing the driver for the card writer module 10 [STEP 3] Upgrading the USB card writer module 12 Online registration 13 Uninstallation 13 Technical support 13 Tips and Techniques for Creating Embroidery Patterns 14 Sew Types 15 Chapter 1 Basic Operation 17 Getting Started 18...
Users Manual - English
Page 6
... Specifying a Design Page size 60 Step3 Creating the embroidery pattern 60 Step4 Checking the embroidering order 61 Step5 Saving the pattern 61 Step6 Transferring the pattern to an original card 62 Step7 Quitting Layout & Editing 63 Embroidering large-size embroidery patterns ...... 63 Step1 Attaching stabilizer to the fabric 63 Step2 Marking the embroidering position ........ 63 Step3 Hooping the fabric 65 Step4 Embroidering 65 Chapter 2 Advanced Operation 67 Advanced Operations 68 About...
... Specifying a Design Page size 60 Step3 Creating the embroidery pattern 60 Step4 Checking the embroidering order 61 Step5 Saving the pattern 61 Step6 Transferring the pattern to an original card 62 Step7 Quitting Layout & Editing 63 Embroidering large-size embroidery patterns ...... 63 Step1 Attaching stabilizer to the fabric 63 Step2 Marking the embroidering position ........ 63 Step3 Hooping the fabric 65 Step4 Embroidering 65 Chapter 2 Advanced Operation 67 Advanced Operations 68 About...
Users Manual - English
Page 13
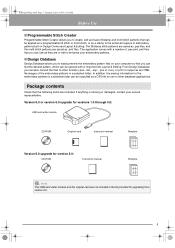
... upgrading from version 5.0. 5 The fill/stamp stitch patterns are saved as .pas files, and the motif stitch patterns are included. In addition, the sewing information for the embroidery patterns in the kit provided for use as they are or edit to enhance your embroidery patterns. ■ Design Database Design Database allows you to easily preview the embroidery pattern files on your service representative. The application comes with a number...
... upgrading from version 5.0. 5 The fill/stamp stitch patterns are saved as .pas files, and the motif stitch patterns are included. In addition, the sewing information for the embroidery patterns in the kit provided for use as they are or edit to enhance your embroidery patterns. ■ Design Database Design Database allows you to easily preview the embroidery pattern files on your service representative. The application comes with a number...
Users Manual - English
Page 22
... same type of fabric as your final material and to sew your particular sewing machine model. Pattern After sewing a Note: When using the satin stitch in a wide area, the stitched area may move out of position by holding down the Ctrl key while scaling the imported embroidery pattern, the original embroidery quality can be sewn remains the same, resulting in a change of embroidery quality if the size of the pattern...
... same type of fabric as your final material and to sew your particular sewing machine model. Pattern After sewing a Note: When using the satin stitch in a wide area, the stitched area may move out of position by holding down the Ctrl key while scaling the imported embroidery pattern, the original embroidery quality can be sewn remains the same, resulting in a change of embroidery quality if the size of the pattern...
Users Manual - English
Page 51
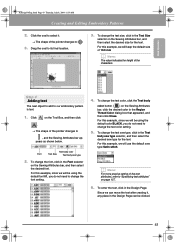
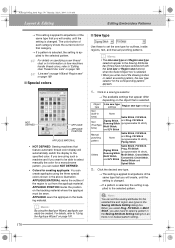
... it . 3. Font Text body color Text Size Text body sew type 2. Drag the oval to our embroidery pattern is text. 1. Basic Operation Step 4 Adding text The next object to add to its final location. For this example, since we will be using the default color BLACK, you do not need to change the font setting. 4. For this example, since we...
... it . 3. Font Text body color Text Size Text body sew type 2. Drag the oval to our embroidery pattern is text. 1. Basic Operation Step 4 Adding text The next object to add to its final location. For this example, since we will be using the default color BLACK, you do not need to change the font setting. 4. For this example, since we...
Users Manual - English
Page 67
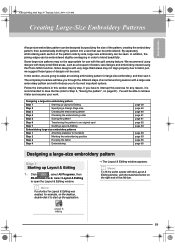
... & Editing window, click the maximize button on the desktop, double-click it later and resume your work. Designing a large-size embroidery pattern Step 1 Starting up Layout & Editing Step 2 Specifying a Design Page size Step 3 Creating the embroidery pattern Step 4 Checking the embroidering order Step 5 Saving the pattern Step 6 Transferring the pattern to an original card Step 7 Quitting Layout & Editing Embroidering large-size embroidery patterns Step 1 Attaching stabilizer to interrupt this exercise for...
... & Editing window, click the maximize button on the desktop, double-click it later and resume your work. Designing a large-size embroidery pattern Step 1 Starting up Layout & Editing Step 2 Specifying a Design Page size Step 3 Creating the embroidery pattern Step 4 Checking the embroidering order Step 5 Saving the pattern Step 6 Transferring the pattern to an original card Step 7 Quitting Layout & Editing Embroidering large-size embroidery patterns Step 1 Attaching stabilizer to interrupt this exercise for...

Users Manual - English
Page 68
.... Step 3 Creating the embroidery pattern For this example, we need to provide space for the Design Page. b Memo: • With the Section Size (for Hoop Size) setting, the width and height of the sections (your embroidery hoop). The double lines indicate adjoining edges where embroidering will use one of the embroidery design. 3. Click File on the menu bar, point to click the Toolbar button indicated below. b Memo...
.... Step 3 Creating the embroidery pattern For this example, we need to provide space for the Design Page. b Memo: • With the Section Size (for Hoop Size) setting, the width and height of the sections (your embroidery hoop). The double lines indicate adjoining edges where embroidering will use one of the embroidery design. 3. Click File on the menu bar, point to click the Toolbar button indicated below. b Memo...
Users Manual - English
Page 98
... need to scroll through the settings, or resize the dialog box by dragging one of the sewing attributes and settings available for entering settings varies according to change the sewing attributes displayed under Line Sew or Region Sew. When entering numerical values in Expert mode. • To hide the preview box, click Hide Hint. b Memo: • In some cases, you make...
... need to scroll through the settings, or resize the dialog box by dragging one of the sewing attributes and settings available for entering settings varies according to change the sewing attributes displayed under Line Sew or Region Sew. When entering numerical values in Expert mode. • To hide the preview box, click Hide Hint. b Memo: • In some cases, you make...
Users Manual - English
Page 99
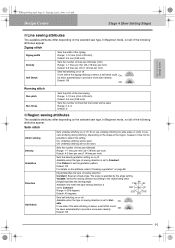
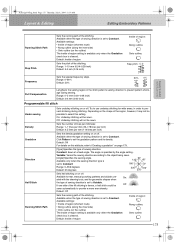
...) Sets the number of the zigzag. Zigzag stitch Zigzag width Density Half Stitch Sets the width of times that the border will not be sewn. Default: Off Off: Running stitch Run pitch Run times Sets the pitch of sewing direction is specified by the angle setting. Click Pattern to prevent shrinking during stitching. If one side of sewing direction. Satin stitch Under sewing Density Gradation Direction Half Stitch Sets underlay stitching on page 96. [Type] Specifies the type...
...) Sets the number of the zigzag. Zigzag stitch Zigzag width Density Half Stitch Sets the width of times that the border will not be sewn. Default: Off Off: Running stitch Run pitch Run times Sets the pitch of sewing direction is specified by the angle setting. Click Pattern to prevent shrinking during stitching. If one side of sewing direction. Satin stitch Under sewing Density Gradation Direction Half Stitch Sets underlay stitching on page 96. [Type] Specifies the type...
Users Manual - English
Page 100
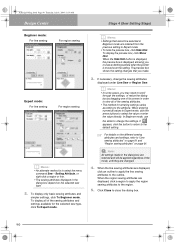
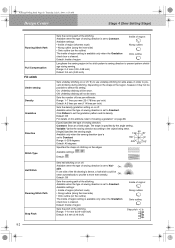
... only when the Gradation check box is set the gradation pattern and its density. PeDesignV6Eng.book Page 92 Thursday, July 8, 2004 11:59 AM Design Center Stage 4 (Sew Setting Stage) Running Stitch Path Pull Compensation Fill stitch Under sewing Density Gradation Direction Stitch Type Half Stitch Running Stitch Path Step Pitch 92 Sets the running path of the stitching. Off: Underlay stitching will be possible to Constant.
... only when the Gradation check box is set the gradation pattern and its density. PeDesignV6Eng.book Page 92 Thursday, July 8, 2004 11:59 AM Design Center Stage 4 (Sew Setting Stage) Running Stitch Path Pull Compensation Fill stitch Under sewing Density Gradation Direction Stitch Type Half Stitch Running Stitch Path Step Pitch 92 Sets the running path of the stitching. Off: Underlay stitching will be possible to Constant.
Users Manual - English
Page 101
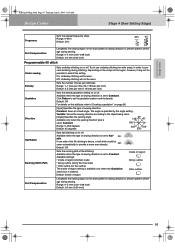
... (0.00 inch) Programmable fill stitch Under sewing Density Gradation Direction Half Stitch Running Stitch Path Pull Compensation Sets underlay stitching on the outline) The inside of sewing direction is set to provide a more even density. Range: 0-99% Default: 30% 30% 0% Pull Compensation Lengthens the sewing region in the stitch pattern's sewing direction to prevent shrinking during sewing. Advanced Opreation Design Center PeDesignV6Eng.book Page 93 Thursday, July 8, 2004...
... (0.00 inch) Programmable fill stitch Under sewing Density Gradation Direction Half Stitch Running Stitch Path Pull Compensation Sets underlay stitching on the outline) The inside of sewing direction is set to provide a more even density. Range: 0-99% Default: 30% 30% 0% Pull Compensation Lengthens the sewing region in the stitch pattern's sewing direction to prevent shrinking during sewing. Advanced Opreation Design Center PeDesignV6Eng.book Page 93 Thursday, July 8, 2004...
Users Manual - English
Page 104
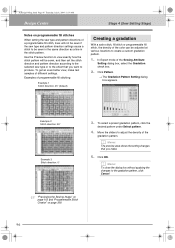
... view, make . 5. Click Pattern. → The Gradation Pattern Setting dialog box appears. PeDesignV6Eng.book Page 96 Thursday, July 8, 2004 11:59 AM Design Center Stage 4 (Sew Setting Stage) Notes on page 208 96 Use the Preview function to view exactly how the stitch pattern will not be sewn if the sew type and pattern direction settings cause a stitch to be sewn, and then set the stitch direction and pattern direction according to...
... view, make . 5. Click Pattern. → The Gradation Pattern Setting dialog box appears. PeDesignV6Eng.book Page 96 Thursday, July 8, 2004 11:59 AM Design Center Stage 4 (Sew Setting Stage) Notes on page 208 96 Use the Preview function to view exactly how the stitch pattern will not be sewn if the sew type and pattern direction settings cause a stitch to be sewn, and then set the stitch direction and pattern direction according to...
Users Manual - English
Page 176
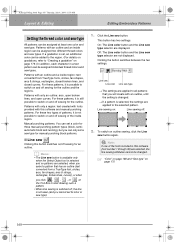
... sew button. a Note: If one color and sew type. b Memo: • The Line sew button is available only when the Select Object tool is switched off : 2. To switch on and off sewing for manual punching block patterns. ■ Line sew Clicking this software and manual punching patterns. PeDesignV6Eng.book Page 168 Thursday, July 8, 2004 11:59 AM Layout & Editing Editing Embroidery Patterns Setting the thread color and sew type All patterns...
... sew button. a Note: If one color and sew type. b Memo: • The Line sew button is available only when the Select Object tool is switched off : 2. To switch on and off sewing for manual punching block patterns. ■ Line sew Clicking this software and manual punching patterns. PeDesignV6Eng.book Page 168 Thursday, July 8, 2004 11:59 AM Layout & Editing Editing Embroidery Patterns Setting the thread color and sew type All patterns...
Users Manual - English
Page 178
... stitch), Piping Stitch Others Satin Stitch, Fill Stitch, Zigzag Stitch, Running Stitch Motif Stitch, and E/V Stitch Prog. PeDesignV6Eng.book Page 170 Thursday, July 8, 2004 11:59 AM Layout & Editing Editing Embroidery Patterns → This setting is applied to all patterns of the same type that feature automatic thread color display will automatically switch the display to the specified color. c For details on specifying a user thread chart or for information on how machines...
... stitch), Piping Stitch Others Satin Stitch, Fill Stitch, Zigzag Stitch, Running Stitch Motif Stitch, and E/V Stitch Prog. PeDesignV6Eng.book Page 170 Thursday, July 8, 2004 11:59 AM Layout & Editing Editing Embroidery Patterns → This setting is applied to all patterns of the same type that feature automatic thread color display will automatically switch the display to the specified color. c For details on specifying a user thread chart or for information on how machines...

Users Manual - English
Page 181
...° 0° Range: 0-359 degrees Default: 45 degrees 225° 315° 270° 173 Range: 1.0-10.0 mm (0.04-0.39 inch) Default: 2.0 mm (0.08 inch) E stitch V stitch V stitch Sets the reverse stitching for wide areas, in the run times. Range: 1, 3, 5 Default: 1 Sets the number of strokes of the yarn carrier. Satin stitch Under sewing Density Gradation Direction Sets underlay stitching on the selected sew type.
...° 0° Range: 0-359 degrees Default: 45 degrees 225° 315° 270° 173 Range: 1.0-10.0 mm (0.04-0.39 inch) Default: 2.0 mm (0.08 inch) E stitch V stitch V stitch Sets the reverse stitching for wide areas, in the run times. Range: 1, 3, 5 Default: 1 Sets the number of strokes of the yarn carrier. Satin stitch Under sewing Density Gradation Direction Sets underlay stitching on the selected sew type.

Users Manual - English
Page 182
... stitching. Constant: Sews at a fixed angle. Default: Off 174 Default: Off For details on this setting. Variable: Varies the sewing direction according to prevent shrinking during sewing. Available for text, manual punching patterns and objects cre- PeDesignV6Eng.book Page 174 Thursday, July 8, 2004 11:59 AM Layout & Editing Editing Embroidery Patterns Half Stitch Running Stitch Path Pull Compensation Fill stitch Under sewing Density Gradation Direction Stitch Type Half Stitch Sets half stitching...
... stitching. Constant: Sews at a fixed angle. Default: Off 174 Default: Off For details on this setting. Variable: Varies the sewing direction according to prevent shrinking during sewing. Available for text, manual punching patterns and objects cre- PeDesignV6Eng.book Page 174 Thursday, July 8, 2004 11:59 AM Layout & Editing Editing Embroidery Patterns Half Stitch Running Stitch Path Pull Compensation Fill stitch Under sewing Density Gradation Direction Stitch Type Half Stitch Sets half stitching...
Users Manual - English
Page 183
... sewing Density Gradation Direction Half Stitch Running Stitch Path Sets underlay stitching on the shape of the region, however, it may not be sewn. Available only when the sewing direction type is dense, a half stitch could be sewn. If one side of region: Along outline: Onto outline: 175 PeDesignV6Eng.book Page 175 Thursday, July 8, 2004 11:59 AM Layout & Editing Editing Embroidery Patterns...
... sewing Density Gradation Direction Half Stitch Running Stitch Path Sets underlay stitching on the shape of the region, however, it may not be sewn. Available only when the sewing direction type is dense, a half stitch could be sewn. If one side of region: Along outline: Onto outline: 175 PeDesignV6Eng.book Page 175 Thursday, July 8, 2004 11:59 AM Layout & Editing Editing Embroidery Patterns...
Users Manual - English
Page 213
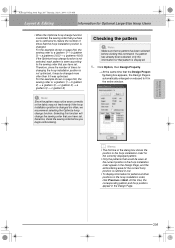
... before you begin embroidering. Checking the pattern a Note: Make sure that you have set, therefore, check the sewing order before clicking this time, the corresponding pattern and hoop position appear in the Design Page. 205 Advanced Opreation Layout & Editing PeDesignV6Eng.book Page 205 Thursday, July 8, 2004 11:59 AM Layout & Editing Information for Optional Large-Size Hoop Users • When the Optimize hoop change function is...
... before you begin embroidering. Checking the pattern a Note: Make sure that you have set, therefore, check the sewing order before clicking this time, the corresponding pattern and hoop position appear in the Design Page. 205 Advanced Opreation Layout & Editing PeDesignV6Eng.book Page 205 Thursday, July 8, 2004 11:59 AM Layout & Editing Information for Optional Large-Size Hoop Users • When the Optimize hoop change function is...


