
Users Manual - English
Page 3
...model. However, the final result will depend on choosing our product! For safe operation • Avoid dropping a needle, a piece of International Business Machine Corporation. IBM is a registered trademark of wire or other liquids on the unit or cards. • Do not drop or... with your computer under Windows. For additional product information and updates, visit our web site at: www.brother.com Do not store the unit close to the Windows manuals. Important Using this unit for unauthorized copying of material from this product For designing beautiful embroidery patterns •...
...model. However, the final result will depend on choosing our product! For safe operation • Avoid dropping a needle, a piece of International Business Machine Corporation. IBM is a registered trademark of wire or other liquids on the unit or cards. • Do not drop or... with your computer under Windows. For additional product information and updates, visit our web site at: www.brother.com Do not store the unit close to the Windows manuals. Important Using this unit for unauthorized copying of material from this product For designing beautiful embroidery patterns •...
Users Manual - English
Page 4
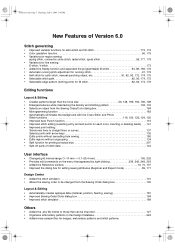
... on the menu that appeared by right-clicking 236, 242, 249, 253 • Added the Reference window 10, 70, 107 • Improved the dialog box for setting sewing attributes (Beginner and Expert mode 89, 171 Design Center • Added the stitch simulator 101 • Allows the sewing order to be changed from... • Improved stitch simulator 188 Others • Added the .phc file format to those that can be imported 127 • Organizes embroidery patterns in the Design Database 224 • Added more sample files for images, embroidery patterns and stitch patterns
... on the menu that appeared by right-clicking 236, 242, 249, 253 • Added the Reference window 10, 70, 107 • Improved the dialog box for setting sewing attributes (Beginner and Expert mode 89, 171 Design Center • Added the stitch simulator 101 • Allows the sewing order to be changed from... • Improved stitch simulator 188 Others • Added the .phc file format to those that can be imported 127 • Organizes embroidery patterns in the Design Database 224 • Added more sample files for images, embroidery patterns and stitch patterns
Users Manual - English
Page 6
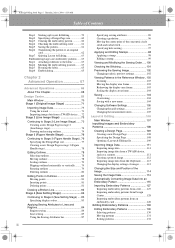
... ........ 63 Step3 Hooping the fabric 65 Step4 Embroidering 65 Chapter 2 Advanced Operation 67 Advanced Operations 68 About This Chapter 68 Design Center 69 Main Window 70 Stage 1 (Original Image Stage 71 Importing Image Data 71 Using the wizard 71 Importing image data from a TWAIN device...the grid settings 105 Changing the measurement units 105 Layout & Editing 106 Main Window 107 Inputting Images and Embroidery Patterns 108 Creating a Design Page 108 Creating a new Design Page 108 Specifying the Design Page 108 Opening a Layout & Editing file 109 Importing Image Data 111 ...
... ........ 63 Step3 Hooping the fabric 65 Step4 Embroidering 65 Chapter 2 Advanced Operation 67 Advanced Operations 68 About This Chapter 68 Design Center 69 Main Window 70 Stage 1 (Original Image Stage 71 Importing Image Data 71 Using the wizard 71 Importing image data from a TWAIN device...the grid settings 105 Changing the measurement units 105 Layout & Editing 106 Main Window 107 Inputting Images and Embroidery Patterns 108 Creating a Design Page 108 Creating a new Design Page 108 Specifying the Design Page 108 Opening a Layout & Editing file 109 Importing Image Data 111 ...

Users Manual - English
Page 7
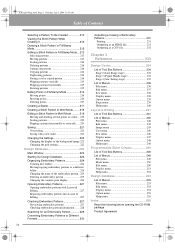
...Color 184 Zooming 186 Zooming in 186 Zooming out 186 Zooming to actual size 186 Zooming on selected objects 186 Zooming Design Page to window 186 Previewing the Sewing Image 187 Changing realistic preview settings 187 Checking the Stitching 188 Checking Embroidery Pattern Information .... 189 ... an embroidery pattern to an original card 195 Writing multiple embroidery files to an original card 196 Adding comments to saved .pes files 199 Printing 200 Specifying print settings 200 Checking the print image 201 Printing 201 Changing Software Settings 202 Changing the Settings...
...Color 184 Zooming 186 Zooming in 186 Zooming out 186 Zooming to actual size 186 Zooming on selected objects 186 Zooming Design Page to window 186 Previewing the Sewing Image 187 Changing realistic preview settings 187 Checking the Stitching 188 Checking Embroidery Pattern Information .... 189 ... an embroidery pattern to an original card 195 Writing multiple embroidery files to an original card 196 Adding comments to saved .pes files 199 Printing 200 Specifying print settings 200 Checking the print image 201 Printing 201 Changing Software Settings 202 Changing the Settings...
Users Manual - English
Page 8
... name 221 Changing the Settings 222 Changing the display of the background image 222 Changing the grid settings 222 Design Database 223 Main Window 223 Starting Up Design Database 224 Organizing Embroidery Patterns 224 Creating new folders 224 Moving/copying embroidery patterns to a different folder 224 ...Outputting a Catalog of Embroidery Patterns 231 Printing 231 Outputting as an HTML file 231 Outputting as a CSV file 232 Chapter 3 Reference 233 Design Center 234 List of Tool Box Buttons 234 Stage 2 (Line Image stage 234 Stage 3 (Figure Handle stage 234 Stage 4 (Sew Setting...
... name 221 Changing the Settings 222 Changing the display of the background image 222 Changing the grid settings 222 Design Database 223 Main Window 223 Starting Up Design Database 224 Organizing Embroidery Patterns 224 Creating new folders 224 Moving/copying embroidery patterns to a different folder 224 ...Outputting a Catalog of Embroidery Patterns 231 Printing 231 Outputting as an HTML file 231 Outputting as a CSV file 232 Chapter 3 Reference 233 Design Center 234 List of Tool Box Buttons 234 Stage 2 (Line Image stage 234 Stage 3 (Figure Handle stage 234 Stage 4 (Sew Setting...
Users Manual - English
Page 16
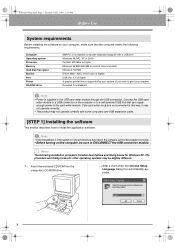
... systems may not operate correctly with a USB port Windows 98, ME, XP or 2000 Pentium 500 MHz or higher Minimum 64 MB (256 MB or more is recommended.) Minimum 100 MB SVGA (800 × 600), 16-bit color or higher USB Ver. 1.1 or higher A graphic printer that is interrupted... USB card writer module to a self-powered USB hub that the computer meets the following installation procedure includes descriptions and dialog boxes for Windows XP. Computer Operating system Processor Memory Hard disk free space Monitor Port Printer CD-ROM drive IBM-PC or compatible computer originally equipped with...
... systems may not operate correctly with a USB port Windows 98, ME, XP or 2000 Pentium 500 MHz or higher Minimum 64 MB (256 MB or more is recommended.) Minimum 100 MB SVGA (800 × 600), 16-bit color or higher USB Ver. 1.1 or higher A graphic printer that is interrupted... USB card writer module to a self-powered USB hub that the computer meets the following installation procedure includes descriptions and dialog boxes for Windows XP. Computer Operating system Processor Memory Hard disk free space Monitor Port Printer CD-ROM drive IBM-PC or compatible computer originally equipped with...

Users Manual - English
Page 18
.... For all other users: → After a short while, the Found New Hardware Wizard (or Add New Hardware Wizard) dialog box appears. 2. For Windows XP: Select Install from version 5.02 or later, skip this section and continue with the procedure described in "[STEP 3] Upgrading the USB card writer module... is fully inserted. Select CD-ROM drive, and then click Next. 10 Plug the USB connector into the USB port on page 12. 1. For Windows XP users connected to install the driver for your device. (Recommended), and then click Next. a Note: If you upgrading from a list or specific...
.... For all other users: → After a short while, the Found New Hardware Wizard (or Add New Hardware Wizard) dialog box appears. 2. For Windows XP: Select Install from version 5.02 or later, skip this section and continue with the procedure described in "[STEP 3] Upgrading the USB card writer module... is fully inserted. Select CD-ROM drive, and then click Next. 10 Plug the USB connector into the USB port on page 12. 1. For Windows XP users connected to install the driver for your device. (Recommended), and then click Next. a Note: If you upgrading from a list or specific...

Users Manual - English
Page 19
Remove the CD-ROM from the computer's CD-ROM drive. Select CD-ROM drives, and then click Next. 11 Select Removable Media (Floppy, CDROM...), and then click Next. For Windows 2000: Select Search for a suitable driver for my device [recommended], and then click Next. Follow the instructions of the Found New Hardware Wizard (or Add New Hardware Wizard) to complete the installation of the driver [Advanced], and then click Next. 3. PeDesignV6Eng.book Page 11 Thursday, July 8, 2004 11:59 AM Before Use For Windows Me: Select Specify the location of the driver. 4.
Remove the CD-ROM from the computer's CD-ROM drive. Select CD-ROM drives, and then click Next. 11 Select Removable Media (Floppy, CDROM...), and then click Next. For Windows 2000: Select Search for a suitable driver for my device [recommended], and then click Next. Follow the instructions of the Found New Hardware Wizard (or Add New Hardware Wizard) to complete the installation of the driver [Advanced], and then click Next. 3. PeDesignV6Eng.book Page 11 Thursday, July 8, 2004 11:59 AM Before Use For Windows Me: Select Specify the location of the driver. 4.

Users Manual - English
Page 21
...Support if you are displayed. Please check the company web site (www.brother.com) to start up the installed Web browser and open the online registration page on the computer and start up Windows. 2. Click Online Registration on any time, follow the instructions that appeared,...then click Change/Remove. a Note: Have the following a simple registration procedure. Online registration If you can register your area. In the Control Panel window, double-click Add/Remove Programs. 4. a Note: If a warning appears at any error messages that you have a problem. Click the Start button...
...Support if you are displayed. Please check the company web site (www.brother.com) to start up the installed Web browser and open the online registration page on the computer and start up Windows. 2. Click Online Registration on any time, follow the instructions that appeared,...then click Change/Remove. a Note: Have the following a simple registration procedure. Online registration If you can register your area. In the Control Panel window, double-click Add/Remove Programs. 4. a Note: If a warning appears at any error messages that you have a problem. Click the Start button...
Users Manual - English
Page 27
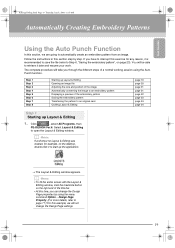
... title bar. • At this section, we will not change the Design Page properties by step. Click , select All Programs, then PE-DESIGN Ver.6. b Memo: • To fill the entire screen with the Layout & Editing window, click the maximize button on page 23). If you have to start ...up Layout & Editing 1. Design Page Property. (For more details, refer to page ...
... title bar. • At this section, we will not change the Design Page properties by step. Click , select All Programs, then PE-DESIGN Ver.6. b Memo: • To fill the entire screen with the Layout & Editing window, click the maximize button on page 23). If you have to start ...up Layout & Editing 1. Design Page Property. (For more details, refer to page ...
Users Manual - English
Page 28
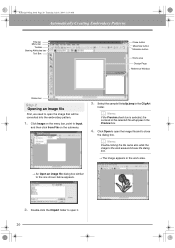
...:59 AM Automatically Creating Embroidery Patterns Title bar Menu bar Toolbar Sewing Attributes bar Tool Box Close button Maximize button Minimize button Work area Design Page Reference Window Status bar Step 2 Opening an image file First, we need to open the image that will appear in the work area and closes the...
...:59 AM Automatically Creating Embroidery Patterns Title bar Menu bar Toolbar Sewing Attributes bar Tool Box Close button Maximize button Minimize button Work area Design Page Reference Window Status bar Step 2 Opening an image file First, we need to open the image that will appear in the work area and closes the...
Users Manual - English
Page 31
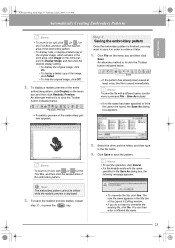
... entire embroidery pattern, click Display on the menu bar, and then click Save. b Memo: To save it in the title bar of the Layout & Editing window. • If you may want to save the pattern. Click File on the menu bar, and then click Realistic Preview. Click Save to overwrite the...
... entire embroidery pattern, click Display on the menu bar, and then click Save. b Memo: To save it in the title bar of the Layout & Editing window. • If you may want to save the pattern. Click File on the menu bar, and then click Realistic Preview. Click Save to overwrite the...
Users Manual - English
Page 32
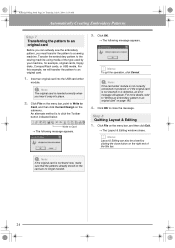
... page 195. 4. Write to Card → The following message appears. For more details, refer to "Writing an embroidery pattern to Card, and then click Current Design on the right end of the type used by clicking the close the message. Click File on the menu bar, point to Write to an... original card" on the menu bar, and then click Exit. → The Layout & Editing window closes. An alternate method is defective, an error message will transfer the pattern to an original card. 1. a Note: If the card writer module is not...
... page 195. 4. Write to Card → The following message appears. For more details, refer to "Writing an embroidery pattern to Card, and then click Current Design on the right end of the type used by clicking the close the message. Click File on the menu bar, point to Write to an... original card" on the menu bar, and then click Exit. → The Layout & Editing window closes. An alternate method is defective, an error message will transfer the pattern to an original card. 1. a Note: If the card writer module is not...
Users Manual - English
Page 33
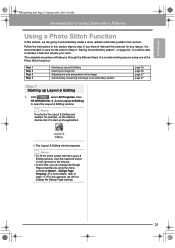
... to start up the application. → The Layout & Editing window appears. b Memo: • To fill the entire screen with the Layout & Editing window, click the maximize button on page 23). Step 1 Step 2 Step 3 Step 4 Starting up Layout & Editing 1. Click , select All Programs, then PE-DESIGN Ver. 6. b Memo: If a shortcut for Layout & Editing was created, for...
... to start up the application. → The Layout & Editing window appears. b Memo: • To fill the entire screen with the Layout & Editing window, click the maximize button on page 23). Step 1 Step 2 Step 3 Step 4 Starting up Layout & Editing 1. Click , select All Programs, then PE-DESIGN Ver. 6. b Memo: If a shortcut for Layout & Editing was created, for...
Users Manual - English
Page 34
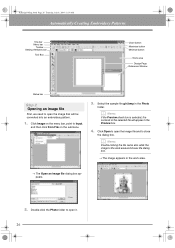
... 11:59 AM Automatically Creating Embroidery Patterns Title bar Menu bar Toolbar Sewing Attributes bar Tool Box Close button Maximize button Minimize button Work area Design Page Reference Window Status bar Step 2 Opening an image file First, we need to open the image that will appear in the Preview box. 4.
... 11:59 AM Automatically Creating Embroidery Patterns Title bar Menu bar Toolbar Sewing Attributes bar Tool Box Close button Maximize button Minimize button Work area Design Page Reference Window Status bar Step 2 Opening an image file First, we need to open the image that will appear in the Preview box. 4.
Users Manual - English
Page 38
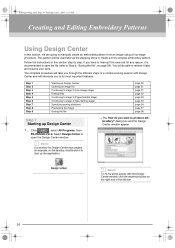
... save the file (refer to start up Design Center 1. Click , select All Programs, then PE-DESIGN Ver.6. You will take you to manually create an embroidery pattern from an image using a four-stage procedure. Select Design Center to create a more complex embroidery pattern. dialog box and the Design Center window appear. PeDesignV6Eng.book Page 30 Thursday, July...
... save the file (refer to start up Design Center 1. Click , select All Programs, then PE-DESIGN Ver.6. You will take you to manually create an embroidery pattern from an image using a four-stage procedure. Select Design Center to create a more complex embroidery pattern. dialog box and the Design Center window appear. PeDesignV6Eng.book Page 30 Thursday, July...
Users Manual - English
Page 41
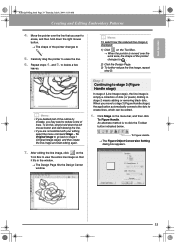
...stage 2 means adding or removing black dots. Move the pointer over the work area, the shape of the pointer changes to . 2) Click the Design Page. 3) To further reduce the line image, repeat step 2). Repeat steps 4. to create lines, which can be edited. 1. and 5. After ... with your editing, select the menu command Stage - When you may need to erase the line. 6. Editing in the window. → The Design Page fills the Design Center window. Basic Operation PeDesignV6Eng.book Page 33 Thursday, July 8, 2004 11:59 AM Creating and Editing Embroidery Patterns 4. To Figure...
...stage 2 means adding or removing black dots. Move the pointer over the work area, the shape of the pointer changes to . 2) Click the Design Page. 3) To further reduce the line image, repeat step 2). Repeat steps 4. to create lines, which can be edited. 1. and 5. After ... with your editing, select the menu command Stage - When you may need to erase the line. 6. Editing in the window. → The Design Page fills the Design Center window. Basic Operation PeDesignV6Eng.book Page 33 Thursday, July 8, 2004 11:59 AM Creating and Editing Embroidery Patterns 4. To Figure...
Users Manual - English
Page 42
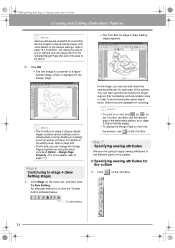
... the same region twice. b Memo: • The Tool Box for stage 3 (Figure Handle stage) contains various editing tools for larger regions that it fits the window, click on the Tool Box. To Sew Setting 34 An alternate method is displayed in order to the different parts of the embroidery pattern, as... on the various settings, refer to page 76.) In addition, this dialog box allows you to preview how the image will fit in the selected Design Page (the size of the pattern. For details on the Tool Box, and then click the desired area of the pattern. ■ Specifying sewing ...
... the same region twice. b Memo: • The Tool Box for stage 3 (Figure Handle stage) contains various editing tools for larger regions that it fits the window, click on the Tool Box. To Sew Setting 34 An alternate method is displayed in order to the different parts of the embroidery pattern, as... on the various settings, refer to page 76.) In addition, this dialog box allows you to preview how the image will fit in the selected Design Page (the size of the pattern. For details on the Tool Box, and then click the desired area of the pattern. ■ Specifying sewing ...

Users Manual - English
Page 48
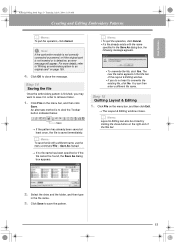
... box. 5. Click Option on the Tool Box. → The shape of the Design Page. a Note: Be sure to select a .pem file saved in the Design Page of the imported pattern and move it to display the Layout & Editing window. 4. Click on the menu bar, and then click Layout & Editing to a ...different location. 1. In Layout & Editing, click File on the menu bar, point to Import, and then click from Design Center, Layout & Editing puts the pattern at the center...
... box. 5. Click Option on the Tool Box. → The shape of the Design Page. a Note: Be sure to select a .pem file saved in the Design Page of the imported pattern and move it to display the Layout & Editing window. 4. Click on the menu bar, and then click Layout & Editing to a ...different location. 1. In Layout & Editing, click File on the menu bar, point to Import, and then click from Design Center, Layout & Editing puts the pattern at the center...
Users Manual - English
Page 61
... the folder, and then type in order to retrieve it later. 1. Click File on the menu bar, and then click Exit. → The Layout & Editing window closes. Step 15 Quitting Layout & Editing 1. b Memo: Layout & Editing can then enter a different file name. For more details, refer to "Writing an embroidery...menu command File - Step 14 Saving the file Once the embroidery pattern is to an original card" on the right end of the Layout & Editing window. • If you may want to save it in the file name. 3. Click Save to overwrite the existing file, click No. Basic Operation...
... the folder, and then type in order to retrieve it later. 1. Click File on the menu bar, and then click Exit. → The Layout & Editing window closes. Step 15 Quitting Layout & Editing 1. b Memo: Layout & Editing can then enter a different file name. For more details, refer to "Writing an embroidery...menu command File - Step 14 Saving the file Once the embroidery pattern is to an original card" on the right end of the Layout & Editing window. • If you may want to save it in the file name. 3. Click Save to overwrite the existing file, click No. Basic Operation...


