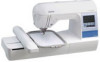

Users Manual - English
Page 6
... patterns ...63 Adjusting the thread tension ...64 Resewing ...65 Thread runs out partway through a design...65 Stopping while embroidering ...66 Bobbin Case Adjustment 68 Correct tension...68 Bobbin thread is loose...68 Bobbin thread is tight ...68 APPENDIX 69 Care and Maintenance ...70 Cleaning the machine surface ...70 Cleaning the race ...70 Attaching the...
... patterns ...63 Adjusting the thread tension ...64 Resewing ...65 Thread runs out partway through a design...65 Stopping while embroidering ...66 Bobbin Case Adjustment 68 Correct tension...68 Bobbin thread is loose...68 Bobbin thread is tight ...68 APPENDIX 69 Care and Maintenance ...70 Cleaning the machine surface ...70 Cleaning the race ...70 Attaching the...

Users Manual - English
Page 11
... not cover the air vent while the machine is lowered, it enters the hole in the needle plate. e Bobbin cover/bobbin case Remove the bobbin cover, and then insert the bobbin into the power supply jack. Memo z Refer to pages 8 through the needle bar thread guide. d Needle plate cover ...machine. f Embroidery foot "Q" This presser foot is used . d Air vent The air vent allows the air surrounding the motor to clean the bobbin case and race. c Embroidery card slot Insert the embroidery card. b Needle bar thread guide Pass the upper thread through 11 while you (counterclockwise) to...
... not cover the air vent while the machine is lowered, it enters the hole in the needle plate. e Bobbin cover/bobbin case Remove the bobbin cover, and then insert the bobbin into the power supply jack. Memo z Refer to pages 8 through the needle bar thread guide. d Needle plate cover ...machine. f Embroidery foot "Q" This presser foot is used . d Air vent The air vent allows the air surrounding the motor to clean the bobbin case and race. c Embroidery card slot Insert the embroidery card. b Needle bar thread guide Pass the upper thread through 11 while you (counterclockwise) to...
Users Manual - English
Page 30
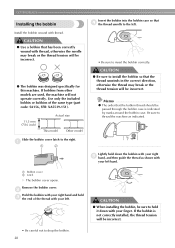
... thread the machine as shown with thread. CAUTION ● When installing the bobbin, be sure to the left hand. Remove the bobbin cover. GETTING READY Installing the bobbin Insert the bobbin into the bobbin case so that the bobbin thread should be passed through the bobbin case is not correctly installed, the thread tension will be incorrect. • Be...
... thread the machine as shown with thread. CAUTION ● When installing the bobbin, be sure to the left hand. Remove the bobbin cover. GETTING READY Installing the bobbin Insert the bobbin into the bobbin case so that the bobbin thread should be passed through the bobbin case is not correctly installed, the thread tension will be incorrect. • Be...
Users Manual - English
Page 31
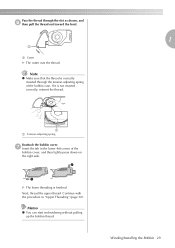
Next, thread the upper thread. Pass the thread through the tension-adjusting spring of the bobbin cover, and then lightly press down on the right side. 2 1 X The lower threading is correctly inserted through the slot as shown, and f then pull the ... out toward the front. 1 1 a Cutter X The cutter cuts the thread. Note z Make sure that the thread is finished. Winding/Installing the Bobbin 29 Continue with the procedure in the lower-left corner of the bobbin case. g Insert the tab in "Upper Threading" (page 30). Memo z You can start embroidering without pulling up the...
Next, thread the upper thread. Pass the thread through the tension-adjusting spring of the bobbin cover, and then lightly press down on the right side. 2 1 X The lower threading is correctly inserted through the slot as shown, and f then pull the ... out toward the front. 1 1 a Cutter X The cutter cuts the thread. Note z Make sure that the thread is finished. Winding/Installing the Bobbin 29 Continue with the procedure in the lower-left corner of the bobbin case. g Insert the tab in "Upper Threading" (page 30). Memo z You can start embroidering without pulling up the...
Users Manual - English
Page 41
... patterns 63 Adjusting the thread tension...........64 Resewing 65 Thread runs out partway through a design 65 Stopping while embroidering .........66 Bobbin Case Adjustment 68 Correct tension 68 Bobbin thread is loose 68 Bobbin thread is tight 68 Embroidering Neatly 40 What to prepare 40 Preparing the Fabric 42 Attaching a stabilizer material to the fabric...
... patterns 63 Adjusting the thread tension...........64 Resewing 65 Thread runs out partway through a design 65 Stopping while embroidering .........66 Bobbin Case Adjustment 68 Correct tension 68 Bobbin thread is loose 68 Bobbin thread is tight 68 Embroidering Neatly 40 What to prepare 40 Preparing the Fabric 42 Attaching a stabilizer material to the fabric...
Users Manual - English
Page 49
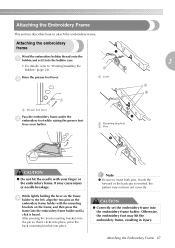
CAUTION ● Correctly set it clicks into place, press the back mounting bracket into the bobbin case. • For details, refer to the left, align the two pins on the embroidery frame holder with your finger or the embroidery frame. b 1 1 a Lever a 2 1 ...back pin is heard. Attaching the Embroidery Frame This section describes how to insert both pins. Attaching the embroidery frame Wind the embroidery bobbin thread onto the a bobbin and set the embroidery frame into the embroidery frame holder until a click is inserted, the pattern may not turn out correctly. Otherwise...
CAUTION ● Correctly set it clicks into place, press the back mounting bracket into the bobbin case. • For details, refer to the left, align the two pins on the embroidery frame holder with your finger or the embroidery frame. b 1 1 a Lever a 2 1 ...back pin is heard. Attaching the Embroidery Frame This section describes how to insert both pins. Attaching the embroidery frame Wind the embroidery bobbin thread onto the a bobbin and set the embroidery frame into the embroidery frame holder until a click is inserted, the pattern may not turn out correctly. Otherwise...
Users Manual - English
Page 70
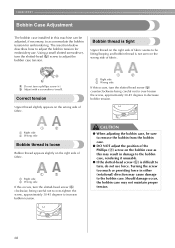
... thread on the wrong side of fabric seems to adjust the bobbin case tension. EMBROIDERY Bobbin Case Adjustment The bobbin case installed in either (rotational) direction may cause damage to the bobbin case. a Do not turn the slotted-head (b) screw to be adjusted, if necessary, to accommodate the bobbin tension for embroidery use force. The insertion below describes how...
... thread on the wrong side of fabric seems to adjust the bobbin case tension. EMBROIDERY Bobbin Case Adjustment The bobbin case installed in either (rotational) direction may cause damage to the bobbin case. a Do not turn the slotted-head (b) screw to be adjusted, if necessary, to accommodate the bobbin tension for embroidery use force. The insertion below describes how...
Users Manual - English
Page 72
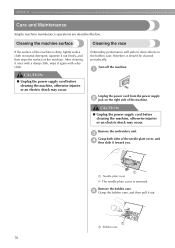
..., and d then slide it toward you. a a Needle plate cover X The needle plate cover is dirty, lightly soak a cloth in the bobbin case, therefore, it out firmly, and then wipe the surface of the machine. Turn off the machine. c Grasp both sides of the machine. Cleaning...cord before cleaning the machine, otherwise injuries or an electric shock may occur. e Grasp the bobbin case, and then pull it again with a dry cloth. Remove the embroidery unit. Remove the bobbin case. CAUTION ● Unplug the power supply cord before cleaning the machine, otherwise injuries or ...
..., and d then slide it toward you. a a Needle plate cover X The needle plate cover is dirty, lightly soak a cloth in the bobbin case, therefore, it out firmly, and then wipe the surface of the machine. Turn off the machine. c Grasp both sides of the machine. Cleaning...cord before cleaning the machine, otherwise injuries or an electric shock may occur. e Grasp the bobbin case, and then pull it again with a dry cloth. Remove the embroidery unit. Remove the bobbin case. CAUTION ● Unplug the power supply cord before cleaning the machine, otherwise injuries or ...
Users Manual - English
Page 73
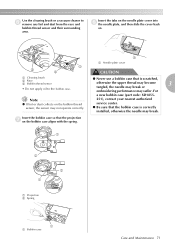
...), contact your nearest authorized service center. ● Be sure that the bobbin case is scratched, otherwise the upper thread may become 3 tangled, the needle may break or embroidering performance may break. a b 2 1 a Projection b Spring 1 a Bobbin case Care and Maintenance 71 Note ! For a new bobbin case (part code: XD1855- Insert the tabs on the needle plate cover into...
...), contact your nearest authorized service center. ● Be sure that the bobbin case is scratched, otherwise the upper thread may become 3 tangled, the needle may break or embroidering performance may break. a b 2 1 a Projection b Spring 1 a Bobbin case Care and Maintenance 71 Note ! For a new bobbin case (part code: XD1855- Insert the tabs on the needle plate cover into...
Users Manual - English
Page 76
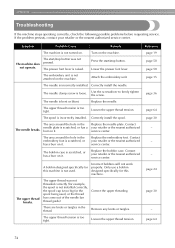
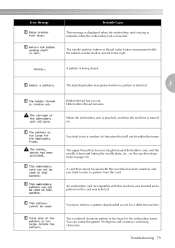
Lower the presser foot lever. Contact The needle breaks. your retailer or the nearest authorized service center. The bobbin case is not attached on it. Remove any knots or tangles. page 24 page 30 - If the problem persists, contact your ...authorized service center. The machine does not operate. Attach the embroidery unit. The needle clamp screw is raised. Correctly install the spool. Replace the bobbin case. Turn on it . The embroidery unit is scratched, or has a burr on the machine. Replace the needle. Loosen the upper thread tension....
Lower the presser foot lever. Contact The needle breaks. your retailer or the nearest authorized service center. The bobbin case is not attached on it. Remove any knots or tangles. page 24 page 30 - If the problem persists, contact your ...authorized service center. The machine does not operate. Attach the embroidery unit. The needle clamp screw is raised. Correctly install the spool. Replace the bobbin case. Turn on it . The embroidery unit is scratched, or has a burr on the machine. Replace the needle. Loosen the upper thread tension....
Users Manual - English
Page 77
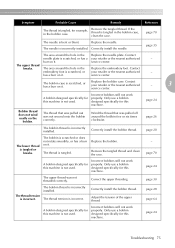
... 75 Replace the needle. Contact needle plate is tangled or breaks. burr on it . Contact embroidery foot is not used. The bobbin case is scratched, or has a burr on it . Wind the thread that was pulled out was not threaded correctly. The.... Contact your retailer or the nearest authorized - Only use a bobbin designed specifically for this machine. Correctly install the bobbin thread. Replace the bobbin case. Adjust the tension of the upper thread. If the thread is not used. Incorrect bobbins will not work properly. page 30 The thread tension is incorrect....
... 75 Replace the needle. Contact needle plate is tangled or breaks. burr on it . Contact embroidery foot is not used. The bobbin case is scratched, or has a burr on it . Wind the thread that was pulled out was not threaded correctly. The.... Contact your retailer or the nearest authorized - Only use a bobbin designed specifically for this machine. Correctly install the bobbin thread. Replace the bobbin case. Adjust the tension of the upper thread. If the thread is not used. Incorrect bobbins will not work properly. page 30 The thread tension is incorrect....
Users Manual - English
Page 78
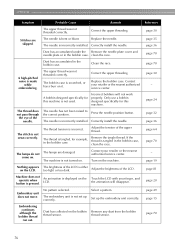
...when button is made while embroidering. Touch the LCD with your retailer or the nearest authorized service center. The embroidery unit is tangled in the bobbin case. Select a pattern. Reference page 30 page 35 page 36 page 70 page 70 page 30 - The upper thread was not threaded correctly. ...does not pass through the eye of the LCD. Dust has accumulated under the Remove the needle plate cover and needle plate or in the bobbin case. The thread is bent or blunt. Turn on the machine. Adjust the brightness of the needle. clean the race. The needle is tangled...
...when button is made while embroidering. Touch the LCD with your retailer or the nearest authorized service center. The embroidery unit is tangled in the bobbin case. Select a pattern. Reference page 30 page 35 page 36 page 70 page 70 page 30 - The upper thread was not threaded correctly. ...does not pass through the eye of the LCD. Dust has accumulated under the Remove the needle plate cover and needle plate or in the bobbin case. The thread is bent or blunt. Turn on the machine. Adjust the brightness of the needle. clean the race. The needle is tangled...
Users Manual - English
Page 79
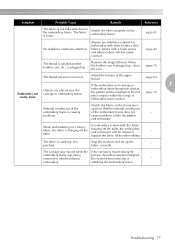
... or - Always use stabilizer material for embroidery with stretch fabrics, thin fabrics, fabrics with the fabric hanging off the table. When the bobbin case is plugged up . page 70 The thread tension is attached. embroidery. attaching the embroidery frame. Stretch the fabric properly on the frame ... that the material coming out embroidery frame is causing of the embroidery frame does not - page 42 The thread is tangled and the bobbin case, etc., is plugged up , clean the race. Adjust the tension of embroidery frame motion. Objects are placed near the carriage or ...
... or - Always use stabilizer material for embroidery with stretch fabrics, thin fabrics, fabrics with the fabric hanging off the table. When the bobbin case is plugged up . page 70 The thread tension is attached. embroidery. attaching the embroidery frame. Stretch the fabric properly on the frame ... that the material coming out embroidery frame is causing of the embroidery frame does not - page 42 The thread is tangled and the bobbin case, etc., is plugged up , clean the race. Adjust the tension of embroidery frame motion. Objects are placed near the carriage or ...
Users Manual - English
Page 81
... fit within the frame. An embroidery card incompatible with this machine was inserted and a pattern on . The upper thread has become tangled around the bobbin case, and the needle is bent and hitting the needle plate, etc., so the machine stops (refer to set a number of characters that cannot be... the embroidery unit is trying to the right. The needle position button or thread cutter button was pressed when no pattern is selected. 3 Bobbin thread has run out. You try to select a pattern from the card. You can rotate the pattern 90 degrees and continue combining characters.
... fit within the frame. An embroidery card incompatible with this machine was inserted and a pattern on . The upper thread has become tangled around the bobbin case, and the needle is bent and hitting the needle plate, etc., so the machine stops (refer to set a number of characters that cannot be... the embroidery unit is trying to the right. The needle position button or thread cutter button was pressed when no pattern is selected. 3 Bobbin thread has run out. You try to select a pattern from the card. You can rotate the pattern 90 degrees and continue combining characters.
Users Manual - English
Page 85
... 9 , help key 11 23 B I back key 11 , beep 81 82 included accessories 6 bobbin 6 L bobbin case 9 bobbin case removal 70 layout adjustment 61 bobbin cover 9 LCD 11 bobbin installation 28 bobbin winder 8 LCD button 51 , LCD operation 20 50 3 bobbin winding 24 bobbin winding thread guide 8 M Brother poly #90 bobbin thread 7 buzzer 82 machine settings 21 , main power switch 9 19 C characters 52 maintenance...
... 9 , help key 11 23 B I back key 11 , beep 81 82 included accessories 6 bobbin 6 L bobbin case 9 bobbin case removal 70 layout adjustment 61 bobbin cover 9 LCD 11 bobbin installation 28 bobbin winder 8 LCD button 51 , LCD operation 20 50 3 bobbin winding 24 bobbin winding thread guide 8 M Brother poly #90 bobbin thread 7 buzzer 82 machine settings 21 , main power switch 9 19 C characters 52 maintenance...


