
Users Manual - English
Page 5
... Crystal Display) Operation 20 Viewing the LCD...20 Changing the machine settings ...21 Checking machine operating procedures ...23 Winding/Installing the Bobbin 24 Bobbin precautions ...24 Winding the bobbin ...24 Installing the bobbin ...28 Upper Threading ...30 About the spool of thread ...30 Threading the upper thread ...30 Threading the needle ...32 Threading the...
... Crystal Display) Operation 20 Viewing the LCD...20 Changing the machine settings ...21 Checking machine operating procedures ...23 Winding/Installing the Bobbin 24 Bobbin precautions ...24 Winding the bobbin ...24 Installing the bobbin ...28 Upper Threading ...30 About the spool of thread ...30 Threading the upper thread ...30 Threading the needle ...32 Threading the...

Users Manual - English
Page 6
... patterns ...63 Adjusting the thread tension ...64 Resewing ...65 Thread runs out partway through a design...65 Stopping while embroidering ...66 Bobbin Case Adjustment 68 Correct tension...68 Bobbin thread is loose...68 Bobbin thread is tight ...68 APPENDIX 69 Care and Maintenance ...70 Cleaning the machine surface ...70 Cleaning the race ...70 Attaching...
... patterns ...63 Adjusting the thread tension ...64 Resewing ...65 Thread runs out partway through a design...65 Stopping while embroidering ...66 Bobbin Case Adjustment 68 Correct tension...68 Bobbin thread is loose...68 Bobbin thread is tight ...68 APPENDIX 69 Care and Maintenance ...70 Cleaning the machine surface ...70 Cleaning the race ...70 Attaching...

Users Manual - English
Page 7
d Embroidery You can start embroiderying without pulling up the bobbin thread (page 28). Machine Features 1 23 4 a Simple bobbin-winding The bobbin can quickly and easily be cut automatically after you for purchasing this manual, store it where it can quickly be accessed for ...embroidering (page 51). Before using the machine, carefully read the "IMPORTANT SAFETY INSTRUCTIONS", and then study this manual for future reference. b Quick-set bobbin You can embroider built-in embroidery patterns, characters, framed decorations, and designs from optional embroidery cards (page 39). 5
d Embroidery You can start embroiderying without pulling up the bobbin thread (page 28). Machine Features 1 23 4 a Simple bobbin-winding The bobbin can quickly and easily be cut automatically after you for purchasing this manual, store it where it can quickly be accessed for ...embroidering (page 51). Before using the machine, carefully read the "IMPORTANT SAFETY INSTRUCTIONS", and then study this manual for future reference. b Quick-set bobbin You can embroider built-in embroidery patterns, characters, framed decorations, and designs from optional embroidery cards (page 39). 5
Users Manual - English
Page 8
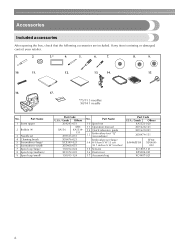
... missing or damaged, contact your retailer. 1. 2. 3.* 4. 5. 6. 7. 8. 9. 10. 11. 12. 13. 14. 15. 16. 17. *75/11 3 needles 90/14 1 needle No. Part Name 1 Seam ripper 2 Bobbin (4) 3 Needle set (large) 14 H 18cm X W 13 cm (H 7 inches X W 5 inches) 15 Scissors 16 Dust cover 17 Accessory bag Part Code U.S.A. / Canada Others XA5523-020 XD1628-121...
... missing or damaged, contact your retailer. 1. 2. 3.* 4. 5. 6. 7. 8. 9. 10. 11. 12. 13. 14. 15. 16. 17. *75/11 3 needles 90/14 1 needle No. Part Name 1 Seam ripper 2 Bobbin (4) 3 Needle set (large) 14 H 18cm X W 13 cm (H 7 inches X W 5 inches) 15 Scissors 16 Dust cover 17 Accessory bag Part Code U.S.A. / Canada Others XA5523-020 XD1628-121...
Users Manual - English
Page 9
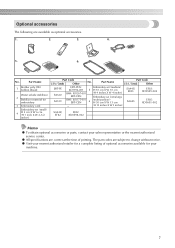
No. Part Name Part Code U.S.A. / Canada Other EBT-PE SA520 SA519 EBT-PEN: Embroidery set (medium) XC5996-001 5 H 10 cm X W 10 cm BM4: X81267-001 (H 4 inches X W 4 inches) EBT-CEN Embroidery set (small) 4 H 2 cm X W 6 cm (H 1 inch X W 2-1/2 inches) Part Code U.S.A. / Canada Other No. Part Name 1 Brother poly #90 bobbin thread Water solude stabilizer 2 Stabilizer material for...
No. Part Name Part Code U.S.A. / Canada Other EBT-PE SA520 SA519 EBT-PEN: Embroidery set (medium) XC5996-001 5 H 10 cm X W 10 cm BM4: X81267-001 (H 4 inches X W 4 inches) EBT-CEN Embroidery set (small) 4 H 2 cm X W 6 cm (H 1 inch X W 2-1/2 inches) Part Code U.S.A. / Canada Other No. Part Name 1 Brother poly #90 bobbin thread Water solude stabilizer 2 Stabilizer material for...

Users Manual - English
Page 10
... Look through the thread cutter to operate the machine. c Spool pin Place a spool of the machine and their functions are described below. d Bobbin winding thread guide Pass the thread around the thread guide cover when threading the upper thread. g Operation panel From the operation panel, patterns can ...to thread the needle. b Thread guide cover Like with the thread guide plate, pass the thread around this thread guide when winding the bobbin thread. Names of Machine Parts and Their Functions The names of the various parts of thread on the spool pin. Before using the machine...
... Look through the thread cutter to operate the machine. c Spool pin Place a spool of the machine and their functions are described below. d Bobbin winding thread guide Pass the thread around the thread guide cover when threading the upper thread. g Operation panel From the operation panel, patterns can ...to thread the needle. b Thread guide cover Like with the thread guide plate, pass the thread around this thread guide when winding the bobbin thread. Names of Machine Parts and Their Functions The names of the various parts of thread on the spool pin. Before using the machine...

Users Manual - English
Page 11
... Pass the upper thread through the thread guide disk when using the needle threader to turn the machine on the power supply cord into the bobbin case. d Needle plate cover Remove the needle plate cover to be exchanged. f Embroidery foot "Q" This presser foot is used . b Handwheel Turn the ...handwheel toward you are learning to raise and lower the needle. d Air vent The air vent allows the air surrounding the motor to clean the bobbin case and race. e Power supply jack Insert the plug on and off. Needle and embroidery foot section Right-side/rear view a Thread guide...
... Pass the upper thread through the thread guide disk when using the needle threader to turn the machine on the power supply cord into the bobbin case. d Needle plate cover Remove the needle plate cover to be exchanged. f Embroidery foot "Q" This presser foot is used . b Handwheel Turn the ...handwheel toward you are learning to raise and lower the needle. d Air vent The air vent allows the air surrounding the motor to clean the bobbin case and race. e Power supply jack Insert the plug on and off. Needle and embroidery foot section Right-side/rear view a Thread guide...
Users Manual - English
Page 12
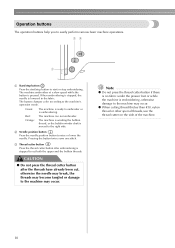
.... c Thread cutter button Press the thread cutter button after the threads have already been cut both the upper and the bobbin threads. Orange: The machine is winding the bobbin thread, or the bobbin winder shaft is pressed. CAUTION ● Do not press the thread cutter button after embroidering is embroidering, otherwise damage to...
.... c Thread cutter button Press the thread cutter button after the threads have already been cut both the upper and the bobbin threads. Orange: The machine is winding the bobbin thread, or the bobbin winder shaft is pressed. CAUTION ● Do not press the thread cutter button after embroidering is embroidering, otherwise damage to...
Users Manual - English
Page 13
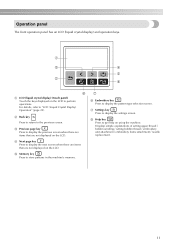
... are not displayed on using the machine. d Next page key Press to get help on the LCD. Displays simple explanations of setting upper thread / bobbin winding / setting bobbin thread / embroidery unit attachment / embroidery frame attachment / needle replacement. 11 g Settings key Press to "LCD (Liquid Crystal Display) Operation" (page 20). a c d e b h f a LCD (liquid crystal...
... are not displayed on using the machine. d Next page key Press to get help on the LCD. Displays simple explanations of setting upper thread / bobbin winding / setting bobbin thread / embroidery unit attachment / embroidery frame attachment / needle replacement. 11 g Settings key Press to "LCD (Liquid Crystal Display) Operation" (page 20). a c d e b h f a LCD (liquid crystal...

Users Manual - English
Page 15
... Crystal Display) Operation 20 Viewing the LCD 20 Changing the machine settings 21 Checking machine operating procedures 23 Winding/Installing the Bobbin 24 Bobbin precautions 24 Winding the bobbin 24 Installing the bobbin 28 Upper Threading ...30 About the spool of thread 30 Threading the upper thread 30 Threading the needle 32 Threading the...
... Crystal Display) Operation 20 Viewing the LCD 20 Changing the machine settings 21 Checking machine operating procedures 23 Winding/Installing the Bobbin 24 Bobbin precautions 24 Winding the bobbin 24 Installing the bobbin 28 Upper Threading ...30 About the spool of thread 30 Threading the upper thread 30 Threading the needle 32 Threading the...

Users Manual - English
Page 16
..."Attaching the Embroidery Frame" (page 47). ↓ 6 Selecting a pattern Select an embroidery pattern. For details, refer to "Winding/Installing the Bobbin" (page 24). ↓ 4 Preparing the fabric Attach a stabilizer material to the embroidery unit. For details on adjusting the layout, refer to...embroidery thread according to "Adjusting the layout" (page 61). ↓ 8 Setting up the embroidery Set up the bobbin thread For the bobbin thread, wind embroidery bobbin thread and set it in place. For details, refer to the fabric. GETTING READY Embroidery Step by Step The ...
..."Attaching the Embroidery Frame" (page 47). ↓ 6 Selecting a pattern Select an embroidery pattern. For details, refer to "Winding/Installing the Bobbin" (page 24). ↓ 4 Preparing the fabric Attach a stabilizer material to the embroidery unit. For details on adjusting the layout, refer to...embroidery thread according to "Adjusting the layout" (page 61). ↓ 8 Setting up the embroidery Set up the bobbin thread For the bobbin thread, wind embroidery bobbin thread and set it in place. For details, refer to the fabric. GETTING READY Embroidery Step by Step The ...
Users Manual - English
Page 25
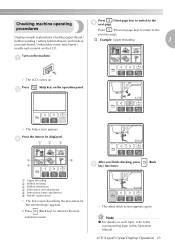
...page key) to switch to the item selection screen. Displays simple explanations of setting upper thread / bobbin winding / setting bobbin thread / embroidery † Example: Upper threading 1 unit attachment / embroidery frame attachment / needle replacement on the operation panel. ...a Upper threading b Bobbin winding c Bobbin installation d Embroidery unit attachment e Embroidery frame attachment f Needle replacement X The first screen describing the procedure for the ...
...page key) to switch to the item selection screen. Displays simple explanations of setting upper thread / bobbin winding / setting bobbin thread / embroidery † Example: Upper threading 1 unit attachment / embroidery frame attachment / needle replacement on the operation panel. ...a Upper threading b Bobbin winding c Bobbin installation d Embroidery unit attachment e Embroidery frame attachment f Needle replacement X The first screen describing the procedure for the ...
Users Manual - English
Page 26
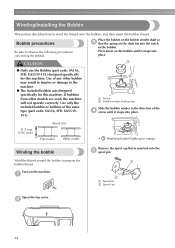
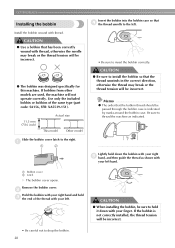
...: XA5539-151) designed specifically for this machine. b 24 Bobbin precautions Be sure to prepare the bobbin thread. Use only the included bobbin or bobbins of the same type (part code: SA156, SFB: XA5539151). 2 a Notch b Bobbin winder shaft spring Slide the bobbin winder in the bobbin. Press down on the bobbin until it snaps into the notch in the...
...: XA5539-151) designed specifically for this machine. b 24 Bobbin precautions Be sure to prepare the bobbin thread. Use only the included bobbin or bobbins of the same type (part code: SA156, SFB: XA5539151). 2 a Notch b Bobbin winder shaft spring Slide the bobbin winder in the bobbin. Press down on the bobbin until it snaps into the notch in the...
Users Manual - English
Page 27
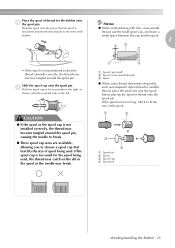
... far as possible to fit the size of spool being used . CAUTION ● If the spool or the spool cap is too small for the bobbin onto f the spool pin. Place the spool of thread onto the spool pin. If the spool cap is not installed correctly, the thread may break... (cross-wound thread) c Space z When using thread that best fits the size of the spool. 1 2 3 4 a Spool net b Spool c Spool cap d Spool pin Winding/Installing the Bobbin 25 Slide the spool onto the pin so that the thread unwinds correctly, the thread may become tangled around the spool pin. Memo z When embroidering...
... far as possible to fit the size of spool being used . CAUTION ● If the spool or the spool cap is too small for the bobbin onto f the spool pin. Place the spool of thread onto the spool pin. If the spool cap is not installed correctly, the thread may break... (cross-wound thread) c Space z When using thread that best fits the size of the spool. 1 2 3 4 a Spool net b Spool c Spool cap d Spool pin Winding/Installing the Bobbin 25 Slide the spool onto the pin so that the thread unwinds correctly, the thread may become tangled around the spool pin. Memo z When embroidering...

Users Manual - English
Page 28
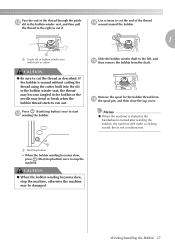
... h your right hand, as shown, pull the thread with your right hand. z Be sure to wind the thread clockwise around the bobbin, otherwise the thread will become wrapped around the bobbin five or six times with your left hand, and then pass the thread behind the thread guide cover and to the... guide plate, i and then pull it to the right. 1 a Thread guide plate a Thread guide Note z Make sure that the thread between the spool and the bobbin is pulled tight. GETTING READY While holding the thread with your left hand, k wind the thread that was pulled out clockwise around the...
... h your right hand, as shown, pull the thread with your right hand. z Be sure to wind the thread clockwise around the bobbin, otherwise the thread will become wrapped around the bobbin five or six times with your left hand, and then pass the thread behind the thread guide cover and to the... guide plate, i and then pull it to the right. 1 a Thread guide plate a Thread guide Note z Make sure that the thread between the spool and the bobbin is pulled tight. GETTING READY While holding the thread with your left hand, k wind the thread that was pulled out clockwise around the...
Users Manual - English
Page 29
...cover. this is not a malfunction. 1 a Start/stop button • When the bobbin winding becomes slow, press (Start/stop button) once to stop button) once to start m winding the bobbin. CAUTION ● When the bobbin winding becomes slow, stop the machine, otherwise the machine may bend or break when ...the bobbin thread starts to run out. Memo z When the machine is started or the handwheel...
...cover. this is not a malfunction. 1 a Start/stop button • When the bobbin winding becomes slow, press (Start/stop button) once to stop button) once to start m winding the bobbin. CAUTION ● When the bobbin winding becomes slow, stop the machine, otherwise the machine may bend or break when ...the bobbin thread starts to run out. Memo z When the machine is started or the handwheel...
Users Manual - English
Page 30
... the correct direction, otherwise the thread may break or the thread tension will be sure to insert the bobbin correctly. Be sure to drop the bobbin. 28 Install the bobbin wound with thread, otherwise the needle may break or the thread tension will not operate correctly. Slide the...) Actual size This model Other model • Be sure to hold down with your finger. If the bobbin is indicated by marks around the bobbin case. CAUTION ● When installing the bobbin, be incorrect. • Be careful not to thread the machine as shown with your left . GETTING ...
... the correct direction, otherwise the thread may break or the thread tension will be sure to insert the bobbin correctly. Be sure to drop the bobbin. 28 Install the bobbin wound with thread, otherwise the needle may break or the thread tension will not operate correctly. Slide the...) Actual size This model Other model • Be sure to hold down with your finger. If the bobbin is indicated by marks around the bobbin case. CAUTION ● When installing the bobbin, be incorrect. • Be careful not to thread the machine as shown with your left . GETTING ...
Users Manual - English
Page 31
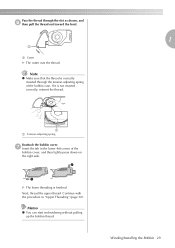
... shown, and f then pull the thread out toward the front. 1 1 a Cutter X The cutter cuts the thread. Winding/Installing the Bobbin 29 Pass the thread through the tension-adjusting spring of the bobbin cover, and then lightly press down on the right side. 2 1 X The lower threading is finished. If it is not inserted...
... shown, and f then pull the thread out toward the front. 1 1 a Cutter X The cutter cuts the thread. Winding/Installing the Bobbin 29 Pass the thread through the tension-adjusting spring of the bobbin cover, and then lightly press down on the right side. 2 1 X The lower threading is finished. If it is not inserted...

Users Manual - English
Page 41
... Adjusting the layout 61 Storing patterns 63 Adjusting the thread tension...........64 Resewing 65 Thread runs out partway through a design 65 Stopping while embroidering .........66 Bobbin Case Adjustment 68 Correct tension 68 Bobbin thread is loose 68 Bobbin thread is tight 68
... Adjusting the layout 61 Storing patterns 63 Adjusting the thread tension...........64 Resewing 65 Thread runs out partway through a design 65 Stopping while embroidering .........66 Bobbin Case Adjustment 68 Correct tension 68 Bobbin thread is loose 68 Bobbin thread is tight 68

Users Manual - English
Page 42
... embroidery unit, and use the embroidery thread or country thread. Prepare a piece of the pattern you continue embroidering when the bobbin thread is enough bobbin thread. Note z Always use the embroidery bobbin thread. If there is space between the embroidery foot and the fabric, the fabric can be sure there is low, the...
... embroidery unit, and use the embroidery thread or country thread. Prepare a piece of the pattern you continue embroidering when the bobbin thread is enough bobbin thread. Note z Always use the embroidery bobbin thread. If there is space between the embroidery foot and the fabric, the fabric can be sure there is low, the...


