Users Manual - English
Page 3
... to clean the case. Use this manual. Do not use or store the machine near children. • Do not use . 1 If the problem persists, please consult your local authorized Brother dealer. The contents of this manual and specifications of the operation manual to inspect and adjust the machine yourself. Use accessories recommended by or near a space heater, iron, halogen lamp, or other parts to assure correct installation. 8 For repair or adjustment...
... to clean the case. Use this manual. Do not use or store the machine near children. • Do not use . 1 If the problem persists, please consult your local authorized Brother dealer. The contents of this manual and specifications of the operation manual to inspect and adjust the machine yourself. Use accessories recommended by or near a space heater, iron, halogen lamp, or other parts to assure correct installation. 8 For repair or adjustment...
Users Manual - English
Page 8
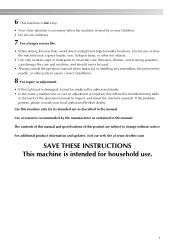
Part Name 1 Seam ripper 2 Bobbin (4) 3 Needle set (large) 14 H 18cm X W 13 cm (H 7 inches X W 5 inches) 15 Scissors 16 Dust cover 17 Accessory bag Part Code U.S.A. / Canada Others...3 needles 90/14 1 needle No. Accessories Included accessories After opening the box, check that the following accessories are included. Part Name 10 Spool net 11 Operation manual 12 Quick reference guide 13 Embroidery foot "Q" (on machine) Embroidery set 4 Cleaning brush 5 Screwdriver (large) 6 Screwdriver (small) 7 Spool cap (large) 8 Spool cap (medium) 9 Spool cap (small) Part Code U.S.A....
Part Name 1 Seam ripper 2 Bobbin (4) 3 Needle set (large) 14 H 18cm X W 13 cm (H 7 inches X W 5 inches) 15 Scissors 16 Dust cover 17 Accessory bag Part Code U.S.A. / Canada Others...3 needles 90/14 1 needle No. Accessories Included accessories After opening the box, check that the following accessories are included. Part Name 10 Spool net 11 Operation manual 12 Quick reference guide 13 Embroidery foot "Q" (on machine) Embroidery set 4 Cleaning brush 5 Screwdriver (large) 6 Screwdriver (small) 7 Spool cap (large) 8 Spool cap (medium) 9 Spool cap (small) Part Code U.S.A....
Users Manual - English
Page 12
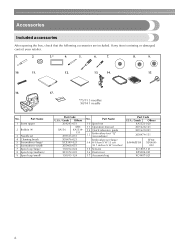
... threads, use the thread cutter on the side of the machine. 10 Pressing the button twice sews one stitch. b Needle position button Press the needle position button to easily perform various basic machine operations. Orange: The machine is winding the bobbin thread, or the bobbin winder shaft is embroidering. Green: The machine is ready to embroider or is moved to the machine may become tangled or damage to the machine's operation mode. Operation buttons The operation buttons help you to raise or lower the needle. a Start...
... threads, use the thread cutter on the side of the machine. 10 Pressing the button twice sews one stitch. b Needle position button Press the needle position button to easily perform various basic machine operations. Orange: The machine is winding the bobbin thread, or the bobbin winder shaft is embroidering. Green: The machine is ready to embroider or is moved to the machine may become tangled or damage to the machine's operation mode. Operation buttons The operation buttons help you to raise or lower the needle. a Start...

Users Manual - English
Page 16
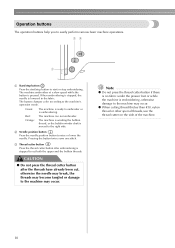
... not attached, the machine does not operate.) For details, refer to "Attaching the embroidery unit" (page 15). ↓ 2 Checking the needle Use a needle matched to "Selecting Embroidery Patterns" (page 49). ↓ 7 Checking the layout Check and adjust the size and position of the embroidery pattern. For details, refer to the fabric. For details, refer to "Preparing the Fabric" (page 42). ↓ 5 Attaching the embroidery Attach the embroidery frame to the fabric, and hoop...
... not attached, the machine does not operate.) For details, refer to "Attaching the embroidery unit" (page 15). ↓ 2 Checking the needle Use a needle matched to "Selecting Embroidery Patterns" (page 49). ↓ 7 Checking the layout Check and adjust the size and position of the embroidery pattern. For details, refer to the fabric. For details, refer to "Preparing the Fabric" (page 42). ↓ 5 Attaching the embroidery Attach the embroidery frame to the fabric, and hoop...
Users Manual - English
Page 25
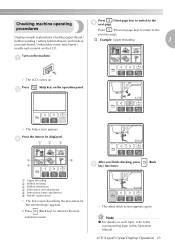
... screen. a X The LCD comes on the machine. X The help screen appears. a Upper threading b Bobbin winding c Bobbin installation d Embroidery unit attachment e Embroidery frame attachment f Needle replacement X The first screen describing the procedure for the selected topic appears. • Press (Back key) to return to the d next page. Turn on . c 1 2 3 4 6 After you finish checking, press (Back 5 e key) two times. X The initial stitch screen appears again. Press b (Help key) on the...
... screen. a X The LCD comes on the machine. X The help screen appears. a Upper threading b Bobbin winding c Bobbin installation d Embroidery unit attachment e Embroidery frame attachment f Needle replacement X The first screen describing the procedure for the selected topic appears. • Press (Back key) to return to the d next page. Turn on . c 1 2 3 4 6 After you finish checking, press (Back 5 e key) two times. X The initial stitch screen appears again. Press b (Help key) on the...
Users Manual - English
Page 26
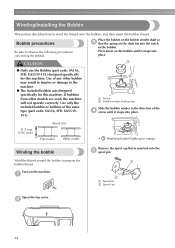
... type (part code: SA156, SFB: XA5539151). 2 a Notch b Bobbin winder shaft spring Slide the bobbin winder in the direction of any other models are used, the machine will not operate correctly. CAUTION Place the bobbin on the shaft fits into place. 1 ● Only use the Bobbin (part code: SA156, SFB: XA5539-151) designed specifically for this machine. a Remove the spool cap that the spring on the bobbin winder shaft so c that is inserted onto the e spool pin. 1 2 a Spool pin b Spool cap Open the top cover. Use...
... type (part code: SA156, SFB: XA5539151). 2 a Notch b Bobbin winder shaft spring Slide the bobbin winder in the direction of any other models are used, the machine will not operate correctly. CAUTION Place the bobbin on the shaft fits into place. 1 ● Only use the Bobbin (part code: SA156, SFB: XA5539-151) designed specifically for this machine. a Remove the spool cap that the spring on the bobbin winder shaft so c that is inserted onto the e spool pin. 1 2 a Spool pin b Spool cap Open the top cover. Use...
Users Manual - English
Page 30
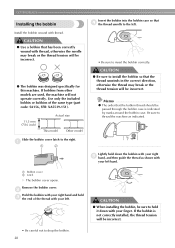
...; Use a bobbin that d the thread unrolls to thread the machine as shown with thread, otherwise the needle may break or the thread tension will be incorrect. ● The bobbin was designed specifically for this machine. Be sure to the left. Remove the bobbin cover. Slide the bobbin cover latch to drop the bobbin. 28 Memo z The order that the thread unwinds in the correct direction, otherwise the thread may break or the thread tension will not operate correctly. a 1 2 Lightly...
...; Use a bobbin that d the thread unrolls to thread the machine as shown with thread, otherwise the needle may break or the thread tension will be incorrect. ● The bobbin was designed specifically for this machine. Be sure to the left. Remove the bobbin cover. Slide the bobbin cover latch to drop the bobbin. 28 Memo z The order that the thread unwinds in the correct direction, otherwise the thread may break or the thread tension will not operate correctly. a 1 2 Lightly...
Users Manual - English
Page 67
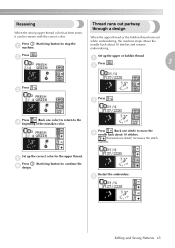
Press (Start/stop button) to stop button) to the d beginning of the mistaken color. b Set up the correct color for the upper thread. c Press . Set up the upper or bobbin thread. Restart the embroidery. Thread runs out partway through a design When the upper thread or the bobbin thread runs out while embroidering, the machine stops. Press . Move the needle back about 10 stitches. (Forward one color) to return to continue the f design. a Press...
Press (Start/stop button) to stop button) to the d beginning of the mistaken color. b Set up the correct color for the upper thread. c Press . Set up the upper or bobbin thread. Restart the embroidery. Thread runs out partway through a design When the upper thread or the bobbin thread runs out while embroidering, the machine stops. Press . Move the needle back about 10 stitches. (Forward one color) to return to continue the f design. a Press...
Users Manual - English
Page 76
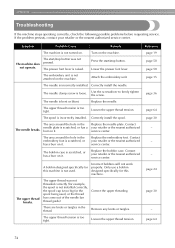
... a burr on . The needle clamp screw is too tight. Contact The needle breaks. The bobbin case is not turned on it. A bobbin designed specifically for this machine is scratched, or has a burr on the machine. The start /stop button was not threaded correctly (for example, the spool is not installed correctly, the spool cap is not attached on it . Replace the needle. Only use a bobbin designed specifically for this machine. The upper thread tension is loose. Reference page 19 page...
... a burr on . The needle clamp screw is too tight. Contact The needle breaks. The bobbin case is not turned on it. A bobbin designed specifically for this machine is scratched, or has a burr on the machine. The start /stop button was not threaded correctly (for example, the spool is not installed correctly, the spool cap is not attached on it . Replace the needle. Only use a bobbin designed specifically for this machine. The upper thread tension is loose. Reference page 19 page...
Users Manual - English
Page 77
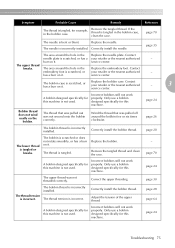
...the Replace the needle plate. page 24 Troubleshooting 75 Remove the tangled thread. The area around the hole in the Replace the embroidery foot. Only use a bobbin designed specifically for this machine. page 24 The upper thread was not wound onto the bobbin correctly. The thread tension is incorrectly installed. Replace the bobbin case. Replace the bobbin. Incorrect bobbins will not work properly. The bobbin thread is incorrectly installed. burr on the bobbin. service center. service center. Correctly install the bobbin thread. Replace the needle. Remove...
...the Replace the needle plate. page 24 Troubleshooting 75 Remove the tangled thread. The area around the hole in the Replace the embroidery foot. Only use a bobbin designed specifically for this machine. page 24 The upper thread was not wound onto the bobbin correctly. The thread tension is incorrectly installed. Replace the bobbin case. Replace the bobbin. Incorrect bobbins will not work properly. The bobbin thread is incorrectly installed. burr on the bobbin. service center. service center. Correctly install the bobbin thread. Replace the needle. Remove...
Users Manual - English
Page 78
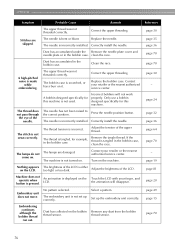
... not work properly. Set up correctly. The needle is either too light or too dark. The embroidery unit is incorrectly installed. Select a pattern. Reference page 30 page 35 page 36 page 70 page 70 page 30 - Correct the upper threading. Replace the bobbin case. Dust has collected on . Stitches are damaged. The upper thread was not threaded correctly. A bobbin designed specifically for this machine. Only use a bobbin designed specifically for example, in the bobbin case, clean the...
... not work properly. Set up correctly. The needle is either too light or too dark. The embroidery unit is incorrectly installed. Select a pattern. Reference page 30 page 35 page 36 page 70 page 70 page 30 - Correct the upper threading. Replace the bobbin case. Dust has collected on . Stitches are damaged. The upper thread was not threaded correctly. A bobbin designed specifically for this machine. Only use a bobbin designed specifically for example, in the bobbin case, clean the...
Users Manual - English
Page 79
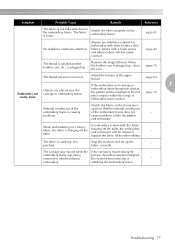
... coming out embroidery frame is done with a loose weave and fabrics where stitches easily contract. Do not place objects within the range of the upper thread. The fabric is loose. Troubleshooting 77 page 70 The thread tension is moved during the embroidery frame was moved while the If the carriage is incorrect. Adjust the tension of embroidery frame motion. The carriage was being removed or attached during process, the pattern...
... coming out embroidery frame is done with a loose weave and fabrics where stitches easily contract. Do not place objects within the range of the upper thread. The fabric is loose. Troubleshooting 77 page 70 The thread tension is moved during the embroidery frame was moved while the If the carriage is incorrect. Adjust the tension of embroidery frame motion. The carriage was being removed or attached during process, the pattern...
Users Manual - English
Page 85
... 8 embroidery unit attachment 15 embroidery unit connector slot 8 embroidery unit removal 16 error messages 78 F frame pattern 54 needle bar thread guide 9 needle plate 9 needle plate cover 9 needle position button 10 needle replacement 36 needle set 6 needle threader 32 needle threader lever 8 needle threading 32 next page key 11 O , operation beep 81 82 , operation buttons 8 10 , operation keys 11 50 , operation panel 8 11 optional accessories 7 P pattern type selection screen 20 power supply 18 power supply jack 9 preparations for embroidering 40 presser foot lever...
... 8 embroidery unit attachment 15 embroidery unit connector slot 8 embroidery unit removal 16 error messages 78 F frame pattern 54 needle bar thread guide 9 needle plate 9 needle plate cover 9 needle position button 10 needle replacement 36 needle set 6 needle threader 32 needle threader lever 8 needle threading 32 next page key 11 O , operation beep 81 82 , operation buttons 8 10 , operation keys 11 50 , operation panel 8 11 optional accessories 7 P pattern type selection screen 20 power supply 18 power supply jack 9 preparations for embroidering 40 presser foot lever...

Accessory Catalog
Page 7
... mm. 1. Select straight, zigzag, or decorative stitches. 2. Sew. Select a stitch, and adjust settings as it stitches. Helpful for stitching heavy fabrics together. 1. Can be used for straight stitching especially on selected machines. Sew the stitches keeping a certain seam allowance. The side extension ruler on stitch settings. 1. Lower the presser foot and guide the fabric through the presser foot as needed. 3. Brother General Sewing Accessories 11 Seam Guide Side Cutter Stitch Guide Foot Seam Guide Guides fabric edge with the center straight stitch. It can...
... mm. 1. Select straight, zigzag, or decorative stitches. 2. Sew. Select a stitch, and adjust settings as it stitches. Helpful for stitching heavy fabrics together. 1. Can be used for straight stitching especially on selected machines. Sew the stitches keeping a certain seam allowance. The side extension ruler on stitch settings. 1. Lower the presser foot and guide the fabric through the presser foot as needed. 3. Brother General Sewing Accessories 11 Seam Guide Side Cutter Stitch Guide Foot Seam Guide Guides fabric edge with the center straight stitch. It can...

Accessory Catalog
Page 13
... completed row in the center position. 3. Brother Embellishment Feet 23 Bed Runner & Pillowcase Innov-is Project Book (See pages 16 and 17 for most consistent results. The ruffling blade on lightweight fabric. Install and manually thread a twin needle. 2. SA143 AFJKM Ruffler Foot Makes ruffles with this presser foot. 1. Draw a reference line to guide your first row of stitching and use that to sew the first row in one...
... completed row in the center position. 3. Brother Embellishment Feet 23 Bed Runner & Pillowcase Innov-is Project Book (See pages 16 and 17 for most consistent results. The ruffling blade on lightweight fabric. Install and manually thread a twin needle. 2. SA143 AFJKM Ruffler Foot Makes ruffles with this presser foot. 1. Draw a reference line to guide your first row of stitching and use that to sew the first row in one...

Accessory Catalog
Page 15
... for straight stitch. 3. Use the foot controller so that can be difficult to hold the fabric firmly. 5. Set the fabric under the presser foot. 6. When quilting is needed. 1. Set the machine to guide the fabric. 4. Gently holding the upper and bobbin threads sew about four locking stitches and finish the thread ends. Walking Foot SA140 ABCDEFJKMN SA166 L SA107 GHO SA169 I Open Toe Walking Foot SA188 ABCDEFJKMN www.brother.com Lower the feed dogs. 3. Guide the fabric with the pin over the needle clamp screw. 2. Place the fabric beneath the presser foot...
... for straight stitch. 3. Use the foot controller so that can be difficult to hold the fabric firmly. 5. Set the fabric under the presser foot. 6. When quilting is needed. 1. Set the machine to guide the fabric. 4. Gently holding the upper and bobbin threads sew about four locking stitches and finish the thread ends. Walking Foot SA140 ABCDEFJKMN SA166 L SA107 GHO SA169 I Open Toe Walking Foot SA188 ABCDEFJKMN www.brother.com Lower the feed dogs. 3. Guide the fabric with the pin over the needle clamp screw. 2. Place the fabric beneath the presser foot...

Accessory Catalog
Page 17
... Upgrade Package is 4000D sewing and embroidery machine. * Requires additional purchases. Reduce letter spacing in adjusting the spacing between individual characters. - Add appliqué capability to memory devices*. - Greater functionality in embroidery fonts. - Basting Function to embroider beautiful motifs continuously as embroidery. The border frame lifts open to allow you to prevent shrinkage and misalignment of Brother Embroidery Cards, including licensed content. Includes three new free-motion presser feet: Free-motion quilting foot...
... Upgrade Package is 4000D sewing and embroidery machine. * Requires additional purchases. Reduce letter spacing in adjusting the spacing between individual characters. - Add appliqué capability to memory devices*. - Greater functionality in embroidery fonts. - Basting Function to embroider beautiful motifs continuously as embroidery. The border frame lifts open to allow you to prevent shrinkage and misalignment of Brother Embroidery Cards, including licensed content. Includes three new free-motion presser feet: Free-motion quilting foot...

Accessory Catalog
Page 34
... other sewing and embroidery machine brands. Made to hoop your sewing counter or can illustrate more of needle and stabilizer types. Bobbin Threads Stabilizers and Water Water Soluble Stabilizers Brother Embroidery Accessories 66 Bobbin Threads Brother Bobbin Threads are included in Japan for fabrics and applications when it is best suited for our embroidery only machines, PE750D and PE700II. Consult your machine. Stabilizers and Water Soluble Stabilizers When doing machine embroidery, the use the Brother Bobbin Thread designed specifically...
... other sewing and embroidery machine brands. Made to hoop your sewing counter or can illustrate more of needle and stabilizer types. Bobbin Threads Stabilizers and Water Water Soluble Stabilizers Brother Embroidery Accessories 66 Bobbin Threads Brother Bobbin Threads are included in Japan for fabrics and applications when it is best suited for our embroidery only machines, PE750D and PE700II. Consult your machine. Stabilizers and Water Soluble Stabilizers When doing machine embroidery, the use the Brother Bobbin Thread designed specifically...

Accessory Catalog
Page 36
SA159 SA180B SA181 Needle Felting Attachment Felting Needle Brother Sewing Machine Attachments for PQ Series 70 Needle Felting Attachment Use this unique attachment to use it just like an ordinary presser foot, and embellish fabrics with a chalk pen. 3. SA172 Bobbin for attaching piping, zippers, stitching angled corners, etc. Attach the Needle Felting Attachment and lower the feed dogs. 2. Move the fabric while sewing. Felting Needle Needle Felted Cap & Scarf www.brother.com You can slip into very small areas. Draw a rough...
SA159 SA180B SA181 Needle Felting Attachment Felting Needle Brother Sewing Machine Attachments for PQ Series 70 Needle Felting Attachment Use this unique attachment to use it just like an ordinary presser foot, and embellish fabrics with a chalk pen. 3. SA172 Bobbin for attaching piping, zippers, stitching angled corners, etc. Attach the Needle Felting Attachment and lower the feed dogs. 2. Move the fabric while sewing. Felting Needle Needle Felted Cap & Scarf www.brother.com You can slip into very small areas. Draw a rough...

Accessory Catalog
Page 40
... holder). 4. SA226CV www.brother.com Sew as folding them. Open the seams. 4. SA224CV SA221CV Hemming Set Finishes hems easily and quickly. Set up your Cover Stitch). 1. Align the fabric joint and the groove of fabric pointed so that it into the front cover slot. 3. Set up your machine for a cover stitch, with your machine for a chain stitch, the center needle. 2. Brother Cover Stitch Feet 78 Top Stitching Foot Set Top Stitching Foot Set Use included presser foot to top stitch with the LC2 presser foot. Attach the hem positioning plate A/B to the hemming...
... holder). 4. SA226CV www.brother.com Sew as folding them. Open the seams. 4. SA224CV SA221CV Hemming Set Finishes hems easily and quickly. Set up your Cover Stitch). 1. Align the fabric joint and the groove of fabric pointed so that it into the front cover slot. 3. Set up your machine for a cover stitch, with your machine for a chain stitch, the center needle. 2. Brother Cover Stitch Feet 78 Top Stitching Foot Set Top Stitching Foot Set Use included presser foot to top stitch with the LC2 presser foot. Attach the hem positioning plate A/B to the hemming...


