Network Users Manual - English
Page 16
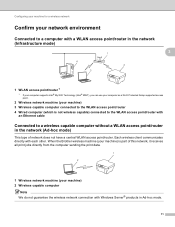
... Ad-hoc mode. 11 Each wireless client communicates directly with an Ethernet cable Connected to the WLAN access point/router with each other. When the Brother wireless machine (your machine) is not wireless capable) connected to a wireless capable computer without a WLAN access point/router in the network (Ad-hoc mode) 3 This... the computer sending the print data. 1 2 1 Wireless network machine (your machine) 3 Wireless capable computer connected to the WLAN access point/router 4 Wired computer (which is part of network does not have a central WLAN access point/router.
... Ad-hoc mode. 11 Each wireless client communicates directly with an Ethernet cable Connected to the WLAN access point/router with each other. When the Brother wireless machine (your machine) is not wireless capable) connected to a wireless capable computer without a WLAN access point/router in the network (Ad-hoc mode) 3 This... the computer sending the print data. 1 2 1 Wireless network machine (your machine) 3 Wireless capable computer connected to the WLAN access point/router 4 Wired computer (which is part of network does not have a central WLAN access point/router.
Quick Setup Guide - English
Page 5
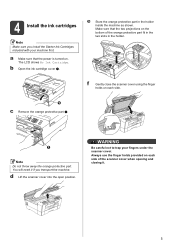
e Store the orange protective part in the holder. d Lift the scanner cover into the open position. b Open the ink cartridge cover a. WARNING Be careful not to trap your machine first. .... f Gently close the scanner cover using the finger holds on each side. 1 c Remove the orange protective part a. 1 Note Do not throw away the orange protective part. Always use the finger holds provided on each side of the orange protective part fit in the two slots in the holder inside the machine as shown.
e Store the orange protective part in the holder. d Lift the scanner cover into the open position. b Open the ink cartridge cover a. WARNING Be careful not to trap your machine first. .... f Gently close the scanner cover using the finger holds on each side. 1 c Remove the orange protective part a. 1 Note Do not throw away the orange protective part. Always use the finger holds provided on each side of the orange protective part fit in the two slots in the holder inside the machine as shown.

Advanced Users Manual - English
Page 38
... press 7001 using the dial pad. To take advantage of low rates, you send a fax. g Press a or b to dial '555-7000' if you can substitute part of the number with l. Press OK.
... press 7001 using the dial pad. To take advantage of low rates, you send a fax. g Press a or b to dial '555-7000' if you can substitute part of the number with l. Press OK.

Advanced Users Manual - English
Page 57
A movie file is automatically divided into 9 parts by movie recording times and is about 60 minutes), these files cannot be printed correctly on the index sheet. Print Images 8 Print Index (Thumbnails) 8 The ...
A movie file is automatically divided into 9 parts by movie recording times and is about 60 minutes), these files cannot be printed correctly on the index sheet. Print Images 8 Print Index (Thumbnails) 8 The ...
Advanced Users Manual - English
Page 61
... to Detect. b Press a or b to try Remove Red-Eye once again. Note You can also adjust the effect level manually, by pressing a or b. The adjusted part is unsuccessful, Unable to change the print settings. (See PhotoCapture Center™ print settings on page 59.) If you want using the dial pad...
... to Detect. b Press a or b to try Remove Red-Eye once again. Note You can also adjust the effect level manually, by pressing a or b. The adjusted part is unsuccessful, Unable to change the print settings. (See PhotoCapture Center™ print settings on page 59.) If you want using the dial pad...
Advanced Users Manual - English
Page 64
... slot. d Adjust the red frame around your machine, you want using your camera manufacturer's support Web site or accompanying documentation. 58 The part inside of the red frame will ask you if you want to trim the photo. Delete and recreate the print order using the dial pad... each arrow key to print images from a digital camera. or Image Too Long. Press OK. c Press d or c to choose your photo and print a part of the following : Change the print settings. (See PhotoCapture Center™ print settings on how to delete or recreate the print order, refer to...
... slot. d Adjust the red frame around your machine, you want using your camera manufacturer's support Web site or accompanying documentation. 58 The part inside of the red frame will ask you if you want to trim the photo. Delete and recreate the print order using the dial pad... each arrow key to print images from a digital camera. or Image Too Long. Press OK. c Press d or c to choose your photo and print a part of the following : Change the print settings. (See PhotoCapture Center™ print settings on how to delete or recreate the print order, refer to...
Advanced Users Manual - English
Page 67
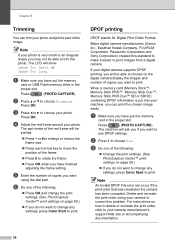
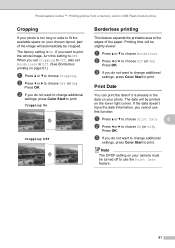
The factory setting is already in the data on your chosen layout, part of the paper. If you set Cropping to Off, also set Borderless to Off. (See Borderless printing on the lower right corner. Cropping: On 8 Cropping: ...
The factory setting is already in the data on your chosen layout, part of the paper. If you set Cropping to Off, also set Borderless to Off. (See Borderless printing on the lower right corner. Cropping: On 8 Cropping: ...

Advanced Users Manual - English
Page 79
... the plastic tabs on the Scanner Cover Support (1). 1 WARNING Be careful not to make sure that all mechanical noise has stopped. d Remove the orange protective part from the AC power outlet.
... the plastic tabs on the Scanner Cover Support (1). 1 WARNING Be careful not to make sure that all mechanical noise has stopped. d Remove the orange protective part from the AC power outlet.
Advanced Users Manual - English
Page 80
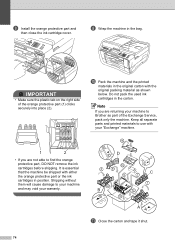
... machine and the printed materials in the bag. i Wrap the machine in the original carton with the original packing material as part of the orange protective part (1) clicks securely into place (2). It is essential that the machine be shipped with your "Exchange" machine. 1 2 •... NOT remove the ink cartridges before shipping. Do not pack the used ink cartridges in position. Keep all separate parts and printed materials to Brother as shown below. Note If you are returning your warranty. 9 DD 10 3 8 6 4 B 5 C C 7 1 2 B A A A k Close the carton and tape ...
... machine and the printed materials in the bag. i Wrap the machine in the original carton with the original packing material as part of the orange protective part (1) clicks securely into place (2). It is essential that the machine be shipped with your "Exchange" machine. 1 2 •... NOT remove the ink cartridges before shipping. Do not pack the used ink cartridges in position. Keep all separate parts and printed materials to Brother as shown below. Note If you are returning your warranty. 9 DD 10 3 8 6 4 B 5 C C 7 1 2 B A A A k Close the carton and tape ...
Users Manual - English
Page 112
....) 98 "Device Busy" Cannot print images from Desktop icon. This will repair and reinstall the software. Cannot access Removable Disk from FaceFilter Studio. Part of the following methods. Install MFL-Pro Suite from the Installation CD-ROM. (See the Quick Setup Guide.) Download the ...Flash memory drive before you start FaceFilter Studio for the first time, you have tried "Eject" from the Installation CD-ROM supplied with your Brother machine is being accessed. To use FaceFilter Studio, you must make sure your machine. Also, before you continue. 4 If an error ...
....) 98 "Device Busy" Cannot print images from Desktop icon. This will repair and reinstall the software. Cannot access Removable Disk from FaceFilter Studio. Part of the following methods. Install MFL-Pro Suite from the Installation CD-ROM. (See the Quick Setup Guide.) Download the ...Flash memory drive before you start FaceFilter Studio for the first time, you have tried "Eject" from the Installation CD-ROM supplied with your Brother machine is being accessed. To use FaceFilter Studio, you must make sure your machine. Also, before you continue. 4 If an error ...
Users Manual - English
Page 139
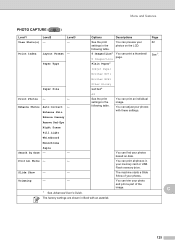
... starts a Slide Show of the image. Enhance Skin A4 See the print settings in your photo and print a part of your photos based on the LCD. You can find your photos. Inkjet Paper Brother BP71 Brother BP61 Other Glossy Paper Size Letter* Print Photos - - Print All Photos - - Trimming - - 1 See Advanced User's Guide. Paper...
... starts a Slide Show of the image. Enhance Skin A4 See the print settings in your photo and print a part of your photos based on the LCD. You can find your photos. Inkjet Paper Brother BP71 Brother BP61 Other Glossy Paper Size Letter* Print Photos - - Print All Photos - - Trimming - - 1 See Advanced User's Guide. Paper...


