Quick Setup Guide - English
Page 3
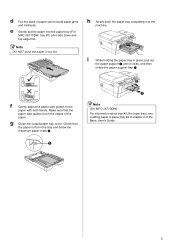
... support a until it clicks, and then unfold the paper support flap b. h Slowly push the paper tray completely into the paper tray (For MFC-J6710DW, tray #1) print side down and top edge first. Make sure that the paper is flat in the tray and below the maximum paper mark a. 1 2 1 Note... (For MFC-J6710DW) For information about tray #2 (the lower tray), see Loading paper in paper tray #2 in chapter 2 of the paper. i While ...
... support a until it clicks, and then unfold the paper support flap b. h Slowly push the paper tray completely into the paper tray (For MFC-J6710DW, tray #1) print side down and top edge first. Make sure that the paper is flat in the tray and below the maximum paper mark a. 1 2 1 Note... (For MFC-J6710DW) For information about tray #2 (the lower tray), see Loading paper in paper tray #2 in chapter 2 of the paper. i While ...
Quick Setup Guide - English
Page 16
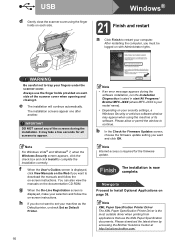
...on the documentation CD-ROM. f When the User's Guides screen is the most suitable driver when printing from applications that use the finger holds provided on each side. 21 Finish and restart a Click Finish to download the manuals and follow the on-screen instructions....latest driver by accessing the Brother Solutions Center at http://solutions.brother.com/. It may appear when using the finger holds on each side of the screens during the software installation, run the Installation Diagnostics located in start/All Programs/ Brother/MFC-JXXX (where MFC-JXXX is displayed, make ...
...on the documentation CD-ROM. f When the User's Guides screen is the most suitable driver when printing from applications that use the finger holds provided on each side. 21 Finish and restart a Click Finish to download the manuals and follow the on-screen instructions....latest driver by accessing the Brother Solutions Center at http://solutions.brother.com/. It may appear when using the finger holds on each side of the screens during the software installation, run the Installation Diagnostics located in start/All Programs/ Brother/MFC-JXXX (where MFC-JXXX is displayed, make ...
Software Users Manual - English
Page 32
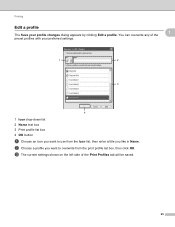
c The current settings shown on the left side of the preset profiles with your profile changes dialog appears by clicking Edit a profile. b Choose a profile you like in Name. You can overwrite any of the Print Profiles tab will be saved. 25 Printing Edit a profile The Save your preferred settings. 1 1 1 2 3 4 1 Icon drop-down list 2 Name text box 3 Print profile list box 4 OK button a Choose an icon you want to use from the Icon list, then enter a title you want to overwrite from the print profile list box, then click OK.
c The current settings shown on the left side of the preset profiles with your profile changes dialog appears by clicking Edit a profile. b Choose a profile you like in Name. You can overwrite any of the Print Profiles tab will be saved. 25 Printing Edit a profile The Save your preferred settings. 1 1 1 2 3 4 1 Icon drop-down list 2 Name text box 3 Print profile list box 4 OK button a Choose an icon you want to use from the Icon list, then enter a title you want to overwrite from the print profile list box, then click OK.

Software Users Manual - English
Page 127
smaller at the top and bottom of the original. 120 Choose Long-edge binding or Short-edge binding in Two-Sided. 8 Note (For Mac OS X 10.4.11 to 10.5.x) When printing on Ledger or B4 paper, duplex prints will be 0.8 in. Printing and Faxing Duplex Printing 8 Automatic Duplex Printing Select Layout.
smaller at the top and bottom of the original. 120 Choose Long-edge binding or Short-edge binding in Two-Sided. 8 Note (For Mac OS X 10.4.11 to 10.5.x) When printing on Ledger or B4 paper, duplex prints will be 0.8 in. Printing and Faxing Duplex Printing 8 Automatic Duplex Printing Select Layout.
Software Users Manual - English
Page 150
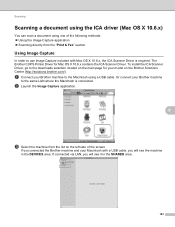
.... If you connected the Brother machine and your model on the left side of the following methods: Using the Image Capture application Scanning directly from the list on the Brother Solutions Center (http://solutions.brother.com/). Or connect your Brother machine to the downloads selection... with Mac OS X 10.6.x, the ICA Scanner Driver is connected. b Launch the Image Capture application. 9 c Select the machine from the "Print & Fax" section Using Image Capture 9 In order to the same LAN where the Macintosh is required. Scanning Scanning a document using the ICA ...
.... If you connected the Brother machine and your model on the left side of the following methods: Using the Image Capture application Scanning directly from the list on the Brother Solutions Center (http://solutions.brother.com/). Or connect your Brother machine to the downloads selection... with Mac OS X 10.6.x, the ICA Scanner Driver is connected. b Launch the Image Capture application. 9 c Select the machine from the "Print & Fax" section Using Image Capture 9 In order to the same LAN where the Macintosh is required. Scanning Scanning a document using the ICA ...
Software Users Manual - English
Page 153
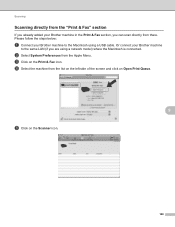
... can scan directly from the Apple Menu. Or connect your Brother machine to the Macintosh using a network model) where the Macintosh is connected. Scanning Scanning directly from the "Print & Fax" section 9 If you already added your Brother machine in the Print & Fax section, you are using a USB cable. ...d Select the machine from the list on the left side of the screen and click on Open Print Queue. 9 e Click on the Print & Fax icon. c ...
... can scan directly from the Apple Menu. Or connect your Brother machine to the Macintosh using a network model) where the Macintosh is connected. Scanning Scanning directly from the "Print & Fax" section 9 If you already added your Brother machine in the Print & Fax section, you are using a USB cable. ...d Select the machine from the list on the left side of the screen and click on Open Print Queue. 9 e Click on the Print & Fax icon. c ...

Advanced Users Manual - English
Page 5
... Skew Adjustment 45 Book Copy ...46 Watermark Copy 46 Duplex (2-sided) copying 48 Setting your changes as the new default 49 Restoring all settings to the factory settings 49 8 PhotoCapture Center™: Printing photos from a memory card or USB Flash memory drive 50 ... drive and folder structures 50 Movie printing 51 Print Images...51 Print Index (Thumbnails 51 Printing Photos 52 Print All Photos 53 Enhance Photos 53 Search by Date 57 Slide Show...57 Trimming...58 DPOF printing 58 PhotoCapture Center™ print settings 59 Print Quality 59 Paper options 59 Adjusting...
... Skew Adjustment 45 Book Copy ...46 Watermark Copy 46 Duplex (2-sided) copying 48 Setting your changes as the new default 49 Restoring all settings to the factory settings 49 8 PhotoCapture Center™: Printing photos from a memory card or USB Flash memory drive 50 ... drive and folder structures 50 Movie printing 51 Print Images...51 Print Index (Thumbnails 51 Printing Photos 52 Print All Photos 53 Enhance Photos 53 Search by Date 57 Slide Show...57 Trimming...58 DPOF printing 58 PhotoCapture Center™ print settings 59 Print Quality 59 Paper options 59 Adjusting...
Advanced Users Manual - English
Page 27
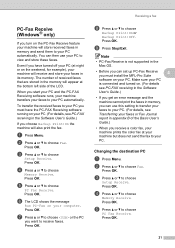
... faxes or Fax Journal report in the Software User's Guide.) If you choose Backup Print:On the machine will also print the fax. Make sure your PC is not supported in the memory will appear at the bottom left side of the Basic User's Guide.) • When you receive a color fax, your machine... prints the color fax at night or on the weekend, for example), your machine will receive and store your faxes in...
... faxes or Fax Journal report in the Software User's Guide.) If you choose Backup Print:On the machine will also print the fax. Make sure your PC is not supported in the memory will appear at the bottom left side of the Basic User's Guide.) • When you receive a color fax, your machine... prints the color fax at night or on the weekend, for example), your machine will receive and store your faxes in...

Advanced Users Manual - English
Page 51
... as a book. • Skew Adjustment is only available if the document is a duplex copy on thin paper, choose Thin Paper Copy so the print on the other side does not bleed through. This setting is skewed, your scanned copy is only available when using the scanner glass. c Enter the number of copies...
... as a book. • Skew Adjustment is only available if the document is a duplex copy on thin paper, choose Thin Paper Copy so the print on the other side does not bleed through. This setting is skewed, your scanned copy is only available when using the scanner glass. c Enter the number of copies...
Advanced Users Manual - English
Page 55
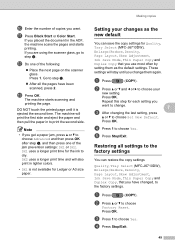
... or b to choose Set New Default. Press OK. If you are using the scanner glass, go to choose Factory Reset. The machine will print the first side and eject the paper and then pull the paper in lighter colors. • DX1 is ejected the second time. DX2 uses a longer...pages have changed, to the factory settings. If you get a paper jam, press a or b to print the second side. Making copies Setting your new setting. Repeat this step for Quality, Tray Select (MFC-J6710DW), Enlarge/Reduce, Density, Page Layout, Skew Adjustment, Ink Save Mode, Thin Paper Copy and Duplex Copy...
... or b to choose Set New Default. Press OK. If you are using the scanner glass, go to choose Factory Reset. The machine will print the first side and eject the paper and then pull the paper in lighter colors. • DX1 is ejected the second time. DX2 uses a longer...pages have changed, to the factory settings. If you get a paper jam, press a or b to print the second side. Making copies Setting your new setting. Repeat this step for Quality, Tray Select (MFC-J6710DW), Enlarge/Reduce, Density, Page Layout, Skew Adjustment, Ink Save Mode, Thin Paper Copy and Duplex Copy...

Advanced Users Manual - English
Page 79
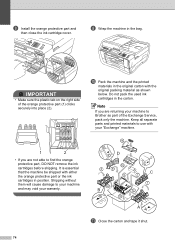
...to trap your fingers under the scanner cover. Routine maintenance e Gently close the scanner cover using the plastic tabs on each side as you push down on each side of the machine to lift the scanner cover into the open position. If you transport the machine, use the finger holds provided... release the ink cartridges and then take the telephone line cord out of the machine. g Press the ink release levers to "park" the print head after a print job. Not allowing the machine to finish this parking process may not be covered by your machine. Then unplug the interface cable from the...
...to trap your fingers under the scanner cover. Routine maintenance e Gently close the scanner cover using the plastic tabs on each side as you push down on each side of the machine to lift the scanner cover into the open position. If you transport the machine, use the finger holds provided... release the ink cartridges and then take the telephone line cord out of the machine. g Press the ink release levers to "park" the print head after a print job. Not allowing the machine to finish this parking process may not be covered by your machine. Then unplug the interface cable from the...
Advanced Users Manual - English
Page 80
... part or the ink cartridges in position. Keep all separate parts and printed materials to use with your "Exchange" machine. 1 2 • If you are not able to your machine and may void your machine to Brother as shown below. i Wrap the machine in the carton. Note If... you are returning your warranty. 9 DD 10 3 8 6 4 B 5 C C 7 1 2 B A A A k Close the carton and tape it shut. 74 IMPORTANT • Make sure the plastic tab on the right side of the Exchange Service, ...
... part or the ink cartridges in position. Keep all separate parts and printed materials to use with your "Exchange" machine. 1 2 • If you are not able to your machine and may void your machine to Brother as shown below. i Wrap the machine in the carton. Note If... you are returning your warranty. 9 DD 10 3 8 6 4 B 5 C C 7 1 2 B A A A k Close the carton and tape it shut. 74 IMPORTANT • Make sure the plastic tab on the right side of the Exchange Service, ...
Users Manual - English
Page 22
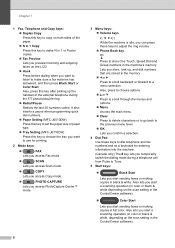
... and outgoing faxes on the LCD. Hook Press before dialing when you want to use for printing. 2 Mode keys: FAX Lets you access Fax mode. SCAN Lets you access Scan...when programming quick dial numbers. Paper Setting (MFC-J6510DW) Press this key to set the paper size or paper type. Tray Setting (MFC-J6710DW) Press this key to choose the tray you ...want to listen to make N in the machine's memory. Chapter 1 1 Fax, Telephone and Copy keys: Duplex Copy Press this key to copy on both sides...
... and outgoing faxes on the LCD. Hook Press before dialing when you want to use for printing. 2 Mode keys: FAX Lets you access Fax mode. SCAN Lets you access Scan...when programming quick dial numbers. Paper Setting (MFC-J6510DW) Press this key to set the paper size or paper type. Tray Setting (MFC-J6710DW) Press this key to choose the tray you ...want to listen to make N in the machine's memory. Chapter 1 1 Fax, Telephone and Copy keys: Duplex Copy Press this key to copy on both sides...
Users Manual - English
Page 26
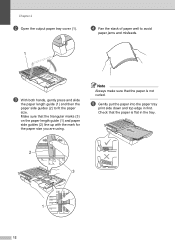
... not curled. Chapter 2 b Open the output paper tray cover (1). Check that the paper is flat in first. e Gently put the paper into the paper tray print side down and top edge in the tray. 2 L Photo 2L 4×6in 10×15cm EXE LTR LGL B5JIS A4 LGR B4JIS 3 B5JIS EXE LTR 1 A4... stack of paper well to avoid paper jams and misfeeds. 1 c With both hands, gently press and slide the paper length guide (1) and then the paper side guides (2) to fit the paper size. Make sure that the triangular marks (3) on the paper length guide (1) and paper...
... not curled. Chapter 2 b Open the output paper tray cover (1). Check that the paper is flat in first. e Gently put the paper into the paper tray print side down and top edge in the tray. 2 L Photo 2L 4×6in 10×15cm EXE LTR LGL B5JIS A4 LGR B4JIS 3 B5JIS EXE LTR 1 A4... stack of paper well to avoid paper jams and misfeeds. 1 c With both hands, gently press and slide the paper length guide (1) and then the paper side guides (2) to fit the paper size. Make sure that the triangular marks (3) on the paper length guide (1) and paper...

Users Manual - English
Page 29
... stack of the paper stack. B5JIS EXE LTR 1 A4 15 Check that the paper is not curled. 2 e Gently put the paper into the paper tray print side down and top edge in the tray and below the maximum paper mark (1). Note Always make sure that the triangular marks (3) on the paper length... guide (1) and paper side guides (2) line up with the marks for the paper size you are using. Over filling the paper tray may cause paper jams. 1 2 L EXE LTR LGL...
... stack of the paper stack. B5JIS EXE LTR 1 A4 15 Check that the paper is not curled. 2 e Gently put the paper into the paper tray print side down and top edge in the tray and below the maximum paper mark (1). Note Always make sure that the triangular marks (3) on the paper length... guide (1) and paper side guides (2) line up with the marks for the paper size you are using. Over filling the paper tray may cause paper jams. 1 2 L EXE LTR LGL...
Users Manual - English
Page 32
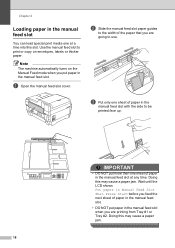
...of paper in the manual feed slot. • DO NOT put paper in the manual feed slot when you are printing from Tray #1 or Tray #2. Doing this may cause a paper jam. 18 JISB4 LGR A3 A4 c Put only... one sheet of paper in the manual feed slot 2 You can load special print media one sheet of the paper that you are going to use. Doing this slot. Use the manual feed slot ... put more than one at any time. Chapter 2 Loading paper in the manual feed slot with the side to be printed face up. b Slide the manual feed slot paper guides to the width of paper in the manual feed...
...of paper in the manual feed slot. • DO NOT put paper in the manual feed slot when you are printing from Tray #1 or Tray #2. Doing this may cause a paper jam. 18 JISB4 LGR A3 A4 c Put only... one sheet of paper in the manual feed slot 2 You can load special print media one sheet of the paper that you are going to use. Doing this slot. Use the manual feed slot ... put more than one at any time. Chapter 2 Loading paper in the manual feed slot with the side to be printed face up. b Slide the manual feed slot paper guides to the width of paper in the manual feed...

Users Manual - English
Page 34
... of the following types of envelopes, as possible. Glue Double flaps Loading envelopes and postcards 2 a Before loading, press the corners and sides of envelopes or postcards to be set in the paper tray at a time. Occasionally you may experience paper feed problems caused by the thickness,...settings to make them as flat as they will cause paper feed problems: • That are of the envelopes you do a test print first before printing many envelopes. Make sure you are "doublefeeding", put one envelope or postcard in the application. IMPORTANT If envelopes or postcards are using. ...
... of the following types of envelopes, as possible. Glue Double flaps Loading envelopes and postcards 2 a Before loading, press the corners and sides of envelopes or postcards to be set in the paper tray at a time. Occasionally you may experience paper feed problems caused by the thickness,...settings to make them as flat as they will cause paper feed problems: • That are of the envelopes you do a test print first before printing many envelopes. Make sure you are "doublefeeding", put one envelope or postcard in the application. IMPORTANT If envelopes or postcards are using. ...

Users Manual - English
Page 35
...first as shown in your application. B5JIS EXE LTR 1 A4 21 Using both hands, gently press and slide the paper length guide (1) and paper side guides (2) to the back edge of the envelopes or postcards. b Make sure the open flap is to fit the size of the envelope when... printing. 2 2 L Photo 2L EXE LTR LGR LGL B5JIS A4 B4JIS c Adjust the size and margin in the illustration. Loading paper If you have problems when printing on envelopes, try the following suggestions:2 a Open the envelope flap.
...first as shown in your application. B5JIS EXE LTR 1 A4 21 Using both hands, gently press and slide the paper length guide (1) and paper side guides (2) to the back edge of the envelopes or postcards. b Make sure the open flap is to fit the size of the envelope when... printing. 2 2 L Photo 2L EXE LTR LGR LGL B5JIS A4 B4JIS c Adjust the size and margin in the illustration. Loading paper If you have problems when printing on envelopes, try the following suggestions:2 a Open the envelope flap.
Users Manual - English
Page 41
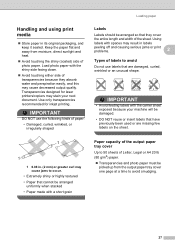
...DO NOT reuse or insert labels that have previously been used or are damaged, curled, wrinkled or an unusual shape. Transparencies designed for inkjet printing. IMPORTANT • Avoid feeding labels with a short grain Paper capacity of the output paper tray cover 2 Up to 50 sheets of ...in labels peeling off and causing serious jams or print problems. 2 Types of photo paper. Load photo paper with spaces may cause decreased output quality. Using labels with the shiny side facing down. Avoid touching either side of transparencies because they cover the entire length ...
...DO NOT reuse or insert labels that have previously been used or are damaged, curled, wrinkled or an unusual shape. Transparencies designed for inkjet printing. IMPORTANT • Avoid feeding labels with a short grain Paper capacity of the output paper tray cover 2 Up to 50 sheets of ...in labels peeling off and causing serious jams or print problems. 2 Types of photo paper. Load photo paper with spaces may cause decreased output quality. Using labels with the shiny side facing down. Avoid touching either side of transparencies because they cover the entire length ...
Users Manual - English
Page 91
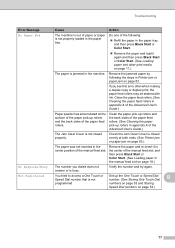
...the paper feed rollers in appendix A of the paper feed rollers. Clean the paper pick-up rollers and the back sides of the paper feed rollers. (See Cleaning the paper pick-up rollers in appendix A of the Advanced User's Guide...again and then press Black Start or Color Start. (See Loading paper and other print media on page 18.) No Response/Busy The number you see this error often when making a duplex copy or... duplex print, the paper feed rollers may be stained with ink. numbers on page 53 and Storing Speed ...
...the paper feed rollers in appendix A of the paper feed rollers. Clean the paper pick-up rollers and the back sides of the paper feed rollers. (See Cleaning the paper pick-up rollers in appendix A of the Advanced User's Guide...again and then press Black Start or Color Start. (See Loading paper and other print media on page 18.) No Response/Busy The number you see this error often when making a duplex copy or... duplex print, the paper feed rollers may be stained with ink. numbers on page 53 and Storing Speed ...


