Network Users Manual - English
Page 62
...check the following items are configured before reading this chapter, you are unable to resolve your problem, please visit the Brother Solutions Center at: http://solutions.brother.com/. The access point (for wireless), router or hub is inserted properly in the filter. If, after successful installation.... The front and back covers are installed properly. Question Are your Brother machine. You can find the security settings. • Ask the manufacturer of the Brother machine is allowed in the paper tray. (For wired networks) A network cable is not found on the...
...check the following items are configured before reading this chapter, you are unable to resolve your problem, please visit the Brother Solutions Center at: http://solutions.brother.com/. The access point (for wireless), router or hub is inserted properly in the filter. If, after successful installation.... The front and back covers are installed properly. Question Are your Brother machine. You can find the security settings. • Ask the manufacturer of the Brother machine is allowed in the paper tray. (For wired networks) A network cable is not found on the...
Quick Setup Guide - English
Page 2
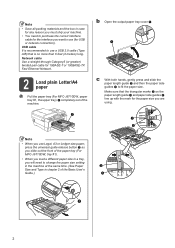
...Legal, A3 or Ledger size paper, press the universal guide release button a as you slide out the front of the machine. b Open the output paper tray cover a. 1 c With both hands, gently press and slide the paper length guide a and then the paper side guides b to use a USB 2.0... Fast Ethernet Network. 2 Load plain Letter/A4 paper a Pull the paper tray (For MFC-J6710DW, paper tray #1, the upper tray) a completely out of the paper tray (For MFC-J6710DW, tray #1). • When you load a different paper size in a tray, you will need to purchase the correct interface cable for the interface you ...
...Legal, A3 or Ledger size paper, press the universal guide release button a as you slide out the front of the machine. b Open the output paper tray cover a. 1 c With both hands, gently press and slide the paper length guide a and then the paper side guides b to use a USB 2.0... Fast Ethernet Network. 2 Load plain Letter/A4 paper a Pull the paper tray (For MFC-J6710DW, paper tray #1, the upper tray) a completely out of the paper tray (For MFC-J6710DW, tray #1). • When you load a different paper size in a tray, you will need to purchase the correct interface cable for the interface you ...
Quick Setup Guide - English
Page 3
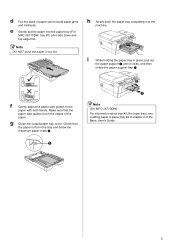
... jams and misfeeds. g Close the output paper tray cover. i While holding the paper tray in too far. Make sure that the paper is flat in the tray and below the maximum paper mark a. 1 2 1 Note (For MFC-J6710DW) For information about tray #2 (the lower tray), see Loading paper in paper tray #2 in chapter 2 of the Basic User's Guide...
... jams and misfeeds. g Close the output paper tray cover. i While holding the paper tray in too far. Make sure that the paper is flat in the tray and below the maximum paper mark a. 1 2 1 Note (For MFC-J6710DW) For information about tray #2 (the lower tray), see Loading paper in paper tray #2 in chapter 2 of the Basic User's Guide...
Quick Setup Guide - English
Page 7
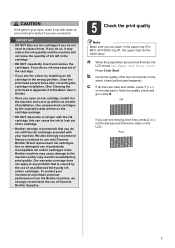
...; Once you are clear and visible, press 1 (Yes) on the dial pad to finish the quality check and go to use only Genuine Brother Brand replacement ink cartridges. We also strongly recommend that is caused by the expiration date written on the LCD. Use unopened ink cartridges by the... installation. Poor 7 b Check the quality of potentially incompatible ink and/or cartridges in the Brother machine may cause damage to any problem that you put paper in the paper tray (For MFC-J6710DW, tray #1, the upper tray) for the initial setup. CAUTION If ink gets in your eyes, wash it out with...
...; Once you are clear and visible, press 1 (Yes) on the dial pad to finish the quality check and go to use only Genuine Brother Brand replacement ink cartridges. We also strongly recommend that is caused by the expiration date written on the LCD. Use unopened ink cartridges by the... installation. Poor 7 b Check the quality of potentially incompatible ink and/or cartridges in the Brother machine may cause damage to any problem that you put paper in the paper tray (For MFC-J6710DW, tray #1, the upper tray) for the initial setup. CAUTION If ink gets in your eyes, wash it out with...
Quick Setup Guide - English
Page 8
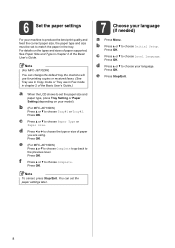
... Type in chapter 2 of the Basic User's Guide.) a When the LCD shows to set the paper size and paper type, press Tray Setting or Paper Setting (depending on your model). b (For MFC-J6710DW) Press a or b to choose Local Language. b Press a or b to choose Paper Type or Paper Size. Press OK. e Press... the type or size of paper you are using. You can change the default tray the machine will use for printing copies or received faxes. (See Tray use in Copy mode or Tray use in Fax mode in the tray. 6 Set the paper settings For your machine to produce the best print quality...
... Type in chapter 2 of the Basic User's Guide.) a When the LCD shows to set the paper size and paper type, press Tray Setting or Paper Setting (depending on your model). b (For MFC-J6710DW) Press a or b to choose Local Language. b Press a or b to choose Paper Type or Paper Size. Press OK. e Press... the type or size of paper you are using. You can change the default tray the machine will use for printing copies or received faxes. (See Tray use in Copy mode or Tray use in Fax mode in the tray. 6 Set the paper settings For your machine to produce the best print quality...

Advanced Users Manual - English
Page 4
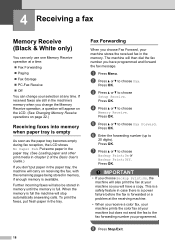
4 Receiving a fax 18 Memory Receive (Black & White only 18 Receiving faxes into memory when paper tray is empty 18 Fax Forwarding 18 Paging ...19 Fax Storage 20 Printing a fax from the memory 20 PC-Fax Receive (Windows® only 21 Turning ...
4 Receiving a fax 18 Memory Receive (Black & White only 18 Receiving faxes into memory when paper tray is empty 18 Fax Forwarding 18 Paging ...19 Fax Storage 20 Printing a fax from the memory 20 PC-Fax Receive (Windows® only 21 Turning ...
Advanced Users Manual - English
Page 6
... outside of the machine 68 Cleaning the machine's printer platen 69 Cleaning the paper feed rollers 69 Cleaning the paper pick-up rollers for paper tray #2 (MFC-J6710DW only 72 Checking the ink volume 72 Packing and shipping the machine 73 B Glossary 75 C Index 79 v
... outside of the machine 68 Cleaning the machine's printer platen 69 Cleaning the paper feed rollers 69 Cleaning the paper pick-up rollers for paper tray #2 (MFC-J6710DW only 72 Checking the ink volume 72 Packing and shipping the machine 73 B Glossary 75 C Index 79 v
Advanced Users Manual - English
Page 24
... memory, if enough memory is available. To print the faxes, put paper in the paper tray, the machine will carry on page 22.) Receiving faxes into memory when paper tray is empty 4 As soon as the paper tray becomes empty during fax reception, the LCD shows No Paper Fed. b Press a or b to choose... the fax, with the remaining pages being stored in memory until the memory is full. Put some paper in the paper tray. (See Loading paper and other print media in the tray. 18 Fax Forwarding 4 When you change your machine but does not send the fax to the fax forwarding number you...
... memory, if enough memory is available. To print the faxes, put paper in the paper tray, the machine will carry on page 22.) Receiving faxes into memory when paper tray is empty 4 As soon as the paper tray becomes empty during fax reception, the LCD shows No Paper Fed. b Press a or b to choose... the fax, with the remaining pages being stored in memory until the memory is full. Put some paper in the paper tray. (See Loading paper and other print media in the tray. 18 Fax Forwarding 4 When you change your machine but does not send the fax to the fax forwarding number you...
Advanced Users Manual - English
Page 55
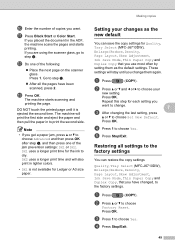
..., to the factory settings. b Press a or b to choose your changes as the new default 7 You can restore the copy settings Quality, Tray Select (MFC-J6710DW), Enlarge/Reduce, Density, Page Layout, Skew Adjustment, Ink Save Mode, Thin Paper Copy and Duplex Copy, that you use most often by ... Note • If you get a paper jam, press a or b to choose Yes. These settings will stay until it is not available for Quality, Tray Select (MFC-J6710DW), Enlarge/Reduce, Density, Page Layout, Skew Adjustment, Ink Save Mode, Thin Paper Copy and Duplex Copy that you want . Go to step m. ...
..., to the factory settings. b Press a or b to choose your changes as the new default 7 You can restore the copy settings Quality, Tray Select (MFC-J6710DW), Enlarge/Reduce, Density, Page Layout, Skew Adjustment, Ink Save Mode, Thin Paper Copy and Duplex Copy, that you use most often by ... Note • If you get a paper jam, press a or b to choose Yes. These settings will stay until it is not available for Quality, Tray Select (MFC-J6710DW), Enlarge/Reduce, Density, Page Layout, Skew Adjustment, Ink Save Mode, Thin Paper Copy and Duplex Copy that you want . Go to step m. ...

Advanced Users Manual - English
Page 74
...machine. • DO NOT use cleaning materials that is stuck inside and outside of the machine. 1 e Close the output paper tray cover and put the output paper tray firmly back in the machine. 1 68 It may crack the panel. A Routine maintenance A Cleaning and checking the machine A ... outside of the machine as thinner or benzine will damage the outside of the machine with volatile liquids such as follows: A a Pull the paper trays (1) completely out of the machine A IMPORTANT • Use neutral detergents. Cleaning with a dry, lint-free soft cloth to remove dust. d ...
...machine. • DO NOT use cleaning materials that is stuck inside and outside of the machine. 1 e Close the output paper tray cover and put the output paper tray firmly back in the machine. 1 68 It may crack the panel. A Routine maintenance A Cleaning and checking the machine A ... outside of the machine as thinner or benzine will damage the outside of the machine with volatile liquids such as follows: A a Pull the paper trays (1) completely out of the machine A IMPORTANT • Use neutral detergents. Cleaning with a dry, lint-free soft cloth to remove dust. d ...

Advanced Users Manual - English
Page 75
... is open position. Routine maintenance Cleaning the machine's printer platen A CAUTION Be sure to unplug the machine from the AC power outlet. Pull the paper tray completely out of the machine to lift the scanner cover into the open , close it may cause damage to avoid an electrical shock. Doing this...
... is open position. Routine maintenance Cleaning the machine's printer platen A CAUTION Be sure to unplug the machine from the AC power outlet. Pull the paper tray completely out of the machine to lift the scanner cover into the open , close it may cause damage to avoid an electrical shock. Doing this...

Advanced Users Manual - English
Page 76
... Re-connect the power cord. After cleaning, wipe the rollers with a dry, lint-free soft cloth to remove all moisture. 1 d Put the paper tray firmly back in the tray, clean the Base Pad (1) with a soft, lint-free soft cloth moistened with water. Note If the machine starts multiple-feeding the last few... the machine again until the rollers are dry may cause paper feed problems. 70 Using the machine before the rollers are dry. b Pull the paper tray completely out of the machine. c Lift the Jam Clear flap (2), and then clean the back side of the Paper Feed Rollers (1) with a soft ...
... Re-connect the power cord. After cleaning, wipe the rollers with a dry, lint-free soft cloth to remove all moisture. 1 d Put the paper tray firmly back in the tray, clean the Base Pad (1) with a soft, lint-free soft cloth moistened with water. Note If the machine starts multiple-feeding the last few... the machine again until the rollers are dry may cause paper feed problems. 70 Using the machine before the rollers are dry. b Pull the paper tray completely out of the machine. c Lift the Jam Clear flap (2), and then clean the back side of the Paper Feed Rollers (1) with a soft ...

Advanced Users Manual - English
Page 77
... cloth to remove all moisture. h Re-connect the power cord. 71 Slowly turn the rollers so that the whole surface is cleaned. g Put the paper tray firmly back in the machine. After cleaning, wipe the rollers with water. Slowly turn the rollers so that the whole surface is cleaned. Note Don...
... cloth to remove all moisture. h Re-connect the power cord. 71 Slowly turn the rollers so that the whole surface is cleaned. g Put the paper tray firmly back in the machine. After cleaning, wipe the rollers with water. Slowly turn the rollers so that the whole surface is cleaned. Note Don...

Advanced Users Manual - English
Page 78
... paper support. The LCD shows the ink volume. c Press a or b to choose Ink. d Press Stop/Exit. Pull tray #2 completely out of the machine. up rollers for paper tray #2 (MFC-J6710DW only) A a Unplug the machine from your computer. (See Printing for Windows® or Printing and Faxing for Macintosh ...in the Software User's Guide.) 1 c Put tray #2 firmly back in each cartridge. Note You can use the Menu key to...
... paper support. The LCD shows the ink volume. c Press a or b to choose Ink. d Press Stop/Exit. Pull tray #2 completely out of the machine. up rollers for paper tray #2 (MFC-J6710DW only) A a Unplug the machine from your computer. (See Printing for Windows® or Printing and Faxing for Macintosh ...in the Software User's Guide.) 1 c Put tray #2 firmly back in each cartridge. Note You can use the Menu key to...

Users Manual - English
Page 9
...documentation 1 Accessing the Advanced User's Guide, Software User's Guide, Network User's Guide and Network Glossary 2 Viewing Documentation 2 Accessing Brother Support (Windows 4 Accessing Brother Support (Macintosh 5 Control panel overview 6 LCD screen...9 Basic Operations 10 2 Loading paper 11 Loading paper and other print media ...20 Printable area 22 Paper settings...23 Paper Size and Type (MFC-J6510DW 23 Paper Size and Type (MFC-J6710DW 24 Tray use in Copy mode (MFC-J6710DW only 24 Tray use in Fax mode (MFC-J6710DW only 25 Secure Paper Feed mode for Ledger size Short Grain...
...documentation 1 Accessing the Advanced User's Guide, Software User's Guide, Network User's Guide and Network Glossary 2 Viewing Documentation 2 Accessing Brother Support (Windows 4 Accessing Brother Support (Macintosh 5 Control panel overview 6 LCD screen...9 Basic Operations 10 2 Loading paper 11 Loading paper and other print media ...20 Printable area 22 Paper settings...23 Paper Size and Type (MFC-J6510DW 23 Paper Size and Type (MFC-J6710DW 24 Tray use in Copy mode (MFC-J6710DW only 24 Tray use in Fax mode (MFC-J6710DW only 25 Secure Paper Feed mode for Ledger size Short Grain...
Users Manual - English
Page 22
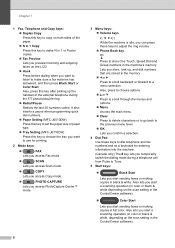
It also inserts a pause when programming quick dial numbers. Paper Setting (MFC-J6510DW) Press this key to set the paper size or paper type. Tray Setting (MFC-J6710DW) Press this key to make N in 1 or Poster copies. Fax Preview Lets you preview incoming and outgoing faxes on the LCD. ...Pulse to a menu selection. Lets you store, look up the handset of the paper. N in 1 Copy Press this key to choose the tray you want to listen to make sure a fax machine has answered, and then press Black Start or Color Start. Also, press this key after picking...
It also inserts a pause when programming quick dial numbers. Paper Setting (MFC-J6510DW) Press this key to set the paper size or paper type. Tray Setting (MFC-J6710DW) Press this key to make N in 1 or Poster copies. Fax Preview Lets you preview incoming and outgoing faxes on the LCD. ...Pulse to a menu selection. Lets you store, look up the handset of the paper. N in 1 Copy Press this key to choose the tray you want to listen to make sure a fax machine has answered, and then press Black Start or Color Start. Also, press this key after picking...
Users Manual - English
Page 24
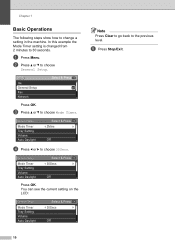
e Press Stop/Exit. 10 a Press Menu. b Press a or b to choose 30Secs. General Setup Mode Timer Tray Setting Volume Auto Daylight Select & Press OK 30Secs Off Press OK. General Setup Mode Timer Tray Setting Volume Auto Daylight Select & Press OK 2Mins Off d Press d or c to choose General Setup. c Press a or b to... Operations 1 The following steps show how to the previous level. You can see the current setting on the LCD: General Setup Mode Timer Tray Setting Volume Auto Daylight Select & Press OK 30Secs Off Note Press Clear to go back to change a setting in the machine.
e Press Stop/Exit. 10 a Press Menu. b Press a or b to choose 30Secs. General Setup Mode Timer Tray Setting Volume Auto Daylight Select & Press OK 30Secs Off Press OK. General Setup Mode Timer Tray Setting Volume Auto Daylight Select & Press OK 2Mins Off d Press d or c to choose General Setup. c Press a or b to... Operations 1 The following steps show how to the previous level. You can see the current setting on the LCD: General Setup Mode Timer Tray Setting Volume Auto Daylight Select & Press OK 30Secs Off Note Press Clear to go back to change a setting in the machine.
Users Manual - English
Page 25
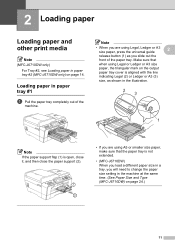
... the paper support flap (1) is not extended. • (MFC-J6710DW) When you load a different paper size in paper tray #1 2 a Pull the paper tray completely out of the paper tray. 2 Loading paper 2 Loading paper and other print media 2 Note (MFC-J6710DW only) For Tray #2, see Loading paper in paper tray #2 (MFC-J6710DW only) on page 24.) 11 Note •...
... the paper support flap (1) is not extended. • (MFC-J6710DW) When you load a different paper size in paper tray #1 2 a Pull the paper tray completely out of the paper tray. 2 Loading paper 2 Loading paper and other print media 2 Note (MFC-J6710DW only) For Tray #2, see Loading paper in paper tray #2 (MFC-J6710DW only) on page 24.) 11 Note •...
Users Manual - English
Page 26
Make sure that the paper is flat in first. e Gently put the paper into the paper tray print side down and top edge in the tray. 2 L Photo 2L 4×6in 10×15cm EXE LTR LGL B5JIS A4 LGR B4JIS 3 B5JIS EXE LTR 1 A4 12 Note Always make sure that the ... guides (2) line up with the mark for the paper size you are using. Check that the paper is not curled. Chapter 2 b Open the output paper tray cover (1). d Fan the stack of paper well to avoid paper jams and misfeeds. 1 c With both hands, gently press and slide the paper length guide (1) and...
Make sure that the paper is flat in first. e Gently put the paper into the paper tray print side down and top edge in the tray. 2 L Photo 2L 4×6in 10×15cm EXE LTR LGL B5JIS A4 LGR B4JIS 3 B5JIS EXE LTR 1 A4 12 Note Always make sure that the ... guides (2) line up with the mark for the paper size you are using. Check that the paper is not curled. Chapter 2 b Open the output paper tray cover (1). d Fan the stack of paper well to avoid paper jams and misfeeds. 1 c With both hands, gently press and slide the paper length guide (1) and...
Users Manual - English
Page 27
...put Photo L size into the machine too quickly. it may cause injury to your hand by trapping it between Tray #1 and Tray #2. WARNING DO NOT push Tray #1 into the paper tray, you do not push the paper in slowly. Check that you need to fit the paper with both sides.... And then slide the paper length guide. Over filling the paper tray may cause paper jams. 2 1 h Slowly push the paper tray completely into the machine. Please push Tray #1 in too far; Loading paper g Close the output paper tray cover. f Gently adjust the paper side guides to release the hinges...
...put Photo L size into the machine too quickly. it may cause injury to your hand by trapping it between Tray #1 and Tray #2. WARNING DO NOT push Tray #1 into the paper tray, you do not push the paper in slowly. Check that you need to fit the paper with both sides.... And then slide the paper length guide. Over filling the paper tray may cause paper jams. 2 1 h Slowly push the paper tray completely into the machine. Please push Tray #1 in too far; Loading paper g Close the output paper tray cover. f Gently adjust the paper side guides to release the hinges...


