Network Users Manual - English
Page 16
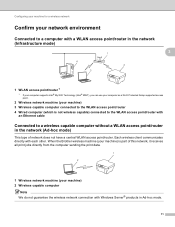
...wireless client communicates directly with an Ethernet cable Connected to a wireless capable computer without a WLAN access point/router in Ad-hoc mode. 11 When the Brother wireless machine (your machine) is not wireless capable) connected to the WLAN access point/router with each other. Configuring your machine for a wireless network Confirm... computer sending the print data. 1 2 1 Wireless network machine (your machine) 3 Wireless capable computer connected to the WLAN access point/router 4 Wired computer (which is part of network does not have a central WLAN access point/router.
...wireless client communicates directly with an Ethernet cable Connected to a wireless capable computer without a WLAN access point/router in Ad-hoc mode. 11 When the Brother wireless machine (your machine) is not wireless capable) connected to the WLAN access point/router with each other. Configuring your machine for a wireless network Confirm... computer sending the print data. 1 2 1 Wireless network machine (your machine) 3 Wireless capable computer connected to the WLAN access point/router 4 Wired computer (which is part of network does not have a central WLAN access point/router.
Quick Setup Guide - English
Page 5
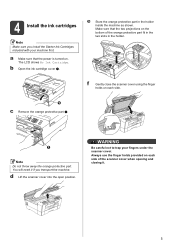
... Ink Cartridges included with your fingers under the scanner cover. Always use the finger holds provided on each side of the orange protective part fit in the two slots in the holder inside the machine as shown. a Make sure that the two projections on . e Store ...the orange protective part in the holder. f Gently close the scanner cover using the finger holds on each side. 1 c Remove the orange protective part a. 1 Note Do not throw away the orange protective part. You will need it . 5 4 Install the ink cartridges Note...
... Ink Cartridges included with your fingers under the scanner cover. Always use the finger holds provided on each side of the orange protective part fit in the two slots in the holder inside the machine as shown. a Make sure that the two projections on . e Store ...the orange protective part in the holder. f Gently close the scanner cover using the finger holds on each side. 1 c Remove the orange protective part a. 1 Note Do not throw away the orange protective part. You will need it . 5 4 Install the ink cartridges Note...

Advanced Users Manual - English
Page 38
... b to choose l02. Press OK. Press OK. You can print the Caller ID List. (See How to choose Send a fax. Press OK. You can substitute part of the number with manual dialing using the dial pad. (See Storing One Touch Dial numbers or Storing Speed Dial numbers in any combination. Press...
... b to choose l02. Press OK. Press OK. You can print the Caller ID List. (See How to choose Send a fax. Press OK. You can substitute part of the number with manual dialing using the dial pad. (See Storing One Touch Dial numbers or Storing Speed Dial numbers in any combination. Press...

Advanced Users Manual - English
Page 57
... that have put the memory card or USB Flash memory drive in 3 lines, then you have been automatically divided. A movie file is automatically divided into 9 parts by movie recording times and is about 60 minutes), these files cannot be printed correctly on a memory card or USB Flash memory drive.
... that have put the memory card or USB Flash memory drive in 3 lines, then you have been automatically divided. A movie file is automatically divided into 9 parts by movie recording times and is about 60 minutes), these files cannot be printed correctly on a memory card or USB Flash memory drive.
Advanced Users Manual - English
Page 61
... Red-Eye. Press OK. PhotoCapture Center™: Printing photos from a memory card or USB Flash memory drive d Press a or b to choose your photo. The adjusted part is unsuccessful, Unable to change the print settings. (See PhotoCapture Center™ print settings on page 59.) If you want to Detect. Note Press...
... Red-Eye. Press OK. PhotoCapture Center™: Printing photos from a memory card or USB Flash memory drive d Press a or b to choose your photo. The adjusted part is unsuccessful, Unable to change the print settings. (See PhotoCapture Center™ print settings on page 59.) If you want to Detect. Note Press...
Advanced Users Manual - English
Page 64
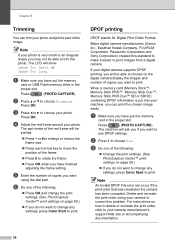
..., FUJIFILM Corporation, Panasonic Corporation and Sony Corporation) created this problem. a Make sure you have finished adjusting the frame setting. Press OK. The part inside of the red frame will be able to choose on the digital camera display the images and number of the following : Press OK... digital camera supports DPOF printing, you will be able to rotate the frame. Press OK when you have put into your photo and print a part of the frame. Press 0 to trim the photo. or Image Too Long. c Press d or c to use DPOF settings. Note An ...
..., FUJIFILM Corporation, Panasonic Corporation and Sony Corporation) created this problem. a Make sure you have finished adjusting the frame setting. Press OK. The part inside of the red frame will be able to choose on the digital camera display the images and number of the following : Press OK... digital camera supports DPOF printing, you will be able to rotate the frame. Press OK when you have put into your photo and print a part of the frame. Press 0 to trim the photo. or Image Too Long. c Press d or c to use DPOF settings. Note An ...
Advanced Users Manual - English
Page 67
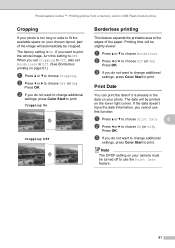
... a memory card or USB Flash memory drive Cropping 8 If your photo is too long or wide to fit the available space on your chosen layout, part of the paper. If the data doesn't have the date information, you do not want to change additional settings, press Color Start to choose On...
... a memory card or USB Flash memory drive Cropping 8 If your photo is too long or wide to fit the available space on your chosen layout, part of the paper. If the data doesn't have the date information, you do not want to change additional settings, press Color Start to choose On...

Advanced Users Manual - English
Page 79
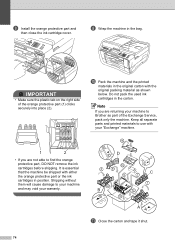
... ink cartridges. (See Replacing the ink cartridges in transit may lead to print problems and possible damage to the print head. d Remove the orange protective part from the AC power outlet. Routine maintenance e Gently close the scanner cover using the plastic tabs on each side as you transport the machine, use...
... ink cartridges. (See Replacing the ink cartridges in transit may lead to print problems and possible damage to the print head. d Remove the orange protective part from the AC power outlet. Routine maintenance e Gently close the scanner cover using the plastic tabs on each side as you transport the machine, use...
Advanced Users Manual - English
Page 80
... to use with your "Exchange" machine. 1 2 • If you are not able to Brother as shown below. Shipping without them will cause damage to your machine and may void your machine to find the orange protective part, DO NOT remove the ink cartridges before shipping. IMPORTANT • Make sure the plastic... tab on the right side of the Exchange Service, pack only the machine. h Install the orange protective part and then close the ink cartridge cover. It is essential that the machine be shipped with the original packing material as...
... to use with your "Exchange" machine. 1 2 • If you are not able to Brother as shown below. Shipping without them will cause damage to your machine and may void your machine to find the orange protective part, DO NOT remove the ink cartridges before shipping. IMPORTANT • Make sure the plastic... tab on the right side of the Exchange Service, pack only the machine. h Install the orange protective part and then close the ink cartridge cover. It is essential that the machine be shipped with the original packing material as...
Users Manual - English
Page 112
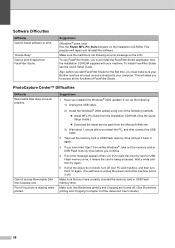
To install FaceFilter Studio see the Quick Setup Guide. Part of the Advanced User's Guide.) 98 If not, do not work properly. Software Difficulties Difficulty Cannot install software or print. This will have to unplug ... have correctly inserted the memory card or USB Flash memory drive. Make sure the machine is being accessed. Wait a while and then try to your Brother machine is turned on again. (You will allow you to access all the functions of the above do the following: 1) Unplug the USB cable. 2) Install...
To install FaceFilter Studio see the Quick Setup Guide. Part of the Advanced User's Guide.) 98 If not, do not work properly. Software Difficulties Difficulty Cannot install software or print. This will have to unplug ... have correctly inserted the memory card or USB Flash memory drive. Make sure the machine is being accessed. Wait a while and then try to your Brother machine is turned on again. (You will allow you to access all the functions of the above do the following: 1) Unplug the USB cable. 2) Install...
Users Manual - English
Page 139
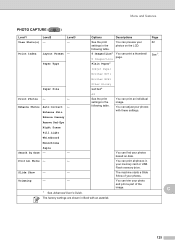
Print All Photos - - The machine starts a Slide Show of your photo and print a part of the image. C The factory settings are shown in your photos based on the LCD. See 1. Enhance Photos Auto Correct - You can trim your photos. ... can preview your photos with an asterisk. 125 Enhance Scenery Remove Red-Eye Night Scene Fill Light Whiteboard Monochrome Sepia Search by Date - - Inkjet Paper Brother BP71 Brother BP61 Other Glossy Paper Size Letter* Print Photos - -
Print All Photos - - The machine starts a Slide Show of your photo and print a part of the image. C The factory settings are shown in your photos based on the LCD. See 1. Enhance Photos Auto Correct - You can trim your photos. ... can preview your photos with an asterisk. 125 Enhance Scenery Remove Red-Eye Night Scene Fill Light Whiteboard Monochrome Sepia Search by Date - - Inkjet Paper Brother BP71 Brother BP61 Other Glossy Paper Size Letter* Print Photos - -


