Network Users Manual - English
Page 67
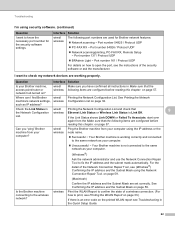
....) If there is Link OK. 9 List. Where can I want to know the necessary port number for Brother network features: wireless Network scanning i Port number 54925 / Protocol UDP PC-FAX RX i Port number 54926 / Protocol UDP Network scanning/printing, PC-FAX RX, Remote Setup i Port number 137 / Protocol UDP BRAdmin Light i Port number...
....) If there is Link OK. 9 List. Where can I want to know the necessary port number for Brother network features: wireless Network scanning i Port number 54925 / Protocol UDP PC-FAX RX i Port number 54926 / Protocol UDP Network scanning/printing, PC-FAX RX, Remote Setup i Port number 137 / Protocol UDP BRAdmin Light i Port number...
Quick Setup Guide - English
Page 21
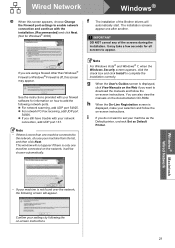
... you are using a firewall other than one after another. Windows® Macintosh Wired Network • If your machine from the list, and then click Next. IMPORTANT DO NOT cancel any of the Brother drivers will appear. See the instructions provided with your firewall software for Windows® ...screen is displayed, click View Manuals on the Web if you want to enable network connection and continue with your settings by following network ports. For network scanning, add UDP port 54925. For network PC-Fax receiving, add UDP port 54926. If you do not want...
... you are using a firewall other than one after another. Windows® Macintosh Wired Network • If your machine from the list, and then click Next. IMPORTANT DO NOT cancel any of the Brother drivers will appear. See the instructions provided with your firewall software for Windows® ...screen is displayed, click View Manuals on the Web if you want to enable network connection and continue with your settings by following network ports. For network scanning, add UDP port 54925. For network PC-Fax receiving, add UDP port 54926. If you do not want...
Quick Setup Guide - English
Page 25
... name you enter will appear on the machine's LCD when you specify an IP Address for your network, choose the machine from the Brother Solutions Center at http://solutions.brother.com/. 25 PageManager icon to go to the Presto! Also see Network Scanning in the Software User's Guide.) f When this screen appears click OK. Wired...
... name you enter will appear on the machine's LCD when you specify an IP Address for your network, choose the machine from the Brother Solutions Center at http://solutions.brother.com/. 25 PageManager icon to go to the Presto! Also see Network Scanning in the Software User's Guide.) f When this screen appears click OK. Wired...

Quick Setup Guide - English
Page 33
... of MFL-Pro Suite. Windows® Macintosh Wireless Network 33 If you are using WEP and the LCD displayed Connected but your settings by following network ports. For network scanning, add UDP port 54925. For network PC-Fax receiving, add UDP port 54926. ...; If you still have trouble with your network connection, add UDP port 137. • If you...
... of MFL-Pro Suite. Windows® Macintosh Wireless Network 33 If you are using WEP and the LCD displayed Connected but your settings by following network ports. For network scanning, add UDP port 54925. For network PC-Fax receiving, add UDP port 54926. ...; If you still have trouble with your network connection, add UDP port 137. • If you...
Quick Setup Guide - English
Page 37
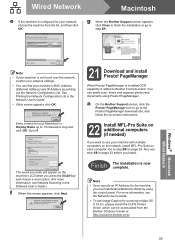
... SCAN key and choose a scan option. (For more information, see Network Scanning in the Software User's Guide.) f When this screen appears, click Next. 23 Download and install Presto! PageManager. PageManager icon to go to step 23. After the installation, this screen appears click OK. Choose your machine from the Brother Solutions Center at http://solutions.brother...
... SCAN key and choose a scan option. (For more information, see Network Scanning in the Software User's Guide.) f When this screen appears, click Next. 23 Download and install Presto! PageManager. PageManager icon to go to step 23. After the installation, this screen appears click OK. Choose your machine from the Brother Solutions Center at http://solutions.brother...

Software Users Manual - English
Page 7
... Network Scanning ...183 Network license (Windows®) ...183 Configuring Network Scanning for Windows 184 Configuring network scanning for Macintosh 187 Using the Scan key on your network ...189 Scan to E-mail (PC)...189 Scan to E-mail (E-mail Server) ...189 Scan to Image ...190 Scan to OCR ...190 Scan to File...191 Scan to FTP...191 Scan to FTP using FTP Server Profiles 193 Scan to Network ...195 Scan to Network...
... Network Scanning ...183 Network license (Windows®) ...183 Configuring Network Scanning for Windows 184 Configuring network scanning for Macintosh 187 Using the Scan key on your network ...189 Scan to E-mail (PC)...189 Scan to E-mail (E-mail Server) ...189 Scan to Image ...190 Scan to OCR ...190 Scan to File...191 Scan to FTP...191 Scan to FTP using FTP Server Profiles 193 Scan to Network ...195 Scan to Network...

Software Users Manual - English
Page 9
...following the Quick Setup Guide. You will find appropriate drivers on the CD-ROM supplied with multiple PCs connected on a network. Using the Brother printer driver 1 A printer driver translates the data from your machine communicate with the machine. Ethernet The Ethernet interface lets...using a page description language, converts it into a format that individual cartridge. Install those drivers by a firewall, and you are unable to network print, network scan or PC Fax, you installed MFL-Pro Suite from Windows® XP. 1 Printing 1 1 Note • The screens in this section...
...following the Quick Setup Guide. You will find appropriate drivers on the CD-ROM supplied with multiple PCs connected on a network. Using the Brother printer driver 1 A printer driver translates the data from your machine communicate with the machine. Ethernet The Ethernet interface lets...using a page description language, converts it into a format that individual cartridge. Install those drivers by a firewall, and you are unable to network print, network scan or PC Fax, you installed MFL-Pro Suite from Windows® XP. 1 Printing 1 1 Note • The screens in this section...

Software Users Manual - English
Page 41
... directly into the PC 2 There are using other software applications that was installed during the MFL-Pro Suite installation to network scan, you may vary when using Windows® Firewall and you can select either use ScanSoft™ PaperPort™12SE. Note ...174; XP/Windows Vista®/Windows® 7) on page 34) and a Windows® Imaging Acquisition (WIA) driver (See Scanning a document using the TWAIN driver 2 The Brother MFL-Pro Suite software includes a TWAIN compliant scanner driver. For more . If you use the ADF (automatic document feeder) or ...
... directly into the PC 2 There are using other software applications that was installed during the MFL-Pro Suite installation to network scan, you may vary when using Windows® Firewall and you can select either use ScanSoft™ PaperPort™12SE. Note ...174; XP/Windows Vista®/Windows® 7) on page 34) and a Windows® Imaging Acquisition (WIA) driver (See Scanning a document using the TWAIN driver 2 The Brother MFL-Pro Suite software includes a TWAIN compliant scanner driver. For more . If you use the ADF (automatic document feeder) or ...
Software Users Manual - English
Page 112
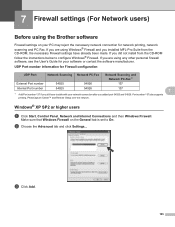
...network connection for network printing, network scanning and PC Fax. b Choose the Advanced tab and click Settings... c Click Add. 105 If you are using Windows® Firewall and you still have already been made. If you added port 54925 and 54926. 7 Firewall settings (For Network users) 7 Before using the Brother... firewall software, see the User's Guide for Firewall configuration UDP Port Network Scanning Network PC-Fax Network Scanning and Network PC-Fax 1 External Port number 54925 54926 137 Internal Port number 54925 54926 137 7 1 Add Port number 137 if you...
...network connection for network printing, network scanning and PC Fax. b Choose the Advanced tab and click Settings... c Click Add. 105 If you are using Windows® Firewall and you still have already been made. If you added port 54925 and 54926. 7 Firewall settings (For Network users) 7 Before using the Brother... firewall software, see the User's Guide for Firewall configuration UDP Port Network Scanning Network PC-Fax Network Scanning and Network PC-Fax 1 External Port number 54925 54926 137 Internal Port number 54925 54926 137 7 1 Add Port number 137 if you...
Software Users Manual - English
Page 113
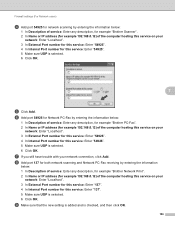
... number for this service: Enter "54926". 4 In Internal Port number for this service: Enter "137". 5 Make sure UDP is selected. 6 Click OK. Firewall settings (For Network users) d Add port 54925 for network scanning by entering the information below: 1 In Description of service: Enter any description, for example "Brother Scanner". 2 In Name or IP address (for...
... number for this service: Enter "54926". 4 In Internal Port number for this service: Enter "137". 5 Make sure UDP is selected. 6 Click OK. Firewall settings (For Network users) d Add port 54925 for network scanning by entering the information below: 1 In Description of service: Enter any description, for example "Brother Scanner". 2 In Name or IP address (for...
Software Users Manual - English
Page 115
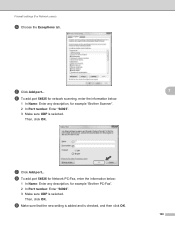
...To add port 54925 for network scanning, enter the information below : 1 In Name: Enter any description, for example "Brother PC-Fax". 2 In Port number: Enter "54926". 3 Make sure UDP is selected. i Make sure that the new setting is added and is selected. Firewall settings (For Network users) d Choose the Exceptions..., click OK. 1 2 3 g Click Add port... e Click Add port... h To add port 54926 for Network PC-Fax, enter the information below : 1 In Name: Enter any description, for example "Brother Scanner". 2 In Port number: Enter "54925". 3 Make sure UDP is checked, and then click OK. 7 ...
...To add port 54925 for network scanning, enter the information below : 1 In Name: Enter any description, for example "Brother PC-Fax". 2 In Port number: Enter "54926". 3 Make sure UDP is selected. i Make sure that the new setting is added and is selected. Firewall settings (For Network users) d Choose the Exceptions..., click OK. 1 2 3 g Click Add port... e Click Add port... h To add port 54926 for Network PC-Fax, enter the information below : 1 In Name: Enter any description, for example "Brother Scanner". 2 In Port number: Enter "54925". 3 Make sure UDP is checked, and then click OK. 7 ...
Software Users Manual - English
Page 116
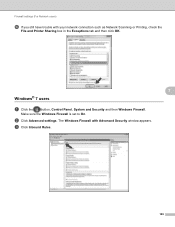
Make sure the Windows Firewall is set to On. Windows® 7 users a Click the button, Control Panel, System and Security and then Windows Firewall. The Windows Firewall with your network connection such as Network Scanning or Printing, check the File and Printer Sharing box in the Exceptions tab and then click OK. Firewall settings (For Network users) j If you still have trouble with Advanced Security window appears. b Click Advanced settings. c Click Inbound Rules. 7 7 109
Make sure the Windows Firewall is set to On. Windows® 7 users a Click the button, Control Panel, System and Security and then Windows Firewall. The Windows Firewall with your network connection such as Network Scanning or Printing, check the File and Printer Sharing box in the Exceptions tab and then click OK. Firewall settings (For Network users) j If you still have trouble with Advanced Security window appears. b Click Advanced settings. c Click Inbound Rules. 7 7 109
Software Users Manual - English
Page 117
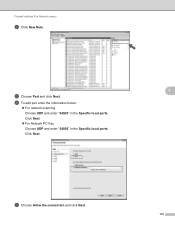
Click Next. g Choose Allow the connection and click Next. 110 Click Next. For Network PC-Fax Choose UDP and enter "54926" in the Specific local ports. f To add port enter the information below: For network scanning Choose UDP and enter "54925" in the Specific local ports. Firewall settings (For Network users) d Click New Rule. 7 e Choose Port and click Next.
Click Next. g Choose Allow the connection and click Next. 110 Click Next. For Network PC-Fax Choose UDP and enter "54926" in the Specific local ports. f To add port enter the information below: For network scanning Choose UDP and enter "54925" in the Specific local ports. Firewall settings (For Network users) d Click New Rule. 7 e Choose Port and click Next.
Software Users Manual - English
Page 119
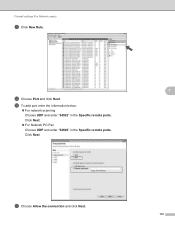
Click Next. For Network PC-Fax Choose UDP and enter "54926" in the Specific remote ports. Click Next. n To add port enter the information below: For network scanning Choose UDP and enter "54925" in the Specific remote ports. Firewall settings (For Network users) l Click New Rule. 7 m Choose Port and click Next. o Choose Allow the connection and click Next. 112
Click Next. For Network PC-Fax Choose UDP and enter "54926" in the Specific remote ports. Click Next. n To add port enter the information below: For network scanning Choose UDP and enter "54925" in the Specific remote ports. Firewall settings (For Network users) l Click New Rule. 7 m Choose Port and click Next. o Choose Allow the connection and click Next. 112
Software Users Manual - English
Page 183
Section III Using the Scan key II I USB cable scanning 177 Network Scanning 183
Section III Using the Scan key II I USB cable scanning 177 Network Scanning 183
Software Users Manual - English
Page 184
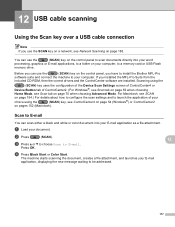
... E-mail application, displaying the new message waiting to be addressed. 177 Scan to E-mail 12 You can use the SCAN key on a network, see ControlCenter4 on page 54 (Windows®) or ControlCenter2 on the control panel, you have to install the Brother MFL-Pro software suite and connect the machine to your computer, to...
... E-mail application, displaying the new message waiting to be addressed. 177 Scan to E-mail 12 You can use the SCAN key on a network, see ControlCenter4 on page 54 (Windows®) or ControlCenter2 on the control panel, you have to install the Brother MFL-Pro software suite and connect the machine to your computer, to...
Software Users Manual - English
Page 190
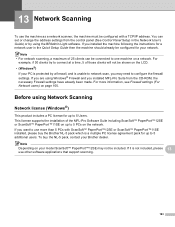
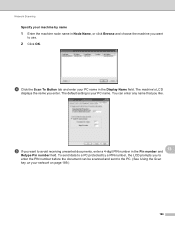
For more than 5 PCs with a TCP/IP address. To buy the Brother NL-5 pack which is a multiple PC license agreement pack for up to 5 additional users. Before using Network Scanning 13 Network license (Windows®) 13 This product includes a PC license for your model ScanSoft™ PaperPort™12SE may ... on the LCD. • (Windows®) If your Brother dealer. For example, if 30 clients try to connect at a time, 5 of those clients will not be connected to one machine on a network. If it is unable to network scan, you installed MFL-Pro Suite from the control panel (See...
For more than 5 PCs with a TCP/IP address. To buy the Brother NL-5 pack which is a multiple PC license agreement pack for up to 5 additional users. Before using Network Scanning 13 Network license (Windows®) 13 This product includes a PC license for your model ScanSoft™ PaperPort™12SE may ... on the LCD. • (Windows®) If your Brother dealer. For example, if 30 clients try to connect at a time, 5 of those clients will not be connected to one machine on a network. If it is unable to network scan, you installed MFL-Pro Suite from the control panel (See...
Software Users Manual - English
Page 191
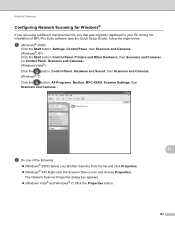
...the button, Control Panel, Hardware and Sound, then Scanners and Cameras. (Windows® 7) Click the button, All Programs, Brother, MFC-XXXX, Scanner Settings, then Scanners and Cameras. 13 b Do one that was originally registered to your PC during the installation of...Brother machine from the list and click Properties. (Windows® XP) Right-click the Scanner Device icon and choose Properties. The Network Scanner Properties dialog box appears. (Windows Vista® and Windows® 7) Click the Properties button. 184 Network Scanning Configuring Network Scanning...
...the button, Control Panel, Hardware and Sound, then Scanners and Cameras. (Windows® 7) Click the button, All Programs, Brother, MFC-XXXX, Scanner Settings, then Scanners and Cameras. 13 b Do one that was originally registered to your PC during the installation of...Brother machine from the list and click Properties. (Windows® XP) Right-click the Scanner Device icon and choose Properties. The Network Scanner Properties dialog box appears. (Windows Vista® and Windows® 7) Click the Properties button. 184 Network Scanning Configuring Network Scanning...
Software Users Manual - English
Page 192
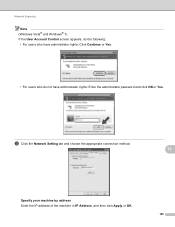
c Click the Network Setting tab and choose the appropriate connection method. 13 Specify your machine by address Enter the IP address of the machine in IP Address, and then click Apply or OK. 185 Network Scanning Note (Windows Vista® and Windows® 7) If the User Account Control screen appears, do the following: • For users who have administrator rights: Click Continue or Yes. • For users who do not have administrator rights: Enter the administrator password and click OK or Yes.
c Click the Network Setting tab and choose the appropriate connection method. 13 Specify your machine by address Enter the IP address of the machine in IP Address, and then click Apply or OK. 185 Network Scanning Note (Windows Vista® and Windows® 7) If the User Account Control screen appears, do the following: • For users who have administrator rights: Click Continue or Yes. • For users who do not have administrator rights: Enter the administrator password and click OK or Yes.
Software Users Manual - English
Page 193
... the document can enter any name that you want to use. 2 Click OK. You can be scanned and sent to the PC. (See Using the Scan key on your network on page 189.) 186 d Click the Scan To Button tab and enter your PC name. The machine's LCD displays the name you want to...
... the document can enter any name that you want to use. 2 Click OK. You can be scanned and sent to the PC. (See Using the Scan key on your network on page 189.) 186 d Click the Scan To Button tab and enter your PC name. The machine's LCD displays the name you want to...


