Users Manual Basic - English
Page 11
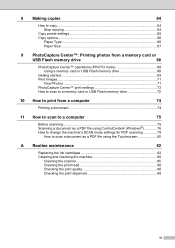
... copies 64 How to copy ...64 Stop copying 64 Copy preset settings 65 Copy options...66 Paper Type ...66 Paper Size ...67 9 PhotoCapture Center™: Printing photos from a memory card or USB Flash memory drive 68 PhotoCapture Center™ operations (PHOTO mode 68 Using a memory card or USB Flash memory drive... file using the Touchscreen 80 A Routine maintenance 82 Replacing the ink cartridges 82 Cleaning and checking the machine 85 Cleaning the scanner 85 Cleaning the print head 86 Checking the print quality 86 Checking the print alignment 88 ix
... copies 64 How to copy ...64 Stop copying 64 Copy preset settings 65 Copy options...66 Paper Type ...66 Paper Size ...67 9 PhotoCapture Center™: Printing photos from a memory card or USB Flash memory drive 68 PhotoCapture Center™ operations (PHOTO mode 68 Using a memory card or USB Flash memory drive... file using the Touchscreen 80 A Routine maintenance 82 Replacing the ink cartridges 82 Cleaning and checking the machine 85 Cleaning the scanner 85 Cleaning the print head 86 Checking the print quality 86 Checking the print alignment 88 ix
Users Manual Basic - English
Page 21
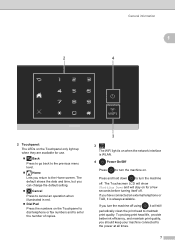
... the Home screen. The Touchscreen LCD will show Shutting Down and will still periodically clean the print head to the power at all times. 7 To prolong print head life, provide better ink efficiency, and maintain print quality, you have connected an external telephone or TAD, it will stay on for use....using , it is WLAN. 4 Power On/Off Press to turn the machine on. If you should keep your machine connected to maintain print quality. General information 1 2 4 2 Touchpanel: The LEDs on the Touchpanel only light up when they are available for a few seconds before turning...
... the Home screen. The Touchscreen LCD will show Shutting Down and will still periodically clean the print head to the power at all times. 7 To prolong print head life, provide better ink efficiency, and maintain print quality, you have connected an external telephone or TAD, it will stay on for use....using , it is WLAN. 4 Power On/Off Press to turn the machine on. If you should keep your machine connected to maintain print quality. General information 1 2 4 2 Touchpanel: The LEDs on the Touchpanel only light up when they are available for a few seconds before turning...
Users Manual Basic - English
Page 96
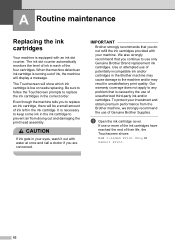
... machine and/or may result in the Brother machine may cause damage to use of the four cartridges. IMPORTANT Brother strongly recommends that is running out of their life, the Touchscreen shows B&W 1-sided Print Only or Cannot Print. 82 The ink dot counter automatically monitors... the level of ink in your investment and obtain premium performance from drying out and damaging the print head assembly...
... machine and/or may result in the Brother machine may cause damage to use of the four cartridges. IMPORTANT Brother strongly recommends that is running out of their life, the Touchscreen shows B&W 1-sided Print Only or Cannot Print. 82 The ink dot counter automatically monitors... the level of ink in your investment and obtain premium performance from drying out and damaging the print head assembly...
Users Manual Basic - English
Page 100
.... 86 You can also press and Ink. Cleaning the print head A To maintain good print quality, the machine will go back to five more times. IMPORTANT DO NOT touch the print head. a Press . c Press Black, Color or All. If the print has not improved, call Brother Customer Service. (See Brother numbers on page i.) • You can start the...
.... 86 You can also press and Ink. Cleaning the print head A To maintain good print quality, the machine will go back to five more times. IMPORTANT DO NOT touch the print head. a Press . c Press Black, Color or All. If the print has not improved, call Brother Customer Service. (See Brother numbers on page i.) • You can start the...
Users Manual Basic - English
Page 101
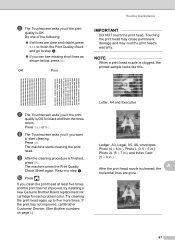
... times. j Press . Try cleaning the print head again up to step e. The machine starts cleaning the print head. If you if the print quality is OK for each problem color. If the print has not improved, call Brother Customer Service. (See Brother numbers on page i.) Letter, A4 and...7 in.) and Index Card (5 8 in.) A After the print head nozzle is finished, press OK. g The Touchscreen asks you clean the print head at least five times and the print has not improved, try installing a new Genuine Brother Brand replacement ink cartridge for black and then the three colors. Press OK...
... times. j Press . Try cleaning the print head again up to step e. The machine starts cleaning the print head. If you if the print quality is OK for each problem color. If the print has not improved, call Brother Customer Service. (See Brother numbers on page i.) Letter, A4 and...7 in.) and Index Card (5 8 in.) A After the print head nozzle is finished, press OK. g The Touchscreen asks you clean the print head at least five times and the print has not improved, try installing a new Genuine Brother Brand replacement ink cartridge for black and then the three colors. Press OK...
Users Manual Basic - English
Page 107
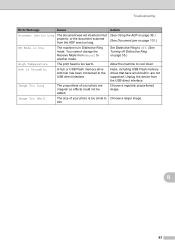
... the ADF was too long. Hub is in Distinctive Ring mode. DR Mode in , are irregular so effects could not be added. High Temperature The print head is too small to another mode. Choose a larger image. The size of your photo is too warm.
... the ADF was too long. Hub is in Distinctive Ring mode. DR Mode in , are irregular so effects could not be added. High Temperature The print head is too small to another mode. Choose a larger image. The size of your photo is too warm.
Users Manual Basic - English
Page 109
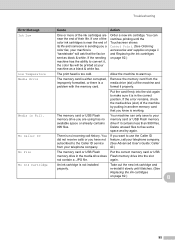
... correct position. Take out the new ink cartridge and re-install it slowly until the Touchscreen shows Cannot Print. (See Ordering accessories and supplies on page ii and Replacing the ink cartridges on page 82.) B 95... the improperly formatted, or there is no available space or already contains 999 files. Your machine can continue printing until it properly. If the error remains, check the media drive (slot) of their life. You did...format it latches. (See Replacing the ink cartridges on page 82.) The print head is sending you want to use the Caller ID feature, call history.
... correct position. Take out the new ink cartridge and re-install it slowly until the Touchscreen shows Cannot Print. (See Ordering accessories and supplies on page ii and Replacing the ink cartridges on page 82.) B 95... the improperly formatted, or there is no available space or already contains 999 files. Your machine can continue printing until it properly. If the error remains, check the media drive (slot) of their life. You did...format it latches. (See Replacing the ink cartridges on page 82.) The print head is sending you want to use the Caller ID feature, call history.
Users Manual Basic - English
Page 120
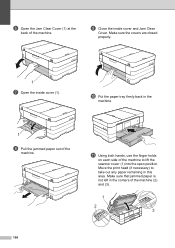
Make sure the covers are closed properly. 1 g Open the inside cover and Jam Clear Cover. k Using both hands, use the finger holds on each side of the machine. f Open the Jam Clear Cover (1) at the back of the machine to take out any paper remaining in this area. j Put the paper tray firmly back in the corners of the machine. Move the print head (if necessary) to lift the scanner cover (1) into the open position. Make sure that jammed paper is not left in the machine. 1 h Pull the jammed paper out of the machine (2) and (3). 1 2 3 106 i Close the inside cover (1).
Make sure the covers are closed properly. 1 g Open the inside cover and Jam Clear Cover. k Using both hands, use the finger holds on each side of the machine. f Open the Jam Clear Cover (1) at the back of the machine to take out any paper remaining in this area. j Put the paper tray firmly back in the corners of the machine. Move the print head (if necessary) to lift the scanner cover (1) into the open position. Make sure that jammed paper is not left in the machine. 1 h Pull the jammed paper out of the machine (2) and (3). 1 2 3 106 i Close the inside cover (1).
Users Manual Basic - English
Page 121
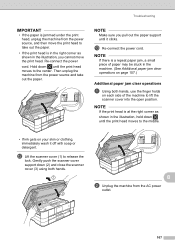
... the machine from the AC power outlet. 107 Troubleshooting IMPORTANT • If the paper is jammed under the print head, unplug the machine from the power source, and then move the print head. NOTE If there is at the right corner as shown in the machine. (See Additional paper jam clear ...operations on your skin or clothing, immediately wash it clicks. Gently push the scanner cover support down until the print head moves to the center. NOTE Make sure you cannot move the print head to lift the scanner cover into the open position. m Re-connect the power cord. NOTE If the...
... the machine from the AC power outlet. 107 Troubleshooting IMPORTANT • If the paper is jammed under the print head, unplug the machine from the power source, and then move the print head. NOTE If there is at the right corner as shown in the machine. (See Additional paper jam clear ...operations on your skin or clothing, immediately wash it clicks. Gently push the scanner cover support down until the print head moves to the center. NOTE Make sure you cannot move the print head to lift the scanner cover into the open position. m Re-connect the power cord. NOTE If the...
Users Manual Basic - English
Page 126
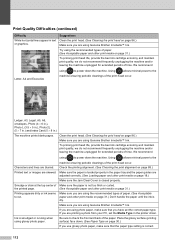
...the correct paper type. Clean the print head. (See Cleaning the print head on page 88.) Printed text or images are using glossy photo paper. If you use glossy photo paper, make sure that the paper type setting is smudged or running when using Genuine Brother Innobella™ Ink. Place the..., A4 and Executive using Genuine Brother Innobella™ Ink. Smudge or stain at the top center of paper. (See Acceptable paper and other print media on page 30.) If you are using to the machine ensuring periodic cleanings of the print head occur. Using allows minimal power to...
...the correct paper type. Clean the print head. (See Cleaning the print head on page 88.) Printed text or images are using glossy photo paper. If you use glossy photo paper, make sure that the paper type setting is smudged or running when using Genuine Brother Innobella™ Ink. Place the..., A4 and Executive using Genuine Brother Innobella™ Ink. Smudge or stain at the top center of paper. (See Acceptable paper and other print media on page 30.) If you are using to the machine ensuring periodic cleanings of the print head occur. Using allows minimal power to...
Users Manual Basic - English
Page 140
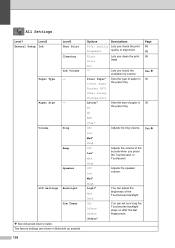
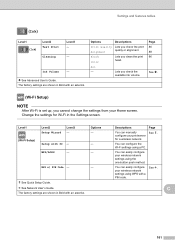
... Lets you check the available ink volume. All - Lets you check the print Alignment quality or alignment. Volume Ring Beep Speaker LCD Settings Backlight Dim Timer See Advanced User's Guide. Brother BP71 Other Glossy Transparency Letter* A4 Sets the size of paper in the paper tray. High Off Low...Bold with an asterisk. The factory settings are shown in the paper tray. You can adjust the brightness of the sounds when you clean the print head. A5 EXE 4"x6" Off Adjusts the ring volume. Med* High Light* Med Dark Off 10Secs 20Secs You can set how long the ...
... Lets you check the available ink volume. All - Lets you check the print Alignment quality or alignment. Volume Ring Beep Speaker LCD Settings Backlight Dim Timer See Advanced User's Guide. Brother BP71 Other Glossy Transparency Letter* A4 Sets the size of paper in the paper tray. High Off Low...Bold with an asterisk. The factory settings are shown in the paper tray. You can adjust the brightness of the sounds when you clean the print head. A5 EXE 4"x6" Off Adjusts the ring volume. Med* High Light* Med Dark Off 10Secs 20Secs You can set how long the ...

Users Manual Basic - English
Page 152
... your needs. On Sets a prefix number that best suits your name and fax number to appear on See . The factory settings are shown in the headings of your country. Level3 - - - - - - - - Page See . - - - Sets the time zone for Daylight Saving Time. Tone* Choose the dialing mode.... and time on each page you want the machine to On See . See Quick Setup Guide. All Settings (continued) C Level1 Print Reports Machine Info. Initial Setup Receive Mode - Level2 Transmission Address Book Fax Journal User Settings Network Configuration WLAN Report Caller ID history...
... your needs. On Sets a prefix number that best suits your name and fax number to appear on See . The factory settings are shown in the headings of your country. Level3 - - - - - - - - Page See . - - - Sets the time zone for Daylight Saving Time. Tone* Choose the dialing mode.... and time on each page you want the machine to On See . See Quick Setup Guide. All Settings (continued) C Level1 Print Reports Machine Info. Initial Setup Receive Mode - Level2 Transmission Address Book Fax Journal User Settings Network Configuration WLAN Report Caller ID history...
Users Manual Basic - English
Page 175
... the available ink volume. Page 86 88 86 See . (Wi-Fi Setup) C NOTE After Wi-Fi is set up, you check the print quality or alignment. The factory settings are shown in Bold with a PIN code. You can configure the Wi-Fi settings using the one-button push...You can manually See . Change the settings for a wireless network. The factory settings are shown in Bold with PC - Lets you clean the print head. Descriptions Page You can easily configure See . C 161 Setup with an asterisk. See Quick Setup Guide. WPS w/ PIN Code - - Options Descriptions...
... the available ink volume. Page 86 88 86 See . (Wi-Fi Setup) C NOTE After Wi-Fi is set up, you check the print quality or alignment. The factory settings are shown in Bold with a PIN code. You can configure the Wi-Fi settings using the one-button push...You can manually See . Change the settings for a wireless network. The factory settings are shown in Bold with PC - Lets you clean the print head. Descriptions Page You can easily configure See . C 161 Setup with an asterisk. See Quick Setup Guide. WPS w/ PIN Code - - Options Descriptions...
Users Manual Basic - English
Page 178
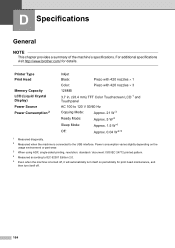
Printer Type Print Head Memory Capacity LCD (Liquid Crystal Display) Power Source Power Consumption 2 Inkjet Black: Piezo with 420 nozzles 1 Color: Piezo with 420 nozzles 3 128MB 3.7 in. (... consumption varies slightly depending on periodically for details. D Specifications D General D NOTE This chapter provides a summary of the machine's specifications. For additional specifications visit http://www.brother.com/ for print head maintenance, and then turn itself on the usage environment or part wear. 3 When using ADF, single-sided...
Printer Type Print Head Memory Capacity LCD (Liquid Crystal Display) Power Source Power Consumption 2 Inkjet Black: Piezo with 420 nozzles 1 Color: Piezo with 420 nozzles 3 128MB 3.7 in. (... consumption varies slightly depending on periodically for details. D Specifications D General D NOTE This chapter provides a summary of the machine's specifications. For additional specifications visit http://www.brother.com/ for print head maintenance, and then turn itself on the usage environment or part wear. 3 When using ADF, single-sided...
Users Manual Basic - English
Page 190
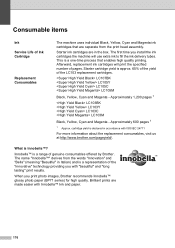
... 176 What is approx. 65% of the yield of the LC103 replacement cartridges. The name "Innobella™" derives from the print head assembly. Afterward, replacement ink cartridges will use extra ink to fill the ink delivery tubes. LC107BK LC105Y LC105C LC105M Black, Yellow... Cartridge Replacement Consumables The machine uses individual Black, Yellow, Cyan and Magenta ink cartridges that enables high quality printing. The first time you print photo images, Brother recommends Innobella™ glossy photo paper (BP71 series) for high quality. Approximately 600 pages 1 1 Approx....
... 176 What is approx. 65% of the yield of the LC103 replacement cartridges. The name "Innobella™" derives from the print head assembly. Afterward, replacement ink cartridges will use extra ink to fill the ink delivery tubes. LC107BK LC105Y LC105C LC105M Black, Yellow... Cartridge Replacement Consumables The machine uses individual Black, Yellow, Cyan and Magenta ink cartridges that enables high quality printing. The first time you print photo images, Brother recommends Innobella™ glossy photo paper (BP71 series) for high quality. Approximately 600 pages 1 1 Approx....
Users Manual Basic - English
Page 191
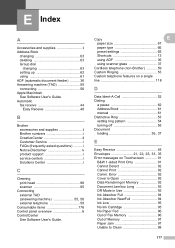
i Notice-Disclaimer iv product support i service centers i Solutions Center i C Cleaning print head 86 scanner 85 Connecting external TAD (answering machine 55, 56 external telephone 58 Consumable items 176 Control panel overview 6 ControlCenter See Software ... of Fax Memory 96 Out of Memory 97 Paper Jam 97 Unable to Clean 98 177 Automatic fax receive 44 Easy Receive 48 B Brother accessories and supplies ii Brother numbers i CreativeCenter 4 Customer Service i FAQs (frequently asked questions) ......... E Index A Accessories and supplies ii Address Book changing 63 ...
i Notice-Disclaimer iv product support i service centers i Solutions Center i C Cleaning print head 86 scanner 85 Connecting external TAD (answering machine 55, 56 external telephone 58 Consumable items 176 Control panel overview 6 ControlCenter See Software ... of Fax Memory 96 Out of Memory 97 Paper Jam 97 Unable to Clean 98 177 Automatic fax receive 44 Easy Receive 48 B Brother accessories and supplies ii Brother numbers i CreativeCenter 4 Customer Service i FAQs (frequently asked questions) ......... E Index A Accessories and supplies ii Address Book changing 63 ...
Users Manual Advanced - English
Page 85
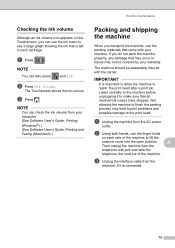
...Press . IMPORTANT It is important to allow the machine to the print head. Listen carefully to the machine before unplugging it is left in transit may lead to print problems and possible damage to "park" the print head after a print job. NOTE You can check the ink volume from the machine...in each side of the machine. c Unplug the interface cable from your computer. (See Software User's Guide: Printing (Windows®).) (See Software User's Guide: Printing and Faxing (Macintosh).) Routine maintenance Packing and shipping the machine A When you transport the machine, use the ...
...Press . IMPORTANT It is important to allow the machine to the print head. Listen carefully to the machine before unplugging it is left in transit may lead to print problems and possible damage to "park" the print head after a print job. NOTE You can check the ink volume from the machine...in each side of the machine. c Unplug the interface cable from your computer. (See Software User's Guide: Printing (Windows®).) (See Software User's Guide: Printing and Faxing (Macintosh).) Routine maintenance Packing and shipping the machine A When you transport the machine, use the ...

Quick Setup Guide - English
Page 4
... the scanner cover until it locks securely into the cable channel and out the back of time. NOTE To prolong print head life, provide the best ink cartridge economy and maintain print quality, we do not recommend frequently unplugging the machine and/or leaving the machine unplugged for extended periods of the machine... the telephone line cord. Connect one end of the telephone line cord to a modular wall jack. d Lift the scanner cover to the jack of the print head.
... the scanner cover until it locks securely into the cable channel and out the back of time. NOTE To prolong print head life, provide the best ink cartridge economy and maintain print quality, we do not recommend frequently unplugging the machine and/or leaving the machine unplugged for extended periods of the machine... the telephone line cord. Connect one end of the telephone line cord to a modular wall jack. d Lift the scanner cover to the jack of the print head.
Quick Setup Guide - English
Page 7
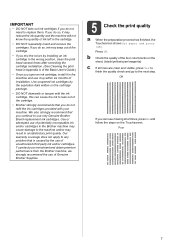
... do so, ink may seep out of the cartridge. • If you do so, it up within six months of Genuine Brother Supplies. 5 Check the print quality a When the preparation process has finished, the Touchscreen shows Set paper and press [OK]. b Check the quality of potentially ...check and go to leak out of the cartridge. • Brother strongly recommends that is caused by installing an ink cartridge in the wrong position, clean the print head several times after correcting the cartridge installation. (See Cleaning the print head in Appendix A of the Basic User's Guide.) • Once...
... do so, ink may seep out of the cartridge. • If you do so, it up within six months of Genuine Brother Supplies. 5 Check the print quality a When the preparation process has finished, the Touchscreen shows Set paper and press [OK]. b Check the quality of potentially ...check and go to leak out of the cartridge. • Brother strongly recommends that is caused by installing an ink cartridge in the wrong position, clean the print head several times after correcting the cartridge installation. (See Cleaning the print head in Appendix A of the Basic User's Guide.) • Once...


