

Users Manual - English
Page 10
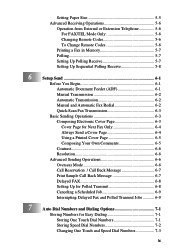
...External Telephone 2-10 On-Screen Programming 3-1 User-Friendly Programming 3-1 Menu Selection Table 3-1 Alternating Displays 3-1 Navigation Keys 3-2 Initial Setup 4-1 Getting Started 4-1 Setting Date and Time 4-1 Setting Station ID 4-1 Details for Entering Text 4-2 Inserting Spaces 4-2 Making Corrections... 4-5 Setting Beeper Volume 4-5 Memory Storage 4-6 Setting Tone/Pulse Dialing Mode 4-6 Setting Up Your Area Code (USA Only 4-6 Setup Receive 5-1 Basic Receiving Operations 5-1 Select Receive Mode 5-1 To select or change your Receive Mode 5-2 Setting Ring Delay 5-3 Setting...
...External Telephone 2-10 On-Screen Programming 3-1 User-Friendly Programming 3-1 Menu Selection Table 3-1 Alternating Displays 3-1 Navigation Keys 3-2 Initial Setup 4-1 Getting Started 4-1 Setting Date and Time 4-1 Setting Station ID 4-1 Details for Entering Text 4-2 Inserting Spaces 4-2 Making Corrections... 4-5 Setting Beeper Volume 4-5 Memory Storage 4-6 Setting Tone/Pulse Dialing Mode 4-6 Setting Up Your Area Code (USA Only 4-6 Setup Receive 5-1 Basic Receiving Operations 5-1 Select Receive Mode 5-1 To select or change your Receive Mode 5-2 Setting Ring Delay 5-3 Setting...
Users Manual - English
Page 11
... FAX/TEL Mode Only 5-6 Changing Remote Codes 5-6 To Change Remote Codes 5-6 Printing a Fax in Memory 5-7 Polling 5-7 Setting Up Polling Receive 5-7 Setting Up Sequential Polling Receive 5-8 6 Setup Send 6-1 Before You Begin 6-1 Automatic Document Feeder (ADF 6-1 Manual Transmission 6-2 Automatic Transmission 6-2 Manual and Automatic Fax Redial 6-2 Quick-Scan Fax Transmission 6-3 Basic Sending Operations 6-3 Composing...
... FAX/TEL Mode Only 5-6 Changing Remote Codes 5-6 To Change Remote Codes 5-6 Printing a Fax in Memory 5-7 Polling 5-7 Setting Up Polling Receive 5-7 Setting Up Sequential Polling Receive 5-8 6 Setup Send 6-1 Before You Begin 6-1 Automatic Document Feeder (ADF 6-1 Manual Transmission 6-2 Automatic Transmission 6-2 Manual and Automatic Fax Redial 6-2 Quick-Scan Fax Transmission 6-3 Basic Sending Operations 6-3 Composing...
Users Manual - English
Page 15
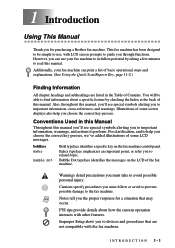
... a specific key on the LCD of the fax machine. Bubble Dot typeface identifies the messages on the fax machine control panel. Improper Setup alerts you choose the correct key presses, we've added illustrations of this manual, you'll see special symbols alerting you must follow... or avoid to prevent possible damage to the fax machine. For clarification, and to help you the proper response for purchasing a Brother fax machine. Also, throughout this manual. This fax machine has been designed to be able to find information about how the current operation...
... a specific key on the LCD of the fax machine. Bubble Dot typeface identifies the messages on the fax machine control panel. Improper Setup alerts you choose the correct key presses, we've added illustrations of this manual, you'll see special symbols alerting you must follow... or avoid to prevent possible damage to the fax machine. For clarification, and to help you the proper response for purchasing a Brother fax machine. Also, throughout this manual. This fax machine has been designed to be able to find information about how the current operation...

Users Manual - English
Page 21
... Printing Cartridge (up to 100 pages) One Touch Name Labels 1 7 3 9 5 11 2 8 4 10 6 12 Owner's Manual Quick Setup Guide If an item is missing, call Brother Customer Service at Note 1-800-284-4329 (in USA), 1-877-BROTHER (in Canada) or (514) 685-6464 (in Montreal). See Ordering Accessories and Supplies on page ii for...
... Printing Cartridge (up to 100 pages) One Touch Name Labels 1 7 3 9 5 11 2 8 4 10 6 12 Owner's Manual Quick Setup Guide If an item is missing, call Brother Customer Service at Note 1-800-284-4329 (in USA), 1-877-BROTHER (in Canada) or (514) 685-6464 (in Montreal). See Ordering Accessories and Supplies on page ii for...

Users Manual - English
Page 31
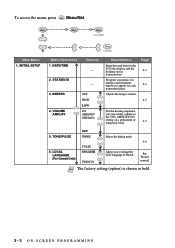
... 3-2 Then the LCD shows next menu level. When you passed your next menu selection, and then press Menu/Set. Press 3 for Setup Send Menu SELECT & SET 1.INITIAL SETUP 2.SETUP RECEIVE 3.SETUP SEND Press 0 for Setup Receive Menu-OR- Navigation Keys * Access the Menu * Go to next menu level * Accept an option * Scroll through the current... SERVICE -OR- Press or to scroll to your choices or to save keystrokes. When you enter the Menu, the LCD scrolls: Then press 1 for Initial Setup Menu-OR-
... 3-2 Then the LCD shows next menu level. When you passed your next menu selection, and then press Menu/Set. Press 3 for Setup Send Menu SELECT & SET 1.INITIAL SETUP 2.SETUP RECEIVE 3.SETUP SEND Press 0 for Setup Receive Menu-OR- Navigation Keys * Access the Menu * Go to next menu level * Accept an option * Scroll through the current... SERVICE -OR- Press or to scroll to your choices or to save keystrokes. When you enter the Menu, the LCD scrolls: Then press 1 for Initial Setup Menu-OR-
Users Manual - English
Page 32
... OFF TONE 6. See French manual Note The factory setting (option) is shown in bold. 3-3 ON-SCREEN PROGRAMMING To access the menu, press Menu/Set. INITIAL SETUP Stop to French. VOLUME AMPLIFY OFF HIGH LOW ON (PERMANENT/ TEMPORARY) Descriptions Page Enter date and time for the LCD the display and the heading...
... OFF TONE 6. See French manual Note The factory setting (option) is shown in bold. 3-3 ON-SCREEN PROGRAMMING To access the menu, press Menu/Set. INITIAL SETUP Stop to French. VOLUME AMPLIFY OFF HIGH LOW ON (PERMANENT/ TEMPORARY) Descriptions Page Enter date and time for the LCD the display and the heading...

Users Manual - English
Page 33
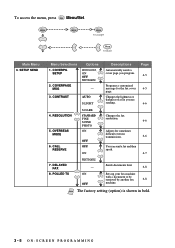
...% 87% 75% LETTER LEGAL Activate or deactivate the fax machine from a remote location. 5-6 You can also personalize these codes. Sets the time for fax receiving. 5-5 7. SETUP RECEIVE Menu Selections 1.
...% 87% 75% LETTER LEGAL Activate or deactivate the fax machine from a remote location. 5-6 You can also personalize these codes. Sets the time for fax receiving. 5-5 7. SETUP RECEIVE Menu Selections 1.
Users Manual - English
Page 34
..., ON OFF PRINT SAMPLE - 3. ON OFF Sends documents later 6-8 Sets up your fax machine with a document to Exit Main Menu 3. COVERPG SETUP 2. RESOLUTION 5. To access the menu, press Menu/Set. SETUP SEND Menu Selections 1. Changes the lightness or darkness of a fax you program. CALL RESERVE S.DARK STANDARD FINE S.FINE PHOTO ON OFF...
..., ON OFF PRINT SAMPLE - 3. ON OFF Sends documents later 6-8 Sets up your fax machine with a document to Exit Main Menu 3. COVERPG SETUP 2. RESOLUTION 5. To access the menu, press Menu/Set. SETUP SEND Menu Selections 1. Changes the lightness or darkness of a fax you program. CALL RESERVE S.DARK STANDARD FINE S.FINE PHOTO ON OFF...

Users Manual - English
Page 35
to accept Stop to dial them by pressing four keys. SET AUTO DIAL 1. SPEED-DIAL 7. SETUP GROUPS 1. Stores dial numbers in bold. Sets up a Group number for polling. ACT.INTERVAL OFF OFF Print lists and reports of activity. (See ...can to Exit Main Menu 4. ONE-TOUCH DIAL 2. TRANSMISSION - - - Stores dial numbers in memory you have the machine set for Broadcasting. INTERRUPT Menu Selections - SETUP REPORTS 3. To access the menu, press Menu/Set. CANCEL JOB 5. Page 6-9 6-9 7-1 7-2 7-3 11-1 2. ON Descriptions Cancel a delayed fax or polling job.
to accept Stop to dial them by pressing four keys. SET AUTO DIAL 1. SPEED-DIAL 7. SETUP GROUPS 1. Stores dial numbers in bold. Sets up a Group number for polling. ACT.INTERVAL OFF OFF Print lists and reports of activity. (See ...can to Exit Main Menu 4. ONE-TOUCH DIAL 2. TRANSMISSION - - - Stores dial numbers in memory you have the machine set for Broadcasting. INTERRUPT Menu Selections - SETUP REPORTS 3. To access the menu, press Menu/Set. CANCEL JOB 5. Page 6-9 6-9 7-1 7-2 7-3 11-1 2. ON Descriptions Cancel a delayed fax or polling job.
Users Manual - English
Page 37
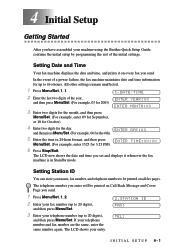
... Started After you have assembled your machine using the Brother Quick Setup Guide, continue the initial setup by programming the rest of the year, and then press Menu/Set. (For example, 03 for 2003) 1.DATE/TIME ENTER YEAR:XX ENTER MONTH:XX 3 ... displays it on all fax pages. The LCD shows your telephone number and fax number are the same, enter the same number again. TEL: INITIAL SETUP 4-1 Setting Station ID You can store your telephone number (up to 20 digits), and then press Menu/Set. In the event of a power failure, the...
... Started After you have assembled your machine using the Brother Quick Setup Guide, continue the initial setup by programming the rest of the year, and then press Menu/Set. (For example, 03 for 2003) 1.DATE/TIME ENTER YEAR:XX ENTER MONTH:XX 3 ... displays it on all fax pages. The LCD shows your telephone number and fax number are the same, enter the same number again. TEL: INITIAL SETUP 4-1 Setting Station ID You can store your telephone number (up to 20 digits), and then press Menu/Set. In the event of a power failure, the...

Users Manual - English
Page 38
... your name (up to 20 characters), and then press Menu/Set. (You can access the character you want to enter a blank space, press twice. 4-2 INITIAL SETUP The keys for 0, # and don't have three or four letters printed above them.
... your name (up to 20 characters), and then press Menu/Set. (You can access the character you want to enter a blank space, press twice. 4-2 INITIAL SETUP The keys for 0, # and don't have three or four letters printed above them.

Users Manual - English
Page 39
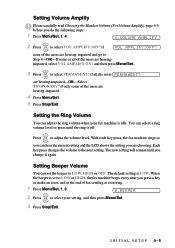
..., press to move the cursor after the last correct letter. Setting the Speaker Volume You can also back up and type over incorrect letters. INITIAL SETUP 4-3 Press for (space Press # for Press 0 for 0 I To enter a space, press once between numbers and twice between characters. Each key press changes the volume to...
..., press to move the cursor after the last correct letter. Setting the Speaker Volume You can also back up and type over incorrect letters. INITIAL SETUP 4-3 Press for (space Press # for Press 0 for 0 I To enter a space, press once between numbers and twice between characters. Each key press changes the volume to...

Users Manual - English
Page 40
... are hearing-impaired. Each key press changes the volume to LOW or HIGH. VOLUME AMPLIFY: OFF This default setting is appropriate if some users. 4-4 INITIAL SETUP During a conversation, users can press Volume or on the control panel to adjust the volume to the next setting. When the handset is hearing-impaired...
... are hearing-impaired. Each key press changes the volume to LOW or HIGH. VOLUME AMPLIFY: OFF This default setting is appropriate if some users. 4-4 INITIAL SETUP During a conversation, users can press Volume or on the control panel to adjust the volume to the next setting. When the handset is hearing-impaired...
Users Manual - English
Page 41
... Beeper Volume You can adjust the ring volume when your setting, and then press Menu/Set. 3 Press Stop/Exit. The default setting is idle. INITIAL SETUP 4-5 Each key press changes the volume to select PERMANENT? if VOL AMPLIFY:OFF? are choosing. With each key press, the fax machine rings so you...
... Beeper Volume You can adjust the ring volume when your setting, and then press Menu/Set. 3 Press Stop/Exit. The default setting is idle. INITIAL SETUP 4-5 Each key press changes the volume to select PERMANENT? if VOL AMPLIFY:OFF? are choosing. With each key press, the fax machine rings so you...
Users Manual - English
Page 42
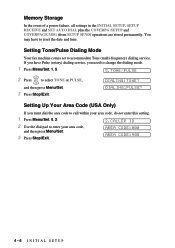
DIALING:TONE? AREA CODE:000 AREA CODE:908 4-6 INITIAL SETUP If you have to accommodate Tone (multi-frequency) dialing service. Setting Up Your Area Code (USA Only) If you need to change the dialing mode. 1 .../Set. 3 Press Stop/Exit. DIALING:PULSE? Memory Storage In the event of a power failure, all settings in the INITIAL SETUP, SETUP RECEIVE and SET AUTO DIAL plus the COVERPG SETUP and COVERPAGE MSG (from SETUP SEND) operations are stored permanently. Setting Tone/Pulse Dialing Mode Your fax machine comes set to reset the date...
DIALING:TONE? AREA CODE:000 AREA CODE:908 4-6 INITIAL SETUP If you have to accommodate Tone (multi-frequency) dialing service. Setting Up Your Area Code (USA Only) If you need to change the dialing mode. 1 .../Set. 3 Press Stop/Exit. DIALING:PULSE? Memory Storage In the event of a power failure, all settings in the INITIAL SETUP, SETUP RECEIVE and SET AUTO DIAL plus the COVERPG SETUP and COVERPAGE MSG (from SETUP SEND) operations are stored permanently. Setting Tone/Pulse Dialing Mode Your fax machine comes set to reset the date...
Users Manual - English
Page 43
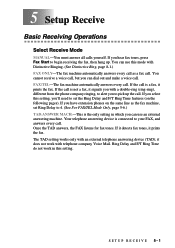
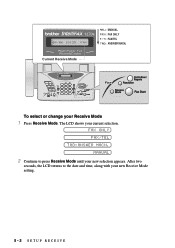
... phones on the following pages). it prints the fax. If the call is connected to begin receiving the fax, then hang up the call . SETUP RECEIVE 5-1 If you 'll need to set Ring Delay to pick up . You cannot receive a voice call, but you select this setting. ...TAD answers, the FAX listens for fax tones. Ring Delay and F/T Ring Time do not work with an external telephone answering device (TAD); 5 Setup Receive Basic Receiving Operations Select Receive Mode MANUAL-You must answer all calls yourself. If you can use an external answering machine. Your telephone answering...
... phones on the following pages). it prints the fax. If the call is connected to begin receiving the fax, then hang up the call . SETUP RECEIVE 5-1 If you 'll need to set Ring Delay to pick up . You cannot receive a voice call, but you select this setting. ...TAD answers, the FAX listens for fax tones. Ring Delay and F/T Ring Time do not work with an external telephone answering device (TAD); 5 Setup Receive Basic Receiving Operations Select Receive Mode MANUAL-You must answer all calls yourself. If you can use an external answering machine. Your telephone answering...
Users Manual - English
Page 44
09/06 15:25 FAX Current Receive Mode To select or change your new selection appears. MANUAL 2 Continue to the date and time, along with your current selection. The LCD shows your new Receive Mode setting. 5-2 SETUP RECEIVE FAX ONLY FAX/TEL TAD:ANSWER MACH. After two seconds, the LCD returns to press Receive Mode until your Receive Mode 1 Press Receive Mode.
09/06 15:25 FAX Current Receive Mode To select or change your new selection appears. MANUAL 2 Continue to the date and time, along with your current selection. The LCD shows your new Receive Mode setting. 5-2 SETUP RECEIVE FAX ONLY FAX/TEL TAD:ANSWER MACH. After two seconds, the LCD returns to press Receive Mode until your Receive Mode 1 Press Receive Mode.
Users Manual - English
Page 45
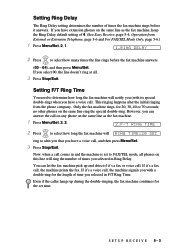
... RING TIME:20 SEC ring to FAX/TEL mode, all . 3 Press Stop/Exit. Even if the caller hangs up and detect if it 's a fax call . SETUP RECEIVE 5-3 Now, when a call . Setting Ring Delay The Ring Delay setting determines the number of times the fax machine rings before the fax machine answers...
... RING TIME:20 SEC ring to FAX/TEL mode, all . 3 Press Stop/Exit. Even if the caller hangs up and detect if it 's a fax call . SETUP RECEIVE 5-3 Now, when a call . Setting Ring Delay The Ring Delay setting determines the number of times the fax machine rings before the fax machine answers...
Users Manual - English
Page 46
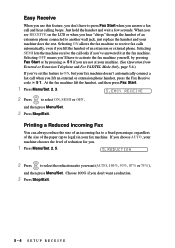
... wall jack, just replace the handset and your fax machine. When you see RECEIVE on the LCD or when you want a reduction. 3 Press Stop/Exit. 5-4 SETUP RECEIVE At the fax machine lift the handset, and then press Fax Start. 1 Press Menu/Set, 2, 3. 3.EASY RECEIVE 2 Press or to legal) in your machine...
... wall jack, just replace the handset and your fax machine. When you see RECEIVE on the LCD or when you want a reduction. 3 Press Stop/Exit. 5-4 SETUP RECEIVE At the fax machine lift the handset, and then press Fax Start. 1 Press Menu/Set, 2, 3. 3.EASY RECEIVE 2 Press or to legal) in your machine...
Users Manual - English
Page 47
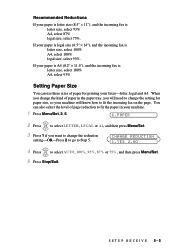
... Menu/Set. 5 Press Stop/Exit. You can use three sizes of page reduction to fit the paper in the paper tray, you want to Step 5. SETUP RECEIVE 5-5 CHANGE REDUCTION 1.YES 2.NO 4 Press or to fit the incoming fax on the page. If your paper is legal size (8.5" × 14"), and the...
... Menu/Set. 5 Press Stop/Exit. You can use three sizes of page reduction to fit the paper in the paper tray, you want to Step 5. SETUP RECEIVE 5-5 CHANGE REDUCTION 1.YES 2.NO 4 Press or to fit the incoming fax on the page. If your paper is legal size (8.5" × 14"), and the...


