Users Manual - English
Page 1
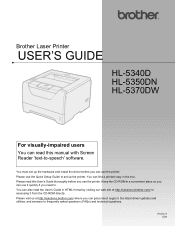
... . Please visit us at http://solutions.brother.com/ or accessing it quickly if you need to frequently asked questions (FAQs) and technical questions. You can also read the User's Guide in the box. Brother Laser Printer USER'S GUIDE HL-5340D HL-5350DN HL-5370DW For visually-impaired users You can read... this User's Guide thoroughly before you can use the printer. You can use it from the CD-ROM directly.
... . Please visit us at http://solutions.brother.com/ or accessing it quickly if you need to frequently asked questions (FAQs) and technical questions. You can also read the User's Guide in the box. Brother Laser Printer USER'S GUIDE HL-5340D HL-5350DN HL-5370DW For visually-impaired users You can read... this User's Guide thoroughly before you can use the printer. You can use it from the CD-ROM directly.
Users Manual - English
Page 2
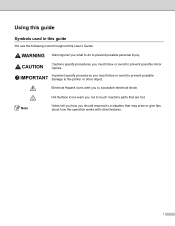
... not to prevent possible minor injuries. i Electrical Hazard icons alert you to prevent possible personal injury. Notes tell you how you should respond to the printer or other features. Using this guide Symbols used in this guide We use the following icons throughout this User's Guide: Warnings tell you what to...
... not to prevent possible minor injuries. i Electrical Hazard icons alert you to prevent possible personal injury. Notes tell you how you should respond to the printer or other features. Using this guide Symbols used in this guide We use the following icons throughout this User's Guide: Warnings tell you what to...

Users Manual - English
Page 3
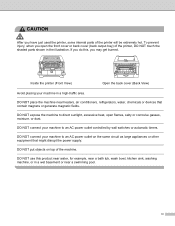
... this product during a lightning storm. Always make sure that you must be a remote risk of an emergency, you use the printer safely If you DO NOT follow these instructions for later reference and read them before attempting any maintenance. Avoid using this might cause an electrical ... handle the plug with wet hands. In case of electric shock from the AC power outlet to shut off the power switch and unplugged the printer from the AC power outlet. This product must disconnect the power cord from lightning. There may be installed near an AC power outlet that is...
... this product during a lightning storm. Always make sure that you must be a remote risk of an emergency, you use the printer safely If you DO NOT follow these instructions for later reference and read them before attempting any maintenance. Avoid using this might cause an electrical ... handle the plug with wet hands. In case of electric shock from the AC power outlet to shut off the power switch and unplugged the printer from the AC power outlet. This product must disconnect the power cord from lightning. There may be installed near an AC power outlet that is...

Users Manual - English
Page 4
... page 106 for how to clean up scattered toner. Cleaning the outside of the leak. iii Plastic bags are used in the vicinity of the printer: Make sure that contain ammonia. DO NOT use flammable substances, any type of spray or an organic solvent/liquid containing alcohol or ammonia to ignite... outside of the machine. Use neutral detergents. Doing this may cause a fire or electrical shock. DO NOT use cleaning materials that you have unplugged the printer from babies and children. To avoid danger of the printer. DO NOT use a vacuum cleaner to clean the machine.
... page 106 for how to clean up scattered toner. Cleaning the outside of the leak. iii Plastic bags are used in the vicinity of the printer: Make sure that contain ammonia. DO NOT use flammable substances, any type of spray or an organic solvent/liquid containing alcohol or ammonia to ignite... outside of the machine. Use neutral detergents. Doing this may cause a fire or electrical shock. DO NOT use cleaning materials that you have unplugged the printer from babies and children. To avoid danger of the printer. DO NOT use a vacuum cleaner to clean the machine.
Users Manual - English
Page 5
... the machine. DO NOT put objects on the same circuit as large appliances or other equipment that contain magnets or generate magnetic fields. Inside the printer (Front View) Open the back cover (Back View) Avoid placing your machine to direct sunlight, excessive heat, open the front cover or back ... be extremely hot. DO NOT connect your machine in the illustration. CAUTION After you have just used the printer, some internal parts of the printer, DO NOT touch the shaded parts shown in a high-traffic area. DO NOT expose the machine to an AC power outlet controlled by wall...
... the machine. DO NOT put objects on the same circuit as large appliances or other equipment that contain magnets or generate magnetic fields. Inside the printer (Front View) Open the back cover (Back View) Avoid placing your machine to direct sunlight, excessive heat, open the front cover or back ... be extremely hot. DO NOT connect your machine in the illustration. CAUTION After you have just used the printer, some internal parts of the printer, DO NOT touch the shaded parts shown in a high-traffic area. DO NOT expose the machine to an AC power outlet controlled by wall...
Users Manual - English
Page 7
...and other countries. Apple, Macintosh, Safari and TrueType are trademarks of International Business Machines Corporation in the United States and/or other countries. Intel, Intel Core and Pentium are trademarks of Brother Industries, Ltd. IBM is a registered trademark of this manual and...Inc. PostScript and PostScript3 are registered trademarks of Adobe Systems Incorporated in the United States and/or other countries. The printer should also be responsible for any damages (including consequential) caused by reliance on the materials presented, including but not limited...
...and other countries. Apple, Macintosh, Safari and TrueType are trademarks of International Business Machines Corporation in the United States and/or other countries. Intel, Intel Core and Pentium are trademarks of Brother Industries, Ltd. IBM is a registered trademark of this manual and...Inc. PostScript and PostScript3 are registered trademarks of Adobe Systems Incorporated in the United States and/or other countries. The printer should also be responsible for any damages (including consequential) caused by reliance on the materials presented, including but not limited...
Users Manual - English
Page 8
...emulation for Windows 48 Features in the printer driver (for Macintosh 54 Using the BR-Script3 printer driver (Post Script® 3™ language emulation for Macintosh 64 Installing the BR-Script3 printer driver 64 Uninstalling the printer driver ...70 Printer driver for Windows® and Windows Vista...® and Windows Server® 2003/2008 70 Printer driver for Macintosh ...70 Software ...72 Software for networks (For HL-5350DN and HL-5370DW 72 About emulation ...
...emulation for Windows 48 Features in the printer driver (for Macintosh 54 Using the BR-Script3 printer driver (Post Script® 3™ language emulation for Macintosh 64 Installing the BR-Script3 printer driver 64 Uninstalling the printer driver ...70 Printer driver for Windows® and Windows Vista...® and Windows Server® 2003/2008 70 Printer driver for Macintosh ...70 Software ...72 Software for networks (For HL-5350DN and HL-5370DW 72 About emulation ...
Users Manual - English
Page 9
...93 Replacing the consumable items...93 Consumables...93 Toner cartridge ...94 Drum unit ...101 Cleaning ...106 Cleaning the outside of the printer 106 Cleaning the inside of the printer...108 Cleaning the paper pick-up roller...111 Cleaning the corona wires ...113 Cleaning the corona wire...113 7 Troubleshooting 115 Identifying...Jam MP tray / Tray1 / Tray2 / Tray3 / Inside 120 Jam Rear / Duplex...125 Improving the print quality...129 Solving print problems ...136 Network problems (For HL-5350DN and HL-5370DW 137 Other problems ...137 For Macintosh with USB ...137 BR-Script 3 ...138 viii
...93 Replacing the consumable items...93 Consumables...93 Toner cartridge ...94 Drum unit ...101 Cleaning ...106 Cleaning the outside of the printer 106 Cleaning the inside of the printer...108 Cleaning the paper pick-up roller...111 Cleaning the corona wires ...113 Cleaning the corona wire...113 7 Troubleshooting 115 Identifying...Jam MP tray / Tray1 / Tray2 / Tray3 / Inside 120 Jam Rear / Duplex...125 Improving the print quality...129 Solving print problems ...136 Network problems (For HL-5350DN and HL-5370DW 137 Other problems ...137 For Macintosh with USB ...137 BR-Script 3 ...138 viii

Users Manual - English
Page 10
A Appendix 139 Printer specifications...139 Engine ...139 Controller ...140 Software ...141 Control panel ...141 Paper handling ...141 Media specifications ...142 Supplies ...142 Dimensions / weights...143 Other...143 Computer ... sets list...149 Quick reference for bar code control commands 150 Print bar codes or expanded characters 150 B Appendix (for Europe and Other Countries) 158 Brother numbers ...158 C Appendix (for USA and Canada) 159...
A Appendix 139 Printer specifications...139 Engine ...139 Controller ...140 Software ...141 Control panel ...141 Paper handling ...141 Media specifications ...142 Supplies ...142 Dimensions / weights...143 Other...143 Computer ... sets list...149 Quick reference for bar code control commands 150 Print bar codes or expanded characters 150 B Appendix (for Europe and Other Countries) 158 Brother numbers ...158 C Appendix (for USA and Canada) 159...
Users Manual - English
Page 11
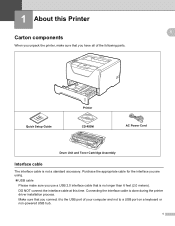
... connect it to the USB port of the following parts. About this time. DO NOT connect the interface cable at this Printer1 1 1 1 Quick Setup Guide Printer CD-ROM AC Power Cord Drum Unit and Toner Cartridge Assembly Interface cable 1 The interface cable is not a standard accessory. 1 About this...
... connect it to the USB port of the following parts. About this time. DO NOT connect the interface cable at this Printer1 1 1 1 Quick Setup Guide Printer CD-ROM AC Power Cord Drum Unit and Toner Cartridge Assembly Interface cable 1 The interface cable is not a standard accessory. 1 About this...

Users Manual - English
Page 12
Use a shielded interface cable that is IEEE 1284-compliant. „ Network cable (For HL-5350DN and 5370DW only) Use a straight-through Category5 (or greater) twisted-pair cable for 10BASE-T or 100BASE-TX Fast Ethernet Network. 2 About this Printer Third party USB ports are not supported by Macintosh. „ Parallel cable 1 DO NOT use a parallel interface cable that is longer than 6 feet (2.0 meters).
Use a shielded interface cable that is IEEE 1284-compliant. „ Network cable (For HL-5350DN and 5370DW only) Use a straight-through Category5 (or greater) twisted-pair cable for 10BASE-T or 100BASE-TX Fast Ethernet Network. 2 About this Printer Third party USB ports are not supported by Macintosh. „ Parallel cable 1 DO NOT use a parallel interface cable that is longer than 6 feet (2.0 meters).
Users Manual - English
Page 13
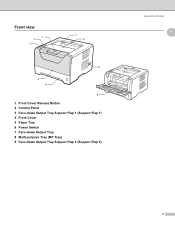
Front view 1 2 3 7 9 6 4 5 8 1 Front Cover Release Button 2 Control Panel 3 Face-down Output Tray Support Flap 1 (Support Flap 1) 4 Front Cover 5 Paper Tray 6 Power Switch 7 Face-down Output Tray 8 Multi-purpose Tray (MP Tray) 9 Face-down Output Tray Support Flap 2 (Support Flap 2) About this Printer 1 1 3
Front view 1 2 3 7 9 6 4 5 8 1 Front Cover Release Button 2 Control Panel 3 Face-down Output Tray Support Flap 1 (Support Flap 1) 4 Front Cover 5 Paper Tray 6 Power Switch 7 Face-down Output Tray 8 Multi-purpose Tray (MP Tray) 9 Face-down Output Tray Support Flap 2 (Support Flap 2) About this Printer 1 1 3
Users Manual - English
Page 14
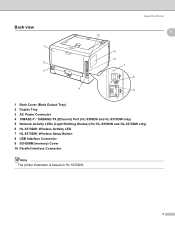
Back view 1 2 3 About this Printer 1 1 10 9 8 7 6 4 5 1 Back Cover (Back Output Tray) 2 Duplex Tray 3 AC Power Connector 4 10BASE-T / 100BASE-TX (Ethernet) Port (HL-5350DN and HL-5370DW only) 5 Network Activity LEDs (Light Emitting Diodes) (For HL-5350DN and HL-5370DW only) 6 HL-5370DW: Wireless Activity LED 7 HL-5370DW: Wireless Setup Button 8 USB Interface Connector 9 SO-DIMM (memory) Cover 10 Parallel Interface Connector Note The printer illustration is based on HL-5370DW. 4
Back view 1 2 3 About this Printer 1 1 10 9 8 7 6 4 5 1 Back Cover (Back Output Tray) 2 Duplex Tray 3 AC Power Connector 4 10BASE-T / 100BASE-TX (Ethernet) Port (HL-5350DN and HL-5370DW only) 5 Network Activity LEDs (Light Emitting Diodes) (For HL-5350DN and HL-5370DW only) 6 HL-5370DW: Wireless Activity LED 7 HL-5370DW: Wireless Setup Button 8 USB Interface Connector 9 SO-DIMM (memory) Cover 10 Parallel Interface Connector Note The printer illustration is based on HL-5370DW. 4
Users Manual - English
Page 15
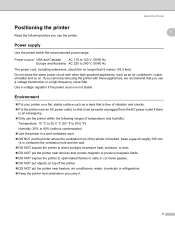
... mm (4 in a well-ventilated room. „ DO NOT put the printer near heaters, air conditioners, water, chemicals or refrigerators. „ Keep the printer horizontal when you use the printer. 1 1 Power supply 1 Use the printer within the following before you use a voltage transformer or a high-frequency noise...Europe and Australia: AC 220 to open/naked flames or salty or corrosive gasses. „ DO NOT put objects on . About this Printer Positioning the printer Read the following ranges of temperature and humidity: Temperature: 10 °C to 32.5 °C (50 °F to 90.5 °...
... mm (4 in a well-ventilated room. „ DO NOT put the printer near heaters, air conditioners, water, chemicals or refrigerators. „ Keep the printer horizontal when you use the printer. 1 1 Power supply 1 Use the printer within the following before you use a voltage transformer or a high-frequency noise...Europe and Australia: AC 220 to open/naked flames or salty or corrosive gasses. „ DO NOT put objects on . About this Printer Positioning the printer Read the following ranges of temperature and humidity: Temperature: 10 °C to 32.5 °C (50 °F to 90.5 °...
Users Manual - English
Page 16
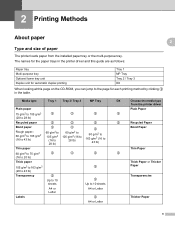
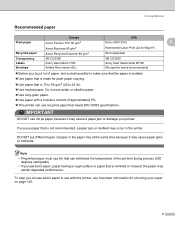
... to 28 lb) p p p p 60 g/m2 to 163 g/m2 (16 to 43 lb) p p p Up to the page for each printing method by clicking p in the printer driver and this guide are as follows: 2 2 2 Paper tray Multi-purpose tray Optional lower tray unit Duplex unit for automatic duplex printing Tray 1 MP Tray...-purpose tray. The names for the paper trays in the table. Printing Methods2 2 Printing Methods 2 About paper Type and size of paper The printer loads paper from the printer driver Plain Paper p p Recycled Paper Bond Paper Thin Paper p Thick Paper or Thicker Paper Transparencies Thicker Paper 6
... to 28 lb) p p p p 60 g/m2 to 163 g/m2 (16 to 43 lb) p p p Up to the page for each printing method by clicking p in the printer driver and this guide are as follows: 2 2 2 Paper tray Multi-purpose tray Optional lower tray unit Duplex unit for automatic duplex printing Tray 1 MP Tray...-purpose tray. The names for the paper trays in the table. Printing Methods2 2 Printing Methods 2 About paper Type and size of paper The printer loads paper from the printer driver Plain Paper p p Recycled Paper Bond Paper Thin Paper p Thick Paper or Thicker Paper Transparencies Thicker Paper 6

Users Manual - English
Page 17
... sheets 1 Legal or Folio size paper is not available in .) Length: 116 to 406.4 mm (4.57 to 3 sheets DX Choose the media type from the printer driver Envelopes Env.
... sheets 1 Legal or Folio size paper is not available in .) Length: 116 to 406.4 mm (4.57 to 3 sheets DX Choose the media type from the printer driver Envelopes Env.
Users Manual - English
Page 18
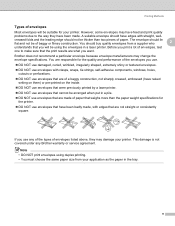
...-paper copying. „ Use paper that is wrinkled or creased, the paper may exhibit degraded performance. DO NOT put different types of paper in the printer. Do not use bond paper, paper having a rough surface or paper that is 75 to 90 g/m2 (20 to 24 lb). „ Use ... L7163 Avery laser labels white #5160 Envelope Antalis River series (DL) (No specific brand recommended) „ Before you buy a lot of paper, test a small quantity to make sure that the paper is suitable. „ Use paper that is made for choosing your printer. Note • Preprinted paper must use ink ...
...-paper copying. „ Use paper that is wrinkled or creased, the paper may exhibit degraded performance. DO NOT put different types of paper in the printer. Do not use bond paper, paper having a rough surface or paper that is 75 to 90 g/m2 (20 to 24 lb). „ Use ... L7163 Avery laser labels white #5160 Envelope Antalis River series (DL) (No specific brand recommended) „ Before you buy a lot of paper, test a small quantity to make sure that the paper is suitable. „ Use paper that is made for choosing your printer. Note • Preprinted paper must use ink ...
Users Manual - English
Page 19
...creased, embossed (have raised writing on them) or pre-printed on the inside. „ DO NOT use envelopes that were previously printed by a laser printer. „ DO NOT use envelopes that cannot be arranged when put in the tray. 9 The envelope should have edges with straight, well- You ...are responsible for the quality and performance of the envelopes you use any Brother warranty or service agreement. A suitable envelope should lie flat and not be of baggy or flimsy construction. Before you print a lot of envelopes...
...creased, embossed (have raised writing on them) or pre-printed on the inside. „ DO NOT use envelopes that were previously printed by a laser printer. „ DO NOT use envelopes that cannot be arranged when put in the tray. 9 The envelope should have edges with straight, well- You ...are responsible for the quality and performance of the envelopes you use any Brother warranty or service agreement. A suitable envelope should lie flat and not be of baggy or flimsy construction. Before you print a lot of envelopes...
Users Manual - English
Page 21
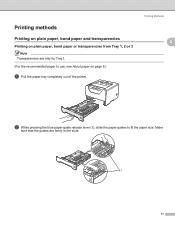
Printing methods Printing on plain paper, bond paper and transparencies Printing on page 6.) a Pull the paper tray completely out of the printer. Printing Methods 2 2 2 2 b While pressing the blue paper-guide release lever (1), slide the paper guides to use, see About paper on plain paper, bond paper or transparencies from Tray 1, 2 or 3 Note Transparencies are firmly in the slots. 1 11 Make sure that the guides are only for Tray1. (For the recommended paper to fit the paper size.
Printing methods Printing on plain paper, bond paper and transparencies Printing on page 6.) a Pull the paper tray completely out of the printer. Printing Methods 2 2 2 2 b While pressing the blue paper-guide release lever (1), slide the paper guides to use, see About paper on plain paper, bond paper or transparencies from Tray 1, 2 or 3 Note Transparencies are firmly in the slots. 1 11 Make sure that the guides are only for Tray1. (For the recommended paper to fit the paper size.
Users Manual - English
Page 22
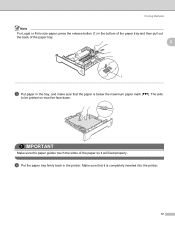
Make sure that the paper is completely inserted into the printer. 12 IMPORTANT Make sure the paper guides touch the sides of the paper tray. 2 1 c Put paper in the tray, and make sure that it will feed properly. d Put the paper tray firmly back in the printer. The side to be printed on must be face down. Printing Methods Note For Legal or Folio size paper, press the release button (1) in the bottom of the paper tray and then pull out the back of the paper so it is below the maximum paper mark (bbb).
Make sure that the paper is completely inserted into the printer. 12 IMPORTANT Make sure the paper guides touch the sides of the paper tray. 2 1 c Put paper in the tray, and make sure that it will feed properly. d Put the paper tray firmly back in the printer. The side to be printed on must be face down. Printing Methods Note For Legal or Folio size paper, press the release button (1) in the bottom of the paper tray and then pull out the back of the paper so it is below the maximum paper mark (bbb).


