Users Manual - English
Page 9
4 Control Panel 76 LEDs (Light Emitting Diodes)...76 Service call indications ...82 Control panel buttons...84 Print a test page ...85 Print the Printer Settings page...86 Print Fonts ...87 Default settings...88 5 Options 89 Lower tray (LT-5300) ...89 SO-DIMM (memory module)...90 SO-DIMM types ...90 Installing extra memory ...91 6 Routine Maintenance 93 Replacing the consumable items...93 Consumables...93 Toner cartridge ...94 Drum unit ...101 Cleaning ...106 Cleaning the outside of the printer 106 Cleaning the inside of the printer...108 Cleaning the paper pick...
4 Control Panel 76 LEDs (Light Emitting Diodes)...76 Service call indications ...82 Control panel buttons...84 Print a test page ...85 Print the Printer Settings page...86 Print Fonts ...87 Default settings...88 5 Options 89 Lower tray (LT-5300) ...89 SO-DIMM (memory module)...90 SO-DIMM types ...90 Installing extra memory ...91 6 Routine Maintenance 93 Replacing the consumable items...93 Consumables...93 Toner cartridge ...94 Drum unit ...101 Cleaning ...106 Cleaning the outside of the printer 106 Cleaning the inside of the printer...108 Cleaning the paper pick...
Users Manual - English
Page 82
... network settings, such as IP address. Driver and Software Software 3 Software for networks (For HL-5350DN and HL-5370DW) 3 BRAdmin Light 3 BRAdmin Light is a utility for Brother products on your network, view the status and configure the network settings. For installing BRAdmin Light on the client PC. By installing the Web BRAdmin server utility on a computer running IIS 1, connect to monitor locally connected printers, install the BRPrint Auditor software on Windows®, please see the Quick Setup Guide we provided with the device...
... network settings, such as IP address. Driver and Software Software 3 Software for networks (For HL-5350DN and HL-5370DW) 3 BRAdmin Light 3 BRAdmin Light is a utility for Brother products on your network, view the status and configure the network settings. For installing BRAdmin Light on the client PC. By installing the Web BRAdmin server utility on a computer running IIS 1, connect to monitor locally connected printers, install the BRPrint Auditor software on Windows®, please see the Quick Setup Guide we provided with the device...
Users Manual - English
Page 125
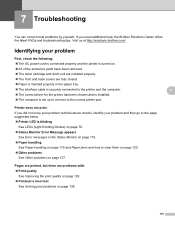
...; Printer LED is blinking See LEDs (Light Emitting Diodes) on page 76. „ Status Monitor Error Message appears See Error messages in the paper tray. „ The interface cable is securely connected to the printer and the computer. „ The correct driver for the printer has been chosen and is installed. „ The computer is set up to connect to clear them on page 120. „ Other problems See Other problems on page 119 and Paper jams...
...; Printer LED is blinking See LEDs (Light Emitting Diodes) on page 76. „ Status Monitor Error Message appears See Error messages in the paper tray. „ The interface cable is securely connected to the printer and the computer. „ The correct driver for the printer has been chosen and is installed. „ The computer is set up to connect to clear them on page 120. „ Other problems See Other problems on page 119 and Paper jams...
Users Manual - English
Page 127
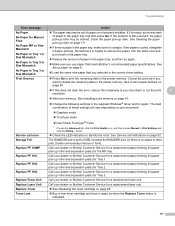
... paper specifications. See About paper on page 95. „ Buy a new toner cartridge and have it is helpful to delete the remaining data in the printer memory. See Installing extra memory on page 82. Replace Laser Unit Replace Toner Toner Low Call your dealer or Brother Customer Service for a replacement paper feeding kit (paper pick up roller and separation plate) for Tray 1. button. „ Check the LED indication to print the remaining data in the printer memory. If the problem is indicated. 117 Troubleshooting Error message Action No Paper No Paper...
... paper specifications. See About paper on page 95. „ Buy a new toner cartridge and have it is helpful to delete the remaining data in the printer memory. See Installing extra memory on page 82. Replace Laser Unit Replace Toner Toner Low Call your dealer or Brother Customer Service for a replacement paper feeding kit (paper pick up roller and separation plate) for Tray 1. button. „ Check the LED indication to print the remaining data in the printer memory. If the problem is indicated. 117 Troubleshooting Error message Action No Paper No Paper...
Users Manual - English
Page 129
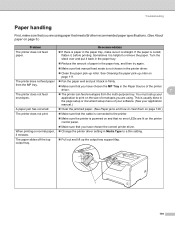
... remove the paper. When printing on normal paper, „ Change the printer driver setting in Media Type to the printer. „ Make sure the printer is powered on and that no error LEDs are lit on the printer control panel. „ Make sure that you have chosen the MP Tray in the Paper Source of paper in the paper tray, and then try again. „ Make sure that manual feed mode is not chosen in the printer driver. „ Clean the paper...
... remove the paper. When printing on normal paper, „ Change the printer driver setting in Media Type to the printer. „ Make sure the printer is powered on and that no error LEDs are lit on the printer control panel. „ Make sure that you have chosen the MP Tray in the Paper Source of paper in the paper tray, and then try again. „ Make sure that manual feed mode is not chosen in the printer driver. „ Clean the paper...
Users Manual - English
Page 142
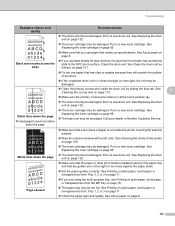
...; Check the paper type and quality. White lines down the page. „ The toner cartridge may be damaged. See Printing on plain paper, bond paper or transparencies from Tray 1, 2 or 3 on page 11. Clean the drum unit. See Replacing the drum unit on page 95. „ The fuser unit may be damaged. See Replacing the toner cartridge on page 102. „ Make sure that meets our specifications. See Cleaning the inside the drum unit by sliding the blue tab. Put in a new drum unit...
...; Check the paper type and quality. White lines down the page. „ The toner cartridge may be damaged. See Printing on plain paper, bond paper or transparencies from Tray 1, 2 or 3 on page 11. Clean the drum unit. See Replacing the drum unit on page 95. „ The fuser unit may be damaged. See Replacing the toner cartridge on page 102. „ Make sure that meets our specifications. See Cleaning the inside the drum unit by sliding the blue tab. Put in a new drum unit...
Users Manual - English
Page 146
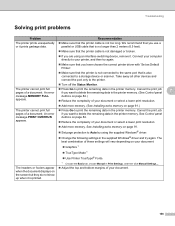
... print resolution. „ Add more memory. An error message PRINT OVERRUN appears. „ Press Go to Auto by using an interface-switching device, remove it. See Installing extra memory on page 84. „ Reduce the complexity of these settings will vary depending on your document. 136 Troubleshooting Solving print problems 7 Problem Recommendation The printer prints unexpectedly „ Make sure that the printer cable is not damaged or broken. „ If you are using the supplied Windows® driver. „ Change...
... print resolution. „ Add more memory. An error message PRINT OVERRUN appears. „ Press Go to Auto by using an interface-switching device, remove it. See Installing extra memory on page 84. „ Reduce the complexity of these settings will vary depending on your document. 136 Troubleshooting Solving print problems 7 Problem Recommendation The printer prints unexpectedly „ Make sure that the printer cable is not damaged or broken. „ If you are using the supplied Windows® driver. „ Change...
Users Manual - English
Page 147
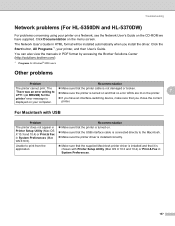
... Printer Setup Utility (Mac OS X 10.3 and 10.4) or Print & Fax in HTML format will be installed automatically when you have supplied. Troubleshooting Network problems (For HL-5350DN and HL-5370DW) 7 For problems concerning using your printer on a Network, see the Network User's Guide on the menu screen. Click Documentation on the CD-ROM we have an interface-switching device, make sure that it is „ If you install the driver. printer. Recommendation „ Make sure that the printer cable...
... Printer Setup Utility (Mac OS X 10.3 and 10.4) or Print & Fax in HTML format will be installed automatically when you have supplied. Troubleshooting Network problems (For HL-5350DN and HL-5370DW) 7 For problems concerning using your printer on a Network, see the Network User's Guide on the menu screen. Click Documentation on the CD-ROM we have an interface-switching device, make sure that it is „ If you install the driver. printer. Recommendation „ Make sure that the printer cable...
Network Users Manual - English
Page 10
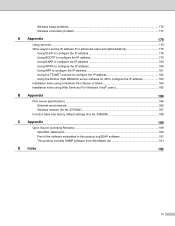
... to configure the IP address 180 Using ARP to configure the IP address 181 Using the TELNET console to configure the IP address 182 Using the Brother Web BRAdmin server software for IIS to configure the IP address 183 Installation when using a Network Print Queue or Share 184 Installation when using Web Services (For Windows Vista® users 185 B Appendix 186 Print server specifications...186 Ethernet wired network...186 Wireless network (for HL-5370DW 187 Function table and factory default settings (For HL-5380DN 188 C Appendix 189 Open...
... to configure the IP address 180 Using ARP to configure the IP address 181 Using the TELNET console to configure the IP address 182 Using the Brother Web BRAdmin server software for IIS to configure the IP address 183 Installation when using a Network Print Queue or Share 184 Installation when using Web Services (For Windows Vista® users 185 B Appendix 186 Print server specifications...186 Ethernet wired network...186 Wireless network (for HL-5370DW 187 Function table and factory default settings (For HL-5380DN 188 C Appendix 189 Open...
Network Users Manual - English
Page 26
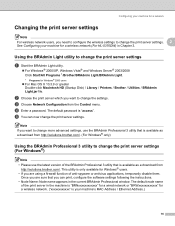
... Windows® 2000 users „ For Mac OS X 10.3.9 or greater Double-click Macintosh HD (Startup Disk) / Library / Printers / Brother / Utilities / BRAdmin Light.jar file. d Enter a password. Using the BRAdmin Light utility to change the settings. Note If you want to change more advanced settings, use the latest version of the print server in the machine is "BRNxxxxxxxxxxxx" for a wired network or "BRWxxxxxxxxxxxx" for a wireless network. ("xxxxxxxxxxxx" is available as a download from the Control menu...
... Windows® 2000 users „ For Mac OS X 10.3.9 or greater Double-click Macintosh HD (Startup Disk) / Library / Printers / Brother / Utilities / BRAdmin Light.jar file. d Enter a password. Using the BRAdmin Light utility to change the settings. Note If you want to change more advanced settings, use the latest version of the print server in the machine is "BRNxxxxxxxxxxxx" for a wired network or "BRWxxxxxxxxxxxx" for a wireless network. ("xxxxxxxxxxxx" is available as a download from the Control menu...
Network Users Manual - English
Page 28
... printing, place the Brother machine as close to 3 your wireless network and install the network software and printer driver which we have provided with the printer. By using the one connection method can easily connect your machine to the network access point/router as possible with mixed text and large graphics, you can be used at a time. 18 For Wireless configuration using this chapter for a wireless network. If you want to configure the wireless network settings...
... printing, place the Brother machine as close to 3 your wireless network and install the network software and printer driver which we have provided with the printer. By using the one connection method can easily connect your machine to the network access point/router as possible with mixed text and large graphics, you can be used at a time. 18 For Wireless configuration using this chapter for a wireless network. If you want to configure the wireless network settings...
Network Users Manual - English
Page 32
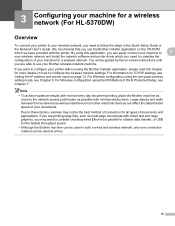
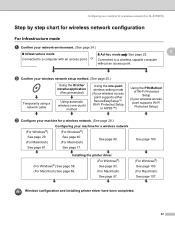
... installing printer driver have been completed. 22 Configuring your machine for a wireless network (For HL-5370DW) Step by step chart for wireless network configuration 3 For Infrastructure mode 3 a Confirm your machine for a wireless network. (See page 28.) Configuring your network environment. (See page 24.) o Infrastructure mode 3 o Ad-hoc mode See page 23. Connected to a computer with an access point or Connected to a wireless capable computer without an access point b Confirm your wireless network setup method. (See page 25.) Temporarily using a network cable Using...
... installing printer driver have been completed. 22 Configuring your machine for a wireless network (For HL-5370DW) Step by step chart for wireless network configuration 3 For Infrastructure mode 3 a Confirm your machine for a wireless network. (See page 28.) Configuring your network environment. (See page 24.) o Infrastructure mode 3 o Ad-hoc mode See page 23. Connected to a computer with an access point or Connected to a wireless capable computer without an access point b Confirm your wireless network setup method. (See page 25.) Temporarily using a network cable Using...
Network Users Manual - English
Page 50
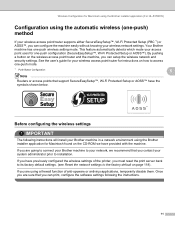
... wireless network settings. Wireless configuration for Windows® using the Brother automatic installer application (For HL-5370DW) Configuration using Windows® Firewall or a firewall function of the printer, you have provided with the machine. Your Brother machine has one -push mode. 1 Push Button Configuration Note Routers or access points that you can setup the wireless network and security settings. Before configuring the wireless settings 4 IMPORTANT The following the instructions. 40 If you must reset the print server back to its factory default settings (see Reset...
... wireless network settings. Wireless configuration for Windows® using the Brother automatic installer application (For HL-5370DW) Configuration using Windows® Firewall or a firewall function of the printer, you have provided with the machine. Your Brother machine has one -push mode. 1 Push Button Configuration Note Routers or access points that you can setup the wireless network and security settings. Before configuring the wireless settings 4 IMPORTANT The following the instructions. 40 If you must reset the print server back to its factory default settings (see Reset...
Network Users Manual - English
Page 81
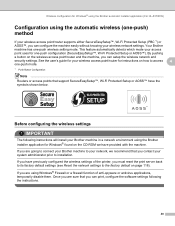
... connect your Brother machine to your network, we have previously configured the wireless settings of anti-spyware or antivirus applications, temporarily disable them. Wireless Configuration for Macintosh using the Brother installer application (For HL-5370DW) Configuration using the automatic wireless (one -push configuration (SecureEasySetup™, Wi-Fi Protected Setup or AOSS™). Your Brother machine has one -push mode. 1 Push Button Configuration 5 Note Routers or access points that you must reset the print server back to its factory default settings...
... connect your Brother machine to your network, we have previously configured the wireless settings of anti-spyware or antivirus applications, temporarily disable them. Wireless Configuration for Macintosh using the Brother installer application (For HL-5370DW) Configuration using the automatic wireless (one -push configuration (SecureEasySetup™, Wi-Fi Protected Setup or AOSS™). Your Brother machine has one -push mode. 1 Push Button Configuration 5 Note Routers or access points that you must reset the print server back to its factory default settings...
Network Users Manual - English
Page 98
... the list, reset the print server back to its factory default settings (see Reset the network settings to connect, and then click OK. Wireless Configuration for the Brother printer. If you wish to the factory default on -screen instructions. Follow the on page 118) and try to cancel any of the screens during this installation. • If your wireless settings fail, an error message will appear during the installation of the same printer model connected on your printer's MAC Address (Ethernet Address) and...
... the list, reset the print server back to its factory default settings (see Reset the network settings to connect, and then click OK. Wireless Configuration for the Brother printer. If you wish to the factory default on -screen instructions. Follow the on page 118) and try to cancel any of the screens during this installation. • If your wireless settings fail, an error message will appear during the installation of the same printer model connected on your printer's MAC Address (Ethernet Address) and...
Quick Setup Guide - English
Page 27
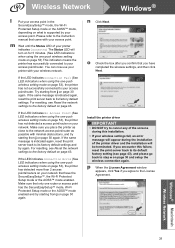
... Address settings of the printer driver and the installation will appear during this failure, reset the print server back to step e on page 25 again. o Check the printed Network Configuration page. Wireless setup was unable to p. Install the printer driver IMPORTANT • DO NOT try starting from e on page 25 and setup the wireless connection again. p Click Finish. Reset the network settings to the factory default (see page 43), and please go to associate with a wireless network. The settings will be automatically changed...
... Address settings of the printer driver and the installation will appear during this failure, reset the print server back to step e on page 25 again. o Check the printed Network Configuration page. Wireless setup was unable to p. Install the printer driver IMPORTANT • DO NOT try starting from e on page 25 and setup the wireless connection again. p Click Finish. Reset the network settings to the factory default (see page 43), and please go to associate with a wireless network. The settings will be automatically changed...
Quick Setup Guide - English
Page 31
... indications when using the one -push wireless setting mode on page 53), the printer has not successfully connected to cancel any of the screens during this failure, reset the print server back to its factory default settings and try to your wireless network. For resetting, see Reset the network settings to the instruction manual that only one router or access point has the SecureEasySetup™ mode, Wi-Fi Protected Setup mode or the AOSS™ mode enabled and...
... indications when using the one -push wireless setting mode on page 53), the printer has not successfully connected to cancel any of the screens during this failure, reset the print server back to its factory default settings and try to your wireless network. For resetting, see Reset the network settings to the instruction manual that only one router or access point has the SecureEasySetup™ mode, Wi-Fi Protected Setup mode or the AOSS™ mode enabled and...
Quick Setup Guide - English
Page 36
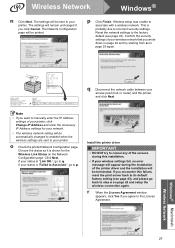
... driver installation starts. o Check the printed Network Configuration page. If you encounter this installation. • If your wireless settings fail, an error message will appear during the installation of the printer driver and the installation will remain unchanged if you wrote down on page 31 your printer, click Change IP Address and enter the necessary IP Address settings for the Wireless Link Status on the Network Configuration page. Follow the on page 34 and setup the wireless connection again. The settings will...
... driver installation starts. o Check the printed Network Configuration page. If you encounter this installation. • If your wireless settings fail, an error message will appear during the installation of the printer driver and the installation will remain unchanged if you wrote down on page 31 your printer, click Change IP Address and enter the necessary IP Address settings for the Wireless Link Status on the Network Configuration page. Follow the on page 34 and setup the wireless connection again. The settings will...
Quick Setup Guide - English
Page 37
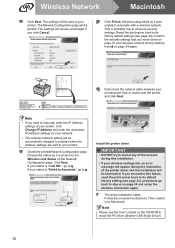
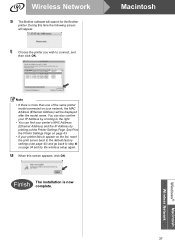
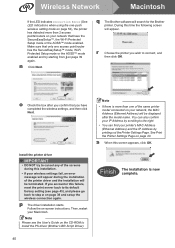
... your printer's MAC Address (Ethernet Address) and the IP Address by printing out the Printer Settings Page. u When this time the following screen will search for the Brother printer. You can find your network, the MAC Address (Ethernet Address) will be displayed after the model name. Windows® Macintosh Wireless Network 37 Macintosh Note • If there is now complete. t Choose the printer you wish to connect, and then click OK. Finish The installation...
... your printer's MAC Address (Ethernet Address) and the IP Address by printing out the Printer Settings Page. u When this time the following screen will search for the Brother printer. You can find your network, the MAC Address (Ethernet Address) will be displayed after the model name. Windows® Macintosh Wireless Network 37 Macintosh Note • If there is now complete. t Choose the printer you wish to connect, and then click OK. Finish The installation...
Quick Setup Guide - English
Page 40
... LED indicates Connection Error (See LED indications when using the one of the printer driver and the installation will be displayed after you confirm that you encounter this failure, reset the print server back to its default factory setting (see the User's Guide on the CD-ROM to step e on your network that have completed the wireless settings, and then click Next. Make sure that only one access point/router...
... LED indicates Connection Error (See LED indications when using the one of the printer driver and the installation will be displayed after you confirm that you encounter this failure, reset the print server back to its default factory setting (see the User's Guide on the CD-ROM to step e on your network that have completed the wireless settings, and then click Next. Make sure that only one access point/router...


