Software & Network Users Manual - English
Page 10
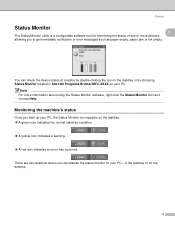
Monitoring the machine's status 1 Once you start up your PC-in Start/All Programs/Brother/MFC-XXXX on the tasktray. „ A green icon indicates the normal stand-by choosing Status Monitor located in the tasktray or on the desktop. 4 Note ... you to get immediate notification of one or more information about using the Status Monitor software, right-click the Status Monitor icon and choose Help. Printing Status Monitor 1 1 The Status Monitor utility is a configurable software tool for monitoring the status of error messages such as paper empty, paper jam or ink empty. You can...
Monitoring the machine's status 1 Once you start up your PC-in Start/All Programs/Brother/MFC-XXXX on the tasktray. „ A green icon indicates the normal stand-by choosing Status Monitor located in the tasktray or on the desktop. 4 Note ... you to get immediate notification of one or more information about using the Status Monitor software, right-click the Status Monitor icon and choose Help. Printing Status Monitor 1 1 The Status Monitor utility is a configurable software tool for monitoring the status of error messages such as paper empty, paper jam or ink empty. You can...
Software & Network Users Manual - English
Page 105
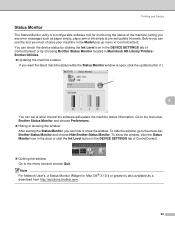
...you must choose your machine in the Model pop-up menu in the DEVICE SETTINGS tab of ControlCenter2 or by choosing Brother Status Monitor located in Macintosh HD/Library/Printers/ Brother/Utilities. „ Updating the machine's status If you can hide or show the window, click the Status Monitor ... the window, go to the menu bar, Brother Status Monitor and choose Preferences. „ Hiding or showing the window After starting the Status Monitor, you want the latest machine status while the Status Monitor window is also available as paper empty, paper jam or ink empty at pre-set at what ...
...you must choose your machine in the Model pop-up menu in the DEVICE SETTINGS tab of ControlCenter2 or by choosing Brother Status Monitor located in Macintosh HD/Library/Printers/ Brother/Utilities. „ Updating the machine's status If you can hide or show the window, click the Status Monitor ... the window, go to the menu bar, Brother Status Monitor and choose Preferences. „ Hiding or showing the window After starting the Status Monitor, you want the latest machine status while the Status Monitor window is also available as paper empty, paper jam or ink empty at pre-set at what ...
Users Manual - English
Page 12
...and Routine Maintenance Troubleshooting 52 If you are having difficulty with your machine 52 Error messages 55 Improving the LCD viewing 57 Printer jam or paper jam 57 Routine maintenance 59 Replacing the ink cartridges 59 Cleaning the outside of the machine 61 Cleaning the scanner 62 Cleaning the ...machine printer platen 62 Cleaning the Paper Pick-up Roller 63 Cleaning the print head 63 Checking the print quality 64 Checking the ...
...and Routine Maintenance Troubleshooting 52 If you are having difficulty with your machine 52 Error messages 55 Improving the LCD viewing 57 Printer jam or paper jam 57 Routine maintenance 59 Replacing the ink cartridges 59 Cleaning the outside of the machine 61 Cleaning the scanner 62 Cleaning the ...machine printer platen 62 Cleaning the Paper Pick-up Roller 63 Cleaning the print head 63 Checking the print quality 64 Checking the ...
Users Manual - English
Page 20
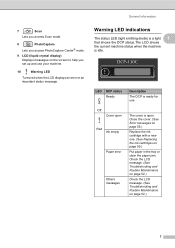
...one. (See Replacing the ink cartridges on page 52.) 7 Check the LCD message. (See Troubleshooting and Routine Maintenance on page 52.) Check the LCD message. (See Troubleshooting and Routine Maintenance on page 59.) Put paper in the tray or clear the paper jam. LED DCP status Ready Description The DCP... is open Red Ink empty Paper error Others messages The cover is ready for use your machine. 10 Warning LED...
...one. (See Replacing the ink cartridges on page 52.) 7 Check the LCD message. (See Troubleshooting and Routine Maintenance on page 52.) Check the LCD message. (See Troubleshooting and Routine Maintenance on page 59.) Put paper in the tray or clear the paper jam. LED DCP status Ready Description The DCP... is open Red Ink empty Paper error Others messages The cover is ready for use your machine. 10 Warning LED...
Users Manual - English
Page 23
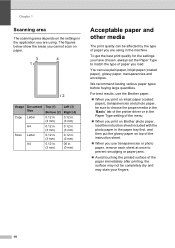
...not be affected by the type of paper you are using . We recommend testing various paper types before buying large quantities. For best results, use the Brother paper. „ When you print on inkjet paper (coated paper), transparencies and photo paper, be sure to choose the proper media... print quality for the settings you have chosen, always set the Paper Type to prevent smudging or paper jams. „ Avoid touching the printed surface of paper you use plain paper, inkjet paper (coated paper), glossy paper, transparencies and envelopes. the surface may stain your fingers. 10 The...
...not be affected by the type of paper you are using . We recommend testing various paper types before buying large quantities. For best results, use the Brother paper. „ When you print on inkjet paper (coated paper), transparencies and photo paper, be sure to choose the proper media... print quality for the settings you have chosen, always set the Paper Type to prevent smudging or paper jams. „ Avoid touching the printed surface of paper you use plain paper, inkjet paper (coated paper), glossy paper, transparencies and envelopes. the surface may stain your fingers. 10 The...

Users Manual - English
Page 27
b Press and slide the paper side guides (1) and paper length guide (2) to avoid paper jams and misfeeds. 1 Note Always make sure the paper is open, close it and lift the output paper tray cover (1). If the paper support flap is not curled. d Gently put the paper into the paper tray print side down and top edge first. Check that the paper is flat in the tray. 14 Chapter 1 Loading paper, envelopes and other media 1 Loading paper and other media 1 a Pull the paper tray completely out of paper well to fit the paper size. 1 2 c Fan the stack of the machine.
b Press and slide the paper side guides (1) and paper length guide (2) to avoid paper jams and misfeeds. 1 Note Always make sure the paper is open, close it and lift the output paper tray cover (1). If the paper support flap is not curled. d Gently put the paper into the paper tray print side down and top edge first. Check that the paper is flat in the tray. 14 Chapter 1 Loading paper, envelopes and other media 1 Loading paper and other media 1 a Pull the paper tray completely out of paper well to fit the paper size. 1 2 c Fan the stack of the machine.
Users Manual - English
Page 66
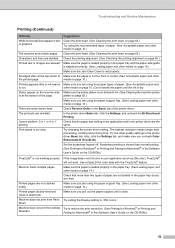
...Make sure you uncheck Color Enhancement (True2Life). platen on page 62.) Make sure you are using the paper support flap. (See Loading paper and other the printed page. Clean the print head. (See Cleaning the print head on page 14.) Printed pages double-feed and cause a paper jam. Try the other... media on page 63.) Characters and lines are the same. Use at least 24 bit color data with ink. (See Cleaning the machine printer or at any one time. The printouts are not stacked neatly. Make sure...
...Make sure you uncheck Color Enhancement (True2Life). platen on page 62.) Make sure you are using the paper support flap. (See Loading paper and other the printed page. Clean the print head. (See Cleaning the print head on page 14.) Printed pages double-feed and cause a paper jam. Try the other... media on page 63.) Characters and lines are the same. Use at least 24 bit color data with ink. (See Cleaning the machine printer or at any one time. The printouts are not stacked neatly. Make sure...
Users Manual - English
Page 69
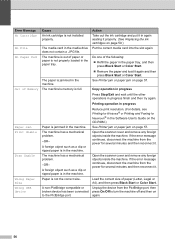
...and then reconnect it . No Paper Fed The machine is not properly loaded in the paper tray, and then press Black Start or Color Start. „ Remove the paper and load it properly. (See Replacing the ink cartridges on the CD-ROM.) Paper Jam Paper is not installed properly. Scan ...power for Macintosh® in the machine. See Printer jam or paper jam on page 57. Print Unable The machine has a mechanical problem. -OR- Do one of paper or paper is out of the following: „ Refill the paper in the paper tray. Open the scanner cover and remove any foreign ...
...and then reconnect it . No Paper Fed The machine is not properly loaded in the paper tray, and then press Black Start or Color Start. „ Remove the paper and load it properly. (See Replacing the ink cartridges on the CD-ROM.) Paper Jam Paper is not installed properly. Scan ...power for Macintosh® in the machine. See Printer jam or paper jam on page 57. Print Unable The machine has a mechanical problem. -OR- Do one of paper or paper is out of the following: „ Refill the paper in the paper tray. Open the scanner cover and remove any foreign ...

Users Manual - English
Page 70
Press OK. Printer jam or paper jam B Take out the jammed paper depending on where it . „ If you cannot remove the jammed paper from the front side of the machine and then close it is jammed in the machine. Pull the jammed paper out of the machine. a Press Menu. c Press a or b to ...try changing the contrast setting. If you have removed the jammed paper, please go to choose 0.Initial Setup. e Press Stop/Exit. d Remove the Jam Clear Cover (1). a Pull the paper tray (1) out of the machine. 1 1 b Pull out the jammed paper (1). 1 57 Improving the LCD viewing B You can ...
Press OK. Printer jam or paper jam B Take out the jammed paper depending on where it . „ If you cannot remove the jammed paper from the front side of the machine and then close it is jammed in the machine. Pull the jammed paper out of the machine. a Press Menu. c Press a or b to ...try changing the contrast setting. If you have removed the jammed paper, please go to choose 0.Initial Setup. e Press Stop/Exit. d Remove the Jam Clear Cover (1). a Pull the paper tray (1) out of the machine. 1 1 b Pull out the jammed paper (1). 1 57 Improving the LCD viewing B You can ...

Users Manual - English
Page 71
... into the open position. Gently push the scanner cover support down (2) and close the scanner cover (3). e Put the Jam Clear Cover back on. Make sure that there is no jammed paper left in the corners of the machine until it locks securely into the machine. f Lift the scanner cover (1) from ...the power source, then move the print head to release the lock (1). Note If the paper is set properly. Note Make sure ...
... into the open position. Gently push the scanner cover support down (2) and close the scanner cover (3). e Put the Jam Clear Cover back on. Make sure that there is no jammed paper left in the corners of the machine until it locks securely into the machine. f Lift the scanner cover (1) from ...the power source, then move the print head to release the lock (1). Note If the paper is set properly. Note Make sure ...
Users Manual - English
Page 76
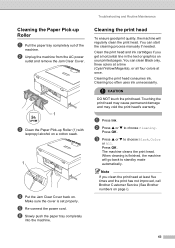
...Magenta), or all four colors at least five times and the print has not improved, call Brother Customer Service (See Brother numbers on your printed pages. You can start the cleaning process manually if needed. e Re-connect the power cord. When cleaning is set properly. f Slowly push the paper tray completely into the ... at once. Cleaning too often uses ink unnecessarily. c Press a or b to choose Cleaning. b Unplug the machine from the AC power outlet and remove the Jam Clear Cover. 1 c Clean the Paper Pick-up Roller B a Pull the paper tray completely out of the machine.
...Magenta), or all four colors at least five times and the print has not improved, call Brother Customer Service (See Brother numbers on your printed pages. You can start the cleaning process manually if needed. e Re-connect the power cord. When cleaning is set properly. f Slowly push the paper tray completely into the ... at once. Cleaning too often uses ink unnecessarily. c Press a or b to choose Cleaning. b Unplug the machine from the AC power outlet and remove the Jam Clear Cover. 1 c Clean the Paper Pick-up Roller B a Pull the paper tray completely out of the machine.
Users Manual - English
Page 99
...See Software User's Guide on the CD-ROM Memory Stick Pro 26 Memory Stick 26 MultiMediaCard 26 Print settings Brightness 32 Contrast 32 Paper type & size 31 Print speed & quality 31 Quality 31 True2Life 32 Printing images 29 Printing Index 28 Scan to Card 34 ...SecureDigital 26 specifications 78 xD-Picture Card 26 PictBridge DPOF Printing 37 Print area 18 difficulties 52 drivers 80 improving quality 63, 64 paper jams 57 reports 8 resolution 80 specifications 80 Printing See Software User's Guide on the CD-ROM Programming your machine 68 Q Quality key (copying...
...See Software User's Guide on the CD-ROM Memory Stick Pro 26 Memory Stick 26 MultiMediaCard 26 Print settings Brightness 32 Contrast 32 Paper type & size 31 Print speed & quality 31 Quality 31 True2Life 32 Printing images 29 Printing Index 28 Scan to Card 34 ...SecureDigital 26 specifications 78 xD-Picture Card 26 PictBridge DPOF Printing 37 Print area 18 difficulties 52 drivers 80 improving quality 63, 64 paper jams 57 reports 8 resolution 80 specifications 80 Printing See Software User's Guide on the CD-ROM Programming your machine 68 Q Quality key (copying...

Users Manual - English
Page 100
T Temporary copy settings 20 Troubleshooting 52 checking ink volume 65 error messages on LCD 55 if you are having difficulty copying 54 PhotoCapture Center 54 printing 52 scanning 54 software 54 paper jam 57 print quality 63, 64 True2Life® PhotoCapture Center 32 W Warranties iv Canada vii Notice-Disclaimer iv USA v World Wide Web i 87
T Temporary copy settings 20 Troubleshooting 52 checking ink volume 65 error messages on LCD 55 if you are having difficulty copying 54 PhotoCapture Center 54 printing 52 scanning 54 software 54 paper jam 57 print quality 63, 64 True2Life® PhotoCapture Center 32 W Warranties iv Canada vii Notice-Disclaimer iv USA v World Wide Web i 87

Quick Setup Guide - English
Page 6
... You can load up to avoid paper jams and misfeeds. Check that the paper is done during the software installation process. 2 Press and slide the paper side guides (1) and paper length guide (2) to fit the paper size. 1 2 2 Loading paper 3 Fan the stack of paper well to 100 sheets of the ...machine and lift the output paper tray cover (1). 4 Gently put the paper into the paper tray print side down and top...
... You can load up to avoid paper jams and misfeeds. Check that the paper is done during the software installation process. 2 Press and slide the paper side guides (1) and paper length guide (2) to fit the paper size. 1 2 2 Loading paper 3 Fan the stack of paper well to 100 sheets of the ...machine and lift the output paper tray cover (1). 4 Gently put the paper into the paper tray print side down and top...


