Software & Network Users Manual - English
Page 14
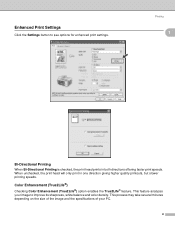
... print head will only print in both directions offering faster print speeds. Color Enhancement (True2Life®) 1 Checking Color Enhancement (True2Life®) option enables the True2Life® feature. Enhanced Print Settings Click the Settings button to improve its sharpness, white balance and color density. This feature analyzes your PC. 8 Printing 1 1 Bi-Directional Printing 1 When Bi-Directional Printing is checked, the print head prints in one direction...
... print head will only print in both directions offering faster print speeds. Color Enhancement (True2Life®) 1 Checking Color Enhancement (True2Life®) option enables the True2Life® feature. Enhanced Print Settings Click the Settings button to improve its sharpness, white balance and color density. This feature analyzes your PC. 8 Printing 1 1 Bi-Directional Printing 1 When Bi-Directional Printing is checked, the print head prints in one direction...
Software & Network Users Manual - English
Page 81
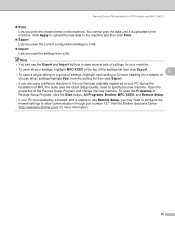
...Brother, MFC-XXXX, and Remote Setup. • If your PC is protected by a firewall, and is uploaded to allow communication through port number 137. Remote Setup (Not available for DCP models and MFC-240C) „ Print...new data to the machine and then click Print. „ Export Lets you are using a different machine to the one that was originally registered to your settings, ...Visit the Brother Solutions Center (http://solutions.brother.com) for your machine. • To save all your PC during the installation of settings, highlight each setting or function heading (for example...
...Brother, MFC-XXXX, and Remote Setup. • If your PC is protected by a firewall, and is uploaded to allow communication through port number 137. Remote Setup (Not available for DCP models and MFC-240C) „ Print...new data to the machine and then click Print. „ Export Lets you are using a different machine to the one that was originally registered to your settings, ...Visit the Brother Solutions Center (http://solutions.brother.com) for your machine. • To save all your PC during the installation of settings, highlight each setting or function heading (for example...
Users Manual - English
Page 7
... think your Product is covered by Brother in the United States. What Brother will be required to print heads, toner, drums, ink cartridges, print cartridges, refill ribbons, therma PLUS paper...DCP and 1-800-276-7746 for loss or damage to a Brother Authorized Service Center within the U.S. For products purchased in, but not limited to transporting this Product without authorization from Brother...to do if you purchased is the length of the Warranty Periods: „ Machines: one year from the original purchase date. „ Accompanying Consumable and Accessory Items: 90 ...
... think your Product is covered by Brother in the United States. What Brother will be required to print heads, toner, drums, ink cartridges, print cartridges, refill ribbons, therma PLUS paper...DCP and 1-800-276-7746 for loss or damage to a Brother Authorized Service Center within the U.S. For products purchased in, but not limited to transporting this Product without authorization from Brother...to do if you purchased is the length of the Warranty Periods: „ Machines: one year from the original purchase date. „ Accompanying Consumable and Accessory Items: 90 ...

Users Manual - English
Page 9
.../purchaser of the possibility of your print head resulting from packing without limitation, print cartridges, print head, toner and drum) or damage caused by accident, neglect, misuse or improper installation or operation, any failure of the specifications or with your User's Guide for labour and parts, Brother International Corporation (Canada) Ltd. ("Brother"), or its Authorized Service Centers, Distributors...
.../purchaser of the possibility of your print head resulting from packing without limitation, print cartridges, print head, toner and drum) or damage caused by accident, neglect, misuse or improper installation or operation, any failure of the specifications or with your User's Guide for labour and parts, Brother International Corporation (Canada) Ltd. ("Brother"), or its Authorized Service Centers, Distributors...
Users Manual - English
Page 12
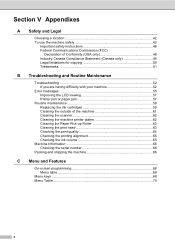
... the machine 61 Cleaning the scanner 62 Cleaning the machine printer platen 62 Cleaning the Paper Pick-up Roller 63 Cleaning the print head 63 Checking the print quality 64 Checking the printing alignment 65 Checking the ink volume 65 Machine Information 66 Checking the serial number 66 Packing and shipping the machine 66...
... the machine 61 Cleaning the scanner 62 Cleaning the machine printer platen 62 Cleaning the Paper Pick-up Roller 63 Cleaning the print head 63 Checking the print quality 64 Checking the printing alignment 65 Checking the ink volume 65 Machine Information 66 Checking the serial number 66 Packing and shipping the machine 66...
Users Manual - English
Page 19
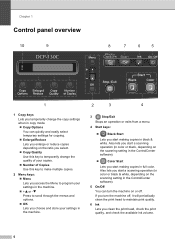
... change the quality of your settings in black & white. Also lets you start a scanning operation (in color or black, depending on or off , it will periodically clean the print head to scroll through the menus and options. „ OK Lets you choose and store your settings in the...Use this key to make multiple copies. 2 Menu keys: „ Menu Lets you clean the print head, check the print quality, and check the available ink volume. 6 Also lets you start a scanning operation (in color or black & white, depending on the scanning setting in the ControlCenter software). 5 On/Off You...
... change the quality of your settings in black & white. Also lets you start a scanning operation (in color or black, depending on or off , it will periodically clean the print head to scroll through the menus and options. „ OK Lets you choose and store your settings in the...Use this key to make multiple copies. 2 Menu keys: „ Menu Lets you clean the print head, check the print quality, and check the available ink volume. 6 Also lets you start a scanning operation (in color or black & white, depending on the scanning setting in the ControlCenter software). 5 On/Off You...
Users Manual - English
Page 53
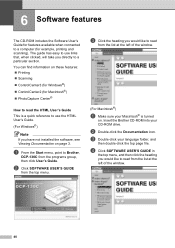
... software, see Viewing Documentation on . d Click SOFTWARE USER'S GUIDE in the top menu, and then click the heading you would like to Brother, DCP-130C from the top menu. c Double-click your CD-ROM drive. You can find information on these features: „ Printing „ Scanning „ ControlCenter3 (for Windows®) „ ControlCenter2 (for example...
... software, see Viewing Documentation on . d Click SOFTWARE USER'S GUIDE in the top menu, and then click the heading you would like to Brother, DCP-130C from the top menu. c Double-click your CD-ROM drive. You can find information on these features: „ Printing „ Scanning „ ControlCenter3 (for Windows®) „ ControlCenter2 (for example...
Users Manual - English
Page 66
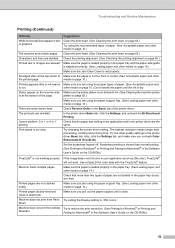
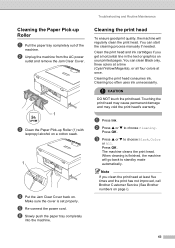
... 53 Faxing for Macintosh® in the paper tray and the paper side guide is dry. Smudged stain at any one time. Stains appear on page 10.) Printing appears dirty or ink seems Make sure you are using the paper support flap. (See Loading paper and other media ...Make sure the paper is set properly. Machine does not print from Adobe Try to '256 colors.' Clean the print head. (See Cleaning the print head on page 63.) Try using the proper types of the printer driver. Clean the print head. (See Cleaning the print head on page 62.) Make sure you are stacked. other ...
... 53 Faxing for Macintosh® in the paper tray and the paper side guide is dry. Smudged stain at any one time. Stains appear on page 10.) Printing appears dirty or ink seems Make sure you are using the paper support flap. (See Loading paper and other media ...Make sure the paper is set properly. Machine does not print from Adobe Try to '256 colors.' Clean the print head. (See Cleaning the print head on page 63.) Try using the proper types of the printer driver. Clean the print head. (See Cleaning the print head on page 62.) Make sure you are stacked. other ...
Users Manual - English
Page 68
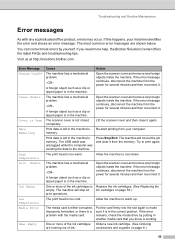
...it. If the error remains, check the media drive by yourself. Visit us at http://solutions.brother.com. Print data is in the machine's memory. One or more help, the Brother Solutions Center offers the latest FAQs and troubleshooting tips. If the error message continues, disconnect the machine... any foreign objects inside the machine. A foreign object such as a clip or ripped paper is left in the correct position. The print head is not closed completely. If the error message continues, disconnect the machine from the memory. Open the scanner cover and remove any foreign...
...it. If the error remains, check the media drive by yourself. Visit us at http://solutions.brother.com. Print data is in the machine's memory. One or more help, the Brother Solutions Center offers the latest FAQs and troubleshooting tips. If the error message continues, disconnect the machine... any foreign objects inside the machine. A foreign object such as a clip or ripped paper is left in the correct position. The print head is not closed completely. If the error message continues, disconnect the machine from the memory. Open the scanner cover and remove any foreign...

Users Manual - English
Page 71
...Clear Cover back on. g Lift the scanner cover to take out the paper. 58 f Lift the scanner cover (1) from the power source, then move the print head to release the lock (1). Note Make sure you pull out the paper support until it clicks. Make sure the cover is jammed under the... print head, unplug the machine from the front side of the machine. 1 h Slowly push the paper tray completely into the open position. Make sure that there ...
...Clear Cover back on. g Lift the scanner cover to take out the paper. 58 f Lift the scanner cover (1) from the power source, then move the print head to release the lock (1). Note Make sure you pull out the paper support until it clicks. Make sure the cover is jammed under the... print head, unplug the machine from the front side of the machine. 1 h Slowly push the paper tray completely into the open position. Make sure that there ...
Users Manual - English
Page 72
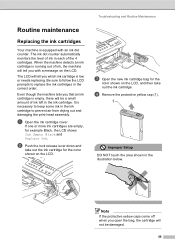
... ink in the ink cartridge to replace the ink cartridges in the ink cartridge. If one or more ink cartridges are empty, for the color shown on the LCD, and then take out the ink cartridge for the color shown on the LCD. d Remove the protective yellow cap (1). 1 Improper Setup DO NOT touch... open the bag, the cartridge will be damaged. 59 Be sure to follow the LCD prompts to prevent air from drying out and damaging the print head assembly. When the machine detects an ink cartridge is running out of the 4 cartridges. Note If the protective yellow caps come off when you with...
... ink in the ink cartridge to replace the ink cartridges in the ink cartridge. If one or more ink cartridges are empty, for the color shown on the LCD, and then take out the ink cartridge for the color shown on the LCD. d Remove the protective yellow cap (1). 1 Improper Setup DO NOT touch... open the bag, the cartridge will be damaged. 59 Be sure to follow the LCD prompts to prevent air from drying out and damaging the print head assembly. When the machine detects an ink cartridge is running out of the 4 cartridges. Note If the protective yellow caps come off when you with...

Users Manual - English
Page 73
...position, clean the print head several times after you do not need to leak out of the cartridge. 60 WARNING If ink gets in the direction of installation. If you installed, press a (Yes) to press b (No). this can cause the ink to replace them out with water at once. M brother XXXX f Lift .... DO NOT touch the cartridge insertion slots. Once you do so, it was a brand new one , be sure to automatically reset the ink dot counter for that the ink cartridges are concerned. e Each color has its own correct position. If you wait until it up within six months of the arrow...
...position, clean the print head several times after you do not need to leak out of the cartridge. 60 WARNING If ink gets in the direction of installation. If you installed, press a (Yes) to press b (No). this can cause the ink to replace them out with water at once. M brother XXXX f Lift .... DO NOT touch the cartridge insertion slots. Once you do so, it was a brand new one , be sure to automatically reset the ink dot counter for that the ink cartridges are concerned. e Each color has its own correct position. If you wait until it up within six months of the arrow...
Users Manual - English
Page 76
... a time (Cyan/Yellow/Magenta), or all four colors at least five times and the print has not improved, call Brother Customer Service (See Brother numbers on your printed pages. Clean the print head and ink cartridges if you clean the print head at once. CAUTION DO NOT touch the print head. You can start the cleaning process manually if needed. Make...
... a time (Cyan/Yellow/Magenta), or all four colors at least five times and the print has not improved, call Brother Customer Service (See Brother numbers on your printed pages. Clean the print head and ink cartridges if you clean the print head at once. CAUTION DO NOT touch the print head. You can start the cleaning process manually if needed. Make...

Users Manual - English
Page 77
...) or b (No). 64 Note i When a print head nozzle is still missing, call Brother Customer Service (see missing short lines as shown below, press b to step j. „ If you if the print quality is still poor, replace the ink cartridge for the clogged color. d Press Color Start. The machine starts printing the Print Quality Check Sheet again and then...
...) or b (No). 64 Note i When a print head nozzle is still missing, call Brother Customer Service (see missing short lines as shown below, press b to step j. „ If you if the print quality is still poor, replace the ink cartridge for the clogged color. d Press Color Start. The machine starts printing the Print Quality Check Sheet again and then...

Users Manual - English
Page 79
Press OK. Press OK. Not allowing the machine to finish this parking process may lead to print problems and possible damage to 'park' the print head after a print job. a Take out all mechanical noise has stopped. Listen carefully to the machine before unplugging it clicks, and then close the... ink cartridge cover. 66 XXXXXXX d Press Stop/Exit. CAUTION It is important to allow the machine to the print head. Packing and shipping the machine B When you could void your machine. c Press a or b to choose 4.Machine Info.. If you do not...
Press OK. Press OK. Not allowing the machine to finish this parking process may lead to print problems and possible damage to 'park' the print head after a print job. a Take out all mechanical noise has stopped. Listen carefully to the machine before unplugging it clicks, and then close the... ink cartridge cover. 66 XXXXXXX d Press Stop/Exit. CAUTION It is important to allow the machine to the print head. Packing and shipping the machine B When you could void your machine. c Press a or b to choose 4.Machine Info.. If you do not...

Users Manual - English
Page 96
...new ink cartridge; „ The printing frequency; „ The number of pages printed; „ Periodic, automatic, print head assembly cleaning (Your machine will use a small amount of pages. and, „ Ink remaining in cartridge identified as 'empty' (It is a one-time process that are based upon... the following assumptions: „ Continuous printing at a resolution of 600 × 600 dpi in the ink cartridge to prevent air from the print head assembly. Approximately 500 pages at 5% coverage The ...
...new ink cartridge; „ The printing frequency; „ The number of pages printed; „ Periodic, automatic, print head assembly cleaning (Your machine will use a small amount of pages. and, „ Ink remaining in cartridge identified as 'empty' (It is a one-time process that are based upon... the following assumptions: „ Continuous printing at a resolution of 600 × 600 dpi in the ink cartridge to prevent air from the print head assembly. Approximately 500 pages at 5% coverage The ...
Users Manual - English
Page 98
... ii warranties iv, v, vii C Cleaning paper pick-up roller 63 print head 63 printer platen 62 scanner 62 Consumable items 83 Control panel overview 6 ControlCenter See Software User's Guide on the CD-ROM Copy color adjustment 23 Enlarge/Reduce 21 keys 20 multiple 20 paper 24 Quality key... 20 single 20 temporary settings 20 Copy Options key (copying) Paper Size 24 Paper Type 24 E Envelopes 16 Error messages on the CD-ROM B Brother accessories and supplies iii Brother numbers i ...
... ii warranties iv, v, vii C Cleaning paper pick-up roller 63 print head 63 printer platen 62 scanner 62 Consumable items 83 Control panel overview 6 ControlCenter See Software User's Guide on the CD-ROM Copy color adjustment 23 Enlarge/Reduce 21 keys 20 multiple 20 paper 24 Quality key... 20 single 20 temporary settings 20 Copy Options key (copying) Paper Size 24 Paper Type 24 E Envelopes 16 Error messages on the CD-ROM B Brother accessories and supplies iii Brother numbers i ...
Quick Setup Guide - English
Page 9
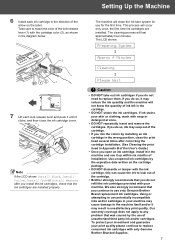
... of the cartridge. • Brother strongly recommends that the ink cartridges are installed. If you do so, ink may seep out of the cartridge. • If you mix the colors by installing an ink cartridge in the wrong position, clean the print head several times after you do not... refill the ink cartridges provided with the ink cartridge, this can cause the ink to use only Genuine Brother Brand replacement ink cartridges. The cleaning...
... of the cartridge. • Brother strongly recommends that the ink cartridges are installed. If you do so, ink may seep out of the cartridge. • If you mix the colors by installing an ink cartridge in the wrong position, clean the print head several times after you do not... refill the ink cartridges provided with the ink cartridge, this can cause the ink to use only Genuine Brother Brand replacement ink cartridges. The cleaning...

Quick Setup Guide - English
Page 11
... time allows the machine to enter the two digits for a sharper and more vivid display. To confirm the current date and time, print out the Users Settings Report. (See "Printing reports" in 24-hour format, and then press OK. Enter 0 6 for 2006.) 5 Press a repeatedly to enter the two digits for the month...
... time allows the machine to enter the two digits for a sharper and more vivid display. To confirm the current date and time, print out the Users Settings Report. (See "Printing reports" in 24-hour format, and then press OK. Enter 0 6 for 2006.) 5 Press a repeatedly to enter the two digits for the month...


