User Manual
Page 3
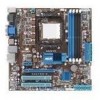
Contents Notices...vi Safety information vii About this guide viii M4A785-M specifications summary x Chapter 1: Product introduction 1.1 Welcome 1-1 1.2 Package contents 1-1 1.3 Special features 1-1 1.3.1 Product highlights 1-1 1.3.2 Innovative ASUS features 1-3 1.4 Before you proceed 1-5 1.5 Motherboard overview 1-6 1.5.1 Placement direction 1-6 1.5.2 Screw holes 1-6 1.5.3 Motherboard layout 1-7 1.5.4 Layout contents 1-7 1.6 Central Processing Unit (CPU 1-8 1.6.1 Installing the CPU 1-8 1.6.2 Installing the heatsink and fan 1-10 1.7 System memory 1-11 1.7.1 Overview 1-11...
Contents Notices...vi Safety information vii About this guide viii M4A785-M specifications summary x Chapter 1: Product introduction 1.1 Welcome 1-1 1.2 Package contents 1-1 1.3 Special features 1-1 1.3.1 Product highlights 1-1 1.3.2 Innovative ASUS features 1-3 1.4 Before you proceed 1-5 1.5 Motherboard overview 1-6 1.5.1 Placement direction 1-6 1.5.2 Screw holes 1-6 1.5.3 Motherboard layout 1-7 1.5.4 Layout contents 1-7 1.6 Central Processing Unit (CPU 1-8 1.6.1 Installing the CPU 1-8 1.6.2 Installing the heatsink and fan 1-10 1.7 System memory 1-11 1.7.1 Overview 1-11...
User Manual
Page 4
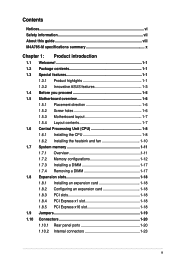
... utility 2-1 2.1.2 ASUS EZ Flash 2 2-2 2.1.3 ASUS CrashFree BIOS 2-3 2.2 BIOS setup program 2-4 2.2.1 BIOS menu screen 2-5 2.2.2 Menu bar 2-5 2.2.3 Navigation keys 2-5 2.2.4 Menu items 2-6 2.2.5 Submenu items 2-6 2.2.6 Configuration fields 2-6 2.2.7 Pop-up window 2-6 2.2.8 Scroll bar 2-6 2.2.9 General help 2-6 2.3 Main menu 2-7 2.3.1 System Time 2-7 2.3.2 System Date 2-7 2.3.3 Primary IDE Master/Slave, SATA 1~6 2-7 2.3.4 SATA Configuration 2-8 2.3.5 System Information 2-9 2.4 Advanced menu 2-9 2.4.1 JumperFree Configuration 2-9 2.4.2 CPU Configuration 2-12 2.4.3 Chipset...
... utility 2-1 2.1.2 ASUS EZ Flash 2 2-2 2.1.3 ASUS CrashFree BIOS 2-3 2.2 BIOS setup program 2-4 2.2.1 BIOS menu screen 2-5 2.2.2 Menu bar 2-5 2.2.3 Navigation keys 2-5 2.2.4 Menu items 2-6 2.2.5 Submenu items 2-6 2.2.6 Configuration fields 2-6 2.2.7 Pop-up window 2-6 2.2.8 Scroll bar 2-6 2.2.9 General help 2-6 2.3 Main menu 2-7 2.3.1 System Time 2-7 2.3.2 System Date 2-7 2.3.3 Primary IDE Master/Slave, SATA 1~6 2-7 2.3.4 SATA Configuration 2-8 2.3.5 System Information 2-9 2.4 Advanced menu 2-9 2.4.1 JumperFree Configuration 2-9 2.4.2 CPU Configuration 2-12 2.4.3 Chipset...
User Manual
Page 10
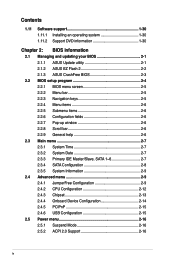
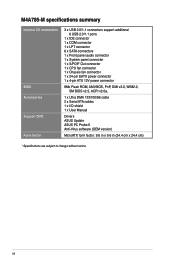
...the blue slots for better performance. ** DDR2 1200(O.C.)/1066 is supported by AM3/AM2+ CPU only. *** Due to AM3/AM2+ CPU limitation, only one DDR2 1200(O.C.)/1066 is supported per channel. ****Refer to www.asus.com for H.264, VC-1, and MPEG-2 Dual VGA output supports: - resolution up ... list. Integrated ATI Radeon™ HD 4200 GPU Maximum shared memory up to 1920x1200 (1080P) @60Hz Supports RGB with max. M4A785-M specifications summary CPU Chipset Front Side Bus Memory Graphics Expansion slots AMD® Phenom™ II / Athlon™ II / Phenom™ / Athlon™ / Sempron&#...
...the blue slots for better performance. ** DDR2 1200(O.C.)/1066 is supported by AM3/AM2+ CPU only. *** Due to AM3/AM2+ CPU limitation, only one DDR2 1200(O.C.)/1066 is supported per channel. ****Refer to www.asus.com for H.264, VC-1, and MPEG-2 Dual VGA output supports: - resolution up ... list. Integrated ATI Radeon™ HD 4200 GPU Maximum shared memory up to 1920x1200 (1080P) @60Hz Supports RGB with max. M4A785-M specifications summary CPU Chipset Front Side Bus Memory Graphics Expansion slots AMD® Phenom™ II / Athlon™ II / Phenom™ / Athlon™ / Sempron&#...

User Manual
Page 11
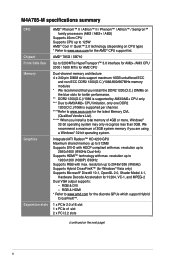
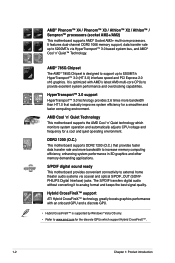
...RAID 0, RAID 1, RAID 0+1, and JBOD configurations VIA® VT1708S 8-channel High Definition Audio CODEC - Optical S/PDIF out port at 1MHz increment Overclocking Protection: ASUS C.P.R. (CPU Parameter Recall) 1 x PS/2 Keyboard/Mouse Combo port 1 x Optical S/PDIF Out port 1 x VGA port 1 x DVI port 1 x HDMI port 1... ports (6 ports at mid-board, 6 ports at 1MHz increment - SFS (Stepless Frequency Selection): - M4A785-M specifications summary Storage Audio USB LAN ASUS unique features ASUS overclocking features Back panel I/O ports 1 x Ultra DMA 133/100/66 connector for up to 150MHz at...
...RAID 0, RAID 1, RAID 0+1, and JBOD configurations VIA® VT1708S 8-channel High Definition Audio CODEC - Optical S/PDIF out port at 1MHz increment Overclocking Protection: ASUS C.P.R. (CPU Parameter Recall) 1 x PS/2 Keyboard/Mouse Combo port 1 x Optical S/PDIF Out port 1 x VGA port 1 x DVI port 1 x HDMI port 1... ports (6 ports at mid-board, 6 ports at 1MHz increment - SFS (Stepless Frequency Selection): - M4A785-M specifications summary Storage Audio USB LAN ASUS unique features ASUS overclocking features Back panel I/O ports 1 x Ultra DMA 133/100/66 connector for up to 150MHz at...
User Manual
Page 12
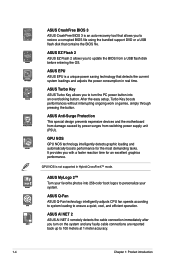
... 1 x S/PDIF Out connector 1 x CPU fan connector 1 x Chassis fan connector 1 x 24-pin EATX power connector 1 x 4-pin ATX 12V power connector 8Mb Flash ROM, AMI BIOS, PnP, DMI v2.0, WfM2.0, SM BIOS v2.5, ACPI v2.0a, 1 x Ultra DMA 133/100/66 cable 2 x Serial ATA cables 1 x I/O shield 1 x User Manual Drivers ASUS Update ASUS PC Probe II Anti...
... 1 x S/PDIF Out connector 1 x CPU fan connector 1 x Chassis fan connector 1 x 24-pin EATX power connector 1 x 4-pin ATX 12V power connector 8Mb Flash ROM, AMI BIOS, PnP, DMI v2.0, WfM2.0, SM BIOS v2.5, ACPI v2.0a, 1 x Ultra DMA 133/100/66 cable 2 x Serial ATA cables 1 x I/O shield 1 x User Manual Drivers ASUS Update ASUS PC Probe II Anti...
User Manual
Page 14
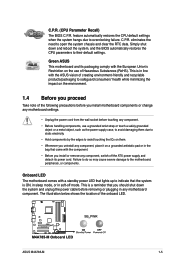
...www.amd.com for the discrete GPUs which monitors system operation and automatically adjusts CPU voltage and frequency for a smoother and faster computing environment. AMD Cool 'n' Quiet Technology This motherboard supports the AMD Cool 'n' Quiet technology which support Hybrid CrossFireX™. 1-2 ... rate and more bandwidth to 5200MT/s via coaxial and optical S/PDIF_OUT (SONYPHILIPS Digital Interface) jacks. DDR2 1200 (O.C.) This motherboard supports DDR2 1200 (O.C.) that radically improves system efficiency for a cool and quiet operating environment. It features dual-channel DDR2...
...www.amd.com for the discrete GPUs which monitors system operation and automatically adjusts CPU voltage and frequency for a smoother and faster computing environment. AMD Cool 'n' Quiet Technology This motherboard supports the AMD Cool 'n' Quiet technology which support Hybrid CrossFireX™. 1-2 ... rate and more bandwidth to 5200MT/s via coaxial and optical S/PDIF_OUT (SONYPHILIPS Digital Interface) jacks. DDR2 1200 (O.C.) This motherboard supports DDR2 1200 (O.C.) that radically improves system efficiency for a cool and quiet operating environment. It features dual-channel DDR2...
User Manual
Page 16
ASUS Anti-Surge Protection This special design prevents expensive devices and the motherboard from damage caused by power surges from a USB flash disk before entering the OS. It provides you with a faster reaction time... intelligently detects graphic loading and automatically boosts performance for an excellent graphics performance. ASUS Q-Fan ASUS Q-Fan technology intelligently adjusts CPU fan speeds according to system loading to personalize your favorite photos into an overclocking button. ASUS Turbo Key ASUS Turbo Key allows you to 100 meters at 1 meter accuracy. 1-4 Chapter ...
ASUS Anti-Surge Protection This special design prevents expensive devices and the motherboard from damage caused by power surges from a USB flash disk before entering the OS. It provides you with a faster reaction time... intelligently detects graphic loading and automatically boosts performance for an excellent graphics performance. ASUS Q-Fan ASUS Q-Fan technology intelligently adjusts CPU fan speeds according to system loading to personalize your favorite photos into an overclocking button. ASUS Turbo Key ASUS Turbo Key allows you to 100 meters at 1 meter accuracy. 1-4 Chapter ...
User Manual
Page 17
... to the motherboard, peripherals, or components. Onboard LED The motherboard comes with a standby power LED that lights up to indicate that came with the component. • Before you proceed Take note of the onboard LED. ASUS M4A785-M 1-5 This is in soft-off the ATX power supply ... the system, and the BIOS automatically restores the CPU parameters to safeguard consumers' health while minimizing the impact on the environment. 1.4 Before you install or remove any component, switch off mode. C.P.R. Green ASUS This motherboard and its power cord. Simply shut down the ...
... to the motherboard, peripherals, or components. Onboard LED The motherboard comes with a standby power LED that lights up to indicate that came with the component. • Before you proceed Take note of the onboard LED. ASUS M4A785-M 1-5 This is in soft-off the ATX power supply ... the system, and the BIOS automatically restores the CPU parameters to safeguard consumers' health while minimizing the impact on the environment. 1.4 Before you install or remove any component, switch off mode. C.P.R. Green ASUS This motherboard and its power cord. Simply shut down the ...
User Manual
Page 19
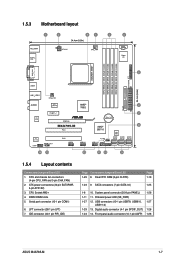
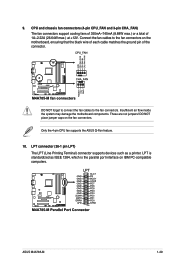
... 10. Digital audio connector (4-1 pin SPDIF_OUT) 1-28 1-24 14. ATX power connectors (24-pin EATXPWR, 4-pin ATX12V) 3. LPT connector (26-1 pin LPT) 7. Front panel audio connector (10-1 pin AAFP) 1-28 ASUS M4A785-M 1-7 CPU Socket AM2+ 4. Onboard power LED (SB_PWR) 1-27 12. DDR2 DIMM... slots 5. USB connectors (10-1 pin USB78, USB910, 1-27 USB1112) 1-29 13. IDE connector (40-1 pin PRI_IDE) Page Connectors/Jumpers/Slots/LED 1-29 8. 1.5.3 Motherboard layout 1.5.4 Layout contents...
... 10. Digital audio connector (4-1 pin SPDIF_OUT) 1-28 1-24 14. ATX power connectors (24-pin EATXPWR, 4-pin ATX12V) 3. LPT connector (26-1 pin LPT) 7. Front panel audio connector (10-1 pin AAFP) 1-28 ASUS M4A785-M 1-7 CPU Socket AM2+ 4. Onboard power LED (SB_PWR) 1-27 12. DDR2 DIMM... slots 5. USB connectors (10-1 pin USB78, USB910, 1-27 USB1112) 1-29 13. IDE connector (40-1 pin PRI_IDE) Page Connectors/Jumpers/Slots/LED 1-29 8. 1.5.3 Motherboard layout 1.5.4 Layout contents...

User Manual
Page 20
... otherwise, the CPU will not fit in one correct orientation. Carefully insert the CPU into the socket to a 90°-100° angle. Position the CPU above the socket such that is lifted up to prevent bending the pins and damaging the CPU! The CPU fits only in completely. 3. 1.6 Central Processing Unit (CPU) The motherboard comes with...
... otherwise, the CPU will not fit in one correct orientation. Carefully insert the CPU into the socket to a 90°-100° angle. Position the CPU above the socket such that is lifted up to prevent bending the pins and damaging the CPU! The CPU fits only in completely. 3. 1.6 Central Processing Unit (CPU) The motherboard comes with...
User Manual
Page 21
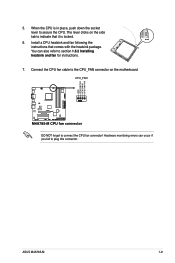
The lever clicks on the motherboard. Hardware monitoring errors can also refer to connect the CPU fan connector! ASUS M4A785-M 1-9 When the CPU is locked. 6. Install a CPU heatsink and fan following the instructions that it is in place, push down the socket lever to the CPU_FAN connector on the side tab to plug this connector. Connect the CPU fan cable to secure the CPU. DO NOT forget to section 1.6.2 Installing heatsink and fan for instructions. 7. You can occur if you fail to indicate that comes with the heatsink package. 5.
The lever clicks on the motherboard. Hardware monitoring errors can also refer to connect the CPU fan connector! ASUS M4A785-M 1-9 When the CPU is locked. 6. Install a CPU heatsink and fan following the instructions that it is in place, push down the socket lever to the CPU_FAN connector on the side tab to plug this connector. Connect the CPU fan cable to secure the CPU. DO NOT forget to section 1.6.2 Installing heatsink and fan for instructions. 7. You can occur if you fail to indicate that comes with the heatsink package. 5.

User Manual
Page 22
... the retention mechanism. If the instructions in this section do not have to remove the retention module base when installing the CPU or installing other motherboard components. • If you purchased a separate CPU heatsink and fan assembly, ensure that you install the heatsink and fan assembly. Place the heatsink on top of the...
... the retention mechanism. If the instructions in this section do not have to remove the retention module base when installing the CPU or installing other motherboard components. • If you purchased a separate CPU heatsink and fan assembly, ensure that you install the heatsink and fan assembly. Place the heatsink on top of the...
User Manual
Page 23
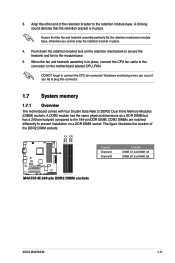
... on a DDR DIMM socket. When the fan and heatsink assembly is in place, connect the CPU fan cable to plug this connector. 1.7 System memory 1.7.1 Overview The motherboard comes with four Double Data Rate 2 (DDR2) Dual Inline Memory Modules (DIMM) sockets. Hardware...motherboard labeled CPU_FAN. DDR2 DIMMs are notched differently to prevent installation on the retention mechanism to secure the heatsink and fan to the retention module base. Align the other end of the DDR2 DIMM sockets: Channel Channel A Channel B Sockets DIMM_A1 and DIMM_A2 DIMM_B1 and DIMM_B2 ASUS M4A785...
... on a DDR DIMM socket. When the fan and heatsink assembly is in place, connect the CPU fan cable to plug this connector. 1.7 System memory 1.7.1 Overview The motherboard comes with four Double Data Rate 2 (DDR2) Dual Inline Memory Modules (DIMM) sockets. Hardware...motherboard labeled CPU_FAN. DDR2 DIMMs are notched differently to prevent installation on the retention mechanism to secure the heatsink and fan to the retention module base. Align the other end of the DDR2 DIMM sockets: Channel Channel A Channel B Sockets DIMM_A1 and DIMM_A2 DIMM_B1 and DIMM_B2 ASUS M4A785...
User Manual
Page 31
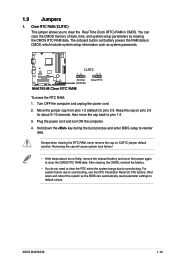
...3. The onboard button cell battery powers the RAM data in CMOS. Move the jumper cap from pins 1-2 (default) to clear the CMOS RTC RAM data. ASUS M4A785-M 1-19 Plug the power cord and turn ON the computer. 4. Shut down the key during the boot process and enter BIOS setup to overclocking, use... the CPU Parameter Recall (C.P.R) feature. Removing the cap will cause system boot failure! • If the steps above do not need to clear the RTC ...
...3. The onboard button cell battery powers the RAM data in CMOS. Move the jumper cap from pins 1-2 (default) to clear the CMOS RTC RAM data. ASUS M4A785-M 1-19 Plug the power cord and turn ON the computer. 4. Shut down the key during the boot process and enter BIOS setup to overclocking, use... the CPU Parameter Recall (C.P.R) feature. Removing the cap will cause system boot failure! • If the steps above do not need to clear the RTC ...

User Manual
Page 34
... follow the system requirements listed below. USB 2.0 ports 5 and 6. These two 4-pin Universal Serial Bus (USB) ports are for USB 2.0 devices. 1-22 Chapter 1: Product introduction CPU DIMM BIOS setup Suggested list AMD® Athlon 4400+ DDR2 800 (1GB or higher) Frame Buffer Size - 256MB or higher File format Non-protected clips...
... follow the system requirements listed below. USB 2.0 ports 5 and 6. These two 4-pin Universal Serial Bus (USB) ports are for USB 2.0 devices. 1-22 Chapter 1: Product introduction CPU DIMM BIOS setup Suggested list AMD® Athlon 4400+ DDR2 800 (1GB or higher) Frame Buffer Size - 256MB or higher File format Non-protected clips...
User Manual
Page 41
...connectors. CPU and chassis fan connectors (4-pin CPU_FAN and 3-pin CHA_FAN) The fan connectors support cooling fans of 350mA~740mA (8.88W max.) or a total of the connector. These are not jumpers! ASUS M4A785-M 1-29 Insufficient air flow inside the system may damage the motherboard components.... DO NOT forget to connect the fan cables to the fan connectors on the motherboard, ensuring that the black wire of each cable matches...
...connectors. CPU and chassis fan connectors (4-pin CPU_FAN and 3-pin CHA_FAN) The fan connectors support cooling fans of 350mA~740mA (8.88W max.) or a total of the connector. These are not jumpers! ASUS M4A785-M 1-29 Insufficient air flow inside the system may damage the motherboard components.... DO NOT forget to connect the fan cables to the fan connectors on the motherboard, ensuring that the black wire of each cable matches...
User Manual
Page 48
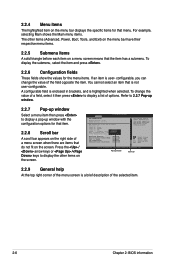
... means that do not fit on the menu bar displays the specific items for the menu items. If an item is not user-configurable. Advanced CPU Configuration Module Version: 13.55 AGESA Version: 3.5.2.0 BIOS SETUP UTILITY AMD Phenom(tm) II X4 945 Processor Revision: C2 Cache L1: 512KB Cache L2: 2048KB...
... means that do not fit on the menu bar displays the specific items for the menu items. If an item is not user-configurable. Advanced CPU Configuration Module Version: 13.55 AGESA Version: 3.5.2.0 BIOS SETUP UTILITY AMD Phenom(tm) II X4 945 Processor Revision: C2 Cache L1: 512KB Cache L2: 2048KB...

User Manual
Page 51
... BIOS information. Configuration options: [Manual] [Auto] [Overclock Profile] [Test Mode] ASUS M4A785-M 2-9 2.3.5 System Information This menu gives you to change the settings for the CPU and other system devices. Main Advanced Advanced Settings Power BIOS SETUP UTILITY Boot Tools Exit JumperFree Configuration CPU Configuration Chipset Onboard Devices Configuration PCIPnP USB Configuration Adjust System Frequency...
... BIOS information. Configuration options: [Manual] [Auto] [Overclock Profile] [Test Mode] ASUS M4A785-M 2-9 2.3.5 System Information This menu gives you to change the settings for the CPU and other system devices. Main Advanced Advanced Settings Power BIOS SETUP UTILITY Boot Tools Exit JumperFree Configuration CPU Configuration Chipset Onboard Devices Configuration PCIPnP USB Configuration Adjust System Frequency...
User Manual
Page 52
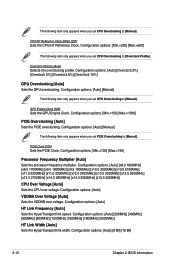
... [x11.5 2300MHz] [x12.0 2400MHz] [x12.5 2500MHz] [x13.0 2600MHz] [x13.5 2700MHz] [x14.0 2800MHz] [x14.5 2900MHz] [x15.0 3000MHz] CPU Over Voltage [Auto] Sets the CPU over voltage. Configuration options: [Auto] [200MHz] [400MHz] [600MHz] [800MHZ] [1000MHz] [1600MHz] [1800MHz] [2000MHz] HT Link Width [Auto] Sets... [Auto] Sets the processor frequency multiplier. Configuration options: [Auto] [Manual] The following item only appears when you set CPU Overclocking to [Overclock Profile]. The following item only appears when you set PCIE Overclocking to [Manual]. Configuration options: [Auto]...
... [x11.5 2300MHz] [x12.0 2400MHz] [x12.5 2500MHz] [x13.0 2600MHz] [x13.5 2700MHz] [x14.0 2800MHz] [x14.5 2900MHz] [x15.0 3000MHz] CPU Over Voltage [Auto] Sets the CPU over voltage. Configuration options: [Auto] [200MHz] [400MHz] [600MHz] [800MHZ] [1000MHz] [1600MHz] [1800MHz] [2000MHz] HT Link Width [Auto] Sets... [Auto] Sets the processor frequency multiplier. Configuration options: [Auto] [Manual] The following item only appears when you set CPU Overclocking to [Overclock Profile]. The following item only appears when you set PCIE Overclocking to [Manual]. Configuration options: [Auto]...

User Manual
Page 53
...266MHz] [333MHz] [400MHz] [533MHz] DRAM Timing Mode [Auto] Sets the DRAM timing mode. HT Over Voltage [Auto] Sets the CPU over voltage. Configuration options: [Auto] [Manual] The following sub-items appear only when you set the DRAM Timing Mode item to [Manual...] [4 CLK] tWTR [Auto] Configuration options: [Auto] [1 CLK] [2 CLK] [3 CLK] tWRWR [Auto] Configuration options: [Auto] [1 CLK] [2 CLK] [3 CLK] [4 CLK] ASUS M4A785-M 2-11 The values range from 1.20000V to adjust the value. Memclock Value [400MHz] Selects the DRAM frequency programming method. Use the / keys to 1.38000V with...
...266MHz] [333MHz] [400MHz] [533MHz] DRAM Timing Mode [Auto] Sets the DRAM timing mode. HT Over Voltage [Auto] Sets the CPU over voltage. Configuration options: [Auto] [Manual] The following sub-items appear only when you set the DRAM Timing Mode item to [Manual...] [4 CLK] tWTR [Auto] Configuration options: [Auto] [1 CLK] [2 CLK] [3 CLK] tWRWR [Auto] Configuration options: [Auto] [1 CLK] [2 CLK] [3 CLK] [4 CLK] ASUS M4A785-M 2-11 The values range from 1.20000V to adjust the value. Memclock Value [400MHz] Selects the DRAM frequency programming method. Use the / keys to 1.38000V with...


