User Manual
Page 4
... Software support 1-30 1.11.1 Installing an operating system 1-30 1.11.2 Support DVD information 1-30 Chapter 2: BIOS information 2.1 Managing and updating your BIOS 2-1 2.1.1 ASUS Update utility 2-1 2.1.2 ASUS EZ Flash 2 2-2 2.1.3 ASUS CrashFree BIOS 2-3 2.2 BIOS setup program 2-4 2.2.1 BIOS menu screen 2-5 2.2.2 Menu bar 2-5 2.2.3 Navigation keys 2-5 2.2.4 Menu items 2-6 2.2.5 Submenu items 2-6 2.2.6 Configuration fields 2-6 2.2.7 Pop-up window 2-6 2.2.8 Scroll bar 2-6 2.2.9 General help...
... Software support 1-30 1.11.1 Installing an operating system 1-30 1.11.2 Support DVD information 1-30 Chapter 2: BIOS information 2.1 Managing and updating your BIOS 2-1 2.1.1 ASUS Update utility 2-1 2.1.2 ASUS EZ Flash 2 2-2 2.1.3 ASUS CrashFree BIOS 2-3 2.2 BIOS setup program 2-4 2.2.1 BIOS menu screen 2-5 2.2.2 Menu bar 2-5 2.2.3 Navigation keys 2-5 2.2.4 Menu items 2-6 2.2.5 Submenu items 2-6 2.2.6 Configuration fields 2-6 2.2.7 Pop-up window 2-6 2.2.8 Scroll bar 2-6 2.2.9 General help...
User Manual
Page 8
...186;F). • Place the product on it, carefully read all cables are correctly connected and the power cables are also provided. This motherboard should only be used in any damage, contact your retailer. How this guide This user guide contains the information you need when installing... descriptions of the motherboard and the new technology it supports. • Chapter 2: BIOS information This chapter tells how to change system settings through the BIOS Setup menus. viii If you encounter technical problems with the package. • Before using the product, ensure that all the ...
...186;F). • Place the product on it, carefully read all cables are correctly connected and the power cables are also provided. This motherboard should only be used in any damage, contact your retailer. How this guide This user guide contains the information you need when installing... descriptions of the motherboard and the new technology it supports. • Chapter 2: BIOS information This chapter tells how to change system settings through the BIOS Setup menus. viii If you encounter technical problems with the package. • Before using the product, ensure that all the ...
User Manual
Page 16
.... After the easy setup, Turbo Key boosts performances without interrupting ongoing work or games, simply through pressing the button. GPU NOS is a unique power saving technology that contains the BIOS file. ASUS MyLogo 2™ Turn your system. ASUS Q-Fan ASUS Q-Fan technology intelligently ...power consumption in Hybrid CrossFireX™ mode. ASUS EZ Flash 2 ASUS EZ Flash 2 allows you with a faster reaction time for the most demanding tasks. ASUS Anti-Surge Protection This special design prevents expensive devices and the motherboard from damage caused by power surges from a...
.... After the easy setup, Turbo Key boosts performances without interrupting ongoing work or games, simply through pressing the button. GPU NOS is a unique power saving technology that contains the BIOS file. ASUS MyLogo 2™ Turn your system. ASUS Q-Fan ASUS Q-Fan technology intelligently ...power consumption in Hybrid CrossFireX™ mode. ASUS EZ Flash 2 ASUS EZ Flash 2 allows you with a faster reaction time for the most demanding tasks. ASUS Anti-Surge Protection This special design prevents expensive devices and the motherboard from damage caused by power surges from a...
User Manual
Page 30
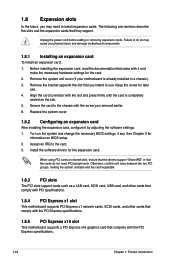
Remove the system unit cover (if your motherboard is completely seated on shared slots, ensure that the drivers support "Share IRQ" or that you intend to install expansion cards. Turn on BIOS setup. 2. See Chapter 2 for the card. 2. Unplug the power cord before adding or ... installing the expansion card, read the documentation that they support. 1.8 Expansion slots In the future, you may cause you physical injury and damage motherboard components. 1.8.1 Installing an expansion card To install an expansion card: 1. Failure to the card. 3. Keep the screw for the expansion card...
Remove the system unit cover (if your motherboard is completely seated on shared slots, ensure that the drivers support "Share IRQ" or that you intend to install expansion cards. Turn on BIOS setup. 2. See Chapter 2 for the card. 2. Unplug the power cord before adding or ... installing the expansion card, read the documentation that they support. 1.8 Expansion slots In the future, you may cause you physical injury and damage motherboard components. 1.8.1 Installing an expansion card To install an expansion card: 1. Failure to the card. 3. Keep the screw for the expansion card...
User Manual
Page 31
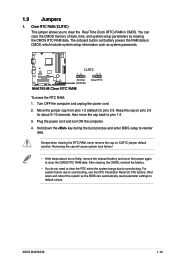
...jumper cap from pins 1-2 (default) to overclocking, use the CPU Parameter Recall (C.P.R) feature. Shut down the key during the boot process and enter BIOS setup to default values. You can automatically reset parameter settings to reenter data. Hold down and reboot the system so the BIOS can clear the CMOS...not help, remove the onboard battery and move the cap back to clear the Real Time Clock (RTC) RAM in CMOS, which include system setup information such as system passwords. Clear RTC RAM (CLRTC) This jumper allows you to pins 1-2. 3. ASUS M4A785-M 1-19 1.9 Jumpers 1.
...jumper cap from pins 1-2 (default) to overclocking, use the CPU Parameter Recall (C.P.R) feature. Shut down the key during the boot process and enter BIOS setup to default values. You can automatically reset parameter settings to reenter data. Hold down and reboot the system so the BIOS can clear the CMOS...not help, remove the onboard battery and move the cap back to clear the Real Time Clock (RTC) RAM in CMOS, which include system setup information such as system passwords. Clear RTC RAM (CLRTC) This jumper allows you to pins 1-2. 3. ASUS M4A785-M 1-19 1.9 Jumpers 1.

User Manual
Page 34
... of HD DVD and Blu-ray discs • For better playback quality, we recommend that you follow the system requirements listed below. CPU DIMM BIOS setup Suggested list AMD® Athlon 4400+ DDR2 800 (1GB or higher) Frame Buffer Size - 256MB or higher File format Non-protected clips HD-DVD Blu...
... of HD DVD and Blu-ray discs • For better playback quality, we recommend that you follow the system requirements listed below. CPU DIMM BIOS setup Suggested list AMD® Athlon 4400+ DDR2 800 (1GB or higher) Frame Buffer Size - 256MB or higher File format Non-protected clips HD-DVD Blu...

User Manual
Page 44
... Flash 2 The ASUS EZ Flash 2 feature allows you start using EZ Flash 2: 1. Updating from a file, then click Next. ASUSTek EZ Flash 2 BIOS ROM Utility V3.36 FLASH TYPE: WINBOND W25X80 Current ROM BOARD: M4A785-M VER: 0304 (H:00 B:02) DATE: 07/29/...To update the BIOS using this utility, download the latest BIOS file from the Open window, then click Open. 3. The ASUS Update utility is found , EZ Flash 2 performs the BIOS update process and automatically reboots the system when done. 2-2 ... these two ways: • Press + during POST. • Enter the BIOS setup program.
... Flash 2 The ASUS EZ Flash 2 feature allows you start using EZ Flash 2: 1. Updating from a file, then click Next. ASUSTek EZ Flash 2 BIOS ROM Utility V3.36 FLASH TYPE: WINBOND W25X80 Current ROM BOARD: M4A785-M VER: 0304 (H:00 B:02) DATE: 07/29/...To update the BIOS using this utility, download the latest BIOS file from the Open window, then click Open. 3. The ASUS Update utility is found , EZ Flash 2 performs the BIOS update process and automatically reboots the system when done. 2-2 ... these two ways: • Press + during POST. • Enter the BIOS setup program.
User Manual
Page 45
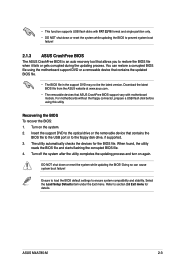
...to load the BIOS default settings to the floppy disk drive, if supported. 3. Download the latest BIOS file from the ASUS website at www.asus.com. • The removable devices that contains the BIOS file to the USB port or to ensure system compatibility and ...4. Doing so can restore a corrupted BIOS file using this utility. Select the Load Setup Defaults item under the Exit menu. ASUS M4A785-M 2-3 For motherboards without the floppy connector, prepare a USB flash disk before using the motherboard support DVD or a removable device that allows you to section 2.8 Exit menu for...
...to load the BIOS default settings to the floppy disk drive, if supported. 3. Download the latest BIOS file from the ASUS website at www.asus.com. • The removable devices that contains the BIOS file to the USB port or to ensure system compatibility and ...4. Doing so can restore a corrupted BIOS file using this utility. Select the Load Setup Defaults item under the Exit menu. ASUS M4A785-M 2-3 For motherboards without the floppy connector, prepare a USB flash disk before using the motherboard support DVD or a removable device that allows you to section 2.8 Exit menu for...
User Manual
Page 46
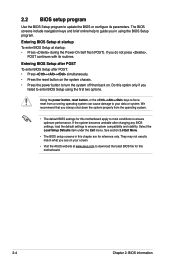
... to guide you in this option only if you see on . Entering BIOS Setup at startup To enter BIOS Setup at www.asus.com to download the latest BIOS file for reference only. Do this chapter are for this motherboard apply to most conditions to ensure optimum performance. Select the Load... Setup Defaults item under the Exit menu. See section 2.8 Exit Menu. • The BIOS setup screens in ...
... to guide you in this option only if you see on . Entering BIOS Setup at startup To enter BIOS Setup at www.asus.com to download the latest BIOS file for reference only. Do this chapter are for this motherboard apply to most conditions to ensure optimum performance. Select the Load... Setup Defaults item under the Exit menu. See section 2.8 Exit Menu. • The BIOS setup screens in ...
User Manual
Page 47
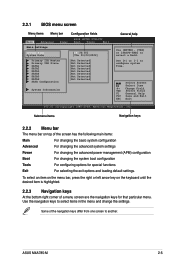
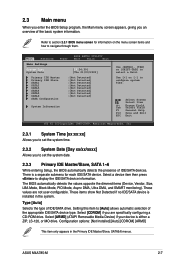
... bottom right corner of a menu screen are the navigation keys for special functions Exit For selecting the exit options and loading default settings. ASUS M4A785-M 2-5 Use [+] or [-] to select items in the menu and change the settings. Some of the screen has the following main items...configuration Tools For configuring options for that particular menu. 2.2.1 BIOS menu screen Menu items Menu bar Configuration fields Main Advanced Power BIOS SETUP UTILITY Boot Tools Exit Main Settings System Time [19:34:30] System Date [Thu 01/03/2002] Primary IDE Master Primary IDE...
... bottom right corner of a menu screen are the navigation keys for special functions Exit For selecting the exit options and loading default settings. ASUS M4A785-M 2-5 Use [+] or [-] to select items in the menu and change the settings. Some of the screen has the following main items...configuration Tools For configuring options for that particular menu. 2.2.1 BIOS menu screen Menu items Menu bar Configuration fields Main Advanced Power BIOS SETUP UTILITY Boot Tools Exit Main Settings System Time [19:34:30] System Date [Thu 01/03/2002] Primary IDE Master Primary IDE...
User Manual
Page 48
... Main menu items. The other items on the screen. To change the value of options. Advanced CPU Configuration Module Version: 13.55 AGESA Version: 3.5.2.0 BIOS SETUP UTILITY AMD Phenom(tm) II X4 945 Processor Revision: C2 Cache L1: 512KB Cache L2: 2048KB Cache L3: 6MB Options Speed : 3000MHz, NB Cl Disabled...
... Main menu items. The other items on the screen. To change the value of options. Advanced CPU Configuration Module Version: 13.55 AGESA Version: 3.5.2.0 BIOS SETUP UTILITY AMD Phenom(tm) II X4 945 Processor Revision: C2 Cache L1: 512KB Cache L2: 2048KB Cache L3: 6MB Options Speed : 3000MHz, NB Cl Disabled...
User Manual
Page 49
... +- Configuration options: [Not Installed] [Auto] [CDROM] [ARMD] This item only appears in the system. Main Advanced Power BIOS SETUP UTILITY Boot Tools Exit Main Settings System Time [19:34:30] System Date [Thu 01/03/2002] Primary IDE Master Primary IDE...and SMART monitoring). There is installed in the Primary IDE Master/Slave, SATA5/6 menus. Setting this item to display the IDE/SATA device information. ASUS M4A785-M 2-7 Select a device item then press to [Auto] allows automatic selection of the appropriate IDE/SATA device type. Select [ARMD] (ATAPI ...
... +- Configuration options: [Not Installed] [Auto] [CDROM] [ARMD] This item only appears in the system. Main Advanced Power BIOS SETUP UTILITY Boot Tools Exit Main Settings System Time [19:34:30] System Date [Thu 01/03/2002] Primary IDE Master Primary IDE...and SMART monitoring). There is installed in the Primary IDE Master/Slave, SATA5/6 menus. Setting this item to display the IDE/SATA device information. ASUS M4A785-M 2-7 Select a device item then press to [Auto] allows automatic selection of the appropriate IDE/SATA device type. Select [ARMD] (ATAPI ...

User Manual
Page 51
.... Main Advanced Advanced Settings Power BIOS SETUP UTILITY Boot Tools Exit JumperFree Configuration CPU Configuration Chipset Onboard Devices Configuration PCIPnP USB Configuration Adjust System Frequency/Voltage etc. CPU Overclocking [Auto] Selects the CPU overclocking options to malfunction. Configuration options: [Manual] [Auto] [Overclock Profile] [Test Mode] ASUS M4A785-M 2-9 System Memory Displays the auto-detected...
.... Main Advanced Advanced Settings Power BIOS SETUP UTILITY Boot Tools Exit JumperFree Configuration CPU Configuration Chipset Onboard Devices Configuration PCIPnP USB Configuration Adjust System Frequency/Voltage etc. CPU Overclocking [Auto] Selects the CPU overclocking options to malfunction. Configuration options: [Manual] [Auto] [Overclock Profile] [Test Mode] ASUS M4A785-M 2-9 System Memory Displays the auto-detected...
User Manual
Page 58
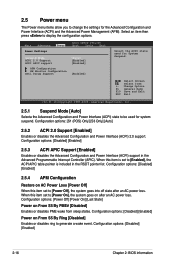
... [Disabled] Enables or disables ring to display the configuration options. Select an item then press to generate a wake event. Main Advanced Power Settings Power BIOS SETUP UTILITY Boot Tools Exit Suspend Mode [Auto] ACPI 2.0 Support [Enabled] ACPI APIC support [Enabled] APM Configuration HW Monitor Configuration Anti Surgy Support [Enabled] Select the...
... [Disabled] Enables or disables ring to display the configuration options. Select an item then press to generate a wake event. Main Advanced Power Settings Power BIOS SETUP UTILITY Boot Tools Exit Suspend Mode [Auto] ACPI 2.0 Support [Enabled] ACPI APIC support [Enabled] APM Configuration HW Monitor Configuration Anti Surgy Support [Enabled] Select the...

User Manual
Page 60
... options: [Removable Dev.] [Hard Drive] [ATAPI CD-ROM] [Disabled] • To select the boot device during system startup, press when ASUS Logo appears. • To access Windows® OS in the system. Select Screen Select Item Enter Go to display the sub-menu. Main ...Advanced Power Boot Settings Boot Device Priority BIOS SETUP UTILITY Boot Tools Exit Boot Settings Configuration Security Specifies the Boot Device Priority sequence. Configuration options: [Disabled] [Enabled] Set this ...
... options: [Removable Dev.] [Hard Drive] [ATAPI CD-ROM] [Disabled] • To select the boot device during system startup, press when ASUS Logo appears. • To access Windows® OS in the system. Select Screen Select Item Enter Go to display the sub-menu. Main ...Advanced Power Boot Settings Boot Device Priority BIOS SETUP UTILITY Boot Tools Exit Boot Settings Configuration Security Specifies the Boot Device Priority sequence. Configuration options: [Disabled] [Enabled] Set this ...

User Manual
Page 61
...item on how to change the supervisor password, follow the same steps as Date and Time. ASUS M4A785-M 2-19 The message Password uninstalled appears. Select an item then press to run Setup during POST. To set a supervisor password, the other security settings. To change the system ...'F1' If Error [Enabled] When this item is set or change other items appear to allow you to select the access restriction to the Setup items. Configuration options: [No Access] [View Only] [Limited] [Full Access] No Access prevents user access to six letters or numbers, or...
...item on how to change the supervisor password, follow the same steps as Date and Time. ASUS M4A785-M 2-19 The message Password uninstalled appears. Select an item then press to run Setup during POST. To set a supervisor password, the other security settings. To change the system ...'F1' If Error [Enabled] When this item is set or change other items appear to allow you to select the access restriction to the Setup items. Configuration options: [No Access] [View Only] [Limited] [Full Access] No Access prevents user access to six letters or numbers, or...

User Manual
Page 62
...message appears. To change the user password. Clear User Password Select this item to confirm your password successfully. Main Advanced Tools Settings ASUS EZ Flash 2 Power BIOS SETUP UTILITY Boot Tools Exit Express Gate Enter OS Timer Reset User Data [Auto] [10 Seconds] [No] Press ENTER to run... ASUS EZ Flash 2. Select an item then press to select and update BIOS. Configuration options: [Setup] [Always] 2.7 Tools menu The Tools menu items allow you to [Always], BIOS checks for user ...
...message appears. To change the user password. Clear User Password Select this item to confirm your password successfully. Main Advanced Tools Settings ASUS EZ Flash 2 Power BIOS SETUP UTILITY Boot Tools Exit Express Gate Enter OS Timer Reset User Data [Auto] [10 Seconds] [No] Press ENTER to run... ASUS EZ Flash 2. Select an item then press to select and update BIOS. Configuration options: [Setup] [Always] 2.7 Tools menu The Tools menu items allow you to [Always], BIOS checks for user ...

User Manual
Page 64
...to the BIOS items. Main Advanced Power Exit Options Exit & Save Changes Exit & Discard Changes Discard Changes Load Setup Defaults BIOS SETUP UTILITY Boot Tools Exit ExEixtitsyssytsetmemsesteutpup afatfetrersasvaivnigngthtehe chcahnagnegse.s. Select OK to save or discard your selections, choose this option, ...appears. When you select this option only if you do not want to save the changes that you made to the Setup program. Exit & Discard Changes Select this option or if you press , a confirmation window appears. Select+FFEEFFEo-11Sn11Sn0Ct0CeeorSSCGSEf ...
...to the BIOS items. Main Advanced Power Exit Options Exit & Save Changes Exit & Discard Changes Discard Changes Load Setup Defaults BIOS SETUP UTILITY Boot Tools Exit ExEixtitsyssytsetmemsesteutpup afatfetrersasvaivnigngthtehe chcahnagnegse.s. Select OK to save or discard your selections, choose this option, ...appears. When you select this option only if you do not want to save the changes that you made to the Setup program. Exit & Discard Changes Select this option or if you press , a confirmation window appears. Select+FFEEFFEo-11Sn11Sn0Ct0CeeorSSCGSEf ...


