User Manual
Page 4
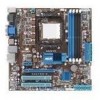
Contents 1.11 Software support 1-30 1.11.1 Installing an operating system 1-30 1.11.2 Support DVD information 1-30 Chapter 2: BIOS information 2.1 Managing and updating your BIOS 2-1 2.1.1 ASUS Update utility 2-1 2.1.2 ASUS EZ Flash 2 2-2 2.1.3 ASUS CrashFree BIOS 2-3 2.2 BIOS setup program 2-4 2.2.1 BIOS menu screen 2-5 2.2.2 Menu bar 2-5 2.2.3 Navigation keys 2-5 2.2.4 Menu items 2-6 2.2.5 Submenu items 2-6 2.2.6 Configuration fields 2-6 2.2.7 Pop-up window 2-6 2.2.8 Scroll bar 2-6 2.2.9 General help 2-6 2.3 Main menu 2-7 2.3.1 System Time 2-7 2.3.2 System...
Contents 1.11 Software support 1-30 1.11.1 Installing an operating system 1-30 1.11.2 Support DVD information 1-30 Chapter 2: BIOS information 2.1 Managing and updating your BIOS 2-1 2.1.1 ASUS Update utility 2-1 2.1.2 ASUS EZ Flash 2 2-2 2.1.3 ASUS CrashFree BIOS 2-3 2.2 BIOS setup program 2-4 2.2.1 BIOS menu screen 2-5 2.2.2 Menu bar 2-5 2.2.3 Navigation keys 2-5 2.2.4 Menu items 2-6 2.2.5 Submenu items 2-6 2.2.6 Configuration fields 2-6 2.2.7 Pop-up window 2-6 2.2.8 Scroll bar 2-6 2.2.9 General help 2-6 2.3 Main menu 2-7 2.3.1 System Time 2-7 2.3.2 System...
User Manual
Page 12
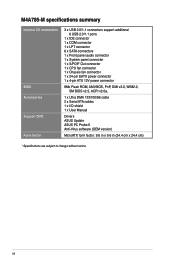
... connector 1 x Chassis fan connector 1 x 24-pin EATX power connector 1 x 4-pin ATX 12V power connector 8Mb Flash ROM, AMI BIOS, PnP, DMI v2.0, WfM2.0, SM BIOS v2.5, ACPI v2.0a, 1 x Ultra DMA 133/100/66 cable 2 x Serial ATA cables 1 x I/O shield 1 x User Manual Drivers ASUS Update ASUS PC Probe II Anti-Virus software (OEM version) MicroATX form factor...
... connector 1 x Chassis fan connector 1 x 24-pin EATX power connector 1 x 4-pin ATX 12V power connector 8Mb Flash ROM, AMI BIOS, PnP, DMI v2.0, WfM2.0, SM BIOS v2.5, ACPI v2.0a, 1 x Ultra DMA 133/100/66 cable 2 x Serial ATA cables 1 x I/O shield 1 x User Manual Drivers ASUS Update ASUS PC Probe II Anti-Virus software (OEM version) MicroATX form factor...
User Manual
Page 16
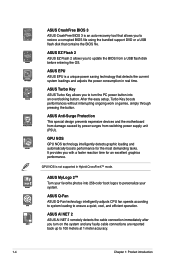
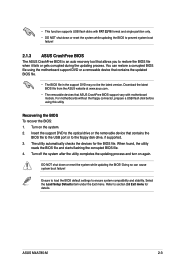
.... 1-4 Chapter 1: Product introduction ASUS Q-Fan ASUS Q-Fan technology intelligently adjusts CPU fan speeds according to system loading to update the BIOS from switching power supply unit (PSU). ASUS Turbo Key ASUS Turbo Key allows you turn the...BIOS file. ASUS EPU ASUS EPU is not supported in real time. ASUS CrashFree BIOS 3 ASUS CrashFree BIOS 3 is an auto-recovery tool that allows you with a faster reaction time for the most demanding tasks. It provides you to personalize your system. ASUS Anti-Surge Protection This special design prevents expensive devices and the motherboard...
.... 1-4 Chapter 1: Product introduction ASUS Q-Fan ASUS Q-Fan technology intelligently adjusts CPU fan speeds according to system loading to update the BIOS from switching power supply unit (PSU). ASUS Turbo Key ASUS Turbo Key allows you turn the...BIOS file. ASUS EPU ASUS EPU is not supported in real time. ASUS CrashFree BIOS 3 ASUS CrashFree BIOS 3 is an auto-recovery tool that allows you with a faster reaction time for the most demanding tasks. It provides you to personalize your system. ASUS Anti-Surge Protection This special design prevents expensive devices and the motherboard...
User Manual
Page 43
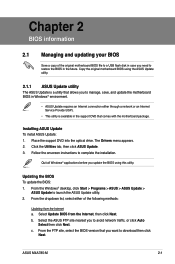
... original motherboard BIOS using this utility. c. b. Chapter 2 BIOS information 2.1 Managing and updating your BIOS Save a copy of the following methods: Updating from the Internet, then click Next. Click the Utilities tab, then click ASUS Update. 3. From the Windows® desktop, click Start > Programs > ASUS > ASUS Update > ASUS Update to download then click Next. The Drivers menu appears. 2. Updating the BIOS To update the BIOS: 1. ASUS M4A785-M 2-1 Installing ASUS Update To install ASUS Update: 1.
... original motherboard BIOS using this utility. c. b. Chapter 2 BIOS information 2.1 Managing and updating your BIOS Save a copy of the following methods: Updating from the Internet, then click Next. Click the Utilities tab, then click ASUS Update. 3. From the Windows® desktop, click Start > Programs > ASUS > ASUS Update > ASUS Update to download then click Next. The Drivers menu appears. 2. Updating the BIOS To update the BIOS: 1. ASUS M4A785-M 2-1 Installing ASUS Update To install ASUS Update: 1.

User Manual
Page 44
...POST. • Enter the BIOS setup program. Always update the utility to enable it. Updating from a file, then click Next. Locate the BIOS file from the ASUS website at www.asus.com. ASUSTek EZ Flash 2 BIOS ROM Utility V3.36 FLASH TYPE: WINBOND W25X80 Current ROM BOARD: M4A785-M VER: 0304 (H:00 B:02...) DATE: 07/29/2009 Update ROM BOARD: Unknown VER: Unknown DATE: Unknown PATH: ...
...POST. • Enter the BIOS setup program. Always update the utility to enable it. Updating from a file, then click Next. Locate the BIOS file from the ASUS website at www.asus.com. ASUSTek EZ Flash 2 BIOS ROM Utility V3.36 FLASH TYPE: WINBOND W25X80 Current ROM BOARD: M4A785-M VER: 0304 (H:00 B:02...) DATE: 07/29/2009 Update ROM BOARD: Unknown VER: Unknown DATE: Unknown PATH: ...
User Manual
Page 45
.../16 format and single partition only. • DO NOT shut down or reset the system while updating the BIOS! ASUS M4A785-M 2-3 • This function supports USB flash disks with motherboard models. Download the latest BIOS file from the ASUS website at www.asus.com. • The removable devices that allows you to the optical drive or the removable...
.../16 format and single partition only. • DO NOT shut down or reset the system while updating the BIOS! ASUS M4A785-M 2-3 • This function supports USB flash disks with motherboard models. Download the latest BIOS file from the ASUS website at www.asus.com. • The removable devices that allows you to the optical drive or the removable...
User Manual
Page 46
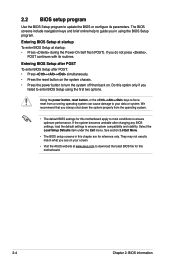
... to ensure system compatibility and stability. If you in this motherboard. 2-4 Chapter 2: BIOS information We recommend that you always shut down the system properly from a running operating system can cause damage to your screen. • Visit the ASUS website at startup: • Press during the Power-On Self... data or system. Select the Load Setup Defaults item under the Exit menu. See section 2.8 Exit Menu. • The BIOS setup screens in using the first two options. 2.2 BIOS setup program Use the BIOS Setup program to update the BIOS or configure its routines.
... to ensure system compatibility and stability. If you in this motherboard. 2-4 Chapter 2: BIOS information We recommend that you always shut down the system properly from a running operating system can cause damage to your screen. • Visit the ASUS website at startup: • Press during the Power-On Self... data or system. Select the Load Setup Defaults item under the Exit menu. See section 2.8 Exit Menu. • The BIOS setup screens in using the first two options. 2.2 BIOS setup program Use the BIOS Setup program to update the BIOS or configure its routines.
User Manual
Page 48
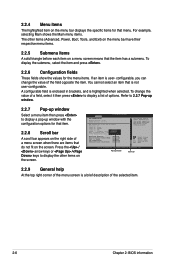
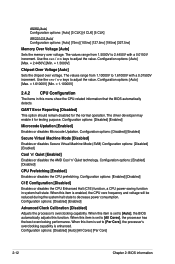
... Press the / arrow keys or / keys to Change Freq.: Yes Enabled uCode Patch Level: 0x1 GART Error Reporting [Disabled] Microcode Updation [Enabled] Secure Virtual Machine Mode [Disabled] Cool 'n' Quiet [Enalbed] C1E Configuration [Disabled] Advanced Clock Calibration [Disabled] This option... description of a field, select it for that menu. configurable, you can change the value of the selected item. 2-6 Chapter 2: BIOS information 2.2.4 Menu items The highlighted item on a menu screen means that the item has a submenu. To display the submenu, select the...
... Press the / arrow keys or / keys to Change Freq.: Yes Enabled uCode Patch Level: 0x1 GART Error Reporting [Disabled] Microcode Updation [Enabled] Secure Virtual Machine Mode [Disabled] Cool 'n' Quiet [Enalbed] C1E Configuration [Disabled] Advanced Clock Calibration [Disabled] This option... description of a field, select it for that menu. configurable, you can change the value of the selected item. 2-6 Chapter 2: BIOS information 2.2.4 Menu items The highlighted item on a menu screen means that the item has a submenu. To display the submenu, select the...
User Manual
Page 54
... to 1.61000V with a 0.0150V increment. Configuration options: [Disabled] [Enabled] Microcode Updation [Enabled] Enables or disables Microcode Updation. Configuration options: [Disabled] [Auto] [All Cores] [Per Core] 2-12 Chapter 2: BIOS information The values range from 1.10000V to 2.4450V with a 0.01500V increment. Configuration...CPU Prefetching [Enabled] Enables or disables the CPU prefetching. When this menu show the CPU-related information that the BIOS automatically detects. Use the / keys to adjust the value. The driver developer may enable it for the normal operation...
... to 1.61000V with a 0.0150V increment. Configuration options: [Disabled] [Enabled] Microcode Updation [Enabled] Enables or disables Microcode Updation. Configuration options: [Disabled] [Auto] [All Cores] [Per Core] 2-12 Chapter 2: BIOS information The values range from 1.10000V to 2.4450V with a 0.01500V increment. Configuration...CPU Prefetching [Enabled] Enables or disables the CPU prefetching. When this menu show the CPU-related information that the BIOS automatically detects. Use the / keys to adjust the value. The driver developer may enable it for the normal operation...

User Manual
Page 62
... 2. Confirm the password when prompted. The User Password item on top of the screen shows the default Not Installed. After you to select and update BIOS. In the password box, key in setting a user password. Select an item then press to confirm your password successfully. Use the left/right... Select Item Enter Go to Sub Screen F1 General Help F10 Save and Exit ESC Exit v02.61 (C)Copyright 1985-2009, American Megatrends, Inc. 2.7.1 ASUS EZ Flash 2 Allows you set a password, this item to set a User Password: 1. Change User Password Select this item to clear the user ...
... 2. Confirm the password when prompted. The User Password item on top of the screen shows the default Not Installed. After you to select and update BIOS. In the password box, key in setting a user password. Select an item then press to confirm your password successfully. Use the left/right... Select Item Enter Go to Sub Screen F1 General Help F10 Save and Exit ESC Exit v02.61 (C)Copyright 1985-2009, American Megatrends, Inc. 2.7.1 ASUS EZ Flash 2 Allows you set a password, this item to set a User Password: 1. Change User Password Select this item to clear the user ...


