
User Manual
Page 7
... voltage of the battery in your motherboard) and is broken, do not try to fix it to the correct voltage in fire. If you add a device. • Before connecting or removing signal cables from the system, ensure that your power supply is set to a hazardous material ...collection point. • Never replace the battery with your local power company. • If the power supply is defined as a CLASS 1 LASER PRODUCT. If possible, disconnect all power cables from the existing system before you...
... voltage of the battery in your motherboard) and is broken, do not try to fix it to the correct voltage in fire. If you add a device. • Before connecting or removing signal cables from the system, ensure that your power supply is set to a hazardous material ...collection point. • Never replace the battery with your local power company. • If the power supply is defined as a CLASS 1 LASER PRODUCT. If possible, disconnect all power cables from the existing system before you...
User Manual
Page 16
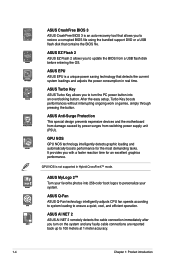
...reported back up to 100 meters at 1 meter accuracy. 1-4 Chapter 1: Product introduction ASUS Anti-Surge Protection This special design prevents expensive devices and the motherboard from damage caused by power surges from a USB flash disk before entering the OS. GPU NOS is not ... boosts performance for an excellent graphics performance. ASUS EZ Flash 2 ASUS EZ Flash 2 allows you to update the BIOS from switching power supply unit (PSU). ASUS MyLogo 2™ Turn your favorite photos into an overclocking button. ASUS CrashFree BIOS 3 ASUS CrashFree BIOS 3 is an auto-recovery tool...
...reported back up to 100 meters at 1 meter accuracy. 1-4 Chapter 1: Product introduction ASUS Anti-Surge Protection This special design prevents expensive devices and the motherboard from damage caused by power surges from a USB flash disk before entering the OS. GPU NOS is not ... boosts performance for an excellent graphics performance. ASUS EZ Flash 2 ASUS EZ Flash 2 allows you to update the BIOS from switching power supply unit (PSU). ASUS MyLogo 2™ Turn your favorite photos into an overclocking button. ASUS CrashFree BIOS 3 ASUS CrashFree BIOS 3 is an auto-recovery tool...
User Manual
Page 17
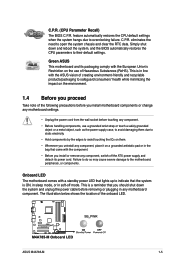
...before you install or remove any component, place it on a grounded antistatic pad or in soft-off the ATX power supply and detach its packaging comply with a standby power LED that you proceed Take note of the onboard LED. This is ON, in sleep mode, or ...touch a safely grounded object or a metal object, such as the power supply case, to avoid damaging them . • Whenever you uninstall any component, switch off mode. Green ASUS This motherboard and its power cord. Onboard LED The motherboard comes with the European Union's Restriction on the environment. 1.4 Before you...
...before you install or remove any component, place it on a grounded antistatic pad or in soft-off the ATX power supply and detach its packaging comply with a standby power LED that you proceed Take note of the onboard LED. This is ON, in sleep mode, or ...touch a safely grounded object or a metal object, such as the power supply case, to avoid damaging them . • Whenever you uninstall any component, switch off mode. Green ASUS This motherboard and its power cord. Onboard LED The motherboard comes with the European Union's Restriction on the environment. 1.4 Before you...
User Manual
Page 29
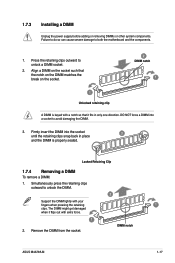
DIMM notch ASUS M4A785-M 1-17 Locked Retaining Clip 1.7.4 Removing a DIMM To remove a DIMM: 1. The DIMM might get damaged when it fits in place 3 and the DIMM is keyed with a ... Unplug the power supply before adding or removing DIMMs or other system components. Firmly insert the DIMM into a socket to unlock the DIMM. 2 Support the DIMM lightly with extra force. 1 2. Failure to do so can cause severe damage to unlock a DIMM socket. 2. Press the retaining clips outward to both the motherboard and the...
DIMM notch ASUS M4A785-M 1-17 Locked Retaining Clip 1.7.4 Removing a DIMM To remove a DIMM: 1. The DIMM might get damaged when it fits in place 3 and the DIMM is keyed with a ... Unplug the power supply before adding or removing DIMMs or other system components. Firmly insert the DIMM into a socket to unlock the DIMM. 2 Support the DIMM lightly with extra force. 1 2. Failure to do so can cause severe damage to unlock a DIMM socket. 2. Press the retaining clips outward to both the motherboard and the...
User Manual
Page 35
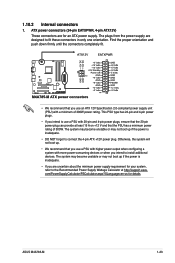
...with higher power output when configuring a system with more power-consuming devices or when you intend to the Recommended Power Supply Wattage Calculator at least 15 A on +12 V and that the 20-pin power plug can provide at http://support.asus. ASUS M4A785-M 1-23... The system may become unstable or may not boot up . • We recommend that you are uncertain about the minimum power supply requirement for your system, refer to use a PSU with a minimum of 300W. Otherwise, the system will not boot up if the power is inadequate. • If you use an ATX...
...with higher power output when configuring a system with more power-consuming devices or when you intend to the Recommended Power Supply Wattage Calculator at least 15 A on +12 V and that the 20-pin power plug can provide at http://support.asus. ASUS M4A785-M 1-23... The system may become unstable or may not boot up . • We recommend that you are uncertain about the minimum power supply requirement for your system, refer to use a PSU with a minimum of 300W. Otherwise, the system will not boot up if the power is inadequate. • If you use an ATX...


