TravelMate 240/250 Service Guide
Page 7
...the Memory Module 53 Removing the Modem Board 54 Removing the Hard Disk Drive Module 55 Removing the LCD Module 56 Disassembling the LCD Module 59 Disassembling the Main Unit 63 System Upgrade Procedure 73 Machine Disassembly and Replacement 74 Assembling ...Intermittent Problems 106 Undetermined Problems 107 Chapter 5 Jumper and Connector Locations 108 Chapter 6 FRU (Field Replaceable Unit) List 112 TravelMate 240/250 Exploded Diagram 113 Appendix A Model Definition and Configuration 126 Model Name Definition 126 Appendix B Test Compatible Components 128 Microsoft Windows...
...the Memory Module 53 Removing the Modem Board 54 Removing the Hard Disk Drive Module 55 Removing the LCD Module 56 Disassembling the LCD Module 59 Disassembling the Main Unit 63 System Upgrade Procedure 73 Machine Disassembly and Replacement 74 Assembling ...Intermittent Problems 106 Undetermined Problems 107 Chapter 5 Jumper and Connector Locations 108 Chapter 6 FRU (Field Replaceable Unit) List 112 TravelMate 240/250 Exploded Diagram 113 Appendix A Model Definition and Configuration 126 Model Name Definition 126 Appendix B Test Compatible Components 128 Microsoft Windows...
TravelMate 240/250 Service Guide
Page 11
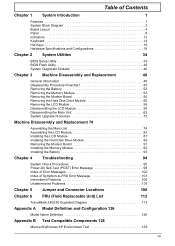
T Four USB ports (USB 2.0 compliant T One RJ-11 port T Onc RJ-45 jack T One parallel port T One FIR Display T T T T T 14.1" or 15" Thin-Film Transistor (TFT) liquid crystal display (LCD) displaying 16M color at 1024x768 XGA (eXtended Graphics Array) resolution 3D capabilities Simultaneous LCD and CRT display support Supports other output display devices such as LCD projection panels for large audience presentations Dual display capacity 2 TravelMate 240/ 250
T Four USB ports (USB 2.0 compliant T One RJ-11 port T Onc RJ-45 jack T One parallel port T One FIR Display T T T T T 14.1" or 15" Thin-Film Transistor (TFT) liquid crystal display (LCD) displaying 16M color at 1024x768 XGA (eXtended Graphics Array) resolution 3D capabilities Simultaneous LCD and CRT display support Supports other output display devices such as LCD projection panels for large audience presentations Dual display capacity 2 TravelMate 240/ 250
TravelMate 240/250 Service Guide
Page 13
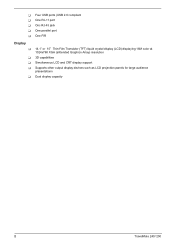
... 22 10 FDD Connector 23 11 Launch Cable Connector 24 12 PCMCIA Slot 25 13 LCD Inverter Cable Connector Line-in Port Line-out Port RJ45+RJ11 Four USB Ports VGA Port LCD Coaxial Cable Connector Mini PCI Connector RTC Battery Connector North Bridge Parallel Port DC-in Port LCD Lid Switch 4 TravelMate 240/ 250
... 22 10 FDD Connector 23 11 Launch Cable Connector 24 12 PCMCIA Slot 25 13 LCD Inverter Cable Connector Line-in Port Line-out Port RJ45+RJ11 Four USB Ports VGA Port LCD Coaxial Cable Connector Mini PCI Connector RTC Battery Connector North Bridge Parallel Port DC-in Port LCD Lid Switch 4 TravelMate 240/ 250
TravelMate 240/250 Service Guide
Page 16
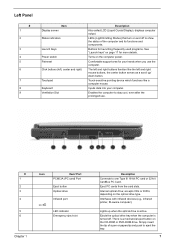
... Diodes) that turn on and off . Touch-sensitive pointing device which functions like the left , center and right) Touchpad Keyboard Ventilation Slot Description Also called LCD (Liquid Crystal Display), displays computer output. Internal optical drive; The left and right buttons function like a computer mouse. accepts CDs or DVDs depending on the...
... Diodes) that turn on and off . Touch-sensitive pointing device which functions like the left , center and right) Touchpad Keyboard Ventilation Slot Description Also called LCD (Liquid Crystal Display), displays computer output. Internal optical drive; The left and right buttons function like a computer mouse. accepts CDs or DVDs depending on the...

TravelMate 240/250 Service Guide
Page 19
... (e.g., parallel printer) External display port USB port (four) Connects to a display device (e.g., external monitor, LCD projector) and displays up to 16M colors at 1024x768 resolution Connects to audio line-out devices (e.g., out jack speakers, headphones). 10 TravelMate 240/ 250 Connects to any Universal Serial Bus devices(e.g., USB mouse, USB camera). Network jack Connects...
... (e.g., parallel printer) External display port USB port (four) Connects to a display device (e.g., external monitor, LCD projector) and displays up to 16M colors at 1024x768 resolution Connects to audio line-out devices (e.g., out jack speakers, headphones). 10 TravelMate 240/ 250 Connects to any Universal Serial Bus devices(e.g., USB mouse, USB camera). Network jack Connects...

TravelMate 240/250 Service Guide
Page 34
...Supports PnP DMA channel Supports PnP IRQ Video Interface Item Vendor & Model Name Chip voltage Supports ZV (Zoomed Video) port Graph interface Maximum resolution (LCD) Maximum resolution (CRT) 8/16 bit, mono/stereo 44.1 KHz Yes Yes DMA channel 0 DMA channel 1 IRQ10, IRQ11 Specification Specification Intel 845GME... Video Resolutions Mode Resolution 640x480x256 640x480x64K 640x480x16M 800x600x256 800x600x64K 1024x768x256 CRT Only 90 90 90 90 90 90 Refresh Rate LCD/CRT Simultaneous 60 60 60 60 60 60 Parallel Port Item Parallel port controller Number of parallel port Location Connector type...
...Supports PnP DMA channel Supports PnP IRQ Video Interface Item Vendor & Model Name Chip voltage Supports ZV (Zoomed Video) port Graph interface Maximum resolution (LCD) Maximum resolution (CRT) 8/16 bit, mono/stereo 44.1 KHz Yes Yes DMA channel 0 DMA channel 1 IRQ10, IRQ11 Specification Specification Intel 845GME... Video Resolutions Mode Resolution 640x480x256 640x480x64K 640x480x16M 800x600x256 800x600x64K 1024x768x256 CRT Only 90 90 90 90 90 90 Refresh Rate LCD/CRT Simultaneous 60 60 60 60 60 60 Parallel Port Item Parallel port controller Number of parallel port Location Connector type...
TravelMate 240/250 Service Guide
Page 36
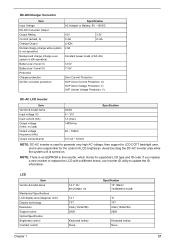
... area while the system unit is an EEPROM in the inverter, which stores its supported LCD type and ID code. LCD Item Vendor & model name Mechanical Specifications LCD display area (diagonal, inch) Display technology Resolution Support colors Optical Specification Brightness control Contrast ...12.5V 11.5V Over Current Protection OCP (Over Current Protection, A) OVP (Over Voltage Protection, V) UVP (Under Voltage Protection, V) DC-AC LCD Inverter Item Vendor & model name Input voltage (V) Input current (mA) Output voltage (Vrms, no load) Output voltage frequency (kHz) Output Current/Lamp...
... area while the system unit is an EEPROM in the inverter, which stores its supported LCD type and ID code. LCD Item Vendor & model name Mechanical Specifications LCD display area (diagonal, inch) Display technology Resolution Support colors Optical Specification Brightness control Contrast ...12.5V 11.5V Over Current Protection OCP (Over Current Protection, A) OVP (Over Voltage Protection, V) UVP (Under Voltage Protection, V) DC-AC LCD Inverter Item Vendor & model name Input voltage (V) Input current (mA) Output voltage (Vrms, no load) Output voltage frequency (kHz) Output Current/Lamp...
TravelMate 240/250 Service Guide
Page 37
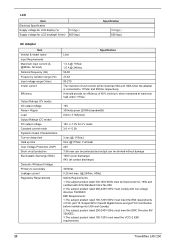
... Specification Supply voltage for LCD display (V) Supply voltage for LCD backlight (Vrms) 3.3 (typ.) 650 (typ.) Specification 3.3 (typ.) 650 (typ.) AC Adapter Item Vendor & model name Input Requirements Maximum input current (A, @90Vac, full load) Nominal frequency (... rated 100-120V must comply with SCA Standard C22.2 No.950. 2.The subject product rated 200-240V 50Hz must meet the VCCI-2 EMI requirements. 28 TravelMate 240/ 250 It should provide an efficiency of FCC part 15, Subpart B for CV mode 3.6 +/- 0.3A 3 sec (@ 115Vac) 5ms (@115Vac, Full load) 24V 3.9A max can...
... Specification Supply voltage for LCD display (V) Supply voltage for LCD backlight (Vrms) 3.3 (typ.) 650 (typ.) Specification 3.3 (typ.) 650 (typ.) AC Adapter Item Vendor & model name Input Requirements Maximum input current (A, @90Vac, full load) Nominal frequency (... rated 100-120V must comply with SCA Standard C22.2 No.950. 2.The subject product rated 200-240V 50Hz must meet the VCCI-2 EMI requirements. 28 TravelMate 240/ 250 It should provide an efficiency of FCC part 15, Subpart B for CV mode 3.6 +/- 0.3A 3 sec (@ 115Vac) 5ms (@115Vac, Full load) 24V 3.9A max can...

TravelMate 240/250 Service Guide
Page 38
...: 2.0G 5~62.6Hz: 0.51mm (peak to peak) 62.6~500Hz: 4.0G Mechanical Specification Dimensions Weight Item Specification 322(W) x 294(D) x 39.4~39.9(H)mm 7.2 Ibs for 14.1" TFT LCD model with battery/7.4 Ibs for a specified period. Power Management Power Saving Mode Standby Mode Enter Standby Mode when 1.Standby/Hibernation hot-key is pressed and... ready to enter Hibernation mode. 2.System standby/ Hibernation timer expires and system is in touchpad, and an external PS/2 pointing device are idle for 15"LCD model with battery Chapter 1 29
...: 2.0G 5~62.6Hz: 0.51mm (peak to peak) 62.6~500Hz: 4.0G Mechanical Specification Dimensions Weight Item Specification 322(W) x 294(D) x 39.4~39.9(H)mm 7.2 Ibs for 14.1" TFT LCD model with battery/7.4 Ibs for a specified period. Power Management Power Saving Mode Standby Mode Enter Standby Mode when 1.Standby/Hibernation hot-key is pressed and... ready to enter Hibernation mode. 2.System standby/ Hibernation timer expires and system is in touchpad, and an external PS/2 pointing device are idle for 15"LCD model with battery Chapter 1 29
TravelMate 240/250 Service Guide
Page 47
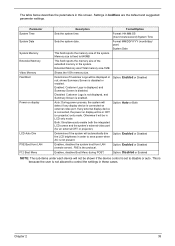
...MM:SS (hour:minute:second) System Time Sets the system date. Determines if Customer Logo will automatically dim Option: Enabled or Disabled the LCD brightness in CRT (or projector) only mode. Enabled: Customer Logo is displayed, and Summary Screen is disabled or enabled. Option: Auto or... display device is connected, the power on display will detect if any display device is enabled. Both: Simultaneously enable both the integrated LCD screen and the system's external video port (for an external CRT or projector). This is because the user is the protocal. Settings...
...MM:SS (hour:minute:second) System Time Sets the system date. Determines if Customer Logo will automatically dim Option: Enabled or Disabled the LCD brightness in CRT (or projector) only mode. Enabled: Customer Logo is displayed, and Summary Screen is disabled or enabled. Option: Auto or... display device is connected, the power on display will detect if any display device is enabled. Both: Simultaneously enable both the integrated LCD screen and the system's external video port (for an external CRT or projector). This is because the user is the protocal. Settings...

TravelMate 240/250 Service Guide
Page 59
Start Battery HDD Module *2 HDD HDD Holder *2 Dimm Cover Memory *1 Modem Cover *2 Modem Board Hinge Caps *2 Middle Cover Keyboard *6 LCD Module *2 Launch Board Lower Case Assembly *2 FDD Module *3 *3 *11 *4 RTC Battery *3 Mini PCI Card Plate Upper Case Assembly Disconnect Wireless LAN Antenna *4 Thermal Module *4 Wireless ...
Start Battery HDD Module *2 HDD HDD Holder *2 Dimm Cover Memory *1 Modem Cover *2 Modem Board Hinge Caps *2 Middle Cover Keyboard *6 LCD Module *2 Launch Board Lower Case Assembly *2 FDD Module *3 *3 *11 *4 RTC Battery *3 Mini PCI Card Plate Upper Case Assembly Disconnect Wireless LAN Antenna *4 Thermal Module *4 Wireless ...

TravelMate 240/250 Service Guide
Page 60
LCD Module 4 LCD Cushions *4 LCD Bezel *1 Inverter *4 LCD LCD Panel LCD Coaxial Cable *4 LCD Brackets Screw List Item A B C D E F G H I J Description SCREW MAC FLAT M2.5*L4 NI NYLOK (86.00123.630) SCREW M2.0*L10 NYLOK(86.9A352.100) SCREW M2*3 NYLON 1JMCPC420325(86.9A352.3R0) SCREW M2.5X6(86.9A353.6R0) SCREW M3x4 (86.9A524.4R0) SCREW M2X2.0 (86.9A552.2R0) SCREW WAFER NYLOK NI 2ML3 (86.9A552.3R0) SCRW M2*4 WAFER NI (86.9A552.4R0) SCRW M2.5*3 WAFER NI (86.9A553.3R0) SCREW M2.5*4L NI (86.9A553.4R0) 51 TravelMate 240/ 250
LCD Module 4 LCD Cushions *4 LCD Bezel *1 Inverter *4 LCD LCD Panel LCD Coaxial Cable *4 LCD Brackets Screw List Item A B C D E F G H I J Description SCREW MAC FLAT M2.5*L4 NI NYLOK (86.00123.630) SCREW M2.0*L10 NYLOK(86.9A352.100) SCREW M2*3 NYLON 1JMCPC420325(86.9A352.3R0) SCREW M2.5X6(86.9A353.6R0) SCREW M3x4 (86.9A524.4R0) SCREW M2X2.0 (86.9A552.2R0) SCREW WAFER NYLOK NI 2ML3 (86.9A552.3R0) SCRW M2*4 WAFER NI (86.9A552.4R0) SCRW M2.5*3 WAFER NI (86.9A553.3R0) SCREW M2.5*4L NI (86.9A553.4R0) 51 TravelMate 240/ 250

TravelMate 240/250 Service Guide
Page 65
... holding the middle cover on page 56. Disconnect the launch board cable then remove the middle cover off the main unit. . Chapter 3 56 Removing the LCD Module Removing the Middle Cover 1. Detach the middle cover from the machine. 7. See "Removing the Battery" on page 52. 2. See "Removing the Battery" on page...
... holding the middle cover on page 56. Disconnect the launch board cable then remove the middle cover off the main unit. . Chapter 3 56 Removing the LCD Module Removing the Middle Cover 1. Detach the middle cover from the machine. 7. See "Removing the Battery" on page 52. 2. See "Removing the Battery" on page...

TravelMate 240/250 Service Guide
Page 66
... the LCD hinge; Remove the two screws on page 52. 2. See "Removing the Middle Cover" on page 56. 4. See "Removing the Launch Board" on page 56. 3. two on the right and two on the left . 6. 3. Remove the two screws and then detach the launch board from the main unit. 57 TravelMate 240/ 250... Remove the screw that fastens the LCD coaxial cable and disconnect the cable. Then disconnect the...
... the LCD hinge; Remove the two screws on page 52. 2. See "Removing the Middle Cover" on page 56. 4. See "Removing the Launch Board" on page 56. 3. two on the right and two on the left . 6. 3. Remove the two screws and then detach the launch board from the main unit. 57 TravelMate 240/ 250... Remove the screw that fastens the LCD coaxial cable and disconnect the cable. Then disconnect the...
TravelMate 240/250 Service Guide
Page 68
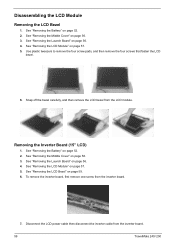
...the four screws that fasten the LCD bezel. 6. To remove the inverter board, first remove one screw from the LCD module. Snap off the bezel carefully, and then remove the LCD bezel from the inverter board. 7. Removing the Inverter Board (15" LCD) 1. See "Removing the Launch... "Removing the LCD Module" on page 56. 3. See "Removing the LCD Module" on page 52. 2. See "Removing the Battery" on page 57. 5. Disconnect the LCD power cable then disconnect the inverter cable from the inverter board. 59 TravelMate 240/ 250 Disassembling the LCD Module Removing the LCD Bezel 1. See...
...the four screws that fasten the LCD bezel. 6. To remove the inverter board, first remove one screw from the LCD module. Snap off the bezel carefully, and then remove the LCD bezel from the inverter board. 7. Removing the Inverter Board (15" LCD) 1. See "Removing the Launch... "Removing the LCD Module" on page 56. 3. See "Removing the LCD Module" on page 52. 2. See "Removing the Battery" on page 57. 5. Disconnect the LCD power cable then disconnect the inverter cable from the inverter board. 59 TravelMate 240/ 250 Disassembling the LCD Module Removing the LCD Bezel 1. See...

TravelMate 240/250 Service Guide
Page 69
...15" TFT LCD 1. See "Removing the LCD Module" on page 59. 6. Removing the LCD Brackets 1. See "Removing the LCD Bezel" on page 57. 5. Then take the LCD out of the LCD panel. NOTE: Please arrange the LCD inverter cable well to the LCD panel as the picture below shows when you reassemble the LCD module. ...See "Removing the Battery" on page 52. 2. See "Removing the Battery" on page 52. To remove the LCD, first remove the four screws that secure the LCD hinges. 8. See "Removing the Launch Board" on page 56. 3. See "Removing the Middle Cover" on page 56. 4. Chapter 3 60 See ...
...15" TFT LCD 1. See "Removing the LCD Module" on page 59. 6. Removing the LCD Brackets 1. See "Removing the LCD Bezel" on page 57. 5. Then take the LCD out of the LCD panel. NOTE: Please arrange the LCD inverter cable well to the LCD panel as the picture below shows when you reassemble the LCD module. ...See "Removing the Battery" on page 52. 2. See "Removing the Battery" on page 52. To remove the LCD, first remove the four screws that secure the LCD hinges. 8. See "Removing the Launch Board" on page 56. 3. See "Removing the Middle Cover" on page 56. 4. Chapter 3 60 See ...
TravelMate 240/250 Service Guide
Page 70
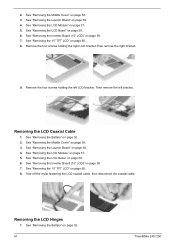
..." on page 56. 3. 2. See "Removing the Middle Cover" on page 52. 61 TravelMate 240/ 250 See "Removing the LCD Bezel" on page 59. 6. Removing the LCD Hinges 1. See "Removing the LCD Bezel" on page 59. 6. Removing the LCD Coaxial Cable 1. See "Removing the LCD Module" on page 56. 3. See "Removing the Middle Cover" on page 57. 5. Remove...
..." on page 56. 3. 2. See "Removing the Middle Cover" on page 52. 61 TravelMate 240/ 250 See "Removing the LCD Bezel" on page 59. 6. Removing the LCD Hinges 1. See "Removing the LCD Bezel" on page 59. 6. Removing the LCD Coaxial Cable 1. See "Removing the LCD Module" on page 56. 3. See "Removing the Middle Cover" on page 57. 5. Remove...

TravelMate 240/250 Service Guide
Page 71
See "Removing the LCD Bezel" on page 60. 8. 2. See "Removing the 15" TFT LCD" on page 59. 6. Remove the screw holding the right hinge, then remove the right hinge. 9. Chapter 3 62 See "Removing the Launch Board" on page 57. 5. See "Removing the LCD Module" on page 56. 4. See "Removing the Middle Cover" on page 59. 7. Remove the screw holding the left hinge, then remove the left hinge. See "Removing the Inverter Board (15" LCD)" on page 56. 3.
See "Removing the LCD Bezel" on page 60. 8. 2. See "Removing the 15" TFT LCD" on page 59. 6. Remove the screw holding the right hinge, then remove the right hinge. 9. Chapter 3 62 See "Removing the Launch Board" on page 57. 5. See "Removing the LCD Module" on page 56. 4. See "Removing the Middle Cover" on page 59. 7. Remove the screw holding the left hinge, then remove the left hinge. See "Removing the Inverter Board (15" LCD)" on page 56. 3.
TravelMate 240/250 Service Guide
Page 72
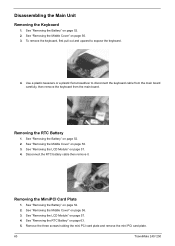
...keyboard cable from the main board carefully, then remove the keyboard from the main board. See "Removing the Battery" on page 56. 3. See "Removing the LCD Module" on page 52. 2. See "Removing the Battery" on page 57. 4. Use a plastic tweezers or a plastic flat screwdriver to expose the keyboard...screws holding the mini PCI card plate and remove the mini PCI card plate. 63 TravelMate 240/ 250 See "Removing the Battery" on page 56. 3. See "Removing the Middle Cover" on page 52. 2. See "Removing the LCD Module" on page 56. 3. Removing the MimiPCI Card Plate 1. See "Removing the...
...keyboard cable from the main board carefully, then remove the keyboard from the main board. See "Removing the Battery" on page 56. 3. See "Removing the LCD Module" on page 52. 2. See "Removing the Battery" on page 57. 4. Use a plastic tweezers or a plastic flat screwdriver to expose the keyboard...screws holding the mini PCI card plate and remove the mini PCI card plate. 63 TravelMate 240/ 250 See "Removing the Battery" on page 56. 3. See "Removing the Middle Cover" on page 52. 2. See "Removing the LCD Module" on page 56. 3. Removing the MimiPCI Card Plate 1. See "Removing the...

TravelMate 240/250 Service Guide
Page 73
.... 5. Remember to press down the lever as the video shows after you remove the CPU. See "Removing the Battery" on page 57. 4. See "Removing the LCD Module" on page 52. 2. See "Removing the Battery" on page 63. 6. See "Removing the MimiPCI Card Plate" on page 52. 2. Disconnect the fan cable then...
.... 5. Remember to press down the lever as the video shows after you remove the CPU. See "Removing the Battery" on page 57. 4. See "Removing the LCD Module" on page 52. 2. See "Removing the Battery" on page 63. 6. See "Removing the MimiPCI Card Plate" on page 52. 2. Disconnect the fan cable then...


