TravelMate 240/250 Service Guide
Page 7
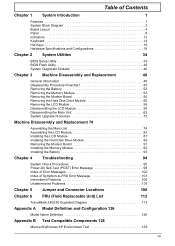
... Block Diagram 3 Board Layout 4 Panel 6 Indicators 12 Keyboard 14 Hot Keys 16 Hardware Specifications and Configurations 19 Chapter 2 System Utilities 34 BIOS Setup Utility 34 BIOS Flash Utility 46 System Diagnostic Diskette 46 Chapter 3 Machine Disassembly and Replacement 48 General Information 49 Disassembly Procedure Flowchart 50 Removing the Battery 52 Removing the Memory Module 53 Removing the Modem Board 54 Removing the Hard Disk Drive Module 55 Removing the LCD Module 56 Disassembling the LCD Module 59 Disassembling the Main Unit 63 System Upgrade Procedure...
... Block Diagram 3 Board Layout 4 Panel 6 Indicators 12 Keyboard 14 Hot Keys 16 Hardware Specifications and Configurations 19 Chapter 2 System Utilities 34 BIOS Setup Utility 34 BIOS Flash Utility 46 System Diagnostic Diskette 46 Chapter 3 Machine Disassembly and Replacement 48 General Information 49 Disassembly Procedure Flowchart 50 Removing the Battery 52 Removing the Memory Module 53 Removing the Modem Board 54 Removing the Hard Disk Drive Module 55 Removing the LCD Module 56 Disassembling the LCD Module 59 Disassembling the Main Unit 63 System Upgrade Procedure...
TravelMate 240/250 Service Guide
Page 10
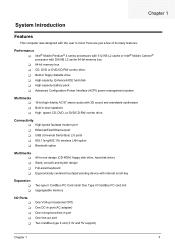
... (CD-ROM, floppy disk drive, hard disk drive) Sleek, smooth and stylish design Full-sized keyboard Ergonomically centered touchpad pointing device with Internet scroll key Expansion T T Two type II CardBus PC Card slots/ One Type III CardBus PC card slot Upgrageable memory I/O Ports T T T T T One VGA port (external CRT) One DC-in port (AC adapter) One microphone/line-in mind. T Built-in floppy diskette drive T High-capacity, Enhanced-IDE hard disk T High-capacity battery pack T Advanced Configuration Power Interface (ACPI) power management system Multimedia...
... (CD-ROM, floppy disk drive, hard disk drive) Sleek, smooth and stylish design Full-sized keyboard Ergonomically centered touchpad pointing device with Internet scroll key Expansion T T Two type II CardBus PC Card slots/ One Type III CardBus PC card slot Upgrageable memory I/O Ports T T T T T One VGA port (external CRT) One DC-in port (AC adapter) One microphone/line-in mind. T Built-in floppy diskette drive T High-capacity, Enhanced-IDE hard disk T High-capacity battery pack T Advanced Configuration Power Interface (ACPI) power management system Multimedia...
TravelMate 240/250 Service Guide
Page 16
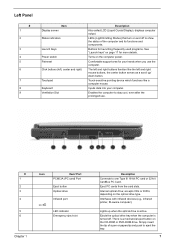
... you use . # 1 2 3 4 5 6 Icon Item/ Port PCMCIA (PC card) Port Eject button Optical drive Infrared port LED indicator Emergency eject slot Chapter 1 Description Connects to stay cool, even after the prolonged use the computer. There is turned off to eject the tray. 7 LEDs (Light Emitting Diodes) that turn on the CD-ROM or DVD-ROM drive. Left Panel # 1 2 3 4 5 6 7 8 9 Item Display screen Status indicators Launch Keys Power switch Palmrest Click buttons (left and right buttons function like a computer mouse. Eject PC cards from the card slots.
... you use . # 1 2 3 4 5 6 Icon Item/ Port PCMCIA (PC card) Port Eject button Optical drive Infrared port LED indicator Emergency eject slot Chapter 1 Description Connects to stay cool, even after the prolonged use the computer. There is turned off to eject the tray. 7 LEDs (Light Emitting Diodes) that turn on the CD-ROM or DVD-ROM drive. Left Panel # 1 2 3 4 5 6 7 8 9 Item Display screen Status indicators Launch Keys Power switch Palmrest Click buttons (left and right buttons function like a computer mouse. Eject PC cards from the card slots.
TravelMate 240/250 Service Guide
Page 23
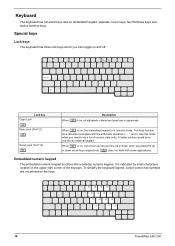
... the keyboard legend, cursor-control key symbols are in numeric mode. Special keys Lock keys The keyboard has three lock keys which you need to connect an external keypad. When [ is on, all alphabetic characters typed are not printed on , the screen moves one line up or down when you press the up or down arrow keys respectively. [ does not work with the arithmetic operators ), -, *, and /). Keyboard The keyboard has...
... the keyboard legend, cursor-control key symbols are in numeric mode. Special keys Lock keys The keyboard has three lock keys which you need to connect an external keypad. When [ is on, all alphabetic characters typed are not printed on , the screen moves one line up or down when you press the up or down arrow keys respectively. [ does not work with the arithmetic operators ), -, *, and /). Keyboard The keyboard has...

TravelMate 240/250 Service Guide
Page 25
... the display screen and external monitor. Puts the computer in the hot key combination. Fn-y Volume down Decreases the sound volume. Hot Key Fn-l Fn-m Fn-n Fn-o Fn-p Fn-q Fn-r Fn-s Fn-w Icon Function Hotkey help Setup Description Displays a list of the computer's controls like screen contrast and brightness, volume output and the BIOS Utility. Turns the display screen backlight off Switches display output between the power management scheme used by the computer (function available if supported by operating system). Accesses the notebook configuration utility. Hot Keys The...
... the display screen and external monitor. Puts the computer in the hot key combination. Fn-y Volume down Decreases the sound volume. Hot Key Fn-l Fn-m Fn-n Fn-o Fn-p Fn-q Fn-r Fn-s Fn-w Icon Function Hotkey help Setup Description Displays a list of the computer's controls like screen contrast and brightness, volume output and the BIOS Utility. Turns the display screen backlight off Switches display output between the power management scheme used by the computer (function available if supported by operating system). Accesses the notebook configuration utility. Hot Keys The...
TravelMate 240/250 Service Guide
Page 28
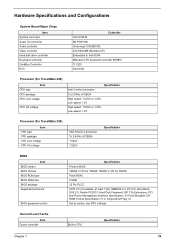
... 1.0b), SMBIOS 2.3, PCI 2.2, Boot Block, PXE 2.0, Mobile PC2001, Hard Disk Password, INT 13h Extensions, PCI Bus Power Management interface Specification, EI Torito-Bootable CDROM Format Specification V1.0, Simple Boot Flag 1.0 Set by switch, see SW1 settings Second Level Cache Item Cache controller Built-in Intel ICH4 Mitsubish LPC keyboard controller M38857 TI 1520 Intel ICH4 Processor (for TravelMate 240) Item CPU type CPU package CPU core voltage CPU I/O voltage Specification Intel Cerelon processor...
... 1.0b), SMBIOS 2.3, PCI 2.2, Boot Block, PXE 2.0, Mobile PC2001, Hard Disk Password, INT 13h Extensions, PCI Bus Power Management interface Specification, EI Torito-Bootable CDROM Format Specification V1.0, Simple Boot Flag 1.0 Set by switch, see SW1 settings Second Level Cache Item Cache controller Built-in Intel ICH4 Mitsubish LPC keyboard controller M38857 TI 1520 Intel ICH4 Processor (for TravelMate 240) Item CPU type CPU package CPU core voltage CPU I/O voltage Specification Intel Cerelon processor...
TravelMate 240/250 Service Guide
Page 29
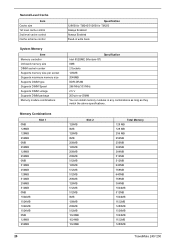
... 1152MB 1280MB 20 TravelMate 240/ 250 Second Level Cache Item Cache size 1st level cache control 2nd level cache control Cache scheme control System Memory Item Memory controller Onboard memory size DIMM socket number Supports memory size per socket Supports maximum memory size Supports DIMM type Supports DIMM Speed Supports DIMM voltage Supports DIMM package Memory module combinations Specification 128KB for TM240/512KB for TM250 Always Enabled Always Enabled Fixed-in write back Specification Intel 852GME...
... 1152MB 1280MB 20 TravelMate 240/ 250 Second Level Cache Item Cache size 1st level cache control 2nd level cache control Cache scheme control System Memory Item Memory controller Onboard memory size DIMM socket number Supports memory size per socket Supports maximum memory size Supports DIMM type Supports DIMM Speed Supports DIMM voltage Supports DIMM package Memory module combinations Specification 128KB for TM240/512KB for TM250 Always Enabled Always Enabled Fixed-in write back Specification Intel 852GME...
TravelMate 240/250 Service Guide
Page 47
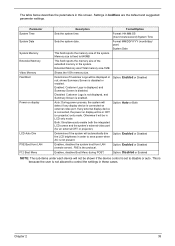
... default and suggested parameter settings. Otherwise it will automatically dim Option: Enabled or Disabled the LCD brightness in LCD only mode. PXE is disabled. Parameter System Time System Date System Memory Extended Memory Video Memory Fast Boot Power on external video port. Both: Simultaneously enable both the integrated LCD screen and the system's external video port (for an external CRT or projector). Settings in this screen. This is because the user is connected on display LCD Auto Dim PXE Boot from LAN (remote server). Enabled...
... default and suggested parameter settings. Otherwise it will automatically dim Option: Enabled or Disabled the LCD brightness in LCD only mode. PXE is disabled. Parameter System Time System Date System Memory Extended Memory Video Memory Fast Boot Power on external video port. Both: Simultaneously enable both the integrated LCD screen and the system's external video port (for an external CRT or projector). Settings in this screen. This is because the user is connected on display LCD Auto Dim PXE Boot from LAN (remote server). Enabled...
TravelMate 240/250 Service Guide
Page 50
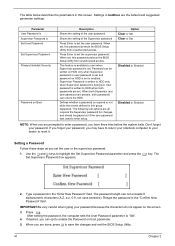
... changes and should be written on HDD only when Supervisor password or user password is set . Parameter User Password is Supervisor Password is written to enter a password, you set . Settings in the "Enter New Password" field. Defines whether a password is being set the user or the supervisor password: 1. Type a password in boldface are set , this group happened. When set . If you forget your password. Retype the password in this password protects the BIOS Setup Utility from unauthorized access. Press e. Use the w andy keys...
... changes and should be written on HDD only when Supervisor password or user password is set . Parameter User Password is Supervisor Password is written to enter a password, you set . Settings in the "Enter New Password" field. Defines whether a password is being set the user or the supervisor password: 1. Type a password in boldface are set , this group happened. When set . If you forget your password. Retype the password in this password protects the BIOS Setup Utility from unauthorized access. Press e. Use the w andy keys...

TravelMate 240/250 Service Guide
Page 51
... BIOS Setup Utility. Use the w and y keys to "Clear". 4. The Set Password box appears: 2. When you are done, press u to save the changes and exit the BIOS Setup Utility. Type the current password in the Enter New Password field. Retype the password in the Enter New Password and Confirm New Password fields. Chapter 2 42 Press e twice without typing anything in the Confirm New Password field. 4. Removing a Password Follow these steps: 1. Use the w and y keys to "Set". 5. The password setting is OK, the screen will display...
... BIOS Setup Utility. Use the w and y keys to "Clear". 4. The Set Password box appears: 2. When you are done, press u to save the changes and exit the BIOS Setup Utility. Type the current password in the Enter New Password field. Retype the password in the Enter New Password and Confirm New Password fields. Chapter 2 42 Press e twice without typing anything in the Confirm New Password field. 4. Removing a Password Follow these steps: 1. Use the w and y keys to "Set". 5. The password setting is OK, the screen will display...
TravelMate 240/250 Service Guide
Page 55
... soon as service CD released. Acer HQ CSD will upload the utility to finish BIOS flash, you may not boot the system because the BIOS is ready. NOTE: If you do not have a crisis recovery diskette at hand, then you should create a Crisis Recovery Diskette before you use the AC adaptor power supply when you use the Phlash. NOTE: Do not install memory-related drivers (XMS...
... soon as service CD released. Acer HQ CSD will upload the utility to finish BIOS flash, you may not boot the system because the BIOS is ready. NOTE: If you do not have a crisis recovery diskette at hand, then you should create a Crisis Recovery Diskette before you use the AC adaptor power supply when you use the Phlash. NOTE: Do not install memory-related drivers (XMS...

TravelMate 240/250 Service Guide
Page 59
... Touchpad Cover Wireless LAN Card CPU ODD Module *4 HDD Bracket *1 ODD Support Bracket *1 CPU Heatsink Plate *3 VGA Heatsink Plate Touchpad Button Pad *2 ODD Bracket ODD *4 Main Board Touchpad Touchpad Scroll Key *2 DC Board *4 PCMCIA Slot Touchpad Cable Upper Case *2 Speaker Set Chapter 3 50 Disassembly Procedure Flowchart The flowchart on the succeeding page gives you a graphic representation on the components that order. For example, if you want to remove the main board, you on the entire disassembly sequence and instructs...
... Touchpad Cover Wireless LAN Card CPU ODD Module *4 HDD Bracket *1 ODD Support Bracket *1 CPU Heatsink Plate *3 VGA Heatsink Plate Touchpad Button Pad *2 ODD Bracket ODD *4 Main Board Touchpad Touchpad Scroll Key *2 DC Board *4 PCMCIA Slot Touchpad Cable Upper Case *2 Speaker Set Chapter 3 50 Disassembly Procedure Flowchart The flowchart on the succeeding page gives you a graphic representation on the components that order. For example, if you want to remove the main board, you on the entire disassembly sequence and instructs...
TravelMate 240/250 Service Guide
Page 81
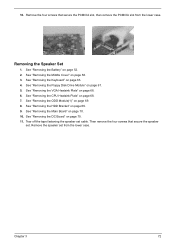
Removing the Speaker Set 1. See "Removing the Keyboard" on page 69. 9. See "Removing the HDD Bracket" on page 63. 4. Tear off the tape fastening the speaker set . See "Removing the DC Board" on page 67. 5. See "Removing the Floppy Disk Drive Module" on page 70. 11. See "Removing the CPU Heatsink Plate" on page 70. 10. See "Removing the Main Board" on page 68. 7. Then remove the four screws...
Removing the Speaker Set 1. See "Removing the Keyboard" on page 69. 9. See "Removing the HDD Bracket" on page 63. 4. Tear off the tape fastening the speaker set . See "Removing the DC Board" on page 67. 5. See "Removing the Floppy Disk Drive Module" on page 70. 11. See "Removing the CPU Heatsink Plate" on page 70. 10. See "Removing the Main Board" on page 68. 7. Then remove the four screws...
TravelMate 240/250 Service Guide
Page 109
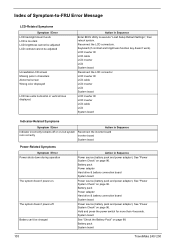
... . Error Message List Error Messages FRU/Action in Sequence Failure Fixed Disk Reconnect hard disk drive connector. System timer error RTC battery Run BIOS Setup Utility to reconfigure system time, then reboot system. Unlock key switch Unlock external keyboard Monitor type does not match CMOS - Keyboard locked - Keyboard Controller Failed see "Keyboard or Auxiliary Input Device Check" on page 95. Replace and run Setup Replace RTC battery and Run BIOS Setup Utility to reconfigure system time, then reboot system. Shadow RAM Failed at offset: nnnn BIOS ROM System board...
... . Error Message List Error Messages FRU/Action in Sequence Failure Fixed Disk Reconnect hard disk drive connector. System timer error RTC battery Run BIOS Setup Utility to reconfigure system time, then reboot system. Unlock key switch Unlock external keyboard Monitor type does not match CMOS - Keyboard locked - Keyboard Controller Failed see "Keyboard or Auxiliary Input Device Check" on page 95. Replace and run Setup Replace RTC battery and Run BIOS Setup Utility to reconfigure system time, then reboot system. Shadow RAM Failed at offset: nnnn BIOS ROM System board...
TravelMate 240/250 Service Guide
Page 112
... board System board Power-Related Symptoms Symptom / Error Power shuts down during operation The system doesn't power-on. See "Power System Check" on page 96. See "Power System Check" on page 96. Keyboard (if contrast and brightness function key doesn't work LCD is too dark LCD brightness cannot be adjusted LCD contrast cannot be charged Action in Sequence Indicator incorrectly remains off . Battery pack Power adapter Hard drive & battery connection board System board Power source (battery pack and power adapter). Battery pack System board 103 TravelMate 240/ 250...
... board System board Power-Related Symptoms Symptom / Error Power shuts down during operation The system doesn't power-on. See "Power System Check" on page 96. See "Power System Check" on page 96. Keyboard (if contrast and brightness function key doesn't work LCD is too dark LCD brightness cannot be adjusted LCD contrast cannot be charged Action in Sequence Indicator incorrectly remains off . Battery pack Power adapter Hard drive & battery connection board System board Power source (battery pack and power adapter). Battery pack System board 103 TravelMate 240/ 250...
TravelMate 240/250 Service Guide
Page 113
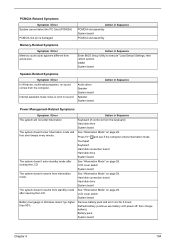
...computer. Battery pack System board Chapter 4 104 Action in Sequence Enter BIOS Setup Utility to execute "Load Default Settings, then reboot system. Touchpad Keyboard Hard disk connection board Hard disk drive System board The system doesn't enter standby mode after opening the LCD. DIMM System board Speaker-Related Symptoms Symptom / Error In Windows, multimedia programs, no sound. LCD cover switch System board The system doesn't resume from hibernation mode. four short beeps every minute. Hard disk connection board Hard disk drive System board The system...
...computer. Battery pack System board Chapter 4 104 Action in Sequence Enter BIOS Setup Utility to execute "Load Default Settings, then reboot system. Touchpad Keyboard Hard disk connection board Hard disk drive System board The system doesn't enter standby mode after opening the LCD. DIMM System board Speaker-Related Symptoms Symptom / Error In Windows, multimedia programs, no sound. LCD cover switch System board The system doesn't resume from hibernation mode. four short beeps every minute. Hard disk connection board Hard disk drive System board The system...
TravelMate 240/250 Service Guide
Page 114
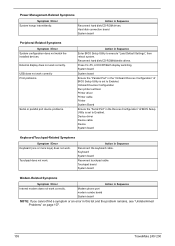
... Enter BIOS Setup Utility to execute "Load Default Settings", then reboot system. Keyboard System board Reconnect touchpad cable. Touchpad board System board Modem-Related Symptoms Symptom / Error Action in the "Onboard Devices Configuration" of BIOS Setup Utility is set to Enabled. Power Management-Related Symptoms Symptom / Error System hangs intermittently. Modem phone port modem combo board System board NOTE: If you cannot find a symptom or an error in Sequence Reconnect hard disk/CD-ROM drives. Reconnect hard disk/CD-ROM/diskette drives. Hard disk connection board...
... Enter BIOS Setup Utility to execute "Load Default Settings", then reboot system. Keyboard System board Reconnect touchpad cable. Touchpad board System board Modem-Related Symptoms Symptom / Error Action in the "Onboard Devices Configuration" of BIOS Setup Utility is set to Enabled. Power Management-Related Symptoms Symptom / Error System hangs intermittently. Modem phone port modem combo board System board NOTE: If you cannot find a symptom or an error in Sequence Reconnect hard disk/CD-ROM drives. Reconnect hard disk/CD-ROM/diskette drives. Hard disk connection board...
TravelMate 240/250 Service Guide
Page 115
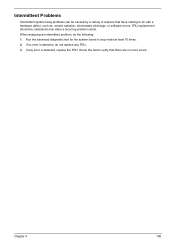
... detected, do not replace any FRU. 3. Chapter 4 106 Intermittent Problems Intermittent system hang problems can be considered only when a recurring problem exists. If no more errors. Rerun the test to verify that have nothing to do the following: 1. When analyzing an intermittent problem, do with a hardware defect, such as: cosmic radiation, electrostatic discharge, or software errors. Run the advanced...
... detected, do not replace any FRU. 3. Chapter 4 106 Intermittent Problems Intermittent system hang problems can be considered only when a recurring problem exists. If no more errors. Rerun the test to verify that have nothing to do the following: 1. When analyzing an intermittent problem, do with a hardware defect, such as: cosmic radiation, electrostatic discharge, or software errors. Run the advanced...
TravelMate 240/250 Service Guide
Page 153
A AC Adapter 28 AFLASH Utility 46 Audio 19 B Battery 26 battery pack charging indicator 12 BIOS 19 package 19 ROM size 19 ROM type 19 vendor 19 Version 19 BIOS Setup Utility 34 BIOS Supports protocol 19 BIOS Utility 34 Basic System Settings 39 Navigating 35 Onboard Device Configuration 41 Startup Configuration 40 System Information 35 System Security 45 Board Layout 4 Bottom View 5, 110 Top View 4, 109 brightness hotkeys 16 C Cache controller 19 size 20 caps lock on indicator 12...
A AC Adapter 28 AFLASH Utility 46 Audio 19 B Battery 26 battery pack charging indicator 12 BIOS 19 package 19 ROM size 19 ROM type 19 vendor 19 Version 19 BIOS Setup Utility 34 BIOS Supports protocol 19 BIOS Utility 34 Basic System Settings 39 Navigating 35 Onboard Device Configuration 41 Startup Configuration 40 System Information 35 System Security 45 Board Layout 4 Bottom View 5, 110 Top View 4, 109 brightness hotkeys 16 C Cache controller 19 size 20 caps lock on indicator 12...
TravelMate 240/250 Service Guide
Page 154
... Hot Keys 16 I I/O Address Map 30 Indicators 12 Intermittent Problems 106 IRQ Assignment Map 32 J Jumper and Connector Locations 108 SW1 Settings 110 K Keyboard 19, 26 Keyboard or Auxiliary Input Device Check 95 L L2 cache 19 LCD 27 M Machine Disassembly 48, 74 Mechanical Specification 29 media access on indicator 12 Memory Address Map 30 Memory Address Map 30 Memory Check 96 Modem 21 N Notebook Manager hotkey 16 num lock on indicator 12 O Online Support...
... Hot Keys 16 I I/O Address Map 30 Indicators 12 Intermittent Problems 106 IRQ Assignment Map 32 J Jumper and Connector Locations 108 SW1 Settings 110 K Keyboard 19, 26 Keyboard or Auxiliary Input Device Check 95 L L2 cache 19 LCD 27 M Machine Disassembly 48, 74 Mechanical Specification 29 media access on indicator 12 Memory Address Map 30 Memory Address Map 30 Memory Check 96 Modem 21 N Notebook Manager hotkey 16 num lock on indicator 12 O Online Support...


