OmniPage SE User Guide
Page 82
... scanner is all the troubleshooting help you have the correct drivers for your hard disk for errors. Make sure other applications to check your scanner, printer, and video card. u Use the software that your system meets all cable connections are functioning properly. Many of the error messages contain self-explanatory descriptions...
... scanner is all the troubleshooting help you have the correct drivers for your hard disk for errors. Make sure other applications to check your scanner, printer, and video card. u Use the software that your system meets all cable connections are functioning properly. Many of the error messages contain self-explanatory descriptions...

User Guide
Page 2
... and receive a fax, and how to change without notice. All rights reserved. • WorkCentre PE16 and Xerox logo are trademarks of the detailed instructions for using your machine as a printer, a scanner and a copier and information for maintaining and troubleshooting the machine. About the User... All information included herein is not responsible for using your machine and installing the supplied software. Xerox Corporation is subject to set fax-related options. The Laser Facsimile User's Guide provides information for any damages, direct or indirect, arising from or related ...
... and receive a fax, and how to change without notice. All rights reserved. • WorkCentre PE16 and Xerox logo are trademarks of the detailed instructions for using your machine as a printer, a scanner and a copier and information for maintaining and troubleshooting the machine. About the User... All information included herein is not responsible for using your machine and installing the supplied software. Xerox Corporation is subject to set fax-related options. The Laser Facsimile User's Guide provides information for any damages, direct or indirect, arising from or related ...

User Guide
Page 3
... Type and Size 1.18 Using the Save Modes 1.19 Toner Save Mode 1.19 Power Save Mode 1.19 CCD Power Save Mode 1.20 Chapter 2: INSTALLING SOFTWARE Printer Driver Features 2.2 System Requirements 2.3 Installing Software 2.4 ii
... Type and Size 1.18 Using the Save Modes 1.19 Toner Save Mode 1.19 Power Save Mode 1.19 CCD Power Save Mode 1.20 Chapter 2: INSTALLING SOFTWARE Printer Driver Features 2.2 System Requirements 2.3 Installing Software 2.4 ii

User Guide
Page 5
... an Overlay 5.16 Creating a New Page Overlay 5.16 Using a Page Overlay 5.18 Deleting a Page Overlay 5.19 Setting Graphic Properties 5.20 Setting Up the Locally Shared Printer 5.22 In Windows 9x/Me 5.22 In Windows NT 4.0/2000/XP 5.23 Chapter 6: SCANNING TWAIN Scanner Program 6.2 Scanning Procedure 6.3 Load the Originals 6.3 Run the Scan...
... an Overlay 5.16 Creating a New Page Overlay 5.16 Using a Page Overlay 5.18 Deleting a Page Overlay 5.19 Setting Graphic Properties 5.20 Setting Up the Locally Shared Printer 5.22 In Windows 9x/Me 5.22 In Windows NT 4.0/2000/XP 5.23 Chapter 6: SCANNING TWAIN Scanner Program 6.2 Scanning Procedure 6.3 Load the Originals 6.3 Run the Scan...

User Guide
Page 7
Chapter A: SPECIFICATIONS General Specifications A.2 Scanner and Copier Specifications A.3 Printer Specifications A.4 Facsimile Specifications A.5 Paper Specifications A.6 Overview A.6 Supported Sizes of Paper A.6 Guidelines for Using Paper A.7 Paper Specifications A.8 Paper Output Capacity A.8 Printer and Paper Storage Environment A.9 vi
Chapter A: SPECIFICATIONS General Specifications A.2 Scanner and Copier Specifications A.3 Printer Specifications A.4 Facsimile Specifications A.5 Paper Specifications A.6 Overview A.6 Supported Sizes of Paper A.6 Guidelines for Using Paper A.7 Paper Specifications A.8 Paper Output Capacity A.8 Printer and Paper Storage Environment A.9 vi
User Guide
Page 9
... AVATTAESSA JA SUOJALUKITUS OHITETTAESSA OLET ALTTIINA NÄKYMÄTTÖMÄLLE LASERSÄTEILYLLE ÄLÄ KATSO SÄTEESEEN. Laser Safety Statement The printer is certified as a Class I laser product conforming to be a remote risk of other controls may result in the .... VARNING - Adjust only those controls covered by a qualified service technician to restore the machine to normal operation. 16. The laser system and printer are not considered to the requirements of the lightning storm. 17. ADVARSEL. - ADVARSEL. - PERIGO - If possible, unplug the...
... AVATTAESSA JA SUOJALUKITUS OHITETTAESSA OLET ALTTIINA NÄKYMÄTTÖMÄLLE LASERSÄTEILYLLE ÄLÄ KATSO SÄTEESEEN. Laser Safety Statement The printer is certified as a Class I laser product conforming to be a remote risk of other controls may result in the .... VARNING - Adjust only those controls covered by a qualified service technician to restore the machine to normal operation. 16. The laser system and printer are not considered to the requirements of the lightning storm. 17. ADVARSEL. - ADVARSEL. - PERIGO - If possible, unplug the...

User Guide
Page 21
482.6 mm (18.8 in.) 1018.6 mm (40.1 in) Selecting a Location Select a level, stable place with adequate space for ventilation) 674 mm (26.5 in) 1.4 GETTING STARTED Do not set the printer close to the edge of heat, cold and humidity. The area should be removed) Back: 100 mm (enough space for ventilation) Right: 100 mm Left: 100 mm (enough space for air circulation. Clearance Space Front: 482.6 mm (enough space so that the paper tray can be well-ventilated and away from direct sunlight or sources of your desk or table. Allow extra space for opening covers and trays.
482.6 mm (18.8 in.) 1018.6 mm (40.1 in) Selecting a Location Select a level, stable place with adequate space for ventilation) 674 mm (26.5 in) 1.4 GETTING STARTED Do not set the printer close to the edge of heat, cold and humidity. The area should be removed) Back: 100 mm (enough space for ventilation) Right: 100 mm Left: 100 mm (enough space for air circulation. Clearance Space Front: 482.6 mm (enough space so that the paper tray can be well-ventilated and away from direct sunlight or sources of your desk or table. Allow extra space for opening covers and trays.

User Guide
Page 32
Fast and Slow. If this occurs, select the Slow mode to the parallel connector on your computer Connecting the printer to connect one of the computer requires a certified USB cable. For details about changing the USB mode, see page 8.17. Fast is the default mode. ...; When using the USB connection, your computer NOTES: • You only need to the USB port of the cables mentioned above. Do not use a parallel printer cable, purchase only IEEE-1284 compliant parallel cable and connect it to achieve successful results. Push the metal clips down to fit inside the notches...
Fast and Slow. If this occurs, select the Slow mode to the parallel connector on your computer Connecting the printer to connect one of the computer requires a certified USB cable. For details about changing the USB mode, see page 8.17. Fast is the default mode. ...; When using the USB connection, your computer NOTES: • You only need to the USB port of the cables mentioned above. Do not use a parallel printer cable, purchase only IEEE-1284 compliant parallel cable and connect it to achieve successful results. Push the metal clips down to fit inside the notches...

User Guide
Page 36
... 5.20. Using the Save Modes Toner Save Mode 1 The toner save mode allows your machine to reduce power consumption when it is not in the printer properties. NOTE: For PC-printing, you want appears. Activating this mode on by selecting the length of time for which the machine waits after a job...
... 5.20. Using the Save Modes Toner Save Mode 1 The toner save mode allows your machine to reduce power consumption when it is not in the printer properties. NOTE: For PC-printing, you want appears. Activating this mode on by selecting the length of time for which the machine waits after a job...

User Guide
Page 38
2 INSTALLING SOFTWARE This chapter gives you information for installing the supplied software. This chapter includes: • Printer Driver Features • System Requirements • Installing Software You must install the software to use your machine as a printer and a scanner.
2 INSTALLING SOFTWARE This chapter gives you information for installing the supplied software. This chapter includes: • Printer Driver Features • System Requirements • Installing Software You must install the software to use your machine as a printer and a scanner.

User Guide
Page 39
Feature Toner Save Print quality option Poster printing Multiple pages per sheet (N-up) Fit to page printing Scale printing Watermark Overlay Printer Driver Win9x/Me Win2000/XP Y Y Y Y Y Y Y Y Y Y Y Y Y Y Y Y NT4.0 Y Y Y Y Y Y Y Y 2.2 INSTALLING SOFTWARE Printer Driver Features Your printer drivers will support the following standard features: • Paper source selection • Paper size, orientation and media type • number of copies Table below lists a general overview of features supported by your printer drivers.
Feature Toner Save Print quality option Poster printing Multiple pages per sheet (N-up) Fit to page printing Scale printing Watermark Overlay Printer Driver Win9x/Me Win2000/XP Y Y Y Y Y Y Y Y Y Y Y Y Y Y Y Y NT4.0 Y Y Y Y Y Y Y Y 2.2 INSTALLING SOFTWARE Printer Driver Features Your printer drivers will support the following standard features: • Paper source selection • Paper size, orientation and media type • number of copies Table below lists a general overview of features supported by your printer drivers.

User Guide
Page 46
... paper in mind: • Attempting to print on damp, curled, wrinkled, or torn paper can tolerate fusing temperature of 200 oC (392o F) for use in laser printers. • To prevent special materials, such as transparencies and label sheets from sticking together, remove them as any plastic container or bag, to prevent dust...
... paper in mind: • Attempting to print on damp, curled, wrinkled, or torn paper can tolerate fusing temperature of 200 oC (392o F) for use in laser printers. • To prevent special materials, such as transparencies and label sheets from sticking together, remove them as any plastic container or bag, to prevent dust...

User Guide
Page 47
... that are separating from the backing sheet or are wrinkled, bubbled, or otherwise damaged. NOTES: • If paper coming out of chemicals and damage your printer. NOTE: Do not use the rear output slot, open or close the rear cover while the machine is printing. 3.4 PAPER HANDLING To use Carbonless paper...
... that are separating from the backing sheet or are wrinkled, bubbled, or otherwise damaged. NOTES: • If paper coming out of chemicals and damage your printer. NOTE: Do not use the rear output slot, open or close the rear cover while the machine is printing. 3.4 PAPER HANDLING To use Carbonless paper...

User Guide
Page 51
If you experience problems with this printer. Note that the print quality is 216 by 356mm(8.5 by 5.83 in.(index) cards and other custom-sized materials can load up to making quick ...
If you experience problems with this printer. Note that the print quality is 216 by 356mm(8.5 by 5.83 in.(index) cards and other custom-sized materials can load up to making quick ...
User Guide
Page 68
5 PRINTING This chapter explains how to print your documents in Windows and how to a Selected Paper Size • Printing Posters • Using Watermarks • Using Overlays • Setting Graphic Properties • Setting Up the Locally Shared Printer This chapter includes: • Printing a Document • Setting Paper Properties • Printing Multiple Pages on One Sheet of Paper (N-Up Printing) • Printing a Reduced or Enlarged Document • Fitting Your Document to use the print settings.
5 PRINTING This chapter explains how to print your documents in Windows and how to a Selected Paper Size • Printing Posters • Using Watermarks • Using Overlays • Setting Graphic Properties • Setting Up the Locally Shared Printer This chapter includes: • Printing a Document • Setting Paper Properties • Printing Multiple Pages on One Sheet of Paper (N-Up Printing) • Printing a Reduced or Enlarged Document • Fitting Your Document to use the print settings.

User Guide
Page 69
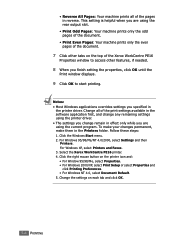
...button instead. Then click Properties on the next screen. 4 Now you see Setup, Printer or Options, click that your machine is selected. œ¤Windows 98 3 To take advantage of the printer features provided by your machine. 5.2 PRINTING The exact steps for printing a document may... you to Step 4. Refer to print. 2 Select Print from various Windows applications. The Print window displays. If you see the Xerox WorkCentre PE16 Properties window, which allows you need when using . The basic print settings are using your machine, click Properties in the application's ...
...button instead. Then click Properties on the next screen. 4 Now you see Setup, Printer or Options, click that your machine is selected. œ¤Windows 98 3 To take advantage of the printer features provided by your machine. 5.2 PRINTING The exact steps for printing a document may... you to Step 4. Refer to print. 2 Select Print from various Windows applications. The Print window displays. If you see the Xerox WorkCentre PE16 Properties window, which allows you need when using . The basic print settings are using your machine, click Properties in the application's ...
User Guide
Page 71
... tabs on the top of the Xerox WorkCentre PE16 Properties window to start printing. To make your changes permanent, make them in the printer driver. Select the Xerox WorkCentre PE16 printer. 4. Change all of the pages in reverse. For Windows XP, select Printers and Faxes. 3. For Windows 95.../98/Me/NT 4.0/2000, select Settings and then Printers. Follow these steps: 1. •...
... tabs on the top of the Xerox WorkCentre PE16 Properties window to start printing. To make your changes permanent, make them in the printer driver. Select the Xerox WorkCentre PE16 printer. 4. Change all of the pages in reverse. For Windows XP, select Printers and Faxes. 3. For Windows 95.../98/Me/NT 4.0/2000, select Settings and then Printers. Follow these steps: 1. •...
User Guide
Page 72
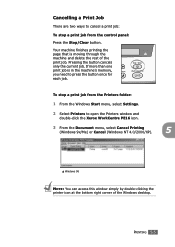
...button once for each job. Your machine finishes printing the page that is in the machine's memory, you need to open the Printers window and double-click the Xerox WorkCentre PE16 icon. 3 From the Document menu, select Cancel Printing (Windows 9x/Me) or Cancel (Windows NT 4.0/2000/XP). 5 œ...;¤Windows 98 NOTE: You can access this window simply by double-clicking the printer icon at the bottom right corner of the print ...
...button once for each job. Your machine finishes printing the page that is in the machine's memory, you need to open the Printers window and double-click the Xerox WorkCentre PE16 icon. 3 From the Document menu, select Cancel Printing (Windows 9x/Me) or Cancel (Windows NT 4.0/2000/XP). 5 œ...;¤Windows 98 NOTE: You can access this window simply by double-clicking the printer icon at the bottom right corner of the print ...

User Guide
Page 73
... activated by selecting from the list and click Delete. To use . Using Help Your machine has a help screens give detailed information about the printer features provided by the printer driver. These help screen that can also click from the Favorites drop-down list. Using a Favorite Setting The Favorites option, which is visible... it from the upper right hand corner, and then click on any setting. 5.6 PRINTING To save the current properties settings for the item in the printer's properties window.
... activated by selecting from the list and click Delete. To use . Using Help Your machine has a help screens give detailed information about the printer features provided by the printer driver. These help screen that can also click from the Favorites drop-down list. Using a Favorite Setting The Favorites option, which is visible... it from the upper right hand corner, and then click on any setting. 5.6 PRINTING To save the current properties settings for the item in the printer's properties window.

User Guide
Page 74
PRINTING 5.7 If the required size is not listed in the tray. See page 5.2 for more information about accessing printer properties. The size setting appears on the Size list so that you to choose the number of paper loaded in the Size box, click Add ... allows you want to use. You can select it. When the Custom Page Size window appears, set the paper handling needs when you access the printer properties. Enter the custom name you to choose the size of copies to be printed. Setting Paper Properties Use the following options to set the...
PRINTING 5.7 If the required size is not listed in the tray. See page 5.2 for more information about accessing printer properties. The size setting appears on the Size list so that you to choose the number of paper loaded in the Size box, click Add ... allows you want to use. You can select it. When the Custom Page Size window appears, set the paper handling needs when you access the printer properties. Enter the custom name you to choose the size of copies to be printed. Setting Paper Properties Use the following options to set the...


