User Guide
Page 4
... 1.7 Chapter 2: GETTING STARTED Unpacking 2.2 Selecting a Location 2.4 Installing the Toner Cartridge 2.5 Loading Paper 2.7 Connecting Telephone Line 2.11 Connecting a Printer Cable 2.12 For Local Printing 2.12 For Network Printing (WorkCentre PE120i only) ......... 2.14 Turning the Machine On 2.14 Changing the Display...2.26 Xerox Driver CD contains 2.28 Xerox Postscript Driver CD contains 2.28 Installing Xerox drivers in Windows 2.29 System Requirements 2.29 Installing Xerox Drivers in Microsoft Windows XP or Windows 2000 using the USB port 2.29 Installing Xerox Drivers in...
... 1.7 Chapter 2: GETTING STARTED Unpacking 2.2 Selecting a Location 2.4 Installing the Toner Cartridge 2.5 Loading Paper 2.7 Connecting Telephone Line 2.11 Connecting a Printer Cable 2.12 For Local Printing 2.12 For Network Printing (WorkCentre PE120i only) ......... 2.14 Turning the Machine On 2.14 Changing the Display...2.26 Xerox Driver CD contains 2.28 Xerox Postscript Driver CD contains 2.28 Installing Xerox drivers in Windows 2.29 System Requirements 2.29 Installing Xerox Drivers in Microsoft Windows XP or Windows 2000 using the USB port 2.29 Installing Xerox Drivers in...

User Guide
Page 7
... the Memory 8.2 Cleaning Your Machine 8.3 Cleaning the Outside 8.3 Cleaning the Inside 8.3 Cleaning the Scan Unit 8.5 Maintaining the Toner Cartridge 8.6 Redistributing Toner 8.7 Replacing the Toner Cartridge 8.8 Setting the Notify Toner Option 8.10 Cleaning the Drum 8.10 Consumables and Replacement Parts 8.12 Replacing the ADF Rubber Pad 8.13 Chapter 9: TROUBLESHOOTING Clearing...Printing Quality Problems 9.21 Copying Problems 9.26 Scanning Problems 9.27 Fax Problems 9.28 Common Linux Problems 9.30 Troubleshooting PS Errors (WorkCentre PE120i Only 9.33 Common Macintosh Problems...
... the Memory 8.2 Cleaning Your Machine 8.3 Cleaning the Outside 8.3 Cleaning the Inside 8.3 Cleaning the Scan Unit 8.5 Maintaining the Toner Cartridge 8.6 Redistributing Toner 8.7 Replacing the Toner Cartridge 8.8 Setting the Notify Toner Option 8.10 Cleaning the Drum 8.10 Consumables and Replacement Parts 8.12 Replacing the ADF Rubber Pad 8.13 Chapter 9: TROUBLESHOOTING Clearing...Printing Quality Problems 9.21 Copying Problems 9.26 Scanning Problems 9.27 Fax Problems 9.28 Common Linux Problems 9.30 Troubleshooting PS Errors (WorkCentre PE120i Only 9.33 Common Macintosh Problems...

User Guide
Page 23
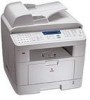
1 Understanding Component Locations These are the main components of your machine: Front View Automatic Document Feeder Document Guides Document Input Tray Document Output Tray Document Cover USB Flash Drive Port Document Glass Control Panel (See page 1.7.) Front Output Tray (Face Down) Front Door Toner Cartridge Paper Output Extension Paper Level Indicator Paper Tray (Tray 1) Bypass Tray Optional Paper Tray (Tray 2) The figure above shows an WorkCentre PE120i. Introduction 1.5
1 Understanding Component Locations These are the main components of your machine: Front View Automatic Document Feeder Document Guides Document Input Tray Document Output Tray Document Cover USB Flash Drive Port Document Glass Control Panel (See page 1.7.) Front Output Tray (Face Down) Front Door Toner Cartridge Paper Output Extension Paper Level Indicator Paper Tray (Tray 1) Bypass Tray Optional Paper Tray (Tray 2) The figure above shows an WorkCentre PE120i. Introduction 1.5

User Guide
Page 25
... you to use special copy features, such Y as Clone, Collation, Auto Fit, 2 Sides on 1 page, 2/4 Up (multiple pages on when the toner cartridge is inserted into the USB port of a few 1 buttons. Introduction 1.7 Allows you to access a list of copies. Makes a copy smaller or larger... an image can be scanned to. 2 You must create the scan list using the Xerox S software (ControlCentre) provided with the touch of your machine. Control Panel Functions 1 WorkCentre PE120/120i Allows you to store frequently-dialed fax numbers and dial them with this C machine...
... you to use special copy features, such Y as Clone, Collation, Auto Fit, 2 Sides on 1 page, 2/4 Up (multiple pages on when the toner cartridge is inserted into the USB port of a few 1 buttons. Introduction 1.7 Allows you to access a list of copies. Makes a copy smaller or larger... an image can be scanned to. 2 You must create the scan list using the Xerox S software (ControlCentre) provided with the touch of your machine. Control Panel Functions 1 WorkCentre PE120/120i Allows you to store frequently-dialed fax numbers and dial them with this C machine...

User Guide
Page 26
...you can take advantage of copies. Allows you back to print a document. Using this feature, you to save on call costs by using less toner to the upper menu level. In Standby mode, clears/cancels the copy options, such as one or two-digit speed dial or group dial numbers... type setting, the copy size, and the number of lower long distance rates at night, for the current fax job. Allows you to save on toner by sending a fax at any time. Allows you to directly print files stored on the display. 5 6 7 F A X 8 9 S A V E 1.8 Introduction Confirms the selection on a USB flash ...
...you can take advantage of copies. Allows you back to print a document. Using this feature, you to save on call costs by using less toner to the upper menu level. In Standby mode, clears/cancels the copy options, such as one or two-digit speed dial or group dial numbers... type setting, the copy size, and the number of lower long distance rates at night, for the current fax job. Allows you to save on toner by sending a fax at any time. Allows you to directly print files stored on the display. 5 6 7 F A X 8 9 S A V E 1.8 Introduction Confirms the selection on a USB flash ...
User Guide
Page 27
This chapter includes: • Setting Up Your Machine Unpacking Installing the Toner Cartridge Loading Paper Connecting Telephone Line Turning the Machine On • Setting Up the Machine System Changing the Display Language Setting the Machine ID Setting the Time and Date Setting the Paper Size and Type Setting Sounds Using the Save Modes • Installing Xerox Drivers Installing Xerox drivers in Windows Using ControlCentre 2 GETTING STARTED This chapter gives you step-by-step instructions for setting up your machine.
This chapter includes: • Setting Up Your Machine Unpacking Installing the Toner Cartridge Loading Paper Connecting Telephone Line Turning the Machine On • Setting Up the Machine System Changing the Display Language Setting the Machine ID Setting the Time and Date Setting the Paper Size and Type Setting Sounds Using the Save Modes • Installing Xerox Drivers Installing Xerox drivers in Windows Using ControlCentre 2 GETTING STARTED This chapter gives you step-by-step instructions for setting up your machine.

User Guide
Page 31
.... Cover it off with a piece of paper, if left exposed for more than a few minutes. • Do not touch the green underside of the toner cartridge. Use the handle on your clothing, wipe it with a dry cloth and wash clothing in cold water. Gently shake the cartridge 5 or 6 times... to avoid touching this area. NOTE: If toner gets on the cartridge to distribute the toner. Installing the Toner Cartridge 1 Open the front door. 2 2 Remove the starter toner cartridge from its bag.
.... Cover it off with a piece of paper, if left exposed for more than a few minutes. • Do not touch the green underside of the toner cartridge. Use the handle on your clothing, wipe it with a dry cloth and wash clothing in cold water. Gently shake the cartridge 5 or 6 times... to avoid touching this area. NOTE: If toner gets on the cartridge to distribute the toner. Installing the Toner Cartridge 1 Open the front door. 2 2 Remove the starter toner cartridge from its bag.

User Guide
Page 32
Groove Tab 4 Close the front door. Make sure that is securely closed. NOTE: When printing text at 5% coverage, you can expect a toner cartridge life of the cartridge and corresponding grooves within the machine will guide the cartridge into the correct position until it locks into the opening .... Tabs on the sides of approximately 3,500 for the Standard-Capacity Print Cartridge and 5,000 for the High-Capacity print Cartridge. (3,500 pages for the toner cartridge that the door is shipped with the machine.) 2.6 Getting Started 3 Hold the...
Groove Tab 4 Close the front door. Make sure that is securely closed. NOTE: When printing text at 5% coverage, you can expect a toner cartridge life of the cartridge and corresponding grooves within the machine will guide the cartridge into the correct position until it locks into the opening .... Tabs on the sides of approximately 3,500 for the Standard-Capacity Print Cartridge and 5,000 for the High-Capacity print Cartridge. (3,500 pages for the toner cartridge that the door is shipped with the machine.) 2.6 Getting Started 3 Hold the...

User Guide
Page 50
... Activating this mode extends the life of the display. 2 Press the scroll button (W or X) until "Fax Setup" appears on the top line of the toner cartridge beyond what one would experience in the normal mode, but it reduces print quality. To return to select the desired dial mode. Setting the... system where your machine is connected to a tone dial line. NOTE: The Dial Mode setting may be unavailable depending on your machine to use less toner on the bottom line of the display. 3 Press Enter. 4 Press the scroll button (W or X) to Standby mode, press Stop/Clear. Using the Save...
... Activating this mode extends the life of the display. 2 Press the scroll button (W or X) until "Fax Setup" appears on the top line of the toner cartridge beyond what one would experience in the normal mode, but it reduces print quality. To return to select the desired dial mode. Setting the... system where your machine is connected to a tone dial line. NOTE: The Dial Mode setting may be unavailable depending on your machine to use less toner on the bottom line of the display. 3 Press Enter. 4 Press the scroll button (W or X) to Standby mode, press Stop/Clear. Using the Save...

User Guide
Page 51
... button on the bottom line. 3 Enter the time and date when your machine to Standby mode, press Stop/Clear. To turn on or off the toner save mode in memory during a preset time slot, when the call charge is lower. The button backlight turns on. 2 Press Enter when "Start Time" displays...
... button on the bottom line. 3 Enter the time and date when your machine to Standby mode, press Stop/Clear. To turn on or off the toner save mode in memory during a preset time slot, when the call charge is lower. The button backlight turns on. 2 Press Enter when "Start Time" displays...
User Guide
Page 62
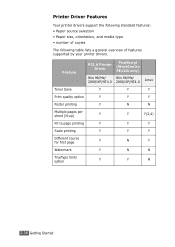
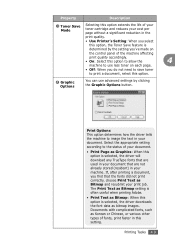
... The following table lists a general overview of features supported by your printer drivers. Feature PCL 6 Printer Driver PostScript (WorkCentre PE120i only) Win 98/Me/ Win 98/Me/ 2000/XP/NT4.0 2000/XP/NT4.0 Linux Toner Save Y Y Y Print quality option Y Y Y Poster printing Y N N Multiple pages per sheet (N-up) Y Y Y(2,4) Fit to page printing Y Y Y Scale printing...
... The following table lists a general overview of features supported by your printer drivers. Feature PCL 6 Printer Driver PostScript (WorkCentre PE120i only) Win 98/Me/ Win 98/Me/ 2000/XP/NT4.0 2000/XP/NT4.0 Linux Toner Save Y Y Y Print quality option Y Y Y Poster printing Y N N Multiple pages per sheet (N-up) Y Y Y(2,4) Fit to page printing Y Y Y Scale printing...
User Guide
Page 87
... reduces your cost per page without a significant reduction in the print quality. • Use Printer's Setting: When you select this option, the Toner Save feature is determined by the setting you've made on the control panel of the machine affecting print quality accordingly. • On: Select this...determines how the driver tells the machine to image the text in your print job. If, after printing a document, you do not need to save toner to the status of your document. • Print Page as Graphics: When this option is selected, the driver will download any TrueType fonts that ...
... reduces your cost per page without a significant reduction in the print quality. • Use Printer's Setting: When you select this option, the Toner Save feature is determined by the setting you've made on the control panel of the machine affecting print quality accordingly. • On: Select this...determines how the driver tells the machine to image the text in your print job. If, after printing a document, you do not need to save toner to the status of your document. • Print Page as Graphics: When this option is selected, the driver will download any TrueType fonts that ...

User Guide
Page 108
... the book or magazine is detected in the ADF (Automatic Document Feeder). NOTES: • Leaving the cover open while copying may affect copy quality and toner consumption. • If you are copying a page from a book or magazine, lift the cover until its hinges are in the ADF, the machine gives it...
... the book or magazine is detected in the ADF (Automatic Document Feeder). NOTES: • Leaving the cover open while copying may affect copy quality and toner consumption. • If you are copying a page from a book or magazine, lift the cover until its hinges are in the ADF, the machine gives it...

User Guide
Page 167
8 MAINTENANCE This chapter provides information for maintaining your machine and the toner cartridge. This chapter includes: • Clearing the Memory • Cleaning Your Machine • Maintaining the Toner Cartridge • Consumables and Replacement Parts • Replacing the ADF Rubber Pad
8 MAINTENANCE This chapter provides information for maintaining your machine and the toner cartridge. This chapter includes: • Clearing the Memory • Cleaning Your Machine • Maintaining the Toner Cartridge • Consumables and Replacement Parts • Replacing the ADF Rubber Pad

User Guide
Page 169
...dampen the cloth slightly with a soft lint-free cloth. Set it down. Wait for the machine to touch the transfer roller, located underneath the toner cartridge. This buildup can cause print quality problems. Cleaning the Outside Clean the cabinet of the machine with water, but be careful not to ...cool down. 2 Open the front door and pull the toner cartridge out, lightly pushing it on a clean flat surface. You can discolor or crack the cabinet. • While cleaning the inside of the ...
...dampen the cloth slightly with a soft lint-free cloth. Set it down. Wait for the machine to touch the transfer roller, located underneath the toner cartridge. This buildup can cause print quality problems. Cleaning the Outside Clean the cabinet of the machine with water, but be careful not to ...cool down. 2 Open the front door and pull the toner cartridge out, lightly pushing it on a clean flat surface. You can discolor or crack the cabinet. • While cleaning the inside of the ...

User Guide
Page 170
...Cover it to avoid touching this area. 3 With a dry lint-free cloth, wipe away any dust and spilled toner from the toner cartridge area and the toner cartridge cavity. CAUTIONS: • To prevent damage to the toner cartridge, do not expose it with a piece of paper, if necessary. • Do not touch the green... underside of the cartridge compartment, and gently swab the glass to see if dirt turns the white cotton black. 5 Reinsert the toner cartridge and close the door. 6 Plug in the power cord and turn the machine on the cartridge to light for more than a few minutes.
...Cover it to avoid touching this area. 3 With a dry lint-free cloth, wipe away any dust and spilled toner from the toner cartridge area and the toner cartridge cavity. CAUTIONS: • To prevent damage to the toner cartridge, do not expose it with a piece of paper, if necessary. • Do not touch the green... underside of the cartridge compartment, and gently swab the glass to see if dirt turns the white cotton black. 5 Reinsert the toner cartridge and close the door. 6 Plug in the power cord and turn the machine on the cartridge to light for more than a few minutes.

User Guide
Page 172
...of 3,500 pages.) The actual number may need to change the cartridge more than a few minutes. Maintaining the Toner Cartridge Toner cartridge storage To get the most from the toner cartridge, keep the following guidelines in the same environment as your cost per page, but it to light for use.... • Do not refill the toner cartridge. Saving toner To save toner, press the Toner Save button on . see page 2.24. The machine warranty does not cover damage caused by using a refilled cartridge. •...
...of 3,500 pages.) The actual number may need to change the cartridge more than a few minutes. Maintaining the Toner Cartridge Toner cartridge storage To get the most from the toner cartridge, keep the following guidelines in the same environment as your cost per page, but it to light for use.... • Do not refill the toner cartridge. Saving toner To save toner, press the Toner Save button on . see page 2.24. The machine warranty does not cover damage caused by using a refilled cartridge. •...

User Guide
Page 173
...its life, white streaks or light printing occurs. You can temporarily reestablish print quality by redistributing the remaining toner in the cartridge. 1 Open the front door. 2 Pull the toner cartridge out and gently shake the cartridge 5 or 6 times to avoid touching this area. 3 Reinstall the... cartridge and close the front door. Maintenance 8.7 Redistributing Toner When the toner cartridge is near the end of the toner cartridge. Use the handle on the cartridge to distribute the toner evenly inside the cartridge. 8 NOTE: If toner gets on your clothing, wipe it off with a dry ...
...its life, white streaks or light printing occurs. You can temporarily reestablish print quality by redistributing the remaining toner in the cartridge. 1 Open the front door. 2 Pull the toner cartridge out and gently shake the cartridge 5 or 6 times to avoid touching this area. 3 Reinstall the... cartridge and close the front door. Maintenance 8.7 Redistributing Toner When the toner cartridge is near the end of the toner cartridge. Use the handle on the cartridge to distribute the toner evenly inside the cartridge. 8 NOTE: If toner gets on your clothing, wipe it off with a dry ...

User Guide
Page 174
At this stage, the toner cartridge needs to be replaced. 1 Open the front door. 2 Lightly pushing the used cartridge down, pull it out. 3 Unpack the new toner cartridge and gently shake it horizontally 5 or 6 times to distribute the toner evenly inside the cartridge. 8.8 Maintenance Save the box and the plastic bag for shipping. Replacing the Toner Cartridge When the display on the control panel shows the warning message, "[Toner Empty]," the machine stops printing.
At this stage, the toner cartridge needs to be replaced. 1 Open the front door. 2 Lightly pushing the used cartridge down, pull it out. 3 Unpack the new toner cartridge and gently shake it horizontally 5 or 6 times to distribute the toner evenly inside the cartridge. 8.8 Maintenance Save the box and the plastic bag for shipping. Replacing the Toner Cartridge When the display on the control panel shows the warning message, "[Toner Empty]," the machine stops printing.

User Guide
Page 175
Use the handle on the cartridge to avoid touching this area. 4 Hold the toner cartridge by the handle. Slowly insert the cartridge into place completely. Tab 8 Maintenance 8.9 CAUTION: Do not touch the green underside of the cartridge and corresponding ... the cartridge into the correct position until it off with a dry cloth and wash clothing in the machine. Tabs on the sides of the toner cartridge. Groove 5 Close the front door. Hot water sets toner into fabric. NOTE: If toner gets on your clothing, wipe it locks into the opening in cold water.
Use the handle on the cartridge to avoid touching this area. 4 Hold the toner cartridge by the handle. Slowly insert the cartridge into place completely. Tab 8 Maintenance 8.9 CAUTION: Do not touch the green underside of the cartridge and corresponding ... the cartridge into the correct position until it off with a dry cloth and wash clothing in the machine. Tabs on the sides of the toner cartridge. Groove 5 Close the front door. Hot water sets toner into fabric. NOTE: If toner gets on your clothing, wipe it locks into the opening in cold water.


