
User Guide
Page 7
... Drum 8.10 Consumables and Replacement Parts 8.12 Replacing the ADF Rubber Pad 8.13 Chapter 9: TROUBLESHOOTING Clearing Document Jams 9.2 Input Misfeed 9.2 Exit Misfeed 9.3 Roller Misfeed 9.4 Clearing Paper Jams 9.5 In Tray 1 9.5 In Optional Tray 2 9.7 In the Fuser Area or Around the Toner Cartridge ............. 9.8 In the Paper Exit Area 9.9 In the Bypass Tray 9.11 Tips for Avoiding Paper Jams 9.12 Clearing LCD Error Messages 9.13 Solving Other Problems 9.17 Paper Feeding Problems 9.17 Printing Problems 9.18 Printing Quality Problems ...
... Drum 8.10 Consumables and Replacement Parts 8.12 Replacing the ADF Rubber Pad 8.13 Chapter 9: TROUBLESHOOTING Clearing Document Jams 9.2 Input Misfeed 9.2 Exit Misfeed 9.3 Roller Misfeed 9.4 Clearing Paper Jams 9.5 In Tray 1 9.5 In Optional Tray 2 9.7 In the Fuser Area or Around the Toner Cartridge ............. 9.8 In the Paper Exit Area 9.9 In the Bypass Tray 9.11 Tips for Avoiding Paper Jams 9.12 Clearing LCD Error Messages 9.13 Solving Other Problems 9.17 Paper Feeding Problems 9.17 Printing Problems 9.18 Printing Quality Problems ...

User Guide
Page 34
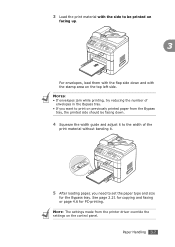
See page 2.21 for copying and faxing, or page 4.6 for the paper type and size you loaded. The settings made from the printer driver override the settings on both inside walls of the tray. 4 Pay attention to set up your machine for PC-printing. Paper overloading may cause paper jams. 5 Insert and slide the paper tray back into the machine. NOTE: After you load paper, you need to the paper limit mark on the control panel. 2.8 Getting Started
See page 2.21 for copying and faxing, or page 4.6 for the paper type and size you loaded. The settings made from the printer driver override the settings on both inside walls of the tray. 4 Pay attention to set up your machine for PC-printing. Paper overloading may cause paper jams. 5 Insert and slide the paper tray back into the machine. NOTE: After you load paper, you need to the paper limit mark on the control panel. 2.8 Getting Started

User Guide
Page 36
NOTES: • Do not push the paper width guide far enough to cause the materials to the stack of the stack. 3 Squeeze the width guide, as shown and slide it to warp. • If you do not adjust the paper width guide, it lightly touches the side of paper until it may cause paper jams. 2.10 Getting Started
NOTES: • Do not push the paper width guide far enough to cause the materials to the stack of the stack. 3 Squeeze the width guide, as shown and slide it to warp. • If you do not adjust the paper width guide, it lightly touches the side of paper until it may cause paper jams. 2.10 Getting Started

User Guide
Page 68
... agreements. When you choose print materials, consider the following: • Size: You can print on media weight, thickness, and environmental conditions. **If you experience excessive jamming, load one sheet at a time through the Bypass tray. 3.2 Paper Handling Paper Type, Input Sources, and Capacities Paper Type Plain paper Input Source/Capacity* Tray...
... agreements. When you choose print materials, consider the following: • Size: You can print on media weight, thickness, and environmental conditions. **If you experience excessive jamming, load one sheet at a time through the Bypass tray. 3.2 Paper Handling Paper Type, Input Sources, and Capacities Paper Type Plain paper Input Source/Capacity* Tray...

User Guide
Page 69
... envelopes. • For transparencies: - Do not use envelopes with windows, coated lining, selfadhesive seals, or other materials that can cause paper jams and poor print quality. 3 • Use only high quality copier grade paper for the best print quality. • Avoid paper with clasps... moisture-proof wrap, such as a plastic container or bag, to avoid paper jams. • Only use in laser printers. • To prevent special materials, such as they print out. • For envelopes: - Paper jams may accumulate on top of time. Place cartons on pallets or shelves, not...
... envelopes. • For transparencies: - Do not use envelopes with windows, coated lining, selfadhesive seals, or other materials that can cause paper jams and poor print quality. 3 • Use only high quality copier grade paper for the best print quality. • Avoid paper with clasps... moisture-proof wrap, such as a plastic container or bag, to avoid paper jams. • Only use in laser printers. • To prevent special materials, such as they print out. • For envelopes: - Paper jams may accumulate on top of time. Place cartons on pallets or shelves, not...

User Guide
Page 70
... their adhesive material can hold a maximum of 250 sheets of paper. Exposed areas can cause labels to peel off during printing, which can cause paper jams. Exposed adhesive can purchase an optional paper tray (Tray 2) and attach it below the standard tray to prolonged sunlight. • For labels: - Do not load...
... their adhesive material can hold a maximum of 250 sheets of paper. Exposed areas can cause labels to peel off during printing, which can cause paper jams. Exposed adhesive can purchase an optional paper tray (Tray 2) and attach it below the standard tray to prolonged sunlight. • For labels: - Do not load...
User Guide
Page 73
... set the paper type and size for PC-printing. 3 Load the print material with the stamp area on the control panel. NOTES: • If envelopes jam while printing, try reducing the number of the print material without bending it. 5 After loading paper, you want to print on previously printed paper from...
... set the paper type and size for PC-printing. 3 Load the print material with the stamp area on the control panel. NOTES: • If envelopes jam while printing, try reducing the number of the print material without bending it. 5 After loading paper, you want to print on previously printed paper from...

User Guide
Page 75
... and be placed in the center of the tray. • Always load only the print materials specified in the Specifications on page E.6 to avoid paper jams and print quality problems. • Flatten any curl on postcards, envelopes, and labels before loading them into the Bypass tray. • When you print on... one size of the print material without bending it to the width of print material at a time in the Bypass tray. • To prevent paper jams, do not add paper when there is still paper in .) sized media on the Bypass tray, open the rear door to use the rear output...
... and be placed in the center of the tray. • Always load only the print materials specified in the Specifications on page E.6 to avoid paper jams and print quality problems. • Flatten any curl on postcards, envelopes, and labels before loading them into the Bypass tray. • When you print on... one size of the print material without bending it to the width of print material at a time in the Bypass tray. • To prevent paper jams, do not add paper when there is still paper in .) sized media on the Bypass tray, open the rear door to use the rear output...

User Guide
Page 76
Printing to the rear output slot. • To avoid paper jams, do not open the rear door. The tray should be used for most print jobs. 3.10 Paper Handling Front output tray Rear output slot To ...
Printing to the rear output slot. • To avoid paper jams, do not open the rear door. The tray should be used for most print jobs. 3.10 Paper Handling Front output tray Rear output slot To ...

User Guide
Page 163
... shows the fax number, the number of pages, the elapsed time of operation(s). When the Junk Fax Barrier feature is no paper loaded or a paper jam has occurred.
... shows the fax number, the number of pages, the elapsed time of operation(s). When the Junk Fax Barrier feature is no paper loaded or a paper jam has occurred.

User Guide
Page 181
This chapter includes: • Clearing Document Jams • Clearing Paper Jams • Clearing LCD Error Messages • Solving Other Problems 9 TROUBLESHOOTING This chapter gives helpful information for what to do if you encounter an error.
This chapter includes: • Clearing Document Jams • Clearing Paper Jams • Clearing LCD Error Messages • Solving Other Problems 9 TROUBLESHOOTING This chapter gives helpful information for what to do if you encounter an error.

User Guide
Page 182
Clearing Document Jams When a document jams while passing through the ADF (Automatic Document Feeder), "Document Jam" appears on the right end of the ADF. 9.2 Troubleshooting Input Misfeed 1 Remove any remaining page(s) from the slot (d). Pull the document gently to the left and out of the ADF roller toward the ADF (c) and remove the roller from the ADF. 2 Open the ADF cover. 3 Rotate the bushing on the display.
Clearing Document Jams When a document jams while passing through the ADF (Automatic Document Feeder), "Document Jam" appears on the right end of the ADF. 9.2 Troubleshooting Input Misfeed 1 Remove any remaining page(s) from the slot (d). Pull the document gently to the left and out of the ADF roller toward the ADF (c) and remove the roller from the ADF. 2 Open the ADF cover. 3 Rotate the bushing on the display.

User Guide
Page 183
NOTE: To prevent document jams, use the document glass for thick, thin, or mixed paper-type documents. Exit Misfeed 1 Remove any , back into the ADF. Then load the removed page(s), ...
NOTE: To prevent document jams, use the document glass for thick, thin, or mixed paper-type documents. Exit Misfeed 1 Remove any , back into the ADF. Then load the removed page(s), ...

User Guide
Page 185
... sections to step 2. 2 Pull Tray 1 open. Troubleshooting 9.5 Clearing Paper Jams When a paper jam occurs, "Paper Jam" appears on the display. In Tray 1 9 1 Open and close the front door. Message [Paper Jam 0] Open/Close Door [Paper Jam 1] Open/Close Door [Paper Jam 2] Check Inside Bypass Jam Location of Jam In the paper tray (Tray 1 or Tray 2) In the fuser...
... sections to step 2. 2 Pull Tray 1 open. Troubleshooting 9.5 Clearing Paper Jams When a paper jam occurs, "Paper Jam" appears on the display. In Tray 1 9 1 Open and close the front door. Message [Paper Jam 0] Open/Close Door [Paper Jam 1] Open/Close Door [Paper Jam 2] Check Inside Bypass Jam Location of Jam In the paper tray (Tray 1 or Tray 2) In the fuser...

User Guide
Page 186
See page 9.8. 4 Insert the paper tray into place. 5 Open and close the front door to resume printing. 9.6 Troubleshooting If there is any resistance and the paper does not move when you pull, or if you cannot see the paper in this area, check the fuser area around the toner cartridge. 3 Remove the jammed paper by gently pulling it snaps into the machine until it straight out.
See page 9.8. 4 Insert the paper tray into place. 5 Open and close the front door to resume printing. 9.6 Troubleshooting If there is any resistance and the paper does not move when you pull, or if you cannot see the paper in this area, check the fuser area around the toner cartridge. 3 Remove the jammed paper by gently pulling it snaps into the machine until it straight out.

User Guide
Page 187
If there is any resistance and the paper does not move when you pull, or if you cannot see the paper in this area, go to resume printing. Troubleshooting 9.7 In Optional Tray 2 1 Pull the optional Tray 2 open . 4 Pull the paper straight up and out. 9 5 Insert Tray 1 into the machine until it snaps into place. 6 Open and close the front door to step 3. 3 Pull the standard Tray 1 open . 2 Remove the jammed paper from the machine.
If there is any resistance and the paper does not move when you pull, or if you cannot see the paper in this area, go to resume printing. Troubleshooting 9.7 In Optional Tray 2 1 Pull the optional Tray 2 open . 4 Pull the paper straight up and out. 9 5 Insert Tray 1 into the machine until it snaps into place. 6 Open and close the front door to step 3. 3 Pull the standard Tray 1 open . 2 Remove the jammed paper from the machine.

User Guide
Page 188
In the Fuser Area or Around the Toner Cartridge NOTE: The fuser area is hot. Take care when removing paper from the machine. 1 Remove paper from back by opening the back door cover and pulling it out of the fuser. 2 Open the front door and pull the toner cartridge out, lightly pushing it down. 3 Remove the jammed paper by gently pulling it straight out. 9.8 Troubleshooting
In the Fuser Area or Around the Toner Cartridge NOTE: The fuser area is hot. Take care when removing paper from the machine. 1 Remove paper from back by opening the back door cover and pulling it out of the fuser. 2 Open the front door and pull the toner cartridge out, lightly pushing it down. 3 Remove the jammed paper by gently pulling it straight out. 9.8 Troubleshooting

User Guide
Page 189
The jammed paper automatically exits the machine. In the Paper Exit Area 1 Open and close the front door. Skip to step 2. 2 Gently pull the paper out of the front output tray. 4 Replace the toner cartridge and close the front door. Printing automatically resumes. If the paper does not exit, continue to step 6. 9 Troubleshooting 9.9
The jammed paper automatically exits the machine. In the Paper Exit Area 1 Open and close the front door. Skip to step 2. 2 Gently pull the paper out of the front output tray. 4 Replace the toner cartridge and close the front door. Printing automatically resumes. If the paper does not exit, continue to step 6. 9 Troubleshooting 9.9

User Guide
Page 190
3 If there is any resistance and the paper does not move when you pull, or if you cannot see the paper in the front output tray, open the rear door. 4 Remove the jammed paper by gently pulling it straight out. 5 Close the rear door. 6 Open and close the front door to resume printing. 9.10 Troubleshooting
3 If there is any resistance and the paper does not move when you pull, or if you cannot see the paper in the front output tray, open the rear door. 4 Remove the jammed paper by gently pulling it straight out. 5 Close the rear door. 6 Open and close the front door to resume printing. 9.10 Troubleshooting

User Guide
Page 191
This may be a lack of the machine. In the Bypass Tray "Bypass Jam" appears on the display when you try to print using the Bypass tray and the machine does not detect paper. If the paper is not feeding properly, pull the paper out of paper or improper paper loading. To resume printing, open and close the front door. 9 Troubleshooting 9.11
This may be a lack of the machine. In the Bypass Tray "Bypass Jam" appears on the display when you try to print using the Bypass tray and the machine does not detect paper. If the paper is not feeding properly, pull the paper out of paper or improper paper loading. To resume printing, open and close the front door. 9 Troubleshooting 9.11


